snowflake build 2025
What is MCP?
MCP stands for Model Context Protocol, an open-source protocol designed to standardize how AI agents interact with external tools, data sources, and services. It enables AI models (like those in Snowflake's Cortex AI) to discover, connect to, and invoke capabilities from lightweight "MCP servers" in a consistent, secure manner. Think of MCP as a universal adapter layer: instead of building custom integrations for each data source or tool, AI agents can use a single protocol to access everything from databases and APIs to file systems and LLMs.
In the context of Snowflake Cortex Agents, MCP servers act as a secure gateway that bridges AI agents with Snowflake's data ecosystem. This allows agents to query structured/unstructured data, run SQL, manage objects, and leverage Cortex AI features (e.g., search, analyst, and agent services) without leaving the secure boundaries of Snowflake. For example, an AI agent could use natural language to analyze sales data in Snowflake, fetch external weather info via a third-party API, and update records—all orchestrated through MCP.
Purpose and Role with Cortex Agents
The primary purpose of MCP is to unify and extend AI data agents by eliminating silos in data access. Traditional AI workflows often require fragmented, custom code for each tool or source, leading to complexity and maintenance headaches. MCP servers solve this by:
- Providing a standards-based interface for AI agents to expose and consume "tools" (executable functions) and "resources" (e.g., data files or prompts).
- Enabling seamless integration with Snowflake Cortex, where agents can dynamically retrieve, transform, and act on data in real-time.
- Supporting agentic workflows, where AI models like Anthropic's Claude or custom agents can chain actions across multiple servers (e.g., query Snowflake, then summarize via Cortex Analyst).
This is particularly powerful for Cortex Agents, which are AI-driven orchestrators in Snowflake. MCP turns them into extensible "super agents" that handle hybrid data pipelines—combining internal Snowflake data with external sources—while respecting role-based access controls (RBAC) and security policies.
Key Features and Benefits
| Category | Key Features | Benefits |
|---|---|---|
| Protocol & Architecture | - Standardized discovery and invocation of tools/resources. - Lightweight servers (local, cloud, or containerized). - Multi-server support for composing workflows. - Flexible transports (e.g., stdio for local, HTTP/SSE for remote). | - Reduces integration time from weeks to minutes. - Scalable for enterprise use without custom adapters. - Modular: Add new servers without breaking existing agents. |
| Snowflake-Specific Tools | - Cortex AI Integration: Access to Cortex Search (RAG on unstructured data), Cortex Analyst (semantic querying of structured data), and Cortex Agent (orchestration). - Object Management: CRUD operations on Snowflake objects (e.g., tables, warehouses, roles). - SQL Orchestration: Execute LLM-generated SQL with configurable permissions. - Semantic Views: Query and discover semantic models/views. | - Empowers agents for real-world tasks like data analysis or automation. - Fine-grained security via RBAC and SQL permissions. - Enhances AI reliability with validated, context-aware responses. |
| Extensibility | - Connect to third-party data (e.g., APIs, PostgreSQL, file systems). - Custom tools via YAML config. - Supports clients like Claude Desktop, Cursor, or fast-agent. | - Builds cost-efficient, reusable workflows. - Improves AI context-awareness for better decision-making. - Secure handling of sensitive data with logging and controls. |
Overall, MCP makes AI agents more powerful and practical by turning data access into a plug-and-play experience, especially in Snowflake's secure, governed environment.
Quickstart: Building an MCP Server for Cortex Agents
The provided blog (a step-by-step guide from Snowflake's developer resources) walks through creating a functional MCP server using the open-source Snowflake MCP repo, starting with just a trial Snowflake account. It takes under 10 minutes for a basic setup. Here's a high-level overview based on the official guide and repo:
Prerequisites
- A Snowflake account (trial works; ensure RBAC permissions for databases/schemas/objects).
- Python environment with
uv(for running the server) or Docker/Docker Compose. - Snowflake Python Connector (auto-handled via
uvx). - An MCP client (e.g., Claude Desktop, Cursor IDE, or fast-agent) for testing.
- Basic YAML editing skills for configuration.
High-Level Steps
-
Clone/Access the Repo: Get the code from GitHub: Snowflake-Labs/mcp.
-
Configure the Server (
tools_config.yaml):- Copy the template from
services/configuration.yaml. - Define services (e.g., list Cortex Agent/Search/Analyst services with database/schema details).
- Enable features: Set
object_manager: True,query_manager: True, etc. - Set SQL permissions (e.g.,
Select: True,Insert: True). - Example snippet for a basic Cortex Analyst service:
analyst_services:
  - service_name: sales_analyst
    semantic_model: MY_DB.MY_SCHEMA.SALES_SEMANTIC_VIEW
    description: "Analyzes sales data with metrics like revenue and trends."
other_services:
  object_manager: True
  query_manager: True
sql_statement_permissions:
  Select: True
  Insert: True
  # All: True  # Uncomment for full access (use cautiously)
- Copy the template from
-
Authenticate and Run Locally:
- Set env vars:
export SNOWFLAKE_ACCOUNT=<account> SNOWFLAKE_USER=<user> SNOWFLAKE_PASSWORD=<pass>. - Run:
uvx snowflake-labs-mcp --service-config-file tools_config.yaml. - For HTTP mode: Add
--transport streamable-http --endpoint /snowflake-mcp --port 9000.
- Set env vars:
-
Deploy via Container (Optional for Production):
- Build Docker image:
docker build -f docker/server/Dockerfile -t mcp-server-snowflake .. - Run:
docker run -d -p 9000:9000 -e SNOWFLAKE_ACCOUNT=$SNOWFLAKE_ACCOUNT ... mcp-server-snowflake. - Or use Docker Compose: Edit
docker-compose.yml, thendocker-compose up -d.
- Build Docker image:
-
Connect and Test with a Client:
- In Claude Desktop, add to
claude_desktop_config.json:{ "mcpServers": { "snowflake-mcp": { "command": "uvx", "args": ["snowflake-labs-mcp", "--service-config-file", "tools_config.yaml"] } } } - Test: Ask the agent, "Query sales data from Snowflake and summarize trends." It should invoke MCP tools automatically.
- Debug: Use
npx @modelcontextprotocol/inspectorfor tool inspection.
- In Claude Desktop, add to
This setup exposes Snowflake as MCP tools, ready for Cortex Agents. For full details, check the blog or repo README—extend it by adding custom third-party integrations for even more power. If you're building this, start with the trial account for hands-on experimentation!
What is an Agent Workflow?
An agent workflow refers to a structured sequence of actions orchestrated by an AI agent (e.g., in frameworks like Snowflake Cortex Agents, LangChain, or AutoGen) to achieve a complex goal. Unlike simple chatbots, agents are autonomous "decision-makers" that can reason, plan, use tools (e.g., APIs, databases), and iterate based on feedback. A workflow defines the agent's behavior: from perceiving a task, selecting tools, executing steps, to refining outputs.
In the context of Snowflake Cortex Agents (as discussed earlier with MCP), workflows leverage AI models like LLMs (e.g., Anthropic's Claude) integrated with data tools for secure, governed data processing. MCP servers enhance this by providing standardized tool access, enabling multi-step, hybrid (internal + external data) workflows.
How to Build an Agent Workflow
Building an agent workflow involves iterative design: define goals, select components, implement logic, test, and deploy. Below is a step-by-step guide, focusing on Snowflake Cortex with MCP for practicality (adaptable to other platforms like OpenAI Assistants API or CrewAI).
Step 1: Define the Goal and Scope
- Identify the problem: E.g., "Automate sales forecasting by querying Snowflake data, enriching with external APIs, and generating reports."
- Outline high-level steps: Input → Reasoning → Tool Calls → Validation → Output.
- Tools needed: Databases (Snowflake SQL), APIs (e.g., weather via OpenAI or third-party), LLMs for summarization.
- Set constraints: Security (RBAC), cost (token limits), reliability (error handling).
Step 2: Choose the Framework and Components
-
Core Agent: Use Cortex Agent service in Snowflake for orchestration, or open-source like LangGraph (for stateful graphs).
-
Tools: Integrate via MCP servers (e.g., Snowflake's MCP for SQL/object management) or custom functions.
-
LLM Backbone: Cortex ML functions (e.g., COMPLETE for reasoning) or external models via API keys (like OpenAI's GPT-4o).
-
State Management: Track workflow state (e.g., variables like "user_query" or "intermediate_results") using session storage or graphs.
Component Example in Snowflake Cortex Alternatives Planner LLM prompt: "Break task into steps." ReAct (Reason + Act) loop in LangChain. Tools MCP-exposed: query_snowflake(),analyze_with_cortex_analyst().OpenAI tools/functions. Memory Session context in Cortex Agents. Vector stores (Pinecone) for long-term recall. Router Conditional logic: If data missing, call external API. Multi-agent setups (e.g., supervisor in AutoGen).
Step 3: Design the Workflow Logic
-
Use a graph-based or loop-based structure:
- Graph (Recommended for Complex Flows): Nodes = actions (e.g., "Query DB" → "Enrich Data" → "Generate Report"); Edges = conditions.
- Loop (Simple ReAct): Agent observes state, reasons ("What tool next?"), acts, repeats until done.
-
Example Pseudo-Code (Python with LangGraph, adaptable to Snowflake):
from langgraph.graph import StateGraph, END from typing import TypedDict, Annotated import operator class AgentState(TypedDict): messages: Annotated[list, operator.add] # Chat history query: str # User input data: dict # Intermediate results def query_snowflake(state): # MCP-integrated tool # Use Snowflake connector: Execute SQL via MCP server sql = f"SELECT * FROM sales WHERE date > '{state['query']}'" result = execute_mcp_sql(sql) # Pseudo-call to MCP return {"data": result, "messages": [f"Queried: {len(result)} rows"]} def enrich_external(state): # Call OpenAI API for weather enrichment enriched = openai.chat.completions.create(model="gpt-4o", messages=[{"role": "user", "content": f"Enrich {state['data']} with weather trends."}]) return {"data": enriched.choices[0].message.content} def generate_report(state): report = cortex_complete(prompt=f"Summarize {state['data']} into a sales forecast.") # Cortex LLM return {"messages": [report]} # Build Graph workflow = StateGraph(AgentState) workflow.add_node("query", query_snowflake) workflow.add_node("enrich", enrich_external) workflow.add_node("report", generate_report) workflow.set_entry_point("query") workflow.add_edge("query", "enrich") workflow.add_edge("enrich", "report") workflow.add_edge("report", END) app = workflow.compile() result = app.invoke({"query": "2025 Q1 sales", "messages": []})- Integrate MCP: Replace
execute_mcp_sqlwith calls to your MCP server (e.g., via HTTP endpoint from the Quickstart).
- Integrate MCP: Replace
Step 4: Implement Security and Error Handling
- Auth: Use API keys (e.g., OpenAI key for external calls) and Snowflake RBAC for data access.
- Validation: Add guardrails—e.g., approve SQL before execution via human-in-loop.
- Errors: Retry logic (e.g., exponential backoff) and fallbacks (e.g., cached data if API fails).
- In MCP: Configure permissions in
tools_config.yaml(e.g.,Select: Trueonly).
Step 5: Test and Deploy
- Unit Test: Mock tools; simulate inputs (e.g., "Forecast sales for rainy regions").
- End-to-End: Use clients like Claude Desktop connected to MCP server.
- Deploy: As a Snowflake stored procedure, Streamlit app, or serverless (e.g., AWS Lambda with MCP container).
- Monitor: Track via Snowflake's query history or OpenAI usage dashboard.
Time Estimate: Basic workflow: 1-2 hours; Production-ready: 1-2 days.
Use Cases
Agent workflows shine in data-intensive, multi-step scenarios. Here are real-world examples, with Snowflake/MCP focus:
| Use Case | Description | Workflow Steps | Benefits |
|---|---|---|---|
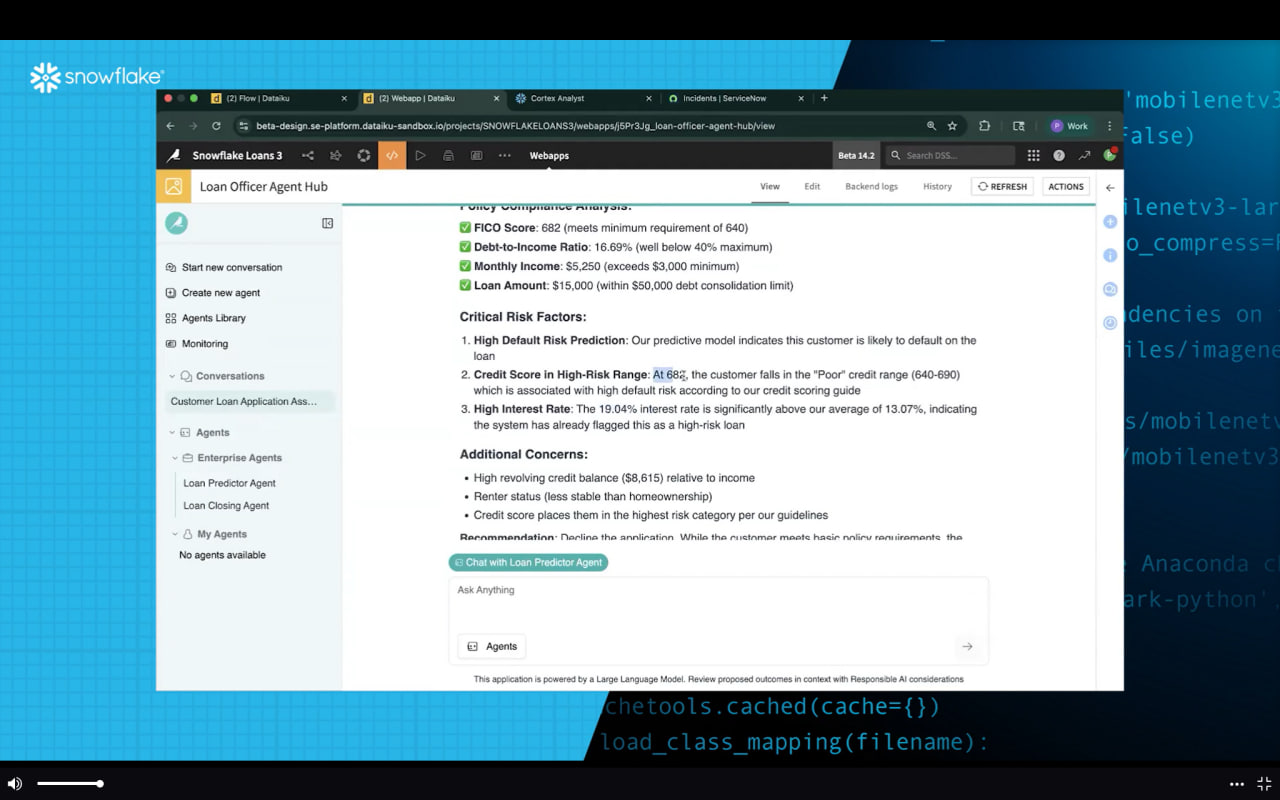
| Data Analysis & Reporting | Automate BI dashboards: User asks "What's Q1 sales trend?" Agent queries Snowflake, analyzes with Cortex Analyst, visualizes. | 1. Parse query → 2. SQL via MCP → 3. Semantic analysis → 4. Chart generation (e.g., via Matplotlib tool). | Speeds up insights from hours to seconds; handles natural language. |
| Customer Support Automation | Triage tickets: Agent fetches user data from CRM (Snowflake), checks inventory via API, suggests resolutions. | 1. Classify ticket → 2. Query user history → 3. Enrich with external sentiment analysis (OpenAI) → 4. Respond/escalate. | Reduces resolution time by 40-60%; scales 24/7. |
| Supply Chain Optimization | Forecast disruptions: Pull inventory from Snowflake, integrate weather/stock APIs, simulate scenarios with LLMs. | 1. Input forecast params → 2. Data aggregation via MCP → 3. Simulation (e.g., PuLP optimization tool) → 4. Alert if risks high. | Minimizes stockouts; saves costs (e.g., 20% inventory reduction). |
| Content Generation Pipeline | Personalized marketing: Query customer segments, generate emails with DALL·E images, A/B test via analytics. | 1. Segment users → 2. Generate copy (Cortex COMPLETE) → 3. Create visuals (OpenAI tool) → 4. Track engagement. | Boosts conversion rates; automates creative workflows. |
| Compliance Auditing | Review logs for anomalies: Agent scans audit trails in Snowflake, cross-references regulations via search tools, flags issues. | 1. Trigger on new logs → 2. Query/analyze → 3. Validate against rules (e.g., regex tools) → 4. Report to compliance team. | Ensures GDPR/HIPAA adherence; proactive risk detection. |
These workflows scale from simple (single-tool) to multi-agent (e.g., one agent for data, another for decisions). Start small—build a query/report flow using the MCP Quickstart—and iterate. If you need code for a specific use case or integration (e.g., with OpenAI key), let me know!
Build Agent-Powered Workflows with Snowflake Cortex AI and Managed MCP Servers
AI agents are becoming essential components of modern applications but giving them secure, structured access to enterprise data is still a major hurdle. In this hands-on workshop, developers will learn how to use Cortex AI Model Context Protocol (MCP) servers to connect AI agents to real enterprise data sources with minimal setup.
You’ll get practical experience with:
Spinning up a Cortex AI MCP server using Snowflake’s open source tooling
Connecting AI agents to Cortex Analyst, Cortex Search, and Cortex Agents through MCP
Executing multi-step tasks like document summarization, insight extraction, and dashboard generation all orchestrated by an agent
By the end of the session, you'll have a working data agent powered by Cortex AI MCP Servers, a clear understanding of how MCP fits into modern AI architectures, and the tools to extend your own applications with powerful, agent-native workflows on Snowflake.
Quickstart/Blog: https://www.snowflake.com/en/developers/solutions-center/how-to-build-an-mcp-server-for-cortex-agents/
Github: