🥧 Spring MVC
Spring MVC 정의
Spring의 모듈 중에 웹 계층을 담당하는 몇가지 모듈이 있다. 그 중 Servlet API를 기반으로 클라이언트의 요청을 처리하는 모듈 이름이 spring-webmvc이다. 이를 줄여서 Spring MVC라고 부르기도 하고 Spring MVC가 웹 프레임워크의 한 종류이기 때문에 Spring MVC 프레임워크라고도 부른다.
Servlet
클라이언트의 요청을 처리하도록 특정 규약에 맞추어서 Java 코드로 작성하는 클래스 파일이다. Spring boot는 내장 톰캣 위에서 돌아가는데 서블릿들이 웹 애플리케이션으로 실행이 되도록 하는 서블릿 컨테이너의 하나이다.
Model
Model은 Spring MVC에서 M에 해당한다. 클라이언트에게서 요청을 받아 처리한 결과물(데이터)를 클라이언트에게 응답으로 돌려줘야 하는데 이때 응답으로 돌려주는 작업의 처리 결과 데이터를 Model이라고 한다.
View
View는 Model 데이터를 이용해서 클라이언트 애플리케이션의 화면에 보여주는 리소스를 제공하는 역할을 한다.
- HTML 페이지의 출력
- PDF, Excel 등의 문서 형태로 출력
- JSON, XML 등 특정 형식의 포멧으로의 변환
Controller
Controller는 클라이언트 측의 요청을 직접적으로 전달받는 엔드포인트이다. Model과 View 중간에서 상호작용을 해주는 역할을 한다.
MVC의 흐름
Client가 요청 데이터 전송
→ Controller가 요청 데이터 수신 → 비즈니스 로직 처리 → Model 데이터 생성
→ Controller에게 Model 데이터 전달 → Controller가 View에게 Model 데이터 전달
→ View가 응답 데이터 생성
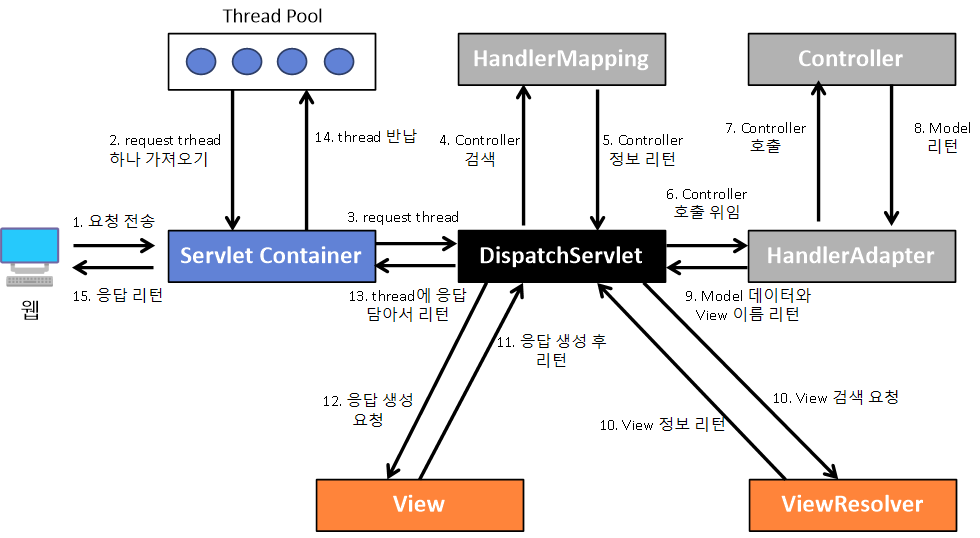
Spring MVC의 동작 방식과 구성 요소
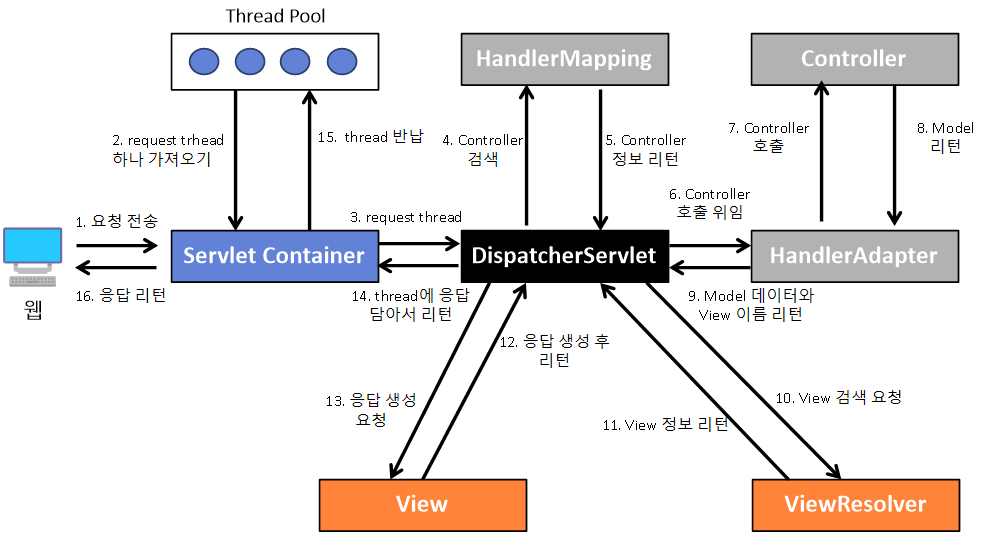
- DispatcherServlet의 역할
DispatcherServlet은 굉장히 바빠보이지만 실제로 요청에 대한 처리는 다른 구성요소들에게 위임하고 있다. 애플리케이션의 가장 앞단에 배치되어 다른 구성요소들과의 상호작용하면서 클라이언트의 요청을 처리하는 패턴을 Front Cotroller Pattern이라고 한다.
🎋 Controller
N-Layered Architecture에서 API 계층에 대해 알아보려고 한다. Controller는 Spring MVC에서 클라이언트 요청의 최종 목적지이다.
핸들러 메서드
@Controller 또는 @RestController 어노테이션이 붙은 컨트롤러를 작성한 클래스 내에 Http Method의 종류에 따라 로직을 처리하는 함수가 핸들러 메서드이다.
import org.springframework.http.MediaType;
import org.springframework.web.bind.annotation.*;

@RestController
@RequestMapping(value = "/v1/users", produces = {MediaType.APPLICATION_JSON_VALUE})
public class UserController {
    @PostMapping
    public String postUser(@RequestParam("email") String email,
                             @RequestParam("name") String name,
                             @RequestParam("phone") String phone) {
        System.out.println("# email: " + email);
        System.out.println("# name: " + name);
        System.out.println("# phone: " + phone);

        String response =
                "{\"" +
                   "email\":\""+email+"\"," +
                   "\"name\":\""+name+"\",\"" +
                   "phone\":\"" + phone+
                "\"}";
        return response;
    }

    @GetMapping("/{user-id}")
    public String getUser(@PathVariable("user-id") long userId) {
        System.out.println("# userId: " + userId);

        // not implementation
        return null;
    }

    @GetMapping
    public String getUsers() {
        System.out.println("# get users");

        // not implementation
        return null;
    }
}
위의 코드에서 @RequestMapping 부분에 produces로 MediaType.APPLICATION_JSON_VALUE을 넣어주었다. 이는 response를 json 타입으로 반환하겠다는 의미이기 때문에 직접 문자열로 json 형식을 맞추고 리턴해줘야한다. 이는 ResponseEntity를 사용한다면 json 형식으로 더 수월하게 response를 줄 수 있다.
@PathVariable: URI에 포함되어 있는 식별자@RequestParam: 쿼리 파라미터(Query Parmeter 또는 Query String), 폼 데이터(form-data), x-www-form-urlencoded 형식
ex)http://localhost:8080/posts?page=1&size=10
ResponseEntity
ResponseEntity는 HttpEntity의 확장 클래스로써 HttpStatus 상태 코드를 추가한 전체 HTTP 응답(상태 코드, 헤더 및 본문)을 표현하는 클래스이다.
위의 코드에서 ResponseEntity를 사용한 코드는 다음과 같다.
import org.springframework.http.HttpStatus;
import org.springframework.http.ResponseEntity;
import org.springframework.web.bind.annotation.*;

@RestController
@RequestMapping(value = "/v1/users")
public class UserController {
    @PostMapping
    public ResponseEntity postUser(@RequestParam("email") String email,
                             @RequestParam("name") String name,
                             @RequestParam("phone") String phone) {
        Map<String, String> map = new HashMap<>();
        map.put("email", email);
        map.put("name", name);
        map.put("phone", phone);

        return new ResponseEntity<>(map, HttpStatus.CREATED);
    }

    @GetMapping("/{user-id}")
    public ResponseEntity getUser(@PathVariable("user-id") long userId) {
        System.out.println("# userId: " + userId);

        // not implementation
        return new ResponseEntity<>(HttpStatus.OK);
    }

    @GetMapping
    public ResponseEntity getUsers() {
        System.out.println("# get users");

        // not implementation
        return new ResponseEntity<>(HttpStatus.OK);
    }
}
여기서 중요한 포인트는 POST 관련 핸들러 메서드부분의 상태 응답코드이다. 다른 핸들러 메서드 부분처럼 HttpStatus.OK가 아닌 HttpStatus.CREATED를 상태 응답코드로 넣어주어 요청에 대한 응답을 자연스럽게 표현할 수 있다.
HTTP 헤더
RequestHeader 확인 방법
@RequestHeader로 개별 헤더 정보 받기
import org.springframework.http.HttpStatus;
import org.springframework.http.ResponseEntity;
import org.springframework.web.bind.annotation.*;

@RestController
@RequestMapping(path = "/v1/users")
public class UserController {
    @PostMapping
    public ResponseEntity postUser(@RequestHeader("user-agent") String userAgent,
                                     @RequestParam("email") String email,
                             @RequestParam("name") String name,
                             @RequestParam("phone") String phone) {
        System.out.println("user-agent: " + userAgent);
        return new ResponseEntity<>(new User(email, name, phone),
                HttpStatus.CREATED);
    }
}@RequestHeader로 전체 헤더 정보 받기
import org.springframework.http.HttpStatus;
import org.springframework.http.ResponseEntity;
import org.springframework.web.bind.annotation.*;

@RestController
@RequestMapping(path = "/v1/users")
public class UserController {
    @PostMapping
    public ResponseEntity postUser(@RequestHeader Map<String, String> headers,
                                     @RequestParam("email") String email,
                             @RequestParam("name") String name,
                             @RequestParam("phone") String phone) {
        for (Map.Entry<String, String> entry : headers.entrySet()) {
            System.out.println("key: " + entry.getKey() +
                    ", value: " + entry.getValue());
        }
        return new ResponseEntity<>(new User(email, name, phone),
                HttpStatus.CREATED);
    }
}HttpServletRequest객체로 헤더 정보 얻기
import org.springframework.http.HttpStatus;
import org.springframework.http.ResponseEntity;
import org.springframework.web.bind.annotation.*;

@RestController
@RequestMapping(path = "/v1/users")
public class UserController {
    @PostMapping
    public ResponseEntity postUser(HttpServletRequest httpServletRequest,
                                     @RequestParam("email") String email,
                             @RequestParam("name") String name,
                             @RequestParam("phone") String phone) {
        System.out.println("user-agent: " + httpServletRequest.getHeader("user-agent"));

        return new ResponseEntity<>(new User(email, name, phone),
                HttpStatus.CREATED);
    }
}HttpEntity로 헤더 정보 얻기
@RestController
@RequestMapping(path = "/v1/users")
public class UserController {
    @PostMapping
    public ResponseEntity postUser(HttpEntity httpEntity,
                                     @RequestParam("email") String email,
                             @RequestParam("name") String name,
                             @RequestParam("phone") String phone) {
        for(Map.Entry<String, List<String>> entry : httpEntity.getHeaders().entrySet()){
            System.out.println("key: " + entry.getKey()
                    + ", " + "value: " + entry.getValue());
        }

        return new ResponseEntity<>(new User(email, name, phone),
                HttpStatus.CREATED);
    }
}
ResponseHeader 추가 방법
HttpHeaders를 사용하여 HttpHeader 추가
@RestController
@RequestMapping(path = "/v1/users")
public class UserController {
    @PostMapping
    public ResponseEntity postUser(@RequestParam("email") String email,
                             @RequestParam("name") String name,
                             @RequestParam("phone") String phone) {
        HttpHeaders headers = new HttpHeaders();
        headers.set("Client-Geo-Location", "Korea,Seoul");

        return new ResponseEntity<>(new User(email, name, phone), headers, HttpStatus.CREATED);
    }
}HttpServletResponse를 사용하여 HttpHeader 추가
@RestController
@RequestMapping(path = "/v1/users")
public class UserController {
    @PostMapping
    public ResponseEntity postUser(HttpServletResponse response, @RequestParam("email") String email,
                             @RequestParam("name") String name,
                             @RequestParam("phone") String phone) {
        response.addHeader("Client-Geo-Location", "Korea,Seoul");

        return new ResponseEntity<>(new User(email, name, phone), HttpStatus.CREATED);
    }
}
Rest Client
Rest API 서버에 HTTP 요청을 보낼 수 있는 클라이언트 툴 또는 라이브러리를 말한다. 즉 클라이언트에서 Rest API 서버로 요청을 보낼 수도, 서버에서 다른 서버로 요청을 보낼 때 사용한다.
결제 서비스나 메시징 기능(카카오톡 메시지) 등의 기능을 구현할 때 사용한다.
RestTemplate
java에서 사용할 수 있는 Http Client라이브러리가 많지만 그 중 RestTemplate에 대해 알아본다.
- 먼저 build.gradle에 dependency를 추가해준다.
dependencies {
    ...
    ...
    implementation 'org.apache.httpcomponents:httpclient'
}- RestTemplate 객체를 생성 후 해당 URI로 request를 보내고 response를 받아 온다.
public class RestClientExample {
    public static void main(String[] args) {
        // 객체 생성
        RestTemplate restTemplate =
                new RestTemplate(new HttpComponentsClientHttpRequestFactory());

        // URI 생성
        UriComponents uriComponents =
                UriComponentsBuilder
                        .newInstance()
                        .scheme("http")
                        .host("worldtimeapi.org")
//                        .port(80)
                        .path("/api/timezone/{continents}/{city}")
                        .encode()
                        .build();
        URI uri = uriComponents.expand("Asia", "Seoul").toUri();

        // Request 전송
        String result = restTemplate.getForObject(uri, String.class);
		System.out.println(result);

        // response key-value에 맞는 객체에도 저장할 수 있다.
		WorldTime worldTime = restTemplate.getForObject(uri, WorldTime.class);

        System.out.println("# datatime: " + worldTime.getDatetime());
        System.out.println("# timezone: " + worldTime.getTimezone());
        System.out.println("# day_of_week: " + worldTime.getDay_of_week());

        // ResponseEntity를 사용하여 body와 header를 한번에 받아올 수 있다.
        ResponseEntity<WorldTime> response =
                restTemplate.getForEntity(uri, WorldTime.class);

        System.out.println("# datatime: " + response.getBody().getDatetime());
        System.out.println("# timezone: " + response.getBody().getTimezone()());
        System.out.println("# day_of_week: " + response.getBody().getDay_of_week());
        System.out.println("# HTTP Status Code: " + response.getStatusCode());
        System.out.println("# HTTP Status Value: " + response.getStatusCodeValue());
        System.out.println("# Content Type: " + response.getHeaders().getContentType());
        System.out.println(response.getHeaders().entrySet());
    }
}
🛒 DTO(Data Transfer Object)
요청 데이터 또는 응답 데이터를 하나의 객체로 전달 받는/하는 역할을 한다. 또한 DTO를 통해 유효성 검증이나 역할 분리를 할 수 있다.
@Setter
@Getter
class UserPostDto {
	private long userId;
    private String email;
    private String name;
    private String phone;
}

@RestController
@RequestMapping(path = "/v1/users")
public class UserController {
    @PostMapping
    public ResponseEntity postUser(@RequestBody UserPostDto userPostDto) {
        userPostDto.setUserId(1L);

        return new ResponseEntity<>(userPostDto, HttpStatus.CREATED);
    }
}
여기서 @RequsetBody 어노테이션을 사용해서 클라이언트 쪽에서 전송한 JSON 형식의 Request Body를 DTO 클래스의 객체로 변환하였다.
그렇다면 @ResponseBody를 사용해서 JSON 형식의 Response Body를 반환해주는 코드가 들어있지 않은데 어떻게 JSON 형식으로 받을 수 있을까
이데 대한 해답은 ResponseEntity에 있다. 핸들러 메서드의 리턴 값이 ResponseEntity일 경우, 내부적으로 HttpMessageConverter가 동작하게 되어 응답 객체(여기서는 DTO 클래스의 객체)를 JSON 형식으로 바꿔준다.
- JSON 직렬화(Serialization) : Java의 객체를 JSON 형식으로 변환하는 것
- 역직렬화(Deserialization) : JSON 형식의 데이터를 DTO 같은 Java의 객체로 변환하는 것
HttpMessageConverter
클라이언트 사이드 렌더링을 위해 필요한 데이터를 특정 형식으로 변환해주는 것
- 사용 목적
- Reqeust Body를 DTO 같은 클래스의 객체로 변환해서 웹 애플리케이션 서버쪽에서 사용할 수 있도록 해줌
- 웹 서버 쪽으로 전달할 응답 데이터를 Response Body로 변환해주는 것
요청 처리 시 HandlerAdapter의 동작 과정
- HandlerMapping을 통해 적절한 HandlerAdapter를 찾으면 HandlerAdapter는 Controller로 넘겨줄 파라미터를 결정하기 위해 이 작업을 HandlerMethodArgumentResolver에게 위임
- HandlerMethodArgumentResolver는 HttpMessageConverter에게 HTTP Request Body를 특정 타입의 객체로 변환해주기를 요청
- HttpMessageConverter는 HTTP Request Body를 특정 타입의 객체로 변환
- HandlerMethodArgumentResolver는 변환된 데이터를 전달 받아서 이 데이터를 다시 HandlerAdapter에게 전달
- HandlerAdapter는 HandlerMethodArgumentResolver로부터 전달 받은 데이터를 핸들러 메서드의 파라미터로 포함 시킨 후, 핸들러 메서드를 호출
응답 처리 시 HandlerAdapter의 동작 과정
- 핸들러 메서드가 응답으로 전달할 데이터를 리턴
- HandlerMethodReturnValueHandler는 핸들러 메서드로부터 전달 받은 응답 데이터를 HttpMessageConverter에게 전달
- HttpMessageConverter는 HandlerMethodReturnValueHandler로부터 전달 받은 데이터를 HTTP Response Body에 포함되는 형식의 데이터로 변환
- HandlerMethodReturnValueHandler는 HttpMessageConverter로부터 전달 받은 데이터를 HandlerAdapter에게 전달
출처: IT Village:티스토리
DTO 유효성 검증
유효성 검증을 위해 다음의 dependency를 추가해줘야한다.
dependencies {
	implementation 'org.springframework.boot:spring-boot-starter-validation'
	...
	...
}
유효성 검증 종류
@Email: email인지 아닌지 확인@NotNull: null만 허용하지 않는다. ""이나 " "는 허용@NotEmpty: null과 "" 허용하지 않는다. " "는 허용@NotBlank: null, "", " " 허용하지 않는다.@Pattern: regexp(정규표현식)을 이용하여 패턴의 불일치 여부 확인@Valid: 핸들러 메서드 파라미터에 붙이며 해당 Dto에 대해 유효성 검증을 하겠다는 의미@Validated: 컨트롤러 클래스 레벨에 붙이며@PathVariable에 대한 유효성 검증을 하겠다는 의미
Custom Validator
import javax.validation.Constraint;
import javax.validation.Payload;
import java.lang.annotation.ElementType;
import java.lang.annotation.Retention;
import java.lang.annotation.RetentionPolicy;
import java.lang.annotation.Target;

@Target(ElementType.FIELD)
@Retention(RetentionPolicy.RUNTIME)
@Constraint(validatedBy = {NotSpaceValidator.class})
public @interface NotSpace {
    String message() default "공백이 아니어야 합니다";
    Class<?>[] groups() default {};
    Class<? extends Payload>[] payload() default {};
}


import org.springframework.util.StringUtils;
import javax.validation.ConstraintValidator;
import javax.validation.ConstraintValidatorContext;

public class NotSpaceValidator implements ConstraintValidator<NotSpace, String> {

    @Override
    public void initialize(NotSpace constraintAnnotation) {
        ConstraintValidator.super.initialize(constraintAnnotation);
    }

    @Override
    public boolean isValid(String value, ConstraintValidatorContext context) {
        return value == null || StringUtils.hasText(value);
    }
}
ConstraintValidator<NotSpace, String>에서 NotSpace는 CustomValidator와 매핑된 Custom Annotation을 의미하며, String은 Custom Annotation으로 검증할 대상 멤버 변수의 타입을 의미한다.
✨ 추가적인 정규표현식에 대해서는 그때그때 찾아서 사용하면 된다.
DTO를 사용하는 이유
API의 request, response에 맞추기 위해 Domain(Entity)가 수정되어선 안되기 때문에 사용하므로 Domain -> Dto / Dto -> Domain으로의 변환 과정이 필요하다. 이를 메퍼라고 하며 다음에 더 자세히 설명하고자 한다. 또한 역할 분리를 하여 역할과 책임이 더 명확해진다.