AsyncStorage
[Async_Storage 공식문서]
https://react-native-async-storage.github.io/async-storage/
설치
npm install @react-native-async-storage/async-storage

yarn add @react-native-async-storage/async-storage
앱을 종류 후 다시 실행하였을 때, 데이터가 남아있지 않는 문제가 있을 수 있다.
이때, LocalStorage처럼 key-value 기반으로 로컬에 데이터를 저장할 수 있게 해주는 라이브러리를 사용한다. LocalStorage와 마찬가지로, 문자열 데이터만 사용이 가능하다.
따라서, JSON.Stringfy 메서드와 JSON.parse 메서드의 사용이 필요하다.
하지만, AsyncStorage는 LocalStorage와는 다르게 비동기 처리가 필요하다.
사용법
>> 1. Storing String Value

const storeData = async (value) => {
  try {
    await AsyncStorage.setItem('my-key', value);
  } catch (e) {
    // saving error
  }
};

>> 2. Storing Object Value

const storeData = async (value) => {
  try {
    const jsonValue = JSON.stringify(value);
    await AsyncStorage.setItem('my-key', jsonValue);
  } catch (e) {
    // saving error
  }
};

>> 3. Reading String Value

const getData = async () => {
  try {
    const value = await AsyncStorage.getItem('my-key');
    if (value !== null) {
      // value previously stored
    }
  } catch (e) {
    // error reading value
  }
};

>> 4. Reading Object Value

const getData = async () => {
  try {
    const jsonValue = await AsyncStorage.getItem('my-key');
    return jsonValue != null ? JSON.parse(jsonValue) : null;
  } catch (e) {
    // error reading value
  }
};
MMKV Storage
High Performant LocalStorage & In-Memory Storage
[MMKV 공식문서]
https://github.com/mrousavy/react-native-mmkv
설치
yarn add react-native-mmkv
cd ios && pod install
사용법
>> 1. Create a new Instance

import { MMKV } from 'react-native-mmkv'

// customize
export const storage = new MMKV({
  id: `user-${userId}-storage`,
  path: `${USER_DIRECTORY}/storage`,
  encryptionKey: 'hunter2'
})

>> 2. GET

const username = storage.getString('user.name') // 'Marc'
const age = storage.getNumber('user.age') // 21
const isMmkvFastAsf = storage.getBoolean('is-mmkv-fast-asf') // true

>> 3. SET

storage.set('user.name', 'Marc')
storage.set('user.age', 21)
storage.set('is-mmkv-fast-asf', true)

>> 4. Keys

// checking if a specific key exists
const hasUsername = storage.contains('user.name')

// getting all keys
const keys = storage.getAllKeys() // ['user.name', 'user.age', 'is-mmkv-fast-asf']

// delete a specific key + value
storage.delete('user.name')

// delete all keys
storage.clearAll()

>> 5. Objects

const user = {
  username: 'Marc',
  age: 21
}

// Serialize the object into a JSON string
storage.set('user', JSON.stringify(user))

// Deserialize the JSON string into an object
const jsonUser = storage.getString('user') // { 'username': 'Marc', 'age': 21 }
const userObject = JSON.parse(jsonUser)

>> 6. Encryption

// encrypt all data with a private key
storage.recrypt('hunter2')

// remove encryption
storage.recrypt(undefined)

>> 7. Buffers

storage.set('someToken', new Uint8Array([1, 100, 255]))
const buffer = storage.getBuffer('someToken')
console.log(buffer) // [1, 100, 255]
Encrypted Storage
[Encrypted_Storage 공식문서]
https://www.npmjs.com/package/react-native-encrypted-storage
설치
npm install react-native-encrypted-storage

yarn add react-native-encrypted-storage
일반적으로 사용하는 LocalStorage인 AsyncStorage 는 엑세스 토큰, 결제 정보 등 민감한 데이터를 저장하기엔 보안상 이상적이지 못하다.
따라서, 위의 문제를 해결하기 위해 보안적으로 개선된 Encryted Storage를 따로 사용하는 것을 권장한다.
사용법
import EncryptedStorage from 'react-native-encrypted-storage';

>> 1. Storing Value

async function storeUserSession() {
    try {
        await EncryptedStorage.setItem(
            "user_session",
            JSON.stringify({
                age : 21,
                token : "ACCESS_TOKEN",
                username : "emeraldsanto",
                languages : ["fr", "en", "de"]
            })
        );

        // Congrats! You've just stored your first value!
    } catch (error) {
        // There was an error on the native side
    }
}

>> 2. Retrieving a Value

async function retrieveUserSession() {
    try {
        const session = await EncryptedStorage.getItem("user_session");

        if (session !== undefined) {
            // Congrats! You've just retrieved your first value!
        }
    } catch (error) {
        // There was an error on the native side
    }
}

>> 3. Removing a Value

async function removeUserSession() {
    try {
        await EncryptedStorage.removeItem("user_session");
        // Congrats! You've just removed your first value!
    } catch (error) {
        // There was an error on the native side
    }
}

>> 4. Clearing All Previously Saved Values

async function clearStorage() {
    try {
        await EncryptedStorage.clear();
        // Congrats! You've just cleared the device storage!
    } catch (error) {
        // There was an error on the native side
    }
}

>> 5. Error Handling

async function removeUserSession() {
    try {
        await EncryptedStorage.removeItem("user_session");
    } catch (error) {
        // There was an error on the native side
        // You can find out more about this error by using the `error.code` property
        console.log(error.code); // ex: -25300 (errSecItemNotFound)
    }
}
FlashList
Fast & Performant React Native List
[FlashList 공식문서]
https://shopify.github.io/flash-list/(React-Native FlatList > 성능 개선)
yarn add @shopify/flash-list
cd ios && pod install
사용법
import React from "react";
import { View, Text, StatusBar } from "react-native";
import { FlashList } from "@shopify/flash-list";

const DATA = [
  {
    title: "First Item",
  },
  {
    title: "Second Item",
  },
];

const MyList = () => {
  return (
    <FlashList
      data={DATA}
      renderItem={({ item }) => <Text>{item.title}</Text>}
      estimatedItemSize={200}
    />
  );
};
DropDown Picker
[DropDown_Picker 공식문서]
https://github.com/hossein-zare/react-native-dropdown-picker
https://hossein-zare.github.io/react-native-dropdown-picker-website/
설치
npm install react-native-dropdown-picker

yarn add react-native-dropdown-picker
React Native에서 DropDown을 구현할 때, 일반적으로 플랫폼 별로 제공하는 네이티브 Picker를 사용하는 경우가 많다보니, 크로스 플랫폼 개발 시에 UI의 통일성이 떨어지고, 디자인이 마음에 들지 않는 경우가 많다. 그렇다고 Picker를 직접 개발하거나 이를 위해 다른 UI 프레임워크를 적용하기에는 다소 부담이 있다.
스타일 커스터마이징도 자유롭고 다중 선택이나, 다크모드, 카테고리, 검색 등도 지원하고 있다.
또한 IOS와 Android 모두 거의 동일한 스타일과 결과물을 보이는 점이 마음에 든다.
사용법
import DropDownPicker from 'react-native-dropdown-picker';

function App() {
  const [open, setOpen] = useState(false);
  const [value, setValue] = useState(null);
  const [items, setItems] = useState([
    {label: 'Apple', value: 'apple'},
    {label: 'Banana', value: 'banana'}
  ]);

  return (
    <DropDownPicker
      open={open}
      value={value}
      items={items}
      setOpen={setOpen}
      setValue={setValue}
      setItems={setItems}
    />
  );
}
Bottom Sheet Modal
[Bottom Sheet 공식문서]
https://github.com/gorhom/react-native-bottom-sheet
https://ui.gorhom.dev/components/bottom-sheet/
설치
>> Dependencies

yarn add react-native-reanimated react-native-gesture-handler

>> Installation

yarn add @gorhom/bottom-sheet@^4
사용법
import React, { useCallback, useMemo, useRef } from 'react';
import { View, Text, StyleSheet } from 'react-native';
import BottomSheet from '@gorhom/bottom-sheet';

const App = () => {
  // ref
  const bottomSheetRef = useRef<BottomSheet>(null);

  // variables
  const snapPoints = useMemo(() => ['25%', '50%'], []);

  // callbacks
  const handleSheetChanges = useCallback((index: number) => {
    console.log('handleSheetChanges', index);
  }, []);

  // renders
  return (
    <View>
      <BottomSheet
        ref={bottomSheetRef}
        index={1}
        snapPoints={snapPoints}
        onChange={handleSheetChanges}
      >
        <View>
          <Text>Awesome 🎉</Text>
        </View>
      </BottomSheet>
    </View>
  );
};

export default App;
가장 기본적인 BottomSheet를 가지고 안의 View를 직접 구현해도 되지만, 다음과 같은 여러 컴포넌트를 제공하므로 활용해보시는 것도 좋을 것 같습니다.
- BottomSheetView
- BottomSheetScrollView
- BottomSheetFlatList
- BottomSheetSectionList
- BottomSheetVirtualizedList
- BottomSheetBackdrop
- BottomSheetFooter
- BottomSheetTextInput
>> BottomSheet처럼 지속적으로 동작하는 것이 아닌 Modal형태가 필요한 경우
>> BottomSheetModal 사용

import React, { useCallback, useMemo, useRef } from 'react';
import { View, Text, StyleSheet, Button } from 'react-native';
import {
  BottomSheetModal,
  BottomSheetModalProvider,
} from '@gorhom/bottom-sheet';

const App = () => {
  // ref
  const bottomSheetModalRef = useRef<BottomSheetModal>(null);

  // variables
  const snapPoints = useMemo(() => ['25%', '50%'], []);

  // callbacks
  const handlePresentModalPress = useCallback(() => {
    bottomSheetModalRef.current?.present();
  }, []);
  const handleSheetChanges = useCallback((index: number) => {
    console.log('handleSheetChanges', index);
  }, []);

  // renders
  return (
    <BottomSheetModalProvider>
      <View>
        <Button
          onPress={handlePresentModalPress}
          title="Present Modal"
          color="black"
        />
        <BottomSheetModal
          ref={bottomSheetModalRef}
          index={1}
          snapPoints={snapPoints}
          onChange={handleSheetChanges}
        >
          <View>
            <Text>Awesome 🎉</Text>
          </View>
        </BottomSheetModal>
      </View>
    </BottomSheetModalProvider>
  );
};

export default App;
Toast Message
[Toast Message 공식문서]
https://github.com/calintamas/react-native-toast-message
설치
npm install -save react-native-toast-message

yarn add react-native-toast-message
Toast Message는 앱 내에서 사용자들에게 이벤트의 발생과 그 내용을 알려줄 수 있는 직관적인 UI 요소로 많은 앱에서 사용된다. 물론 구현 난이도 자체는 높지 않기 때문에 직접 구현하는 것도 좋은 방법이지만, 서비스의 핵심적인 기능은 아니다보니 적당한 라이브러리를 활용하면 시간을 절약할 수 있다.
사용법
>> App.tsx에서 아래와 같은 구조로 <Toast />를 추가

import Toast from 'react-native-toast-message';

export function App(props) {
  return (
    <>
      {/* ... React Navigation 등 */}
      <Toast />
    </>
  );
}
>> Toast Message를 보여주는 방법
import Toast from 'react-native-toast-message';
import { Button } from 'react-native'
export function Foo(props) {
const showToast = () => {
Toast.show({
type: 'success',
text1: 'Hello',
text2: 'This is some something 👋'
});
}
return (
<Button
title='Show toast'
onPress={showToast}
/>
)
}Magical Modal
[Magical Modal 공식문서]
https://github.com/GSTJ/react-native-magic-modal
설치
npm install -save react-native-magic-modal

yarn add react-native-magic-modal
아주 디테일한 부분까지 모달을 컨트롤 해야 하는 경우가 아니라면,
거의 이 라이브러리를 계속 활용하게 될 것 같다.
사용법
>> Modal을 관리해 줄 Provider를 상위 컴포넌트에 아래와 같은 형태로 추가 <<

import { MagicModalPortal } from 'react-native-magic-modal';

export default function App() {
  return (
    <SomeRandomProvider>
      <MagicModalPortal />  // <-- On the top of the app component hierarchy
      <Router /> // Your app router or something could follow below
    </SomeRandomProvider>
  );
}

>> magicModal.show() && magicModal.hide() <<

import React from 'react';
import { View, Text, TouchableOpacity } from 'react-native';
import { MagicModalPortal, magicModal } from 'react-native-magic-modal';

const ConfirmationModal = () => (
  <View>
    <TouchableOpacity onPress={() => magicModal.hide({ success: true })}>
      <Text>Click here to confirm</Text>
    </TouchableOpacity>
  </View>
);

const handleConfirmationFlow = async () => {
  const result = await magicModal.show(ConfirmationModal);
};

export const MainScreen = () => {
  return (
    <View>
      <TouchableOpacity onPress={handleConfirmationFlow}>
        <Text>Start the modal flow!</Text>
      </TouchableOpacity>
    </View>
  );
};
Splash Screen
[Splash Screen 공식문서]
https://github.com/crazycodeboy/react-native-splash-screen
설치
npm install -save react-native-splash-screen

yarn add react-native-splash-screen
RN는 기본적으로 Splash 스크린을 제공한다. 하지만 실제 앱을 구동하면 Splash 스크린이 너무 빨리 종료된다. 보통의 앱에서는 Splash 스크린을 표시하고 뒤에서 필요한 정보를 API를 통해 받아 온 후 Splash 스크린을 종료하여 자연스러운 사용자 경험을 제공하지만 RN에서 기본으로 제공하는 Splash 스크린은 스런 사용자 경험을 제공하기 어렵다.
사용법 (ANDROID)
>> MainActivity.java(kt) 파일을 열고 아래와 같이 수정 <<

...
import android.os.Bundle; // 추가
import com.facebook.react.ReactActivity;
import org.devio.rn.splashscreen.SplashScreen; // 추가
...
public class MainActivity extends ReactActivity {
   @Override
    protected void onCreate(Bundle savedInstanceState) {
        SplashScreen.show(this);
        super.onCreate(savedInstanceState);
    }
    ...
}
>> Android에서 사용할 Splash Screen 추가 <<
>> android/app/src/main/res/layout/launch_screen.xml 파일을 생성하고 아래 코드를 추가<?xml version="1.0" encoding="utf-8"?>
<RelativeLayout xmlns:android="http://schemas.android.com/apk/res/android"
android:orientation="vertical" android:layout_width="match_parent"
android:layout_height="match_parent">
<ImageView android:layout_width="match_parent" android:layout_height="match_parent"
android:src="@drawable/launch_screen" android:scaleType="centerCrop" />
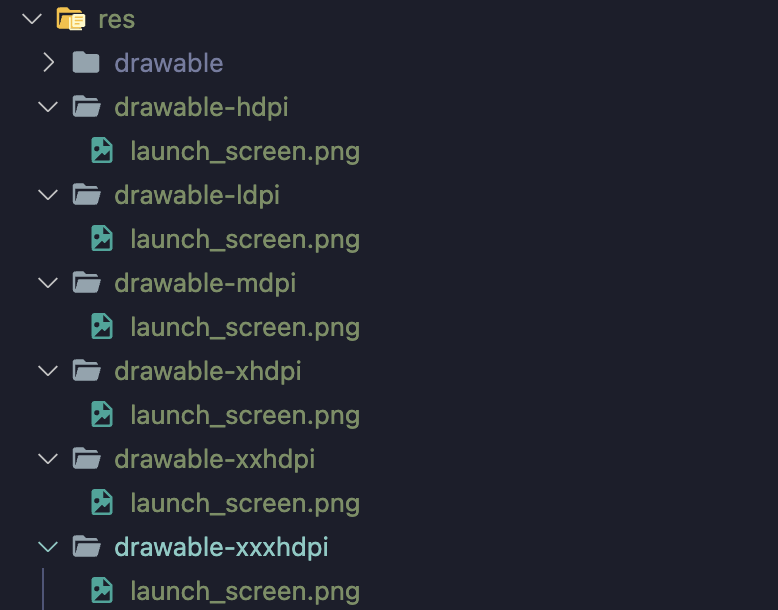
</RelativeLayout>준비된 splash 이미지들을 /android/app/src/main/res 폴더 안에 아래와 같이 넣는다. 생성된 이미지 파일을 res/의 적절한 하위 디렉터리에 배치하면 시스템에서 앱이 실행되는 기기의 픽셀 밀도에 따라 자동으로 알맞은 크기를 선택한다.