STT (Speech-To-Text 음성인식)
: 사람이 말하는 음성 언어를 컴퓨터가 해석해 그 내용을 문자 데이터로 전환하는 처리
다음 두 가지를 사용하여 STT를 구현하는 방법을 알아보자.
1) Naver Cloud와 Spring, React (CSR)
2) React 라이브러리 (react-speech-kit)
CSR (CLOVA Speech Recognition)
: 사람의 목소리를 텍스트로 변환하는 네이버 클라우드 플랫폼의 오픈 API
→ HTTP 기반 REST API를 이용하여 음성 데이터 파일을 텍스트로 변환
CSR 사용 방법
Naver Cloud
-
로그인 후 메인페이지 오른쪽 상단 [콘솔] 접속
→ 좌측 메뉴의 Services
→ AI·NAVER API -
[+ Application 등록] 클릭
→ 이름을 작성하고, CSR 체크
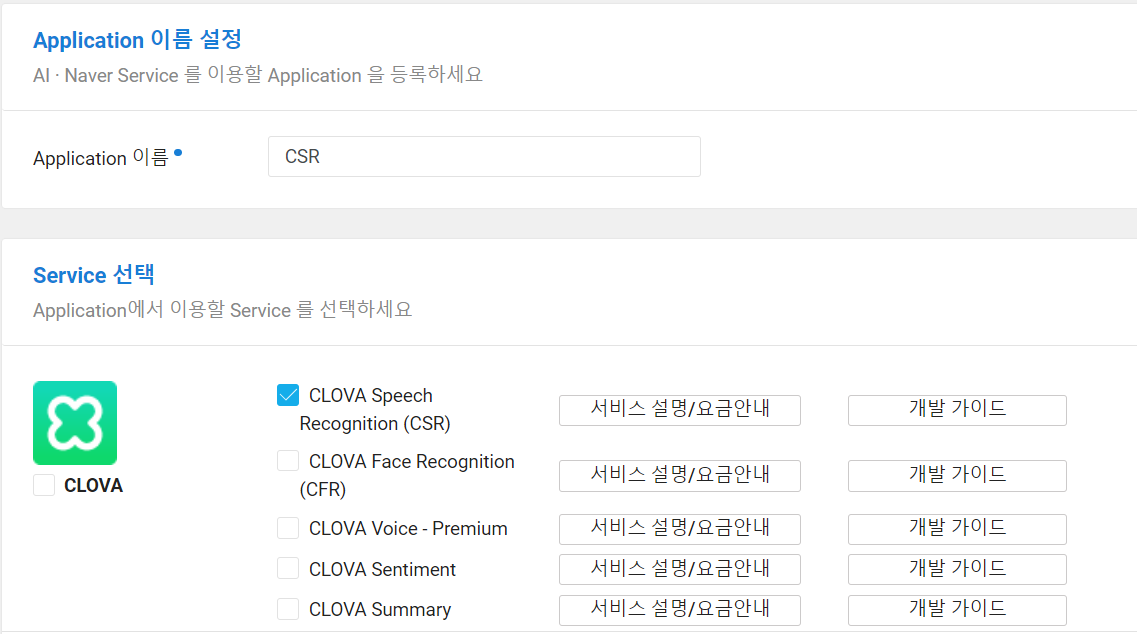
→ [등록]
→ App 이름 아래에 있는 [인증 정보] 클릭
→ clientId, clientSecret 메모해두기
백엔드
- STS 실행
→ Spring Starter Project 생성
→ pom.xml에 의존성 주입
<dependency>
    <groupId>org.springframework.boot</groupId>
    <artifactId>spring-boot-starter</artifactId>
</dependency>

<dependency>
    <groupId>org.springframework.boot</groupId>
    <artifactId>spring-boot-starter-test</artifactId>
    <scope>test</scope>
</dependency>

<dependency>
    <groupId>org.springframework.boot</groupId>
    <artifactId>spring-boot-starter-web</artifactId>
</dependency>

<dependency>
    <groupId>org.springframework.boot</groupId>
    <artifactId>spring-boot-starter-tomcat</artifactId>
</dependency>

<dependency>
    <groupId>com.fasterxml.jackson.core</groupId>
    <artifactId>jackson-core</artifactId>
    <version>2.14.1</version>
</dependency>

<dependency>
    <groupId>com.fasterxml.jackson.core</groupId>
    <artifactId>jackson-databind</artifactId>
    <version>2.14.1</version>
</dependency>
→ WebConfigurer.java 설정
@Configuration		// 자동 호출되어 설정됨
public class WebConfigurer implements WebMvcConfigurer {

	@Override
	public void addCorsMappings(CorsRegistry registry) {

		// 모든 client 접속 허가
		registry.addMapping("/**").allowedOrigins("*");
	}
}
- controller 작성
@RestController
public class NaverController {
	// STT 음성인식
	@PostMapping("fileUpload")
	public String fileUpload(@RequestParam("upload") MultipartFile upload,
							HttpServletRequest req) {
		System.out.println("NaverController STT " + new Date());

        // 음성파일을 업로드할 경로
		String uploadpath = req.getServletContext().getRealPath("/upload");

		String filename = upload.getOriginalFilename();

		String filepath = uploadpath + "/" + filename;

		try {// 파일 복사
			BufferedOutputStream os = new BufferedOutputStream(new FileOutputStream(new File(filepath)));
			os.write(upload.getBytes());
			os.close();

		} catch (Exception e) {
			e.printStackTrace();
			return "fail";
		}

		// Naver Cloud AI
		String resp = NaverCloud.stt(filepath);
		return resp;
	}
}
- CSR API 구현
→ CLOVA Speech Recognition REST API 에서 main 메소드 복붙
→ 어플리케이션 등록 시 메모해놓은 clientId, clientSecret로 수정
→ imgFile 변수에 음성 파일 경로로 수정
→ 반환값 수정
import java.io.*;
import java.net.HttpURLConnection;
import java.net.URL;

public class NaverCloud {

	public static String stt(String filepath) {	// 컨트롤러에서 사용하기 위해 static으로

		String clientId = "복붙!";             // Application Client ID
        String clientSecret = "복붙!";     	  // Application Client Secret
        StringBuffer response = new StringBuffer();	// 반환하기 위해 try문 외부에서 선언

        try {
            String imgFile = filepath;		// 파라미터로 받은 파일 경로
        .
        .
        .
		return response.toString();	// 변환된 문자열 반환
	}
}
프론트엔드
-
React 프로젝트 생성
→ 라이브러리 설치
npm install axios
npm install react-media-recorder -
App.js 작성
import React, { useState } from 'react';
import axios from 'axios';
import { ReactMediaRecorder } from 'react-media-recorder';

function App() {
  // 음성 인식 후 텍스트 반환값
  const [resp, setResp] = useState("");

  const fileupload = (e) => {
    e.preventDefault();

    let formData = new FormData();
    formData.append("upload", document.frm.upload.files[0]);

    axios.post("http://localhost:3000/fileUpload", formData)
    .then(function(resp) {
      setResp(resp.data.text);
    })
    .catch(function(error) {
      alert(error);
    })
  }

  return (
    <div>
      <h2>음성 녹음 및 다운로드</h2>

      <ReactMediaRecorder
        audio
        render={({status, startRecording, stopRecording, mediaBlobUrl}) => (
          <div>
            <p>{status}</p>
            <button onClick={startRecording}>start recording</button>
            <button onClick={stopRecording}>stop recording</button><br/>
            {/* 녹음한 파일 들어보기 */}
            <audio src={mediaBlobUrl} controls></audio><br/>
            {/* 녹음한 파일 다운로드 */}
            <a href={mediaBlobUrl} download="myvoice.wav">File Download</a>
          </div>
        )}/>

      <hr/>
      <h2>파일 업로드 및 텍스트 변환</h2>

      <form name='frm' onSubmit={fileupload} encType="multipart/form-data">
        <input type='file' name='upload' accept='*' />
        <input type='submit' value='upload' />
      </form>

      <h3>결과: {resp}</h3>
    </div>
  );
}

export default App;
실행
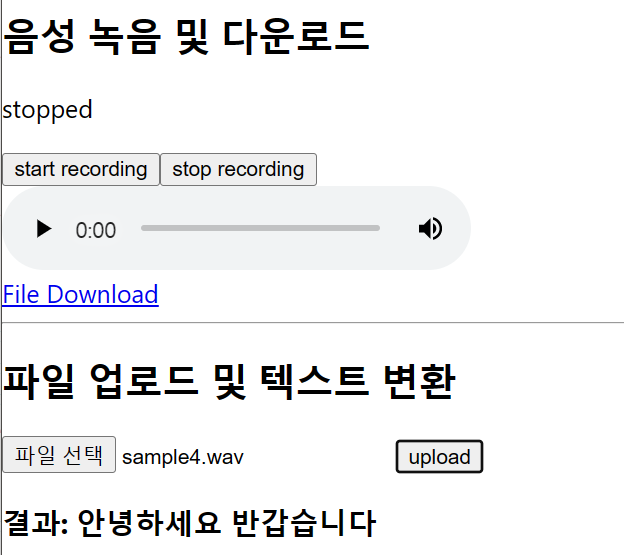
- 실행 첫 화면
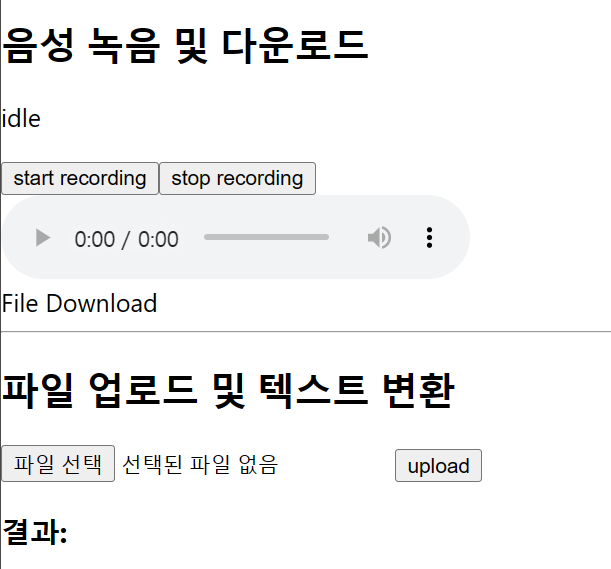
→ 음성 녹음 후, File Download와 오디오 재생 버튼이 활성화됨
→ 파일을 선택하여 업로드하면 아래에 결과 텍스트가 삽입됨
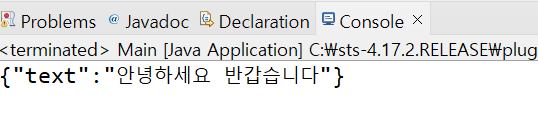
- 백엔드 콘솔에도 결과가 출력됨
react-speech-kit
React 프로젝트 생성
→ 라이브러리 설치
npm i --force react-speech-kit
→ 컴포넌트 생성
import React, { useState } from 'react';
import { useSpeechRecognition } from "react-speech-kit";
function Speech() {
const [value, setValue] = useState('결과');
const { listen, listening, stop } = useSpeechRecognition({
onResult: result => {
setValue(result);
}
});
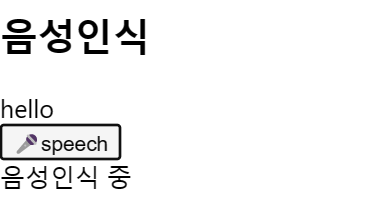
return (
<div>
<h2>음성인식</h2>
<div>{value}</div>
<button onMouseDown={listen} onMouseUp={stop}>
🎤speech
</button>
{listening && <div>음성인식 중</div>}
</div>
);
}
export default Speech;→ 실행