
https://velog.io/@stella6767/spring-legacy-intellij-%EC%85%8B%ED%8C%85Java-%EC%84%A4%EC%A0%95
위의 1,2,3,6,7,8 과정과 동일
4. xml 설정
web.xml
<?xml version="1.0" encoding="UTF-8"?>
<web-app xmlns="http://xmlns.jcp.org/xml/ns/javaee"
         xmlns:xsi="http://www.w3.org/2001/XMLSchema-instance"
         xsi:schemaLocation="http://xmlns.jcp.org/xml/ns/javaee http://xmlns.jcp.org/xml/ns/javaee/web-app_4_0.xsd"
         version="4.0">
  <display-name>Archetype Created Web Application</display-name>

  <context-param>
    <param-name>contextConfigLocation</param-name>
    <param-value>/WEB-INF/config/root-context.xml</param-value>
  </context-param>

  <listener>
    <listener-class>org.springframework.web.context.ContextLoaderListener</listener-class>
  </listener>


  <servlet>
    <servlet-name>appServlet</servlet-name>
    <servlet-class>org.springframework.web.servlet.DispatcherServlet</servlet-class>
    //톰캣을 사용하는 자바 웹 어플리케이션은 기본적으로 org.apache.Catalina.servlets.defaultServlet이 클라이언트의 요청을 가장 먼저 받도록 매핑 설정이 되어있다. 이를 스프링 MVC의 DispatcherServlet으로 변경하는 설정을 해야한다.
    <init-param>
      <param-name>contextConfigLocation</param-name>
      <param-value>/WEB-INF/config/servlet-context.xml</param-value> //servlet-context.xml 등록
    </init-param>
    <load-on-startup>1</load-on-startup>
  </servlet>
  <servlet-mapping>
    <servlet-name>appServlet</servlet-name>
    <url-pattern>/</url-pattern>
  </servlet-mapping>

  <filter>
    <filter-name>encodingFilter</filter-name>
    <filter-class>org.springframework.web.filter.CharacterEncodingFilter</filter-class>
    <init-param>
      <param-name>encoding</param-name>
      <param-value>UTF-8</param-value>
    </init-param>
    <init-param>
      <param-name>forceEncoding</param-name>
      <param-value>true</param-value>
    </init-param>
  </filter>

  <filter-mapping>
    <filter-name>encodingFilter</filter-name>
    <url-pattern>/*</url-pattern>
  </filter-mapping>
</web-app>
servlet-context.xml (DispatcherServlet 설정)
<?xml version="1.0" encoding="UTF-8"?>
<beans:beans xmlns="http://www.springframework.org/schema/mvc"
             xmlns:xsi="http://www.w3.org/2001/XMLSchema-instance"
             xmlns:beans="http://www.springframework.org/schema/beans"
             xmlns:context="http://www.springframework.org/schema/context"
             xsi:schemaLocation="http://www.springframework.org/schema/mvc
			 					 http://www.springframework.org/schema/mvc/spring-mvc.xsd
			 					 http://www.springframework.org/schema/beans
			 					 http://www.springframework.org/schema/beans/spring-beans.xsd
			 					 http://www.springframework.org/schema/context
			 					 http://www.springframework.org/schema/context/spring-context.xsd">

     <!-- @Controller 애노테이션 사용 -->
    <annotation-driven/>

    <!-- Component Scan 패키지 설정 -->
    <context:component-scan base-package="org.kang.springLegacyXml"/>

    이렇게 설정하면 org.kang.springLegacyXml 패키지에 있는 클래스에 @Controller를 붙여 컨트롤러로 사용할 수 있게 된다.


    //ViewResolver 설정
    <beans:bean class="org.springframework.web.servlet.view.InternalResourceViewResolver">
        <beans:property name="prefix" value="/WEB-INF/views/"/>
        <beans:property name="suffix" value=".jsp"/>
    </beans:bean>

// Static Resources 설정
    <resources mapping="/**" location="/resources/"/>
</beans:beans>
root-context.xml
<?xml version="1.0" encoding="UTF-8"?>
<beans xmlns="http://www.springframework.org/schema/beans"
       xmlns:xsi="http://www.w3.org/2001/XMLSchema-instance"
       xsi:schemaLocation="http://www.springframework.org/schema/beans
	   					   http://www.springframework.org/schema/beans/spring-beans.xsd">


</beans>
나머지는 자바 설정과 동일.
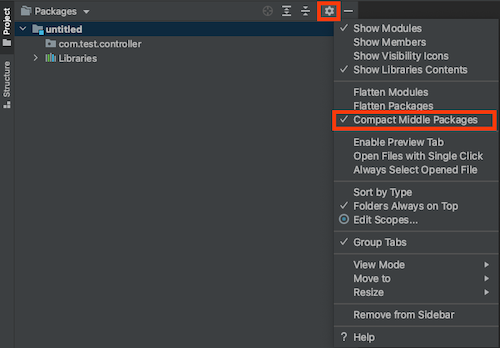
참고: Compact Middle Packages를 선택 해제 하면 Package구조가 계층적으로 표시됩니다.
참고로 보면 좋은 다른 셋팅방법들
https://nesoy.github.io/articles/2017-02/SpringMVC
https://debugdaldal.tistory.com/190

시간대비효율