[JS] Event
JS

⭐ Event-driven Programming
- 브라우저는 클릭이나 키보드 입력, 마우스 이동 등이 일어나면 이를 감지해 특정한 타입의 이벤트를 발생시킨다.
- 이때 이벤트가 발생했을 때 호출될 함수를 이벤트 핸들러(event handler) 라 하고, 이벤트가 발생했을 때 브라우저에게 이벤트 핸들러의 호출을 위임하는 것을 이벤트 핸들러 등록이라 한다.
- 예를 들어, 특정 버튼 요소에서 클릭 이벤트가 발생하면 특정 함수(이벤트 핸들러)를 호출하도록 브라우저에게 위임(이벤트 핸들러 등록)할 수 있다. -> 사용자가 언제 이벤트를 발생시킬지 모르기 때문!
- 이벤트와 그에 대응하는 함수(이벤트 핸들러)를 통해 사용자와 애플리케이션은 상호작용을 할 수 있다. 이와 같이 프로그램의 흐름을 이벤트 중심으로 제어하는 프로그래밍 방식을 이벤트 드리븐 프로그래밍이라 한다.
⭐ 이벤트 타입
- 이벤트의 종류를 나타내는 문자열.
- 이벤트 타입에 대한 상세 목록은 MDN의 Event reference에서 확인할 수 있다.
✨ mouse event
| 이벤트 타입 | 이벤트 발생 시점 |
|---|---|
click | 마우스 버튼을 클릭했을 때 |
dbclick | 더블 클릭 했을 때 |
mousedown | 마우스 버튼을 눌렀을 때 |
mouseup | 누르고 있던 마우스 버튼을 놓았을 때 |
mousemove | 마우스 커서를 움직였을 때 |
mouseenter | 마우스 커서를 HTML 요소 안으로 이동했을 때 (버블링❌) |
mouseover | 마우스 커서를 HTML 요소 안으로 이동했을 때 (버블링⭕) |
mouseleave | 마우스 커서를 HTML 요소 밖으로 이동했을 때 (버블링❌) |
mouseout | 마우스 커서를 HTML 요소 안으로 이동했을 때 (버블링⭕) |
✨ keyboard event
| 이벤트 타입 | 이벤트 발생 시점 |
|---|---|
keydown | 모든 키를 눌렀을 때 발생한다.(control,option, shift, delete, enter, 방향 키와 문자, 숫자 특수 문자 키를 눌렀을 때 발생한다.) |
keyup | 누르고 있던 키를 놓았을 때 한 번만 발생한다.(위와 동일) |
✨ focus event
| 이벤트 타입 | 이벤트 발생 시점 |
|---|---|
focus | HTML 요소가 포커스를 받았을 때 (버블링❌) |
blur | HTML 요소가 포커스를 잃었을 때 (버블링❌) |
focusin | HTML 요소가 포커스를 받았을 때 (버블링⭕). addEventListener 메서드 방식을 사용해야 한다. |
focusout | HTML 요소가 포커스를 잃었을 때 (버블링⭕). addEventListener 메서드 방식을 사용해야 한다. |
✨ form event
| 이벤트 타입 | 이벤트 발생 시점 |
|---|---|
submit | 1. form 요소 내의 submit 버튼을 클릭했을 때 2. form 요소 내의 submit 버튼을 클릭했을 때 |
reset | form 요소 내의 reset 버튼을 클릭했을 때 (최근에는 사용 안함) |
✨ change-value event
| 이벤트 타입 | 이벤트 발생 시점 |
|---|---|
input | input, select, textarea 요소의 값이 입력되었을 때 |
change | input, select, textarea 요소의 값이 변경되었을 때 |
readystatechange | HTML 문서의 로드와 파싱 상태를 나타내는 document.readyState 프로퍼티 값(loading, interactive, complete)이 변경될 때 |
✨ DOM mutation event
| 이벤트 타입 | 이벤트 발생 시점 |
|---|---|
DOMContentLoaded | HTML문서의 로드와 파싱이 완료되어 DOM생성이 완료되었을 때. |
✨ view event
| 이벤트 타입 | 이벤트 발생 시점 |
|---|---|
resize | 브라우저 윈도우의 크기를 리사이즈할 때 연속적으로 발생한다(오직 window 객체에서만) |
scroll | 웹페이지 또는 HTML 요소를 스크롤할 때 연속적으로 발생한다 |
✨ resource event
| 이벤트 타입 | 이벤트 발생 시점 |
|---|---|
load | DOMContentLoaded 이벤트가 발생한 이후, 모든 리소스의 로딩이 완료되었을 때 |
unload | 리소스가 언로드될 때 (주로 새로운 웹페이지를 요청한 경우) |
abort | 리소스 로딩이 중단되었을 때 |
error | 리소스 로딩이 실패했을 때 |
⭐ 이벤트 핸들러 등록
- 이벤트가 발생했을 때 브라우저에게 이벤트 핸들러의 호출을 위임하는 것을 이벤트 핸들러 등록이라 한다. 이벤트 핸들러를 등록하는 방법은 3가지다.
✨ 이벤트 핸들러 어트리뷰트 방식
- HTML 요소의 어트리뷰트에는 이벤트 핸들러 어트리뷰트가 있다.
onclick과 같이 on 접두사와 이벤트의 종류를 나타내는 이벤트 타입으로 이루어져 있다.- 이벤트 핸들러 어트리뷰트 값으로 함수 호출문 등의 문(statement)을 할당하면 이벤트 핸들러가 등록된다.
<button onclick = "sayHi('Ssong')">Click me!</button>
<script>
  function sayHi(name) {
    console.log(`Hi! ${name}.`);
  }
</script>onclick="sayHi('Ssong')"어트리뷰트는 파싱되어 다음과 같은 함수를 암묵적으로 생성하고 이벤트 핸들러 어트리뷰트 이름과 동일한 키onclick이벤트 핸들러 프로퍼티에 할당한다.
 function onclick(event) {
   sayHi('Lee');
}- 이렇게 동작하는 이유는 이벤트 핸들러에 인수를 전달하기 위해서다. 만약 값으로 함수 참조를 할당해야 한다면 이벤트 핸들러에 인수를 전달하기가 곤란하다.
<!--인수를 전달하기가 곤란함-->
<button onclick="sayHi">Click me!</button>- 또한 이벤트 핸들러 어트리뷰트 값으로 할당한 문자열은 암묵적으로 생성되는 이벤트 핸들러의 함수 몸체이기 때문에, 어트리뷰트 값으로 여러 개의 문을 할당할 수도 있다.
<button onclick="console.log('Hi! '); console.log('Lee');">Click me!</button>❗ 어트리뷰트 방식은 더 이상 사용하지 않는 것이 좋다.
✨ 이벤트 핸들러 프로퍼티 방식
- window 객체와 Document, HTMLElement 타입의 DOM 노드 객체는 이벤트에 대응하는 이벤트 핸들러 프로퍼티를 가지고 있다. 프로퍼티 키도 on 접두사와 이벤트의 종류를 나타내는 이벤트 타입으로 이루어져 있다.
- 이벤트 핸들러 프로퍼티에 함수를 바인딩하면 이벤트 핸들러가 등록된다.
<script>
    const $button = document.querySelector('button');
   //이벤트 핸들러 프로퍼티에 이벤트 핸들러를 바인딩
    $button.onclick = () => { console.log('button click'); };
</script>- 이벤트 핸들러를 등록하기 위해서는 아래 3요소가 필요하다.
- 이벤트 타깃 : 이벤트를 발생시킬 객체 -> button
- 이벤트 타입 : 이벤트의 종류 -> click
- 이벤트 핸들러 : function
❗ 이벤트 핸들러 프로퍼티에는 하나의 이벤트 핸들러만 바인딩할 수 있다.
✨ addEventListener 메서드 방식
- 이벤트 핸들러를 인수로 전달한다.
그림출처 poiemaweb
- 첫 번째 매개변수에는 click 등의 이벤트의 종류를 나타내는 문자열인 이벤트 타입을 전달한다. 이때 on 접두사를 붙이지 않는다.
- 두 번째 매개변수에는 이벤트 핸들러를 전달한다.
- 마지막 매개변수에는 이벤트를 캐치할 이벤트 전파 단계(캡쳐링 또는 버블링)을 지정한다. 생략하거나 false를 지정하면 버블링 단계에서 이벤트를 캐치하고, true를 지정하면 캡처링 단계에서 이벤트를 캐치한다.
    <button>Click me!</button>
    <script>
        const $button = document.querySelector('button');
        //handeler 방식
        $button.onclick = () => { console.log('button click'); };
        //addEventListener 방식
        $button.addEventListener('click', function () {
            console.log('button click');
        });
</script>addEventListener메서드는 하나 이상의 이벤트 핸들러를 등록할 수 있으며, 등록된 순서대로 호출된다.
 <button>Click me!</button>
  <script>
    const $button = document.querySelector('button');
    $button.addEventListener('click', function() {
    	console.log('button clicked 1');
    });
   //하나 이상의 핸들러 등록 가능.
    $button.addEventListener('click', function() {
    	console.log('button clicked 2');
    });
</script>- ❗ 단, 동일한 이벤트를 중복 등록하면 하나의 이벤트 핸들러만 등록된다.
 <button>Click me!</button>
  <script>
    const $button = document.querySelector('button');
    const handleClick = () => console.log('button click');

   // event
    $button.addEventListener('click', handleClick);
    // 동일한 이벤트를 등록하면 하나의 핸들러만 등록된다.
    $button.addEventListener('click', handleClick);
  </script>
⭐ 이벤트 핸들러 제거
addEventListener메서드로 등록한 이벤트 핸들러를 제거하기 위해removeEventListener메서드를 사용한다.- 이때
addEventListener메서드에 전달한 인수와removeEventListener메서드에 전달한 인수가 일치하지 않으면 이벤트 핸들러가 제거되지 않는다.
<button>Click me!</button>
  <script>
    const $button = document.querySelector('button');

    const handleClick = () => console.log('button click');

    $button.addEventListener('click', handleClick);

    $button.removeEventListener('click', handleClick, true); // 실패
    $button.removeEventListener('click', handleClick); // 성공
</script>- 이벤트 핸들러를 제거하려면 이벤트 핸들러의 참조를 변수나 자료구조에 저장하고 있어야 한다.
- 그래서 ❌ 무명 함수를 이벤트 핸들러로 등록할 경우에 제거할 수 없다.
<script>
  $button.addEventListener('click', () => console.log('button click'));
</script>- 하지만 기명 이벤트 핸들러 내부에서
removeEventListener메서드를 호출해 이벤트 핸들러를 제거할 수 있다. 이때 이벤트 핸들러는 단 한 번만 호출된다.
<script>
  $button.addEventListener('click', function foo() {
  	console.log('button click');
  	// 위에서 이벤트 핸들러를 등록한 후 아래에서 삭제한다.
  	// 이벤트 핸들러는 단 한 번만 호출된다.
  	$button.removeEventListener('click', foo);
  });
</script>
$button.addEventListener('click', () => console.log('click'));
❌ 이벤트 핸들러 프로퍼티 방식으로 등록한 이벤트 헨들러는 removeEventListener 메서드로 제거할 수 없다. -> 이벤트 핸들러 프로퍼티에 null을 할당하여 제거할 수 있다.
<script>
  const $button = document.querySelector('button');

  const handleClick = () => console.log('button click');

  $button.onclick = handleClick;

  $button.removeEventListener('click', handleClick); // 제거 불가
  $button.onclick = null; // 제거 가능
</script>
⭐ 이벤트 객체
- 이벤트가 발생하면 이벤트에 관련한 다양한 정보를 담고 있는 이벤트 객체가 동적으로 생성된다. 생성된 이벤트 객체는 이벤트 핸들러의 첫 번째 인수로 전달된다.
- 이벤트 핸들러 어트리뷰트 방식의 경우 이벤트 객체를 전달받으려면 이벤트 핸들러의 첫 번째 매개변수 이름이 반드시 event이어야 한다. -> 이벤트 핸들러 어트리뷰트 값은 암묵적으로 생성되는 이벤트 핸들러의 함수 몸체이고, 첫 번째 매개변수 이름이 event로 암묵적으로 명명되기 때문이다.
<!DOCTYPE html>
<html>
<!-- 어트리뷰트 방식의 경우 event가 아닌 다른 이름으로는 이벤트 객체를 전달받지 못한다. -->
<body onclick="showCoords(event)">
 <p>클릭하세요. 클릭한 곳의 좌표가 표시됩니다.></p>
 <em class="message"></em>
 <script>
   const $msg = document.querySelector('.message');

   // 이벤트 객체는 이벤트 핸들러의 첫 번째 인수로 전달된다.
   function showCoords(e) {
     $msg.textContent = `clientX: >${e.clientX}, clientY: ${e.clientY}`;
   }
 </script>
</body>
</html>
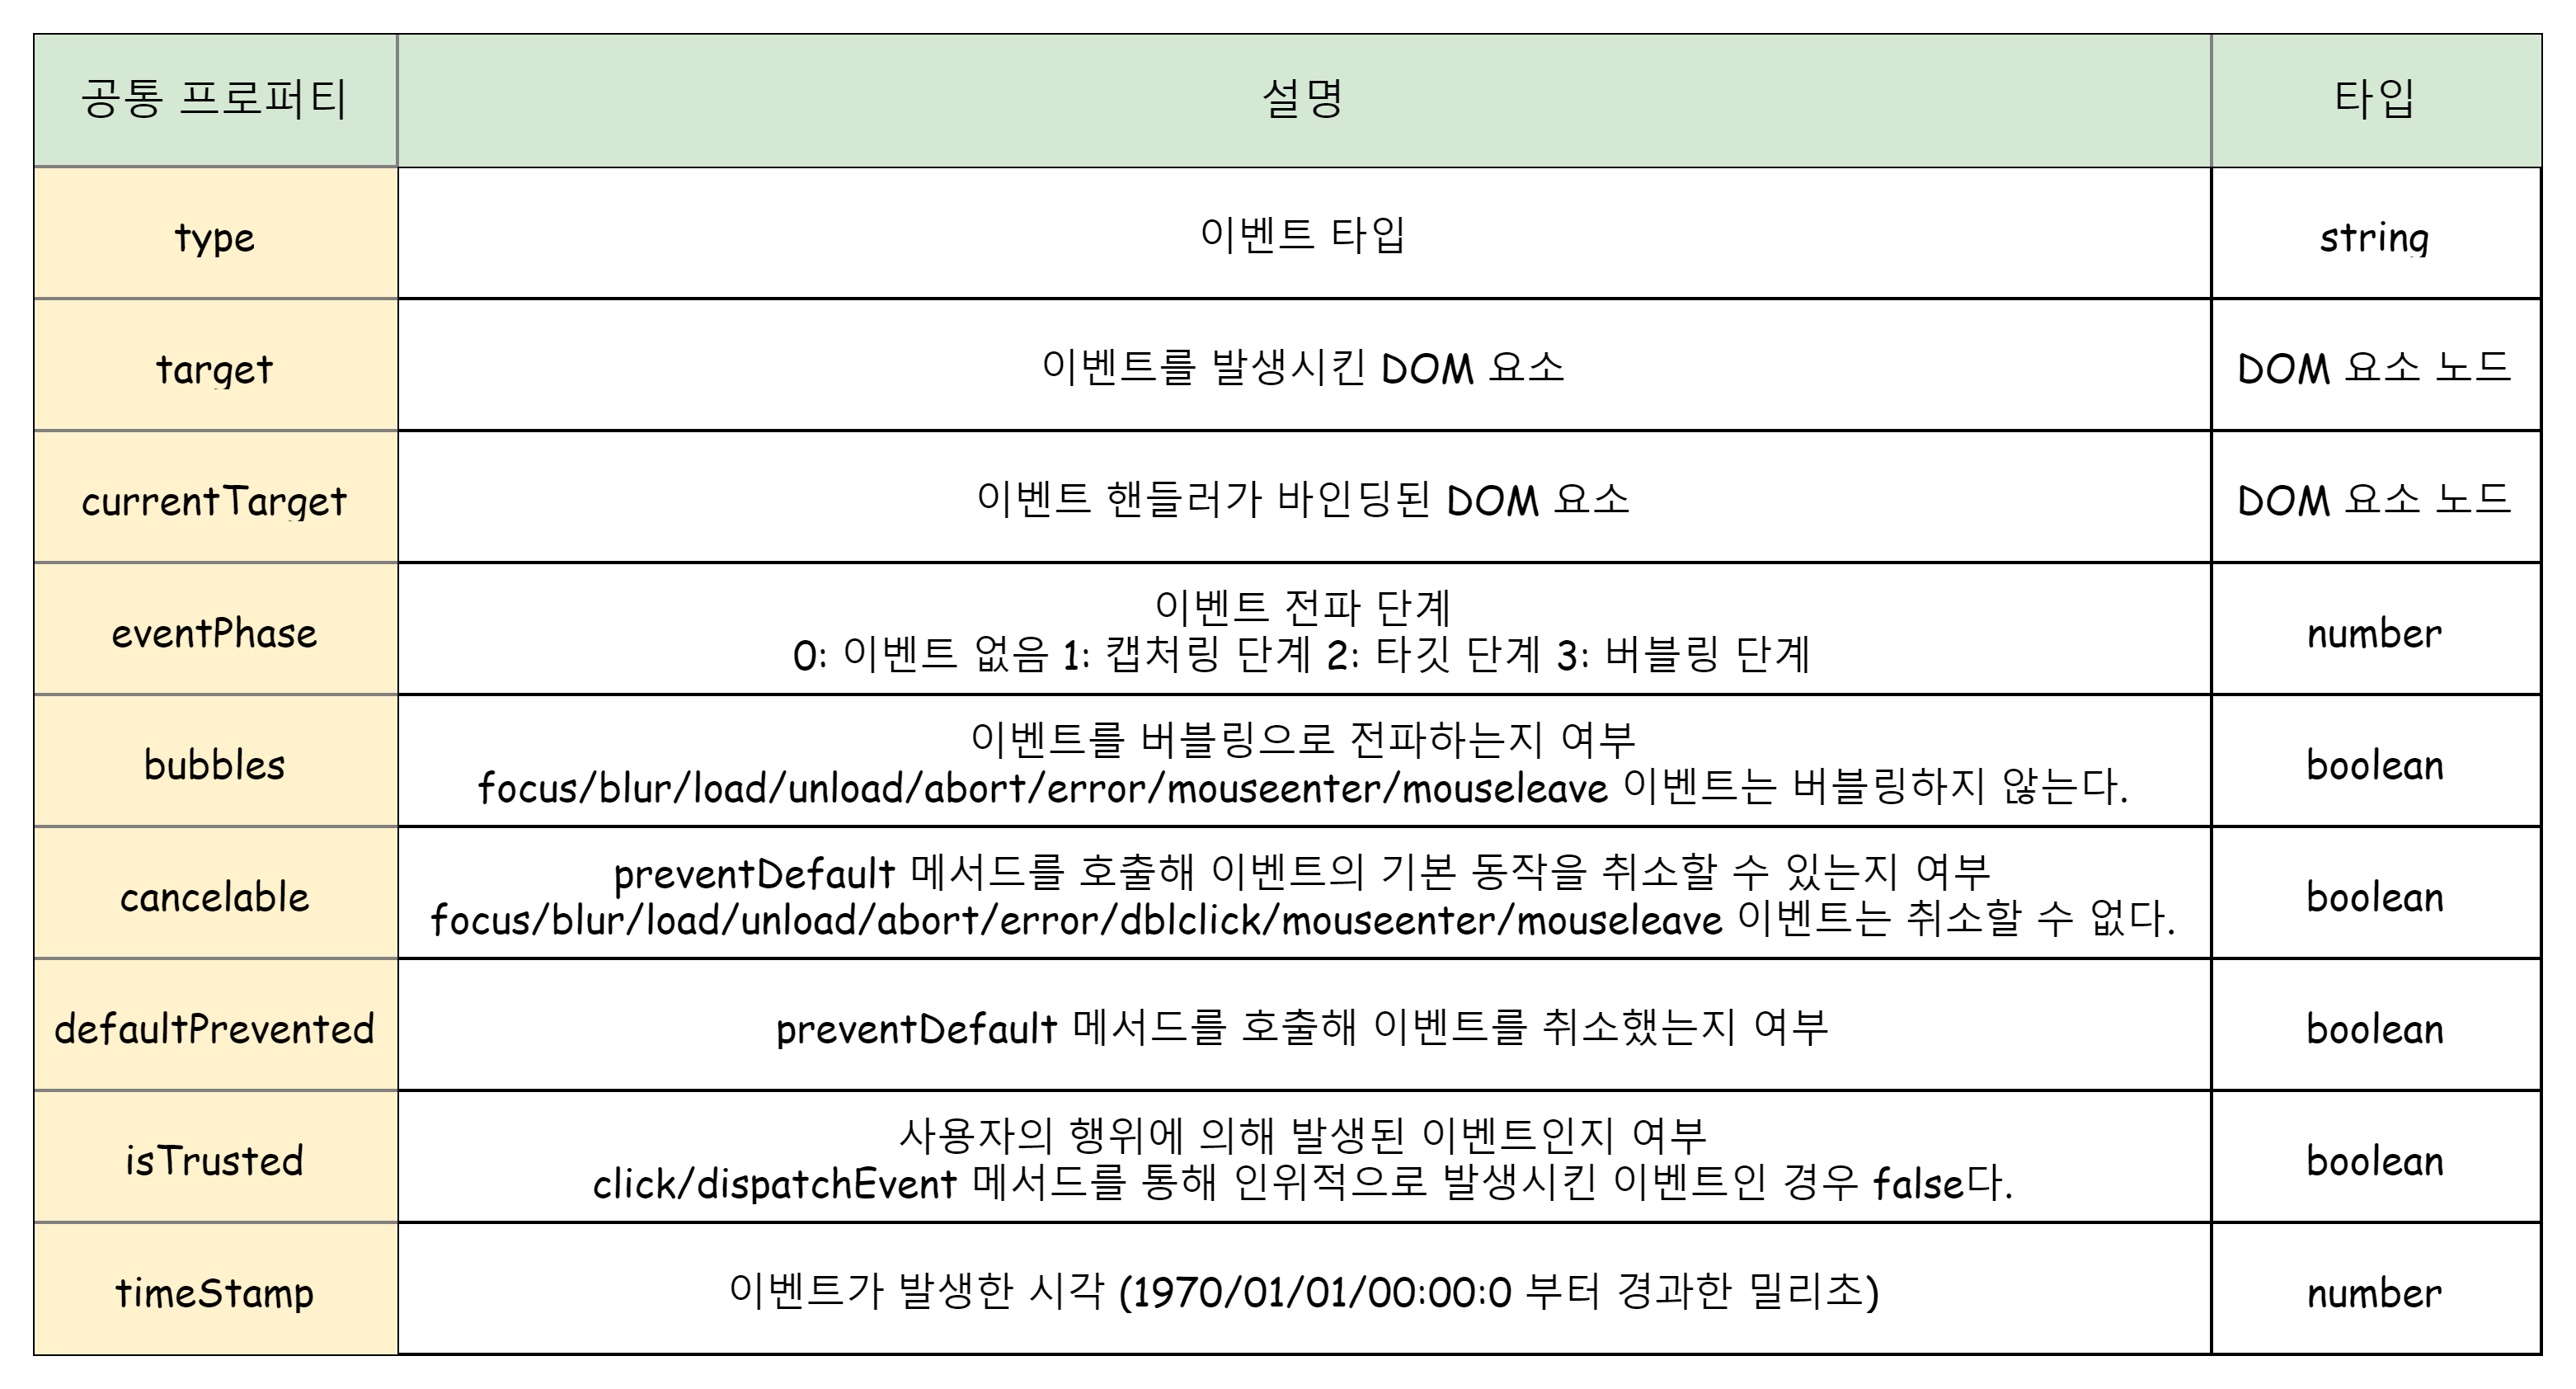
✨ 이벤트 객체의 공통 프로퍼티
- Event.prototype에 정의되어 있는 이벤트 관련 프로퍼티는 모든 이벤트 객체가 상속받는 공통 프로퍼티다.
📌 이벤트 객체의target프로퍼티는 이벤트 발생시킨 객체를 나타낸다.
📌 이벤트 객체의currentTarget프로퍼티는 이벤트 핸들러가 바인딩된 DOM 요소를 가리킨다.
✨ 마우스 정보 취득
click, dbclick, mousedown등의 이벤트가 발생하면 생성되는MouseEvent타입의 이벤트 객체는 다음와 같은 고유의 프로퍼티를 갖는다.
프로퍼티 특징 값 마우스 포인터의 좌표 정보를 나타내는 프로퍼티 screenX/screenY, clientX/clientY(뷰포트), pageX/pageY, offsetX/offsetY버튼 정보를 나타내는 프로퍼티 altKey, ctrlKey, shiftyKey, button
✨ 키보드 정보 취득
keydown, keyup, keypress이벤트가 발생하면 생성되는KeyboardEvent타입의 이벤트 객체는altKey, ctrlKey, shiftKey, metaKey, key, keyCode같은 고유의 프로퍼티를 갖는다.
⭐ 이벤트 전파
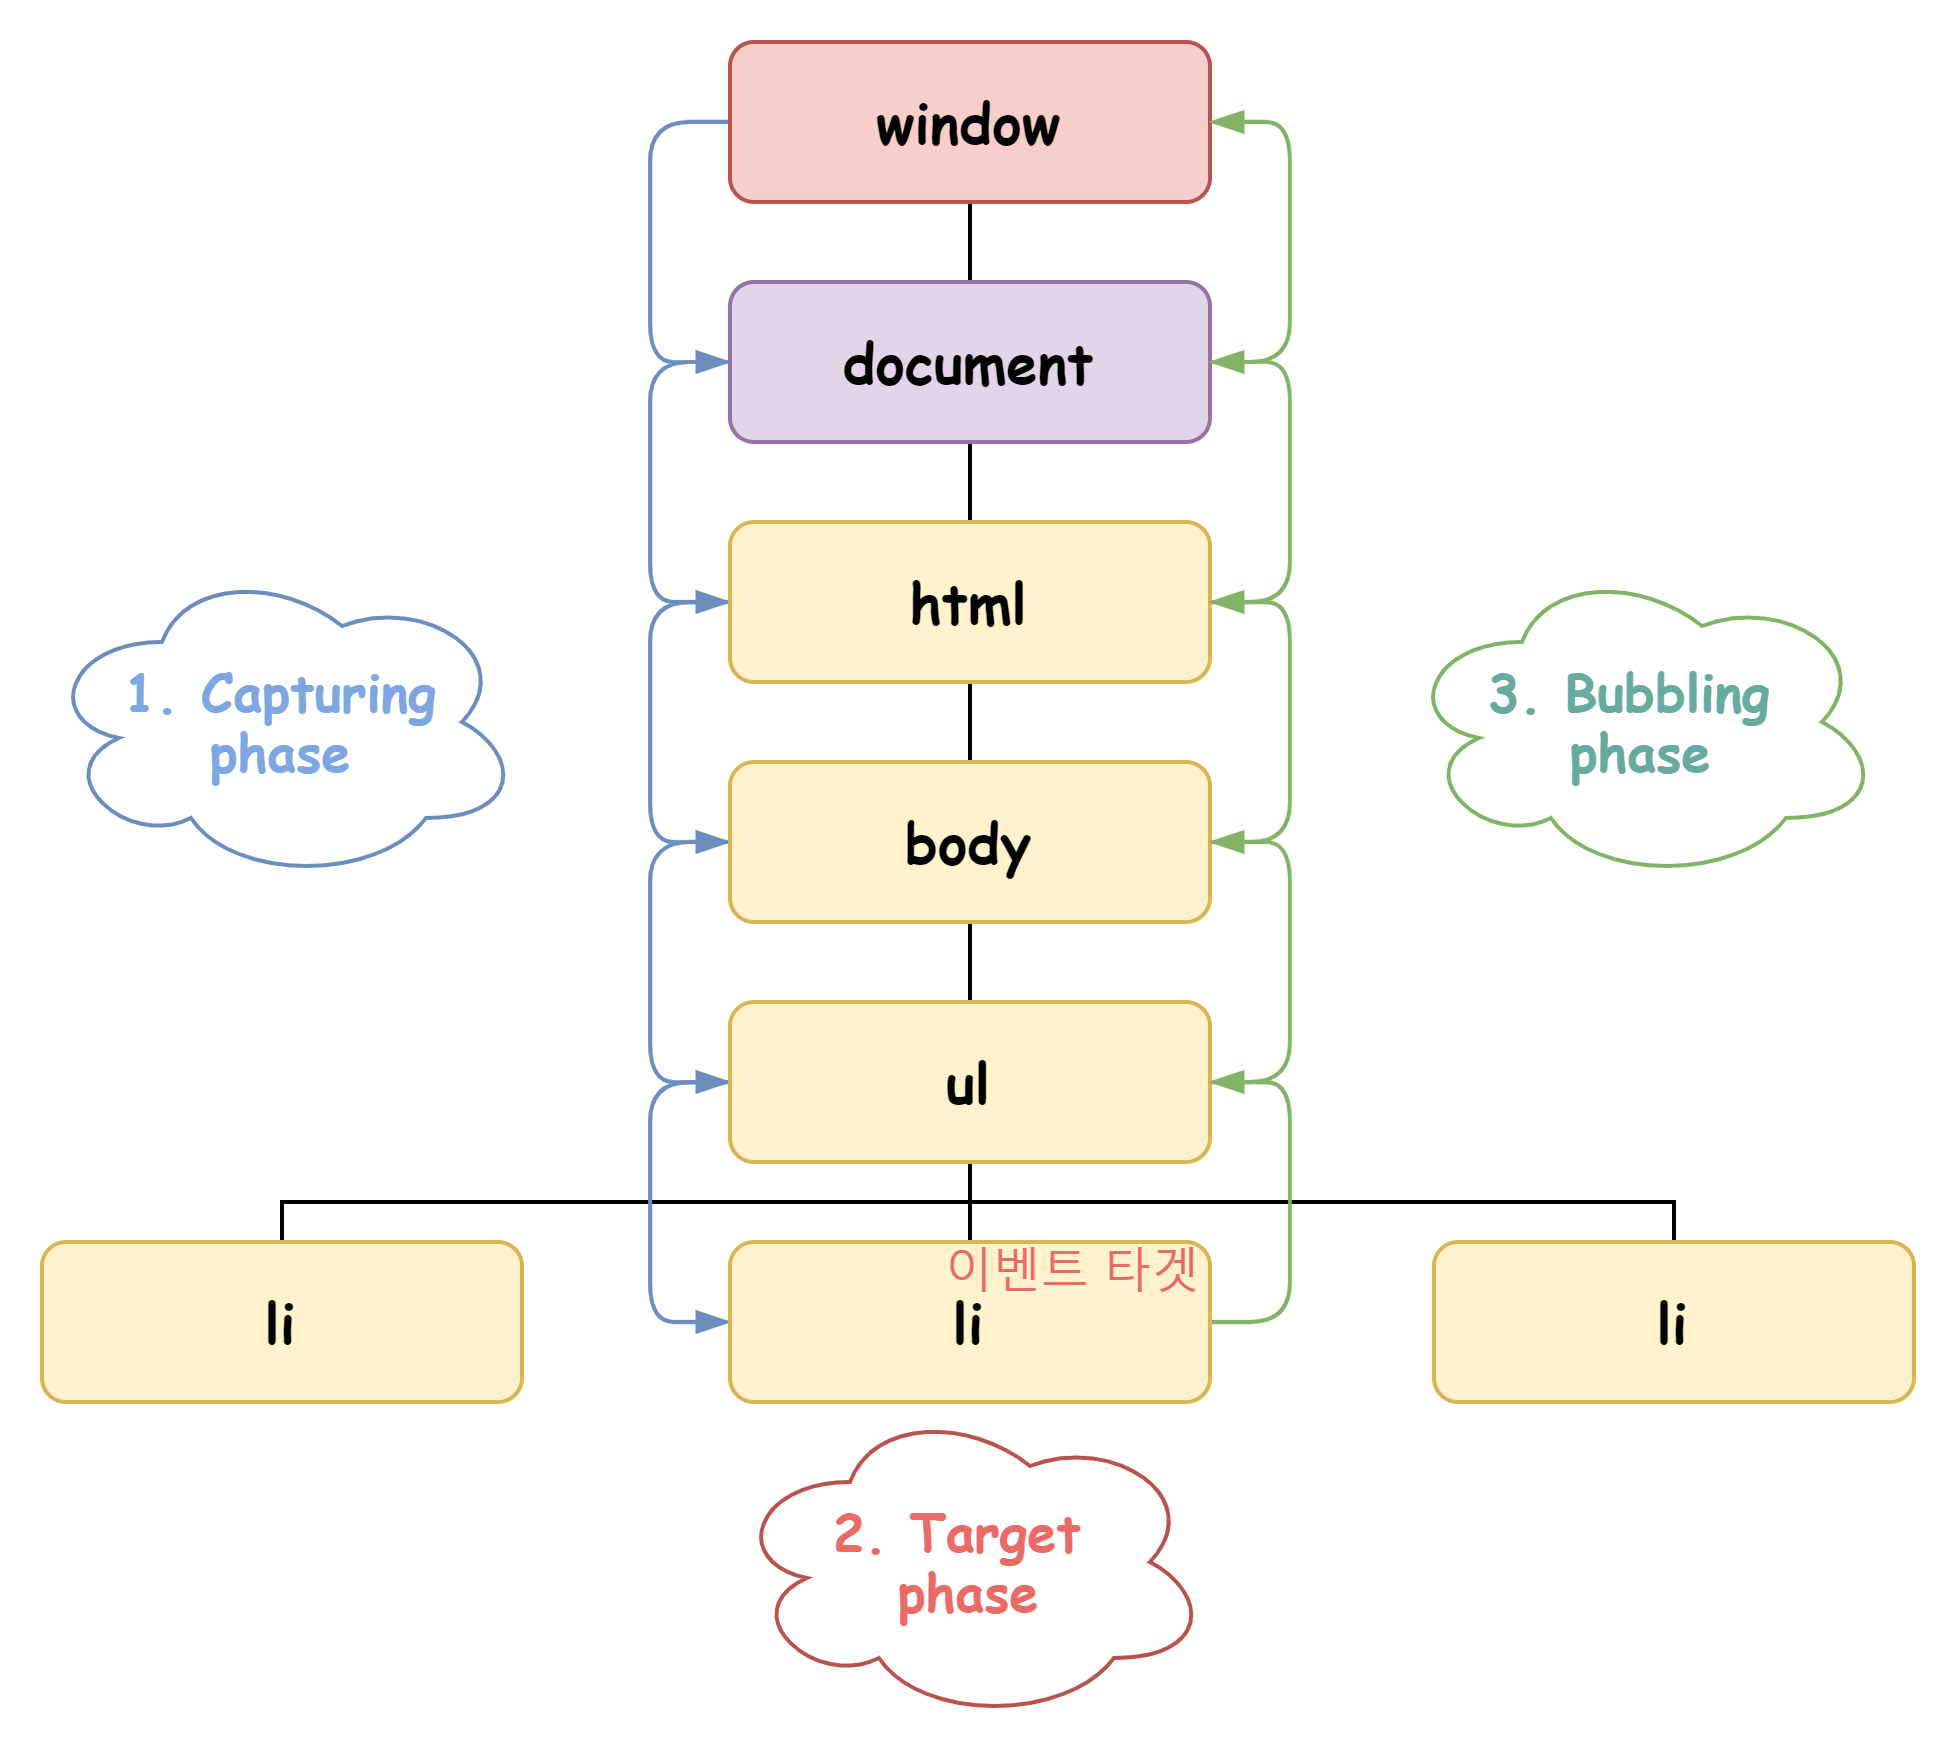
- DOM 트리 상에 존재하는 DOM 요소 노드에서 발생한 이벤트는 이벤트를 발생시킨 DOM 요소인 이벤트 타겟을 중심으로 DOM 트리를 통해 전파된다. 이를 이벤트 전파(event propagation)라고 한다. '
- 이벤트는 이벤트를 발생시킨 이벤트 타깃은 물론 상위 DOM 요소에서도 캐치할 수 있다.
- 이벤트 전파는 이벤트 객체가 전파되는 방향에 따라 3단계로 구분할 수 있다.
✅ 캡처링 단계(capturing phase) : 이벤트가 상위 요소에서 하위 요소 방향으로 전파
✅ 타겟 단계(target phase) : 이벤트가 이벤트 타깃에 도달
✅ 버블링 단계(bubbling phase) : 이벤트가 하위 요소에서 상위 요소 방향으로 전파
❗ 이벤트 핸들러 어트리뷰트 및 프로퍼티 방식으로 등록한 이벤트 핸들러는 타겟 단계와 버블링 단계의 이벤트만 캐치할 수 있지만,
addEventListener메서드 방식으로 등록한 이벤트 핸들러는 캡처링 단계까지 캐치할 수 있다. -> 캡처링 단계 이벤트를 캐치하려면addEventListener메서드의 3번째 인수로true를 전달하면 된다.
- 대부분의 이벤트는 버블링을 통해 전파된다. 그러나 아래 이벤트들은 버블링을 통해 전파되지 않는다.
⚡ 포커스 이벤트 :
focus / blur
⚡ 리소스 이벤트 :load / unload / abort / error
⚡ 마우스 이벤트 :mouseenter / mouseleave👉🏻 위 이벤트들은 버블링되지 않아 이벤트 타겟의 상위 요소에서 위 이벤트를 캐치하려면 캡처링 단계의 이벤트를 캐치해야 하지만, 버블링되는 이벤트로 위의 이벤트들을 대체할 수 있다. 포커스 이벤트는
focusin/focusout으로, 마우스 이벤트는mouseover/mouseout으로 대체할 수 있다.
<!DOCTYPE html>
<html>
<body>
  <p>버블링과 캡처링 이벤트 <button>버튼</button></p>
  <script>
    // 버블링 단계의 이벤트 캐치
    document.body.addEventListener('click', () => {
    	console.log('Handler for body.');
    });

    // 캡처링 단계의 이벤트 캐치
    document.querySelector('p').addEventListener('click', () => {
    	console.log('Handler for paragraph.');
    }, true);

    // 버블링 단계의 이벤트 캐치
    document.querySelector('button').addEventListener('click', () => {
    	console.log('Handler for button.');
    });
  </script>
</body>
</html>body와button은 버블링 단계의 이벤트만을 캐치하고p는 캡처링 단계의 이벤트만 캐치한다. 이벤트는 캡처링 -> 타겟 -> 버블링 단계로 전파되기 때문에,button에서 클릭 이벤트가 발생하면 먼저 캡처링 단계를 캐치하는p의 이벤트 핸들러가 호출되고, 그후 버블링 단계의 이벤트를 캐치하는body의 이벤트 핸들러가 호출된다.
Handler for paragraph.
Handler for button.
Handler for body.- 만약 p에서 클릭 이벤트가 발생하면 캡처링 단계를 캐치하는 p의 이벤트 핸들러가 호출되고 버블링 단계를 캐치하는 body 의 이벤트 핸들러가 호출된다.
Handler for paragraph.
Handler for body.
⭐ 이벤트 위임
- 이벤트 위임은 여러 개의 하위 DOM 요소에 각각 이벤트 핸들러를 등록하는 대신 하나의 상위 DOM 요소에 이벤트 핸들러를 등록하는 방법을 말한다.
- 이벤트 위임을 통해 상위 DOM 요소에 이벤트 핸들러를 등록하면 여러 개의 하위 DOM 요소에 이벤트 핸들러를 등록할 필요가 없다.
- 또한 동적으로 하위 DOM 요소를 추가하더라도 일일이 추가된 DOM 요소에 이벤트 핸들러를 등록할 필요가 없다.
<!DOCTYPE html>
<html>
<body>
  <ul class="post-list">
    <li id="post-1">Item 1</li>
    <li id="post-2">Item 2</li>
    <li id="post-3">Item 3</li>
    <li id="post-4">Item 4</li>
  </ul>
  <div class="msg" />
  <script>
    const msg = document.querySelector('.msg');
    const list = document.querySelector('.post-list')

    list.addEventListener('click', function (e) {
      console.log(e.target.id);
    });
  </script>
</body>
</html>- 모든
li가 클릭 이벤트에 반응하는 처리를 구현하고 싶을 때, 모든li에 이벤트 핸들러를 바인딩하면 총 4개의 이벤트 핸들러를 바인딩해야 하지만, 이벤트 위임을 통해 부모 요소에만 이벤트 핸들러를 바인딩하는 것이다.
❗ 상위 요소에 이벤트 핸들러를 등록하기 때문에 이벤트 타깃, 즉 이벤트를 실제로 발생시킨 DOM 요소가 개발자가 기대한 DOM 요소가 아닐 수도 있다. 👉🏻 따라서 target 검사를 해줘야 한다.
function activate({target}) {
 if(!target.matches('#fruits > li')) >return;
}
⭐ 이벤트 동작 중단
✨ preventDefault() -> DOM 요소 기본 동작 중단
- a요소를 클릭했을 때 href 어트리뷰트에 지정된 링크로 이동하게 하는 등의 기본 동작을 중단시킨다.
<!DOCTYPE html>
<html>
<body>
 <a href="http://www.google.com">go</a>
 <script>
 document.querySelector('a').onclick = e => {
   // a 요소의 기본 동작을 중단한다.
   e.preventDefault();
 };
 </script>
</body>
</html>
✨ stopPropagation() -> 이벤트 전파 방지
- 하위 DOM 요소의 이벤트를 개별적으로 처리하기 위해 이벤트의 전파를 중단시킨다.
<!DOCTYPE html>
<html>
<body>
 <div class="container">
   <button class="btn1">Button 1</button>
   <button class="btn2">Button 2</button>
   <button class="btn3">Button 3</button>
 </div>
 <script>
   // 이벤트 위임. 클릭된 하위 버튼 요소의 color를 변경
   document.querySelector('.container').onclick = ({ target }) => {
     if(!target.matches('.container > button')) return;
     target.style.color = 'red';
   };

   document.querySelector('.btn2').onclick = e => {
     e.stopPropagation(); // 이벤트 전파 중단
     e.target.style.color = 'blue';
   };
 </script>
</body>
</html>
⭐이벤트 핸들러 내부의 this
💠 이벤트 핸들러 어트리뷰트 방식
- 이벤트 핸들러 어트리뷰트 방식의 경우, 이벤트 핸들러는 일반 함수로서 호출되므로 이벤트 핸들러 내부의 this는 전역 객체 window를 가리킨다.
<!DOCTYPE html>
<html>
<body>
 <button onclick="handleClick(this)">Click me</button>
 <script>
   function handleClick (button) {
     console.log(button); // 이벤트를 바인딩한 button
     console.log(this); // window
   }
 </script>
</body>
</html>
❗ 단, 이벤트 핸들러를 호출할 때 인수로 전달한 this는 이벤트를 바인딩한 DOM 요소를 가리킨다.
💠 이벤트 핸들러 프로퍼티 방식과 addEventListener 메서드 방식
- 프로퍼티 방식과
addEventListener방식 모두 이벤트 핸들러 내부의 this는 이벤트를 바인딩한 DOM 요소를 가리킨다. 즉, 이벤트 핸들러 내부의 this는 이벤트 객체의currentTarget프로퍼티와 같다.// 이벤트 핸들러 프로퍼티 방식 $button1.onclick = function(e) { console.log(this); // $button1 console.log(e.currentTarget); //$button1 }; // addEventListener 방식 $button2.addEventListener('click', function(e) { console.log(this); // $button2 console.log(e.currentTarget); // $button2 });❗ 화살표 함수로 정의한 내부 this는 상위 스코프의 this를 가리킨다.
❗ 클래스에서 이벤트 핸들러를 바인딩하는 경우 bind 메서드를 사용하여, 함수의 메서드가 클래스가 생성할 인스턴스를 가리키도록 해야 한다.<script> class App { constructor() { this.$button = document.querySelector('.btn'); this.count = 0; //increase 메서드를 이벤트 핸들러로 등록 this.$button.onclick = this.increase; } increase() { //이벤트 핸들러 increase 내부의 this는 DOM요소(this.$button)를 가리킨다. //따라서 this.$button은 this.$button.$button과 같다. this.$button.textContent = ++this.$button; // -> TypeError: Cannot set property 'textContent' of undefined } } </script>
- 위와 같은 코드에서는
increase메서드 내부의 this는this.this.$button을 가리키므로,this.$button.onclick = this.increase;부분을
this.$button.onclick = >this.increase.bind(this);로 바꿔줘야 한다.
⭐ 이벤트 핸들러에 인수 전달
- 이벤트 핸들러 내부에서 함수를 호출하면서 인수를 전달할 수 있다.
const checkUserNameLength = min => {...}

$input.onblur = () => { checkUserNameLength(인수); }
- 또는 이벤트 핸들러를 반환하는 함수를 호출하면서 인수를 전달할 수 있다.
const checkUserNameLength = min => e => {...}

$input.onblur = checkUserNameLength(인수);
👉🏻
checkUserNameLength함수는 함수를 반환한다. 따라서$input.onblur에는 결국checkUserNameLength함수가 반환하는 함수가 바인딩된다.
⭐ 커스텀 이벤트
- 개발자 의도로 생성된 이벤트를 커스텀 이벤트라고 한다.
- 커스텀 이벤트 객체는 버블링되지 않으며
preventDefault메서드로 취소할 수도 없다. ->bubbles와cancelable프로퍼티 값이false로 기본 설정된다.
📌 반드시addEventListener메서드 방식으로 이벤트 핸들러를 등록해야 한다. -> 'on + 이벤트 타입' 으로 정의된 이벤트 어트리뷰트/핸들러가 없기 때문!
✨ 커스텀 이벤트 생성
CunstomEvent생성자 함수를 사용한다.
const customEvent = new CustomEvent('foo');
console.log(customEvent.type); // foo
❓ 커스텀 이벤트 객체의
bubbles와cancelable프로퍼티 값을true로 설정하려면?
✅ 이벤트 생성자 함수의 두 번째 인수로bubbles또는cancelable프로퍼티를 갖는 객체를 전달한다.const customEvent = new MouseEvent('click', >{ bubbles: true, cancelable: true });
✨ 커스텀 이벤트 디스패치
dispatchEvent메서드로 디스패치(이벤트를 발생시키는 행위) 할 수 있다.dispatchEvent메서드에 이벤트 객체를 인수로 전달하면서 호출하면 인수로 전달한 이벤트 타입의 이벤트가 발생한다.- 이벤트 핸들러를 동기 처리 방식으로 호출한다. -> 바인딩된 이벤트 핸들러를 직접 호출하는 것과 같다.
<script>
   const $button = document.querySelector('.btn');

   // 버튼 요소에 foo 커스텀 이벤트 핸들러 등록
   // 커스텀 이벤트 디스패치 전에 이벤트 핸들러를 등록해야 한다.
   $button.addEventListener('click', e => {
       console.log(e); //MouseEvent {isTrusted: false ...}
       alert(`${e} Clicked!`);
   })
</script>
<모던 자바스크립트 deepdive와, 추가 탐구한 내용을 정리한 포스트입니다.>


