~53일차~
1.Type vs Interface
- 타입의 이름을 지정하는 방법으로 매우 유사
- 대부분의 경우 자유롭게 선택 가능
1) 확장 방법
① Interface : extends으로 확장
interface Animal {
  name: string;
}
//extends으로 확장
interface Bear extends Animal {
  honey: boolean;
}
const bear1: Bear = {
  name: 'honey bear',
  honey: true
}
② Type : Intersection으로 확장
type Animal = {
  name: string;
}
//Intersection으로 확장
type Bear2 = Animal & {
  honey: boolean;
}
const bear: Bear = {
  name: 'honey bear',
  honey: true
}
2) 선언 병합
① Interface : 선언 병합 가능
interface Animal {
  name: string;
}
interface Animal {
  honey: boolean;
}
const bear: Animal = {
  name: 'honey bear',
  honey: true
}
② Type : 선언 병합 불가
type Animal = {
  name: string;
}
interface  Animal = {
  honey: boolean;
}
const bear: Animal = {
  name: 'honey bear',
  honey: true
}
2.Call Signature, Index Signature
1) Call Signature
interface getLikeNumber {
  (like: number) : number;
  // (매개변수)으로 작성하되 반환하는 부분의 타입은 : 으로 주기
}

interface Post {
  id:number;
  title: string;
  getLikeNumber : getLikeNumber; //(like: number) => number;
}

const post1: Post = {
  id: 1,
  title: 'post 1',
  getLikeNumber(like: number) {
    return like;
  }
}

post1.getLikeNumber(1);
2) Index Signature
- 속성의 이름은 모르지만 값의 형태는 알고 있을 때 사용
-> 사용가능한 값의 Type 지정 가능
interface Post {
  [key: string]: unknown; //any 사용 X
  id:number;
  title: string;
}

const post1 = {
  id: 1,
  title: 'post1'
}

// [key: string]: unknown; 로 에러 발생 X
post1['description'] = 'post 1 description';
post1['pages'] = 300;
post1['pages2'] = {};
3) Array Index Signature
interface Names {
  [item: number]: string;
  //[INDEXER_NAME: INDEXER_TYPE]: RETURN_TYPE
}

const userNames: Names = ['John', 'Kim', 'Joe']

userNames[0] = 'John'

// 'John'의 item은 0,
// 'Kim'의 item은 1,
// 'Joe'의 item은 2
3. 함수 오버로드 (Overloads)
- 이름은 같지만 매개변수 타입과 반환 타입이 다른 여러 함수를 가질 수 있는 것
- 함수 오버로드를 통해 다양한 구조의 함수를 생성하고 관리 가능
Case 01
function add1(a: string, b: string): string {
  return a + b;
}
function add2(a:number, b: number): number {
  return a + b;
}
console.log(add1('hello', 'world'));
console.log(add2(1, 2));

// 위의 코드를 함수오버로딩을 이용해 아래와 같이 구현 가능


// 함수 오버로딩  1. 타입 선언 2. 함수 구현

// 타입 선언
function add(a: string, b: string): string;
function add(a: number, b: number): number;
// 함수 구현
function add(a: any, b: any): any {
  return a + b;
}
Case 02
- 함수오버로드 사용 여부에 따라 다르게 작성하는 방법
- 함수오버로드를 쓰지 않을 경우, union을 사용할 수 있다.
function saySomething(word: string): string{
  return word;
}
saySomething('Hi');  // 'Hi'


function saySomething(word: string[]): string {
  return word.join(' ');
}
saySomething(['hello', 'world']); // 'hello world'
// 함수오버로딩 X union 사용
function saySomething(word: string | string[]): string {
if(typeof word === 'string') {
return word;
} else if (Array.isArray(word)) { //array인지아닌지 메소드
return word.join(' ');
}
throw new Error('unable to say something');
}
//함수오버로딩 O
function saySomething(word: string): string;
function saySomething(word: string[]): string;
function saySomething(word: any): any {
if(typeof word === 'string') {
return word;
} else if (Array.isArray(word)) { //array인지아닌지 메소드
return word.join(' ');
}
throw new Error('unable to say something');
}4. 접근 제어자 (Access Modifier)
1) 종류
① public => default 어디서든 접근 가능
② protected => 클래스 내, 상속받은 자식 클래스에서 접근 가능
③ private => 클래스 내에서만 접근 가능
2) 코드 작성
- constructor 안에서
this를 사용할 경우, class body안에서 타입 지정이 필요
class PostA {
  //this로 접근하는 건 class body안에 타입이 지정되어야 함
  private id: number = 0; // = 0 이렇게 초기화 값
  protected title: string = "";

  constructor(id: number, title: string) {
    this.id = id;
    this.title = title;
  }
  getPost() {
    return (`postId: ${this.id}, postTitle: ${this.title}.`);
  }
}


class PostB extends PostA {
  getPost() {              //id가 private라 error
    return (`postId: ${this.id}, postTitle: ${this.title}.`);
  }
}

let post: PostA = new PostA(1, "title 1");
console.log(post.id);
console.log(post.title);
PostA의 constructor 깔끔하게 정리
  class PostC {
    constructor(
      private id: number = 0 ,
      protected title: string = ""
      ) {}

    // (후략)
5. Generics
- 타입을 함수의 파라미터처럼 사용
1) Case 01
① 우선 다른 타입의 인수를 받는 함수를 작성한다.
// arr: number[]
function getArrayLength(arr: number[]): number {
  return arr.length;
}
const array1 = [1, 2, 3];
getArrayLength(array1);

//arr: number[] | string[]
function getArrayLength(arr: number[] | string[]): number {
  return arr.length;
}
const array2 = ['a', 'b', 'c'];
getArrayLength(array2);

//arr: number[] | string[] | boolean[]
function getArrayLength(arr: number[] | string[] | boolean[]): number {
  return arr.length;
}
const array3 = [true, false, true];
getArrayLength(array3);
② T type 파라미터, T 전달 받아서 함수에서 사용
// generic을 이용해서 간단하게 만들기
function getArrayLength<T>(arr: T[]): number {
  return arr.length;
}
const array1 = [1, 2, 3];
getArrayLength<number>(array1);

const array2 = ['a', 'b', 'c'];
getArrayLength<string>(array2);

const array3 = [true, false, true];
getArrayLength<boolean>(array3);
2) Case 02
interface Vehicle<T> {
  name: string;
  color:string;
  option: T;   //T로 받음
}
                  // 인수 타입 지정
const car: Vehicle<{ price: number }> = {
  name: 'Car',
  color: 'red',
  option: {
    price: 1000
  }
}
                  //// 인수 타입 지정
const bike: Vehicle<boolean> = {
  name: 'Bike',
  color: 'green',
  option: true
}
3) Case 03 - 매개변수 2개일 때
                //각각 지정                :반환값에도 지정 가능
const makeArr = <T, Y = string>(x: T, y: Y): [T, Y] => {
  return [x, y];
}

const array = makeArr<number, number>(4,5);
const array2 = makeArr('a', 'b'); // 위에서 기본 타입을 넣어서 생략 가능
const array3 = makeArr(4, "b");
4) Geniric Extends
extends는 지정한 타입만 사용하도록 제약하는 것
                   //이전 (obj: {firstName: string, lastName: string})
const makeFullName = <T extends {firstName: string, lastName: string}>(obj:T) => {
  return {
      ...obj,
      fullName: obj.firstName + " " + obj.lastName
  }
}

const user1 = makeFullName({firstName: 'John', lastName: 'Doe', location: 'Seoul' });
                           //firstName이 필수라서 없으면 error
const user2 = makeFullName({haha: 'John', lastName: 'Doe', location: 'Seoul' });
5) 그 외 (주로 React에서)
- 부모에서 자녀로 extends 해줄때 컴포먼트에 props로 뭐가 올지 모르니 컴포먼트마다 타입을 줄 수 있다.
- useState에서도 generic 타입 사용이 가능하다.
6. Utility Types
1) Partial
Partial< 타입 >- 특정 타입의 부분 집합을 만족하는 타입을 정의
- 정의해둔 타입을 일부만 사용하거나 아예 사용하지 않아도 된다.
interface Address {
  email: string;
  address: string;
}

const nothing: Partial<Address> = {}; // 아예 사용하지 않아도 됨
const one: Partial<Address> = {email: "abc@example.com"}; // 부분적으로 사용 가능
const all: Address = {email: "abc@example.com", address: 'address'};
2) Pick
Pick< 타입, '속성1' | '속성2' >- 몇 개의 속성을 선택하여 타입을 정의
interface Todo {
  title: string;
  description: string;
  completed: boolean;
}

const todo: Pick<Todo, 'title' | 'completed'> = {
  title: 'clean room',
  completed: false
}
3) Omit
Omit< 타입, '속성1' >- 특정 속성만 제거
interface Todo {
title: string;
description: string;
completed: boolean;
createdAt: number;
}
const todo: Omit<Todo, 'description'> = {
title: 'clean room',
completed: false,
createdAt: 323434
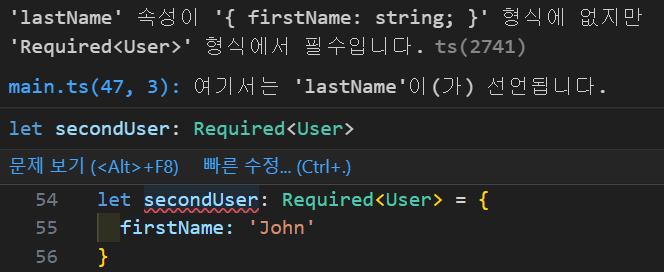
}4) Required
-Required< 타입 >
- 모든 속성을 필수로 변경한 새로운 타입 반환
- Required를 준 경우, 선택적인 속성도 모두 필수가 된다
type User = {
  firstName: string,
  lastName?: string  //? - 선택적
}

let firstUser: User = {
  firstName: 'john'
}

let secondUser: Required<User> = {
  firstName: 'John'  // Error - lastName 필요
}
Error Message
5) Record
Record<KEY, TYPE>- ` KEY를 속성(Key)으로, TYPE를 그 속성값의 타입(Type)으로 지정하는 새로운 타입을 반환
interface CatInfo {
  age: number;
  breed: string;
}
type CatName = "miffy" |"boris" | "mordred";

const cats: Record<CatName, CatInfo> = {
  miffy: { age: 10, breed: "Persian" },
  boris: { age: 5, breed: "Maine Coon" },
  mordred: { age: 16, breed: "British Shorthair" }
}
6) ReturnType
ReturnType< TYPE >- 함수 TYPE의 반환(Return) 타입을 새로운 타입으로 반환
① case 01
type T0 = ReturnType< () => string>;
//type T0 = string
type T1 = ReturnType<(s: string) => void>;
//type T1 = void
② case 02
function fn(str: string) {
  return str; // 반환 타입 string
}
const a: ReturnType<typeof fn> = 'Hello';


function fn2(str: string) {
  return false;  // 반환 타입 boolean
}
const b: ReturnType<typeof fn2> = true;
7. Implements vs Extends
1) Extends
부모 class의 프로퍼티와 메소드를 그대로 상속 받음
2) Implements
- 새로운 class의 타입 체크를 위해서 사용, 클래스의 모양을 정의할 때 사용
- X 프로퍼티와 메소드의 상속이 아님 X
class Car {
  mileage = 0;
  price = 100;
  color = 'white';

  drive() {
    return 'drive';
  }
  brake() {
    return 'brake';
  }

}

interface Part {
  seats: number;
  tire: number;
}

class Ford implements Car, Part {
  mileage = 1;
  price = 2;
  color = 'white'; // 내용은 얼마든지 변경 가능
  seats = 10;
  tire = 3;

  drive() {
    return '24234';  // 내용은 얼마든지 변경 가능
  }
  brake() {
    return 'sdfsdf';// 내용은 얼마든지 변경 가능
  }

}
8. Keyof
-인덱싱 가능 타입에서 keyof를 사용
-> 속성 이름을 타입으로 사용
- 인덱싱 가능 타입의 속성 이름들이 Union 타입으로 적용
- type에서 key 추출 시 유용하다
interface IUser {
  name: string;
  age: number;
  address: string;
}

type UserKeys = keyof IUser; // 'name' | 'age' | 'address'
const user = {
  name: 'John',
  age: 20,
  address: 'Seoul'
}
keyof typeof
// 위의 코드 연장선

type UserKeys2 = keyof typeof user
//user는 type이 아님, object
// 먼저 typeof로 type을 가져온 다음, keyof로 추출

// enum 객체와 비슷하다.
enum UserRole {
  admin,
  manager
}
// 'admin' | 'manager'
type UserRoleKeys = keyof typeof UserRole;
9. Mapped Types
- 중복을 피하기 위해 다른 타입을 바탕으로 새로운 타입을 생성
-JS의 map()을 타입에 적용했다고 생각하면 된다
1) 기초 예시
type Subset<T> = {
  [K in keyof T]?: T[K];  //여기서 ?는 프로퍼티를 선택사항으로 만들어줌
}
interface Person {
  age: number;
  name: string;
}
위의 타입과 인터페이스를 가지고 새로운 타입을 생성할 수 있다.
[K in keyof T]?: T[K];
① T = Person
② K = Person의 key => 'age', 'name'
③ : T[K] => age: number, name: string를 반환 한다
const ageOnly: Subset<Person> = { age: 23 }; // age
const nameOnly: Subset<Person> = { name: 'Tony' };  // name
const ironman: Subset<Person> = { age: 23, name: 'Tony' }; // 둘다 사용
const empty: Subset<Person> = {}; // empty
2) 심화 예시
① 사용자 프로필을 조회하는 API 함수와,
interface UserProfile {
  username: string;
  email: string;
  profilePhotoUrl: string;
}
function fetchUserProfile(): UserProfile {
  // ...
}
프로필 수정하는 API 함수가 있다고 해보자.
interface UserProfileUpdate {
  username?: string;
  email?: string;
  profilePhotoUrl?: string;
}
function updateUserProfile(params: UserProfileUpdate) {
  // ...
}
② 다음과 같이 동일한 타입에 대해서 반복해서 선언하는 것을 피해야 함.
interface UserProfile {
  username: string;
  email: string;
  profilePhotoUrl: string;
}
interface UserProfileUpdate {
  username?: string;
  email?: string;
  profilePhotoUrl?: string;
}
③ 반복되는 구조 정리
type UserProfileUpdate = {
  username?: UserProfile['username'];
  email?: UserProfile['email'];
  profilePhotoUrl?: UserProfile['profilePhotoUrl'];
}
④ 더욱 간결하게 만들기
type UserProfileUpdate = {
  [p in 'username' | 'email' | 'profilePhotoUrl']?: UserProfile[p]
}
⑤ keyof를 적용해서 최종 정리
type UserProfileUpdate = {
  [p in keyof UserProfile]?: UserProfile[p]
}
Mapped Types 출저
https://joshua1988.github.io/ts/usage/mapped-type.html#%EB%A7%B5%EB%93%9C-%ED%83%80%EC%9E%85-%EC%8B%A4%EC%9A%A9-%EC%98%88%EC%A0%9C-2