
Pop-Up
   <div>
    <label for="send_msg">전송메세지</label>
    <input type="text" id="send_msg">
    <input type="button" value="전송" id="btn_send">
   </div>
   <div>
    <div id="receive_msg">받은 메시지는 여기에 표시됩니다.</div>
   </div>
 <script>

    // 전역 객체(모든 함수에서 사용이 가능함)
    var popup = null;
    function openWindow(){
      // 브라우저 화면의 정중앙에 창 열기, 창 크기는 640px * 480px
      var width = 640;
      var height = 480;
      var left = (screen.width - width) / 2;
      var top = (screen.height - height) / 2;
      var feature = 'width=' + width + ',height=' + height + ',left=' + left + ',top=' + top;
      // popup이 열려 있지 않으면 popup을 연다.
      if(popup === null || popup.closed){
        popup = window.open('12_popup.html', '', feature);
      }
    }

      function sendMsg(){
        // 12_popup.html 본문을 모두 읽은 뒤 스크립트를 처리할 수 있도록 load 이벤트를 사용함
        popup.addEventListener('load', function(){
        // 12_browser_object.html     →  12_popup.html
        //    <input id="send_msg">   →     <div id="receive_msg"></div>
          popup.document.getElementById('receive_msg').textContent = document.getElementById('send_msg').value;
       })
      }

      document.getElementById('btn_send').addEventListener('click',function(){
        openWindow();
        sendMsg();
      })
  </script>


popup.html

 <style>
    div {
      box-sizing: border-box;
    }
    .wrap {
      width: 615px;
      height: 480px;
      margin: 10px auto;
    }
    .footer {
      border-top: 1px solid gray;
      text-align: right;
    }
  </style>
</head>
<body>

  <script>
    /*
      이벤트 대상 : window
      이벤트 타입 : load
      이벤트 설명 : 본문을 모두 읽은 뒤에 이벤트 리스너를 처리하는 이벤트
    */
    addEventListener('load', function(){
      sendMsg();
      closeWindow();
    })
    function sendMsg(){
      document.getElementById('btn_send').addEventListener('click', function(){
        // 12_browser_object.html           ←  12_popup.html
        //    <div id="receive_msg"></div>  ←     <input id="send_msg">
        // opener : 현재 창을 열어 준 부모창을 의미함
        opener.document.getElementById('receive_msg').textContent = document.getElementById('send_msg').value;
      })
    }
    function closeWindow(){
      document.getElementById('btn_close').addEventListener('click', function(){
        window.close();
      })
    }

  </script>
  <div class="wrap">
    <h1>팝업창</h1>
    <div id="receive_msg">여기에 받은 메시지가 표시됩니다.</div>
    <div>
      <label for="send_msg">전송 메시지</label>
      <input type="text" id="send_msg">
      <input type="button" value="전송" id="btn_send">
    </div>
    <div class="footer">
      <input type="button" value="닫기" id="btn_close">
    </div>
  </div>
</body>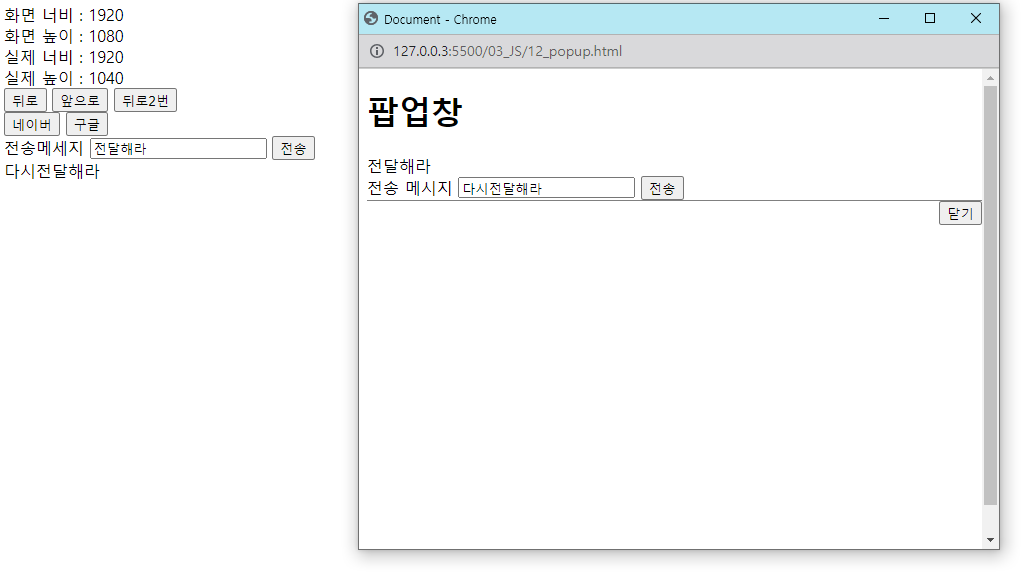
비동기 처리방식
 비동기(Asynchronous)
	  1. 통신(송수신, 요청과 응답)을 할 때 사용하는 방식이다.
      2. 요청과 응답이 순서대로 진행되는 "동기(synchronous)" 처리 방식이 있고,
          요청과 응답이 순서없이 진행되는 "비동기(Asynchronous)" 처리 방식이 있다.
      3. 비동기 처리 방식은 요청에 대한 응답이 없어도 계속 요철할 수 있다.
      4. 응답을 기다리는 시간이 없기 때문에 빠른 통신 방식이다.
      5. 순서대로 처리해야하는 서비스의 경우 문제가 발생할 수 있다.

     동기 통신 : 요청 결과(응답)를 받을 때까지 새로운 요청을 하지 않는 통신 방식
      client                         server
        A ---------------------------→ A
        ACK ←-------------------------(A 성공)
        B ---------------------------→ B
        ACK ←-------------------------(B 성공)
        C ---------------------------→ C
        NAK ←-------------------------(C 실패)
        C ---------------------------→ C
        ACK ←-------------------------(C 성공)
        D ---------------------------→ D
        ...

        비동기 통신 : 요청 결과(응답)를 기다리지 않고 새로운 요청을 하는 통신 방식
      client                         server
        A ---------------------------→ A
        B ---------------------------→ B
        ACK ←-------------------------(A 성공)
        C ---------------------------→ C
        D ---------------------------→ D
        ACK ←-------------------------(B 성공)
        NAK ←-------------------------(C 실패)
        C ---------------------------→ C
        ACK ←-------------------------(C 성공)
        ...
XML 읽는 방식
 <div class="wrap1">
    <input type="button" value="XML요청" id="btn_xml_request1">
    <div id="xml_response1"></div>
  </div>

  <script>
    document.getElementById('btn_xml_request1').addEventListener('click', function(){

      // 1. XMLHttpRequest 객체 생성(비동기 통신을 수행하는 객체)
      var xhr = new XMLHttpRequest();

      // 2. 요청 정보생성
      //  1) 형식 : xhr.open(RequestMethod, URL, Sync/Async);
      //    (1) RequestMethod : get 또는 post
      //    (2) URL 요청 URL (서버 경로 작성)
      //    (3) Sync(동기) : false, Async(비동기) : true
      xhr.open('get', 'book1.xml', true);  /*Syns - false*/

      // 3. 요청
      xhr.send();

      // 4. 응답
      //  1) xhr 객체의 readystatechange 이벤트 : 응답되었는지 확인하는 이벤트
      //  2) xhr.readyState : 통신상태 (0 : OPENED  1: UNSEND 2: HEADER_RECEIVE, 3: LOADING 4: DONE )
      //  3) xhr.status : 응답코드 (200 성공 4XX 클라이언측 오류, 5XX 서버특 오류)
      //  4) 응답 데이터 형식에 따른 속성(property)
      //      (1) XML  : responseText
      //      (2) JSON  : responseText
      xhr.addEventListener('readystatechange',function(){

        if(xhr.readyState === 4 && xhr.status === 200 ){
          var data = xhr.responseXML;
          var str = '';
          var title = data.getElementsByTagName('title');
          var author = data.getElementsByTagName('author');
          for(let i = 0; i < title.length; i++){
            str +='<ul>';
            str += '<li>' + title[i].textContent + '</li>';
            str += '<li>' + author[i].textContent + '</li>';
            str += '</ul>';
          }
          document.getElementById('xml_response1').innerHTML = str;
        }
      })
    })
  </script>
json 읽는 방식
<div class="wrap3">
    <input type="button" value="JSON요청1" id="btn_json_request1">
    <div id="json_response1">
    </div>
  </div>
  <script>
 document.getElementById('btn_json_request1').addEventListener('click',function(){
      var xhr = new XMLHttpRequest();
      xhr.open('get','book1.json',true);
      xhr.send();
      xhr.addEventListener('readystatechange', function(){
        if(xhr.readyState === 4){
          if(xhr.status === 200){
            var data = JSON.parse(xhr.responseText);
            var str='';
            for(let i = 0; i < data.lenght; i++){
              str += '<ul>';
              str += '<li>' + data[i].title + '</li>'; //data[i].['title']
              str += '<li>' + data[i].author + '</li>';
              str += '</ul>';
            }
            document.getElementById('json_response1').innerHTML = str;
          }
        }
      })

    })
  </script>
연습
<!-- 문제1. sfc_web_map.xml 읽어서 테이블로 표시하기(지역명 날씨 온도) -->
  <div class="wrap5">
    <table border="1">
      <thead>
        <tr>
          <td>순번</td>
          <td>지역명</td>
          <td>날씨</td>
          <td>온도</td>
        </tr>
      </thead>
      <tbody id="sfc_web_map"></tbody>
    </table>
  </div>
  <script>

      var xhr = new XMLHttpRequest();
      xhr.open('get','sfc_web_map.xml',true);
      xhr.send();
      xhr.addEventListener('readystatechange', function(){
        if(xhr.readyState === 4){
          if(xhr.status === 200){
            var data = xhr.responseXML;
            var local = data.getElementsByTagName('local');
            var str = '';
            for(let i = 0; i < local.length; i++){
              str += '<tr>';
              str += '<td>' + (i + 1) + '</td>';
              str += '<td>' + local[i].textContent + '</td>';   /* <name>홍길동</name> 이면 textContent 를 쓴다.  */
              str += '<td>' + local[i].getAttribute('desc') + '</td>';
              str += '<td>' + local[i].getAttribute('ta') + '</td>';
              str += '</tr>'
            }
            document.getElementById('sfc_web_map').innerHTML = str;
          }
        }
      })
  </script>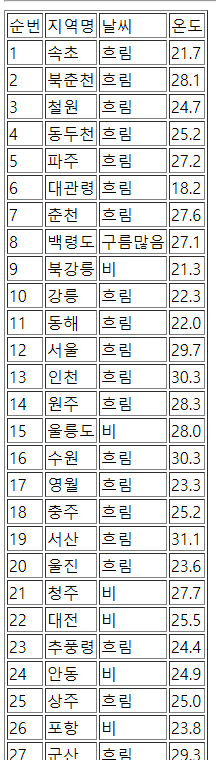
백엔드 준비생의 막 블로그