앞선 포스트에서는 Servlet의 원리를 알아봤습니다. 이번에는 Spring의 기본 원리를 알아보겠습니다.
인프런 토비선생님의 스프링부트 강의내용을 옮긴 글입니다.
원래 servlet에서는 servletContext.addServlet()을 이용하여 url을 일일히 맵핑해주었습니다. 해당 내용은 여기서 확인가능합니다.
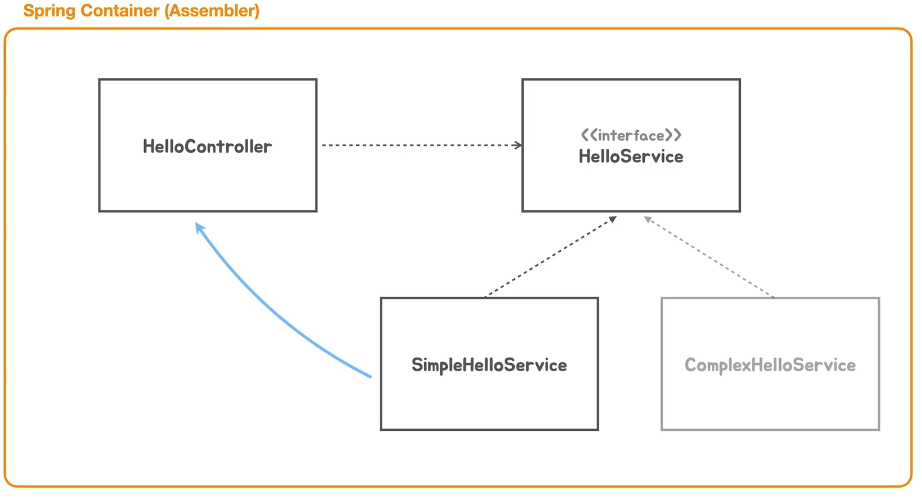
Spring은 Assembler라는 Container가 우리가 만들었던 business object들을 묶어 runtime을 통해 서로 관계를 맺어줍니다. (DI)
이렇게 빈으로 넣어서 관리하면 컨트롤러와 서비스 같은 비지니스 로직을 따로 따로 구현가능하고 관리하기가 쉬워집니다. 또한 싱글톤(Singleton)을 사용하여 재사용 된다는 장점은 다들 아실겁니다.
이 때 서비스로직은 인터페이스로 생성해 서비스로직의 변경과 추가 작업에 의존없이 유연하게 처리할 수 있도록 만들어서 빈에 등록 시켜주는 겁니다.
코드를 작성해보면 다음과 같습니다.
	applicationContext.registerBean(HelloController.class);
	applicationContext.registerBean(HelloService.class);
	applicationContext.refresh();
여기에 여러개의 servlet Container를 관리하게 해줄 DispacherServlet 객체를 생성합니다.
xml로 Spring 설정을 해보신 분이라면 DispacherServlet이 무엇인지 잘 아실겁니다. 다만 여기서는 java Factory Method를 사용하여 작업을 할거라 xml방법은 건너뜁니다.
	<!--이렇게 xml로 설정을 해서 사용하는것이 가능합니다.-->
	<display-name>appName</display-name>
	<context-param>
		<param-name>contextConfigLocation</param-name>
		<param-value>
			classpath:/spring-context/aspect-context.xml
			classpath:/spring-context/message-context.xml
			classpath:/spring-context/mutipartResolver-context.xml
			classpath:/spring-context/practice-context.xml
			classpath:/spring-context/database-context.xml
			classpath:/spring-context/cache-context.xml
		</param-value>
	</context-param>
	<servlet>
		<servlet-name>appServlet</servlet-name>
		<servlet-class>org.springframework.web.servlet.DispatcherServlet</servlet-class>
		<init-param>
			<param-name>contextConfigLocation</param-name>
			<param-value>/WEB-INF/servlet-context.xml</param-value>
		</init-param>
		<load-on-startup>1</load-on-startup>
	</servlet>
	<servlet-mapping>
		<servlet-name>appServlet</servlet-name>
		<url-pattern>/</url-pattern>
	</servlet-mapping>
추가로 DispacherServlet을 add해봅니다.
GenericWebApplicationContext applicationContext = new GenericWebApplicationContext();
		applicationContext.registerBean(HelloController.class);
		applicationContext.registerBean(HelloService.class);
		applicationContext.refresh();

		TomcatServletWebServerFactory server= new TomcatServletWebServerFactory();
		WebServer webServer = server.getWebServer(servletContext -> {
			servletContext.addServlet("dispatcherServlet", new DispatcherServlet(applicationContext))
					.addMapping("/*");
		});
		webServer.start();
Servlet에서 작성했던것 보다 간결해진 코드입니다. 하지만 /* 로 맵핑된것을 내가 원하는 주소로 맵핑해야합니다. 이때 사용하는게 Spring Annotation입니다.
    @GetMapping("/hello")
    @ResponseBody
    public String hello(String name){
        return helloService.say(Objects.requireNonNull(name));
    }
이렇게 Annotation을 붙혀주면 mapping이 되고 해당 주소로 호출되는것을 확인 가능합니다.
이번에는 Spring Container에 servlet을 통합해봅시다.
GenericWebApplicationContext를 상속받는 매서드를 만들어 onRefresh를 Override합니다.
//이렇게 하면 초기화하면서 servlet Container를 등록이 가능합니다.
GenericWebApplicationContext applicationContext = new GenericWebApplicationContext() {
			@Override
			protected void onRefresh() { //'on'입니다 선언과 생성전 사이에 이런 커스텀이 가능하게 만들어진 매서드입니다.
				super.onRefresh(); // 내부적으로 돌아가는게 있으므로 지우면 X
				TomcatServletWebServerFactory server= new TomcatServletWebServerFactory();
				WebServer webServer = server.getWebServer(servletContext -> {
					servletContext.addServlet("dispatcherServlet", new DispatcherServlet(this))
                    // dispatcherServlet는 생성자에 applicationContext이 필요하므로 여기서는 this을 선언하면 됩니다.
							.addMapping("/*");
				});
				webServer.start();
			}
		};
		applicationContext.registerBean(HelloController.class);
		applicationContext.registerBean(HelloService.class);
		applicationContext.refresh();
다음으로는 bean을 등록하는부분도 Configuration으로 등록해봅니다.
@Configuration을 선언해서 해당파일이 spring container를 나타내는 구성요소 파일이라고 선언하면 해당 클래스안에 있는 @Bean 매서드를 검색하여 주입하게 됩니다.
@Configuration
public class PracticeApplication {

	@Bean
	public HelloController helloController(HelloServiceImpl helloServiceImpl){
		return new HelloController(helloServiceImpl);
	}
	@Bean
	public HelloServiceImpl helloServiceImpl(){
		return new HelloService();

    public static void main(String[] args) {
    //GenericWeb에서 Annotation으로 바꼈습니다.
		AnnotationConfigWebApplicationContext applicationContext = new AnnotationConfigWebApplicationContext() {
			@Override
			protected void onRefresh() {
				super.onRefresh();
				TomcatServletWebServerFactory server= new TomcatServletWebServerFactory();
				WebServer webServer = server.getWebServer(servletContext -> {
					servletContext.addServlet("dispatcherServlet", new DispatcherServlet(this))
							.addMapping("/*");
				});
				webServer.start();
			}
		};
		applicationContext.register(PracticeApplication.class);
		applicationContext.refresh();
    }

}
하지만 이렇게하면 컨트롤러와 서비스가 많아지면 마찬가지로 번거로워지죠... 더 줄어보겠습니다.
@Configuration
@ComponentScan
public class PracticeApplication {

    public static void main(String[] args) {
		AnnotationConfigWebApplicationContext applicationContext = new AnnotationConfigWebApplicationContext() {
			@Override
			protected void onRefresh() {
				super.onRefresh();
				TomcatServletWebServerFactory server= new TomcatServletWebServerFactory();
				WebServer webServer = server.getWebServer(servletContext -> {
					servletContext.addServlet("dispatcherServlet", new DispatcherServlet(this))
							.addMapping("/*");
				});
				webServer.start();
			}
		};
		applicationContext.register(PracticeApplication.class);
		applicationContext.refresh();
    }

}
@ComponentScan을 통해 해당 클래서에서 필요한 객체를 자동으로 스캔합니다. 이때 대상이 되는 클래스들도 @Component 라고 선언을 해야합니다.
// Controller하고 Service에 Component를 선언해야 Spring Container가 실행될때 검색을 하게 된다.
@Component
@RequestMapping
public class HelloController {

// 이건 Service.java
@Component
public class HelloService implements HelloServiceImpl{
그 외에 TomcatServletWebServerFactory 과 DisPacherServlet 객체들도 Bean으로 등록해서 쓰면 다음과 같은 코드 완성 할 수 있습니다.
// Spring boot 최상단 Application.java
@Configuration
@ComponentScan
public class PracticeApplication {

	@Bean
	public ServletWebServerFactory servletWebServerFactory(){
		return new TomcatServletWebServerFactory();
	}
	@Bean
	public DispatcherServlet dispatcherServlet(){
		return new DispatcherServlet();
	}

	public static void main(String[] args) {

	AnnotationConfigWebApplicationContext applicationContext = new AnnotationConfigWebApplicationContext() {
		@Override
		protected void onRefresh() {
			super.onRefresh();
			ServletWebServerFactory server = this.getBean(ServletWebServerFactory.class);
			DispatcherServlet dispatcherServlet = this.getBean(DispatcherServlet.class);
			//dispatcherServlet.setApplicationContext(this); // Spring의 장점입니다. Bean으로 생성하면 자동으로 주입되서 선언할 필요가 없습니다.
			WebServer webServer = server.getWebServer(servletContext -> {
				servletContext.addServlet("dispatcherServlet", dispatcherServlet)
						.addMapping("/*");
			});
			webServer.start();
		}
	};
		applicationContext.register(PracticeApplication.class);
		applicationContext.refresh();
}

}
@Component
@RequestMapping
public class HelloController {
private HelloServiceImpl helloService;
private ApplicationContext applicationContext;
public HelloController(HelloServiceImpl helloService, ApplicationContext applicationContext) {
this.helloService = helloService;
this.applicationContext = applicationContext;
System.out.println(applicationContext);
// ApplicationContext는 @ComponentScan에 의해 HelloController에 Bean을 찾고 주입하는 과정이 생기니
// 이렇게 생성자를 통해 Context의 본체도 받아올 수 있습니다.
}
@GetMapping("/hello")
@ResponseBody
public String hello(String name){
return helloService.say(Objects.requireNonNull(name));
}
}public interface HelloServiceImpl {
String say(String name);
}@Component
public class HelloService implements HelloServiceImpl{
@Override
public String say(String name){
return "Hello service" +name;
}
}결론, 편한게 좋습니다. 왜 boot가 만들어졌는지 아시겠죠?
이런 설정하지말고, boot프로젝트만들어서 어플리케이션만 코딩합시다.