1. @Import Annotation란
Custom Annotation을 제작해서 사용할때 다양한 매타 관계를 붙혀서 작업을합니다. 예제
이때 Components들은 ComponentScan이 선언 되어있는 패키지 안에 있어서 로딩이 가능합니다.
다음과 같은 예를 봅시다.
@Retention(RetentionPolicy.RUNTIME)
@Target(ElementType.TYPE)
@Configuration
@ComponentScan
@EnableMyAutoConfig
public @interface MySpringBootApplication {
}@Retention(RetentionPolicy.RUNTIME)
@Target(ElementType.TYPE)
@DispacherServletConfig
@TomcatWebServerConfig
public @interface EnableMyAutoConfig {
}MySpringBootApplication은 @EnableMyAutoConfig를 매타로 갖고, EnableMyAutoConfig도 마찬가지로 @DispacherServletConfig, @TomcatWebServerConfig를 갖습니다. 하지만 패키지 주소가 달라지면 읽지 못합니다.
이때 사용하는 것이 @Import입니다.
@Retention(RetentionPolicy.RUNTIME)
@Target(ElementType.TYPE)
@Import({DispacherServletConfig.class, TomcatWebServerConfig.class})
//@Import로 하면 어느패키지 경로에 있던지 상관없게 된다.
public @interface EnableMyAutoConfig {
}
2.ImportSelector 란
기능은 구현이 가능해졌지만, Components가 추가할수록 매우 복잡해질거 같습니다. Class명을 쭉 나열해야하기 때문이죠. 우리는 다양한 매타데이터들을 xml이나 yml로 불러와 사용합니다.
마찬가지로 @Import도 ImportSelector를 이용해서 사용할 수 있습니다.
직접사용해보고 느낀 장점은 이렇습니다.
- 파일을 여러개 만들거나 각각 load하여 동적으로 관리하게 해준다.
먼저 Annotation을 하나 만들어 패키징해줄 Annotation 하나를 준비합니다.
@Retention(RetentionPolicy.RUNTIME)
@Target(ElementType.TYPE)
@Configuration
public @interface MyAutoConfig {
}
그 다음 DeferredImportSelector 상속받는 selecter코드를 만들어줍니다.
public class MyAutoConfigImportSelector implements DeferredImportSelector {
    private final ClassLoader classLoader;

    public MyAutoConfigImportSelector(ClassLoader classLoader) {
        this.classLoader = classLoader;
    }

    @Override
    public String[] selectImports(AnnotationMetadata importingClassMetadata) {

        /* //다른 사용법들
        //for문 두가지방식 for, forEach
        List<String> autoConfig = new ArrayList<>();
        for(String candidates : ImportCandidates.load(MyAutoConfig.class, classLoader)){
            autoConfig.add(candidates);
        }
        ImportCandidates.load(MyAutoConfig.class, classLoader).forEach(autoConfig::add); //method refference로 대체가 가능하다.

        // 리턴도 두 가지방식
        return autoConfig.toArray(new String[0]); //0으로 선언하면 사이즈가 작기때문에 autoConfig에 사이즈만큼 생성이 된다.
        return Arrays.copyOf(autoConfig.toArray(), autoConfig.size(), String[].class); // 이렇게도 가능
        */

        Iterable<String> candidates = ImportCandidates.load(MyAutoConfig.class, classLoader);
        return StreamSupport.stream(candidates.spliterator(), false).toArray(String[]::new);
    }
}
classLoader같은 경우에는 ApplicationContext의 자동주입 대상이므로 따로 선언할 필요는 없습니다. 생성자에 등록해주면 알아서 됩니다. 그래도 뭐가 주입되는지 확인하고 싶다면, BeanClassLoaderAware 를 확인해보시면 됩니다.
그리고 @Import에 selecter class를 선언해주면 설정은 완료 된겁니다.
@Retention(RetentionPolicy.RUNTIME)
@Target(ElementType.TYPE)
@Import(MyAutoConfigImportSelector.class) // 이제 이렇게 선언합니다.
//@Import({DispacherServletConfig.class, TomcatWebServerConfig.class})
public @interface EnableMyAutoConfig {
}
3.ImportSelector 대상 파일 만들기
이제 앞에서 말씀드렸던 xml이건 yml이건 리스트 파일을 만들어주어야합니다.
ImportCandidates 문서에 따르면 다음과 같습니다.
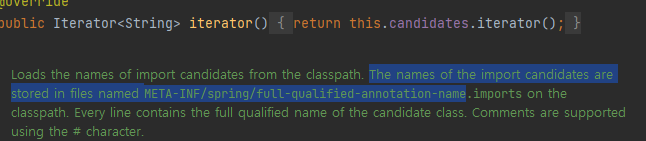
META-INF/spring/full-path로 해주면 되겠네요.
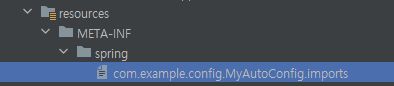
다음과 같이 resources 아래에 폴더들을 만들고 imports확장자로 파일을 만들어주면 됩니다.
그 안에 import할 클래스들을 전부 담으면 됩니다.

이제 서버를 재가동하고 테스트 해보시면 됩니다.