1. 클라우드 강의 수강
클라우드란 무엇인지, 관련 기술은 어떤 것이 있는지 등등에 대한
대략적인 개념을 학습했다.
2. 로그인 기능 구현
Vue2 기준
프론트 로그인 페이지를 구현했다.
디자인 요소는 고려하지 않고 코드 작성 후
회원가입 페이지를 구현한 팀원과 코드를 공유했다.
뷰티파이를 사용해서 구현한 회원가입 페이지는 굉장히 깔끔하고 예뻤다!
그래서 얼른 Vuetify 홈페이지를 둘러보고 내 로그인 페이지에 적용했다.
<template>
  <v-card class="my-10 mx-auto p-3 text-center rounded-card" color="FBF8F8">

    <v-form ref="form" v-model="valid" lazy-validation @submit.prevent="login">
      <h2>주유소</h2>
      <v-text-field
      v-model="credentials.id"
      :counter="16"
      :rules = "idRules"
      label="아이디"
      required>
      </v-text-field>

      <v-text-field
      v-model="credentials.password"
      :counter="20"
      :rules="passwordRules"
      label="비밀번호"
      required></v-text-field>
      <br>
      <v-btn color="#1CFD9F">로그인</v-btn>
    </v-form>

    <v-btn plain>비밀번호 찾기</v-btn>


  </v-card>
</template>

<script>
import axios from 'axios'

export default {
  name: 'Login',
  data: function () {
    return {
      valid: true,
      credentials: {
        id: null,
        password: null
      },
      idRules: [
        v => !!v || '아이디는 필수입니다',
        v => (v && v.length <= 16) || '아이디는 16자리를 넘길 수 없습니다',
      ],
      password: '',
      passwordRules: [
        v => !!v || '비밀번호는 필수입니다',
        v => (v && v.length <= 20) || '비밀번호는 20자리를 넘길 수 없습니다',
      ]
    }
  },
  methods: {
    login: function () {
      axios({
        method: 'post',
        url: `${process.env.VUE_APP_API_URL}/api/v1/auth/login`,
        data: this.credentials
      })
        .then(res => {
          console.log(res)
          localStorage.setItem('jwt', res.data.accessToken)
          this.$router.push({name:'Main'})
        })
        .catch(err => {
          console.log(err)
          alert('아이디와 비밀번호를 정확히 입력해 주세요 ')
          this.credentials.id = null
          this.credentials.password = null
        })
    }
  }
}
</script>

<style>

</style>
아직 완벽한 코드는 아니고 뷰티파이 작업이 더 필요하다.
지금은 아주 옹졸한 로그인 페이지이다.
3. Merge Request 학습
지난주에도 branch 만들기, merge 하기 등등 실습을 했지만!
아직 익숙하지 않기에 팀원들과 한 번 더 연습을 했다.
아직 많은 기능을 구현하지 않았음에도 브랜치들은 꽤나 복잡했다.
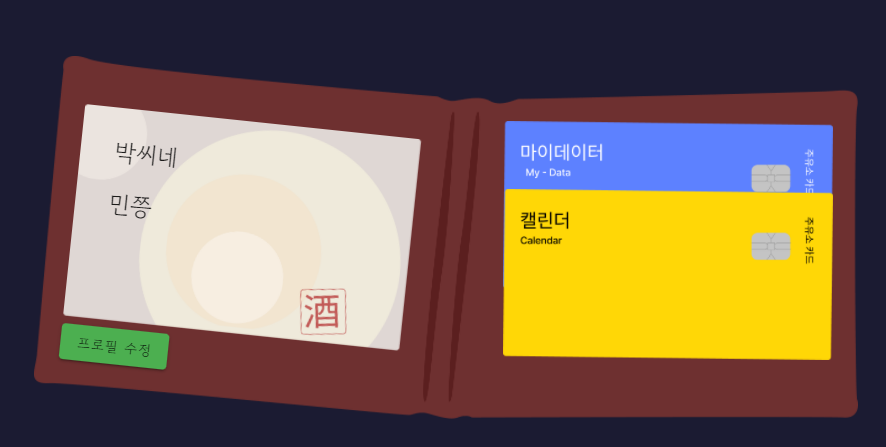
4. CSS 이미지 배치
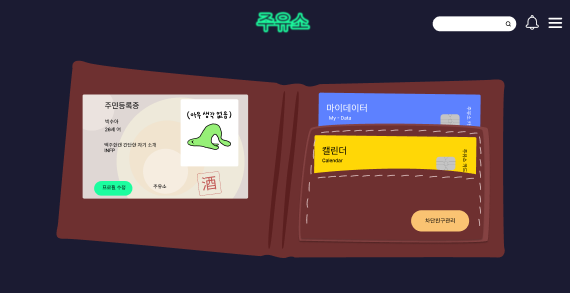
요렇게 이미지를 배치해야 한다.
그런데 쉽지가 않다.
그리하여 CSS 공부를 다시하는 중이다.
오늘 배운 css
- 이미지 포지셔닝
- 이미지 위에 이미지
- 이미지 위에 텍스트
뿌듯하구먼,,ㅎ
<template>
  <div class="wallet-container">
    <div class="wallet">
      <img src="@/assets/wallet_main.png" alt="wallet">

      <div class="profile-card">
        <img src="@/assets/profile.png" alt="profile-card">
        <div class="profile-card-info">
          <p>박씨네</p>
          <p>민쯩</p>
        </div>
        <v-btn @click="goProfileEdit" color="green" >프로필 수정</v-btn>
      </div>

      <div class="profile-mydata">
        <div class="profile-mydata-card">
          <img @click="goMyData" src="@/assets/Group 56.png" width="95%" alt="mydata">
        </div>

        <div class="wallet-1">
          <img src="@/assets/wallet_card_1.png" alt="wallet-card">
        </div>
        <div class="profile-calendar">
          <img @click="goCalendar" src="@/assets/Group 57.png" alt="calendar">
        </div>

        <div class="wallet-2">
          <img src="@/assets/wallet_card_2.png" alt="wallet-card">
        </div>

        <div class="friend-block-btn">
          <v-btn @click="goBlockedFriend">차단친구 관리</v-btn>
        </div>

      </div>


    </div>
  </div>
</template>

<script>
export default {
  name: 'MyPage',
  methods: {
    goProfileEdit: function (){
      this.$router.push({name: 'ProfileEdit'})
    },
    goCalendar: function () {
      this.$router.push({name:'Calendar'})
    },
    goMyData: function () {
      this.$router.push({name: 'MyData'})
    },
    goBlockedFriend: function () {
      this.$router.push({name: 'BlockedFriend'})
    }
  }
}
</script>

<style scoped>

.wallet-container {
  width: 80vw;
  margin: 150px auto;
}

img {
 max-width: 100%;
 max-height: 100%;
}

.wallet {
  position: relative;
}

.profile-card {
  width: 41%;
  position: absolute;
  top: 18%;
  left: 4.5%;
  transform: rotate(6deg);
}

.profile-card:hover {
  transform: scale(1.3);
}

.profile-card-info {
  position: absolute;
  top: 10%;
  left: 10%;
  font-size: 1.5rem;
}

.profile-mydata {
  width: 40%;
  position: absolute;
  top: 18%;
  right: 3%;
}


.profile-mydata-card {
  cursor: pointer;

}

.profile-mydata-card:hover {
  /* transform: scale(1.1); */
  cursor: pointer;
}

.profile-calendar {
  position:absolute;
  top: 50%;
  width: 95%;
  cursor: pointer;
}

.profile-calendar:hover {
  transform: scale(1.1);
}

.wallet-1 {
  position: absolute;
  top: 35%;
  right: -2%;
  width: 110%;

}

.wallet-2 {
  position: absolute;
  top: 85%;
  width: 96%;

}

.friend-block-btn {
  position: absolute;
  top: 140%;
  right: 10%;
}

</style>
느낀점
이번 프로젝트를 시작하면서부터 마음가짐을 바꿨다.
이 프로젝트의 Why는 '나'다.
나의 실력을 위해, 경험을 위해, 취업을 위해
이렇게 생각하니 코드를 짜고 공부하는 과정이 재밌어졌다.
지난 6개월 간 학습한 내용을 직접 사용하는 것도 너무 신기하고,
해당 커리큘럼을 배운 이유도 납득이 간다.
뭐든 다 이유가 있는 것이여~
저 지갑 페이지를 꼭 성공하겠다 🍩🍪
간만에 눈이 희번뜩

갹