Flutter 일기
참고 1 : Flutter.dev - material - AppBar
AppBar
오늘은 가장 많이 쓰는 위젯 중 하나인 AppBar를 다뤄보겠다.
제일 기본적인 건데 맨날 보는거라 일기로 쓸 생각을 못했다.
그래도 AppBar에 매번 글자만 넣을 수는 없으니, 이걸 어떻게 꾸밀 수 있는지 알아보도록 하자.
Flutter.dev 에 있는 나온 예시 코드에, 지금까지 배웠던 것들이 몇개 들어가 있길래 가져다가 몇 개만 추가해서 실행하였다.
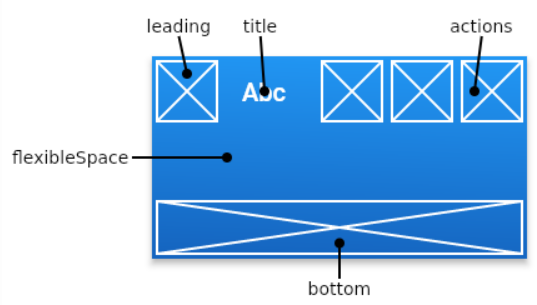
우선 AppBar의 영역은 위와 같은데, 오늘은 leading, title, actions에 대해서 다뤄보겠다.
AppBar는 고정된 높이값을 갖는다. 스크롤을 내렸을 때 높이가 변하는(AppBar가 사라지는) 위젯을 찾는다면, 저번에 다뤄본 SliverAppBar를 쓰면 된다.
코드 예시로 알아보자
import 'package:flutter/material.dart';
void main() => runApp(const MyApp());
class MyApp extends StatelessWidget {
const MyApp({Key? key}) : super(key: key);
Widget build(BuildContext context) {
return const MaterialApp(
home: MyStatelessWidget(),
);
}
}
class MyStatelessWidget extends StatelessWidget {
const MyStatelessWidget({Key? key}) : super(key: key);
Widget build(BuildContext context) {
return Scaffold(
appBar: AppBar(
title: const Text('AppBar Demo'),
elevation: 10,
leading: const BackButton(),
// backgroundColor: Colors.black54,
actions: <Widget>[
IconButton(
icon: const Icon(Icons.add_alert),
tooltip: 'Show Snackbar',
onPressed: () {
ScaffoldMessenger.of(context).showSnackBar(
const SnackBar(content: Text('This is a snackbar')));
},
),
IconButton(
icon: const Icon(Icons.navigate_next),
tooltip: 'Go to the next page',
onPressed: () {
Navigator.push(context, MaterialPageRoute<void>(
builder: (BuildContext context) {
return Scaffold(
appBar: AppBar(
title: const Text('Next page'),
),
body: const Center(
child: Text(
'This is the next page',
style: TextStyle(fontSize: 24),
),
),
);
},
));
},
),
],
),
body: const Center(
child: Text(
'This is the home page',
style: TextStyle(fontSize: 24),
),
),
);
}
}
우선 property 하나하나 뜯어보자.
1. title, elevation, leading
title: const Text('AppBar Demo'),
elevation: 10,
leading: const BackButton(),title 에는 보통 위와 같이 Text 위젯을 많이 쓴다.
elevation은 그냥 AppBar아래의 그림자이다. 기본값은 4인데, 건드리는 경우는 많진 않다. AppBar바로 아래에서 body위젯이 시작되거나 한다면 elevation에 0을 줘서 없애버리는 경우는 가끔 있다.
| elevation : 0 | 4 | 10 |
|---|---|---|
leading은 자주 활용될 만하다. title 왼쪽에 나오는 부분이고, IconButton을 넣든 아무 기능 없는 Icon을 넣든 상관없다. 여기서는 BackButton 위젯으로 한번 넣어보았다.
2. actions
actions: <Widget>[
          IconButton(
            icon: const Icon(Icons.add_alert),
            tooltip: 'Show Snackbar',
            onPressed: () {
              ScaffoldMessenger.of(context).showSnackBar(
                  const SnackBar(content: Text('This is a snackbar')));
            },
          ),
          IconButton(
            icon: const Icon(Icons.navigate_next),
            tooltip: 'Go to the next page',
            onPressed: () {
              Navigator.push(context, MaterialPageRoute<void>(
                builder: (BuildContext context) {
                  return Scaffold(
                    appBar: AppBar(
                      title: const Text('Next page'),
                    ),
                    body: const Center(
                      child: Text(
                        'This is the next page',
                        style: TextStyle(fontSize: 24),
                      ),
				...
        ],
사실 AppBar에서 눈여겨봐야 할 속성은 actions 이다. AppBar 오른쪽 끝으로 Icon을 나열하는 경우가 많기 때문이다. 특히 사용자 정보나 장바구니 같은 아이콘들이 대부분 저기 있지 않은가? 예를 들어서, CircleAvatar를 IconButton으로 감싸버리면 사용자 사진을 띄움과 동시에 IconButton의 기능을 할 수도 있다.
이처럼 여러가지로 활용할 수 있는 자리인데, 여기서는 SnackBar를 띄우는 것과 Navigation 기능을 수행하는 버튼이 사용되었다.
showSnackBar는 이전의 40번 일기에서 사용해본 적이 있고, 두 번째 IconButton은 복잡하게 생긴 감이 있는데, 이전에 배웠던 Navigator를 사용한 것이다. 그때는 아래와 같은 코드를 썼다.
Navigator.of(context)
              .push(MaterialPageRoute(builder: (context) => SecondPage()));
SecondPage 위젯을 따로 만들어둔 후 호출하지 않고, builder 안에다가 위젯을 바로 써버린 형태이다.
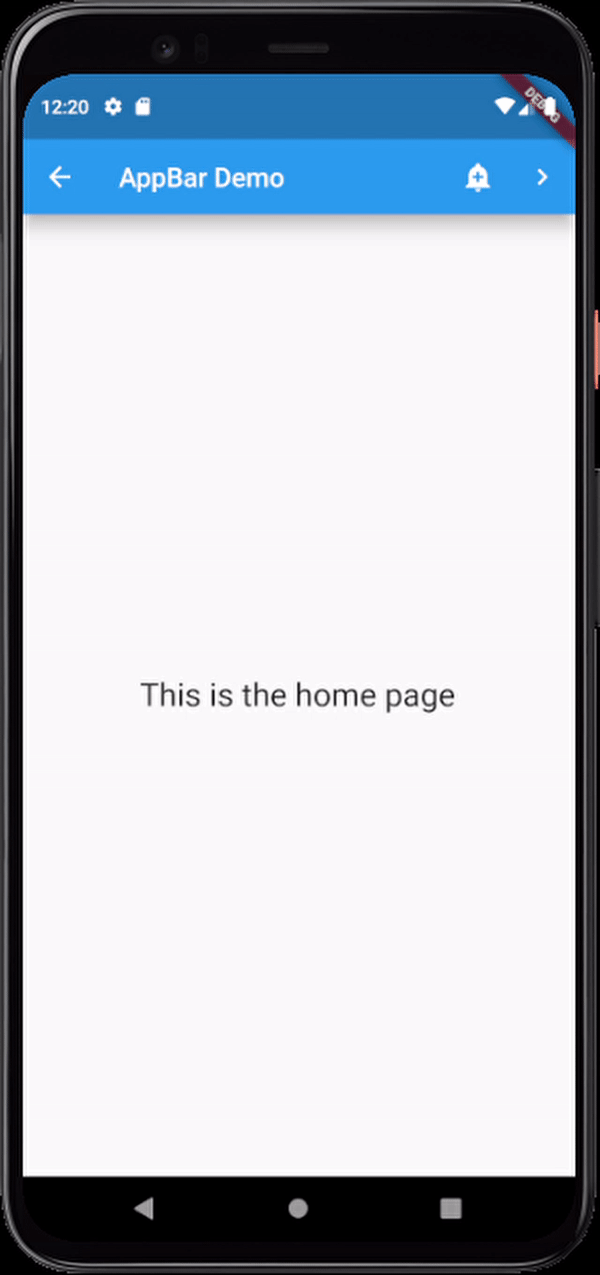
마지막으로 실행화면은 아래와 같다.
오늘의 일기는 여기까지!