[논문리뷰/코드 구현] [SIGGRAPH 2017] Real-Time User-Guided Image Colorization with Learned Deep Priors
본 논문은 colorization에 user-input과 hint라는 개념을 도입해 real-time colorization 및 colorization 성능 향상을 보여준다.
특이사항:
이 논문의 저자들은 CycleGAN의 저자들중 한명이며 UC Berkley에서 박사학위를 하시면서 Adobe에서 인턴하시던 도중 쓰신것 같다. 결국 이 기술은 Adobe에서 채택되어 실제로 과거에 사용된 기술이기도 하다.
Introduction
-
Colorization에서는 Data-driven colorization method와 Fully automatic colorization이 있다. Zhang et. al. (2016) 이나 Larsson et al. (2016) 등 다양한 저자들이 fully automatic colorization을 활용해 cheap and easy colored images를 생성했지만 artifacts들이 존재하거나 알맞지 않는 색상들을 입히는 현상이 나타난다.
-
저자들은 contribution을 아래와 같이 요약 했다.
- End-to-end learning 을 하여 sparse user points를 생성해 (추후 설명) network를 학습시켜 grayscale image colored image를 생성한다.
- User들이 원하는 색이나 특정 부분에 색을 추천하기 위해 Data-driven color palette를 제시한다.
- 최소시간으로 학습이 가능하며 1분이내로 GUI를 사용해 일반인들도 colorize를 쉽게 할수 있게 만들었다.
- 부자연스러운 색이나 어울리지 않는 색상을 고의적으로 만들수 도 있게 하였다.
- user input이 directly하게 없이도 output의 분포를 따라 가상의 user input을 만들어 학습을 할 수 있게도 만들었다.
Methods
- Local Hint Network, Global Hint Network를 사용하여 main network에 살을 덧붙여 "hint"를 주어 색칠에 도움을 되게 했다.
용어:
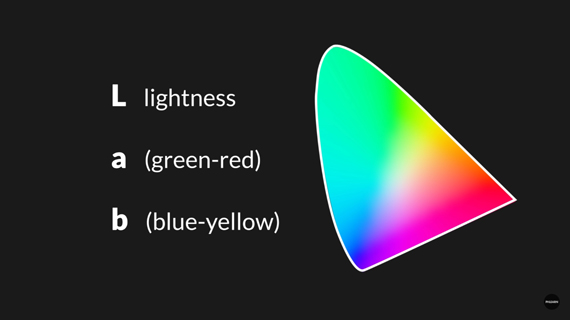
- Lab (color channel different from RGB!)
- L → Lightness (luminescence)
- a and B for color spectrum green-red and blue-yellow respecitvely.
colorization
- 2 Stage Process:
- classification loss를 활용해 automatic colorization을 진행
- fine-tuning 을 통해 user-interactive colorization을 진행. 이때는 Regression Loss를 사용.
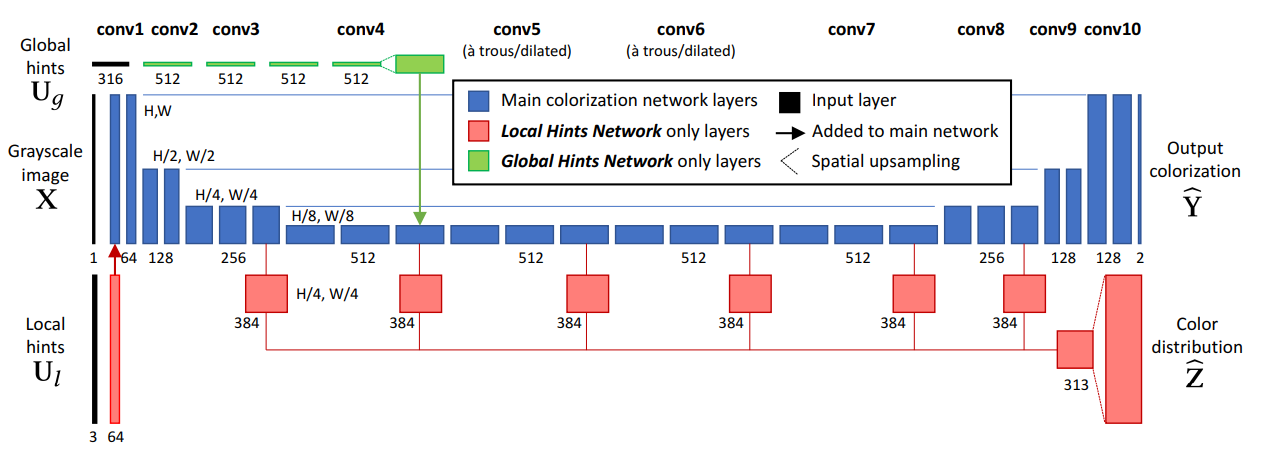
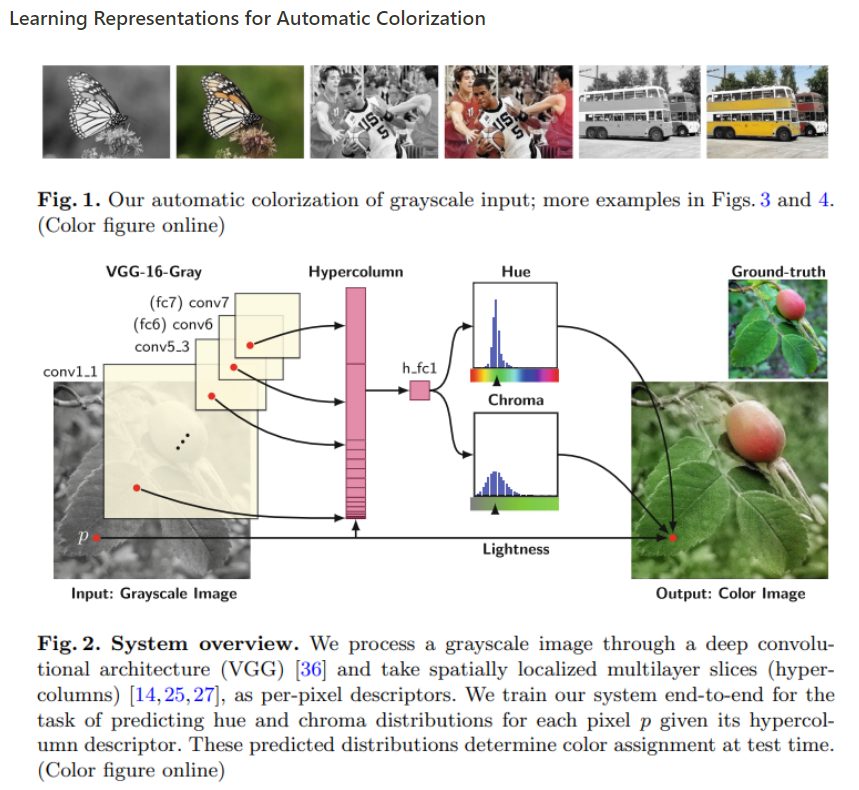
위 그림은 이 논문의 핵심인 전체적인 모델 파이프라인이다. 특이사항으로 Grayscale image, Local Hints, Global Hints Network로 구성된 전체 네트워크를 볼 수 있다.
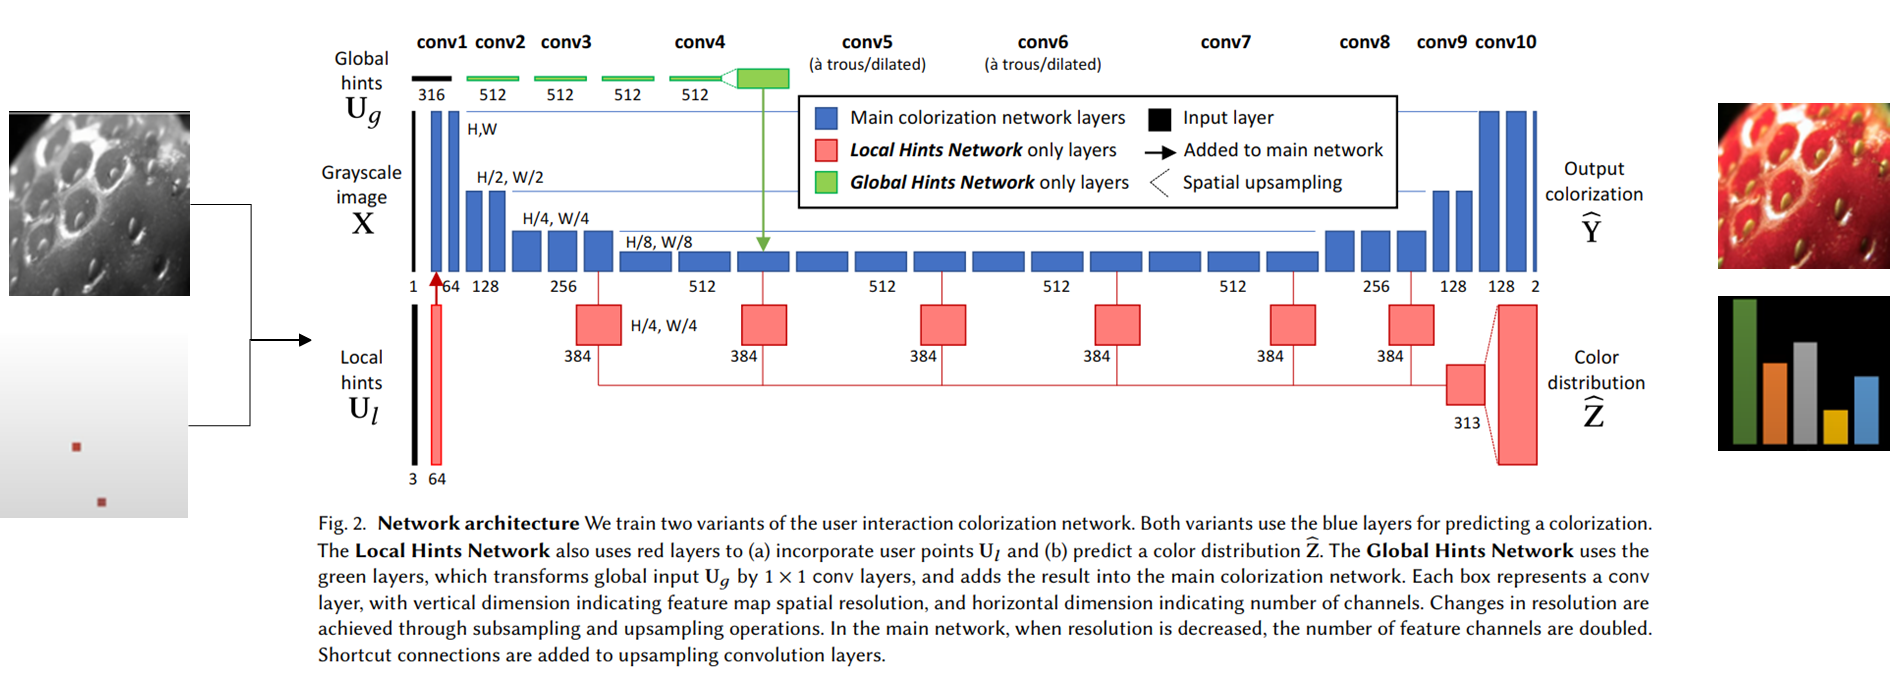
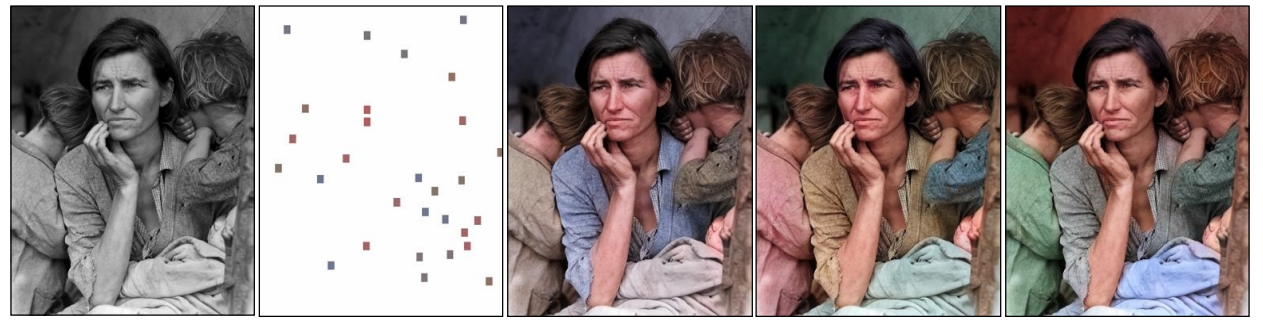
위 사진은 input이 왼쪽처럼 grayscale 이미지와 user input (hint)가 같이 포함된다. hint는 랜덤하게도 딸기의 patch를 뽑아내서 힌트를 주어 학습시킨다.
Local Hint Network
Local Hint Network Structure
- Sparse user point랑 input grayscale image랑 concat해서 input으로 넣음.
- 동시에 각 pixel 마다 color distribution을 예측하여 (sparse user point랑 input grayscale image concat된걸로) user에게 색깔을 추천함. (Single colorization이랑 비슷한 원리) 이므로 main branch에 있는 feature 를 reuse함 (making hypercolumn)
- 은 main branch 에다가 side branch (hypercolumn) 를 추가한 구조.
Hypercolumn 이란
input이 주어졌을때 그 위치 (pixel 위치)의 output은 그 pixel보다 위에있는 layer들의 feature들을 하나의 벡터로 stack하여 만든 feature들이 합이라고 볼 수 있다.
- https://openaccess.thecvf.com/content_cvpr_2015/papers/Hariharan_Hypercolumns_for_Object_2015_CVPR_paper.pdf
- https://link.springer.com/chapter/10.1007/978-3-319-46493-0_35
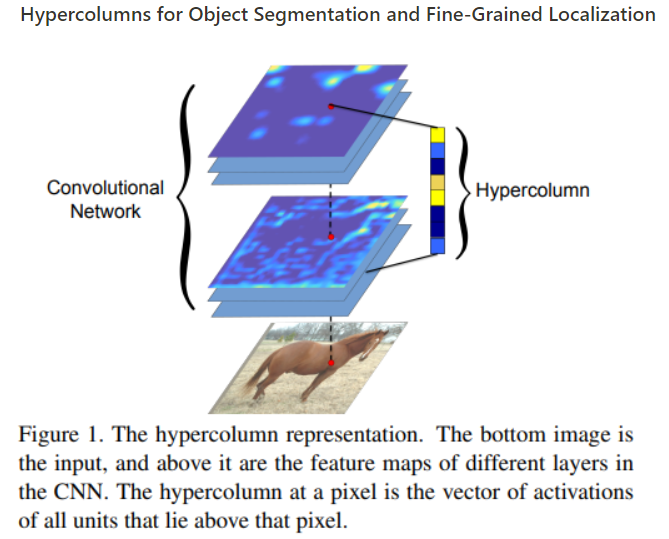
위 두 논문에서 언급한 hypercolumn approach로 main branch (파란색)에 있는 convolutional layer에서 low-level 부터 high-level feature을 추출하여 hypercolumn을 만들어 segmentation과 localization에 도움을 줄 수있게 구성함.
이 논문은 hypercolumn을 직접 colorization에서 사용한 논문이며 Real-Time 논문 저자들도 이 방법을 그대로 채택하여 사용하였다.
- equivalently extract per-pixel descriptors by reading localized slices of multiple layers
- Colorization에서 hypercolumn은 각 convolution layer마다 pixel에서 나오는 색을 이미지를 stack해서 (high level feature을 제일 많이 extract하는듯) fc layer을 통과하여 hue and lightness 를 추출하여 colorize를 pixel마다 진행.
- input data 부터 conv7 (fc7) layer에서 feature를 layer단에 spatial location을 추출하여 12,417 channel descriptors를 생성하여 hypercolumn에 stacking함.
Global Hints Network
Input 받는 원리
- User가 global statistics (histogram and saturation 정보)를 제공을 통해 진행
- 제공하지 않을 시 average histogram과 saturation 으로 진행
- Global histogram 계산:
- XYZ color 에서 bilinear interpolation을 통해 Y를 1/4 화질로 resize하고 각 pixel을 quantized ab space에다가 encoding함.
- Global Saturation 계산:
- GT image를 HSV color space로 변환 후 avereage over S channel spatially…
- GT 색깔 분포, saturation을 (둘중에 하나, 둘다, 아니면 둘다 X) 랜덤으로 학습때 hint로 reveal함.
Global Hints Network Structure
- Local Hint Network처럼 input이 spatial information을 담고있지 않아 main colorization network 중간에 feature information을 upsampling하여 integrate함 (conv4)
- global hint input이 4 conv-relu layer, 1x1 kernel size, 512 channel을 거쳐서 conv4 feature map과 같은 size를 가지게 shape을 조정함.
Hint 생성되는 방법
-
local hints () 이나 global hints ()는 "peek projection" function을 ground truth image (색이 있는 이미지)에서 뽑아낸다.
-
는 peek projection function이며 user input이 sampled되는 함수이다. 여기서 user가 직접 뽑거나, random sampling 또는 2D Gaussian distribution을 따르게 뽑아낸다.
Results
아무래도 colorization이라 PSNR 점수보다 흑백이미지 에서 색 구현을 얼마나 잘 했는지가 중요한것 같아 이미지 result figure만 첨부하였다.
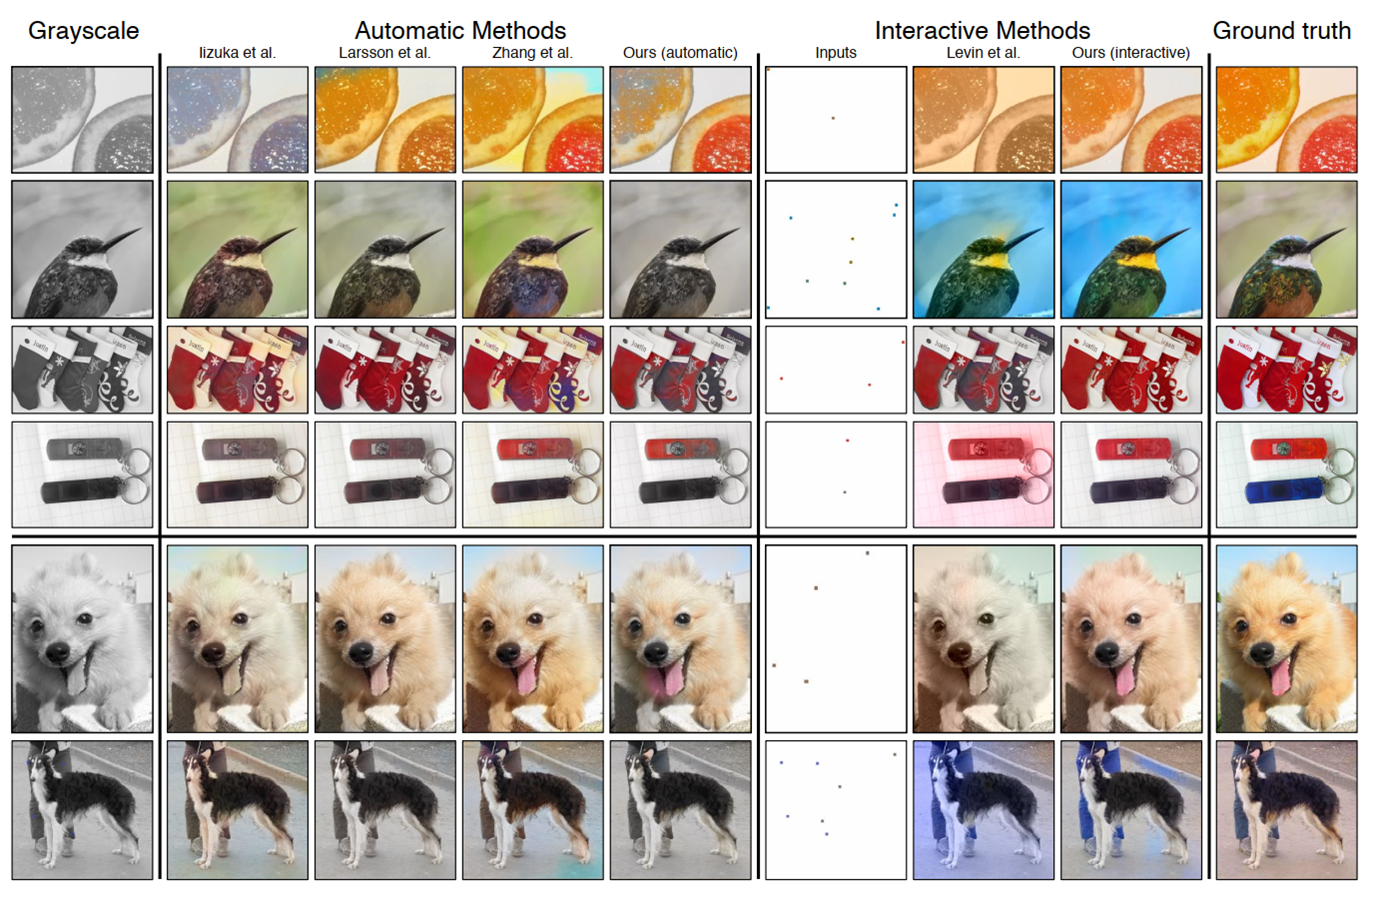
위 이미지처럼 automatic methods는 완벽하게 색 구현을 하지 못했다. interactive methods를 보면 user input (hint)에 따라 색을 ground-truth와 비슷하게 구현할수 있다고 볼수 있다.
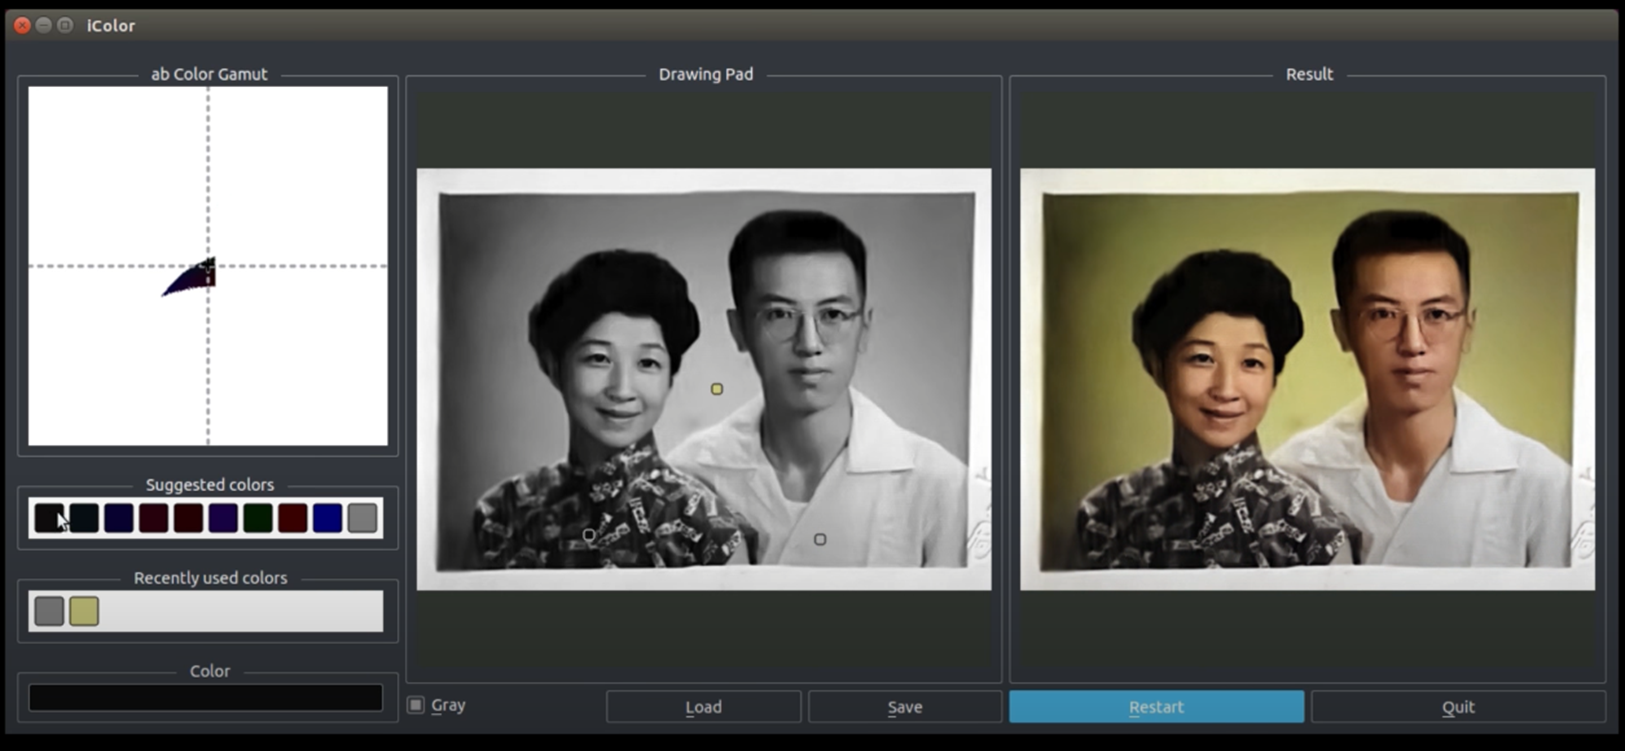
위 이미지는 GUI로 실행되는 화면이다.
코드 구현
주의:
Python 2.7 기반 코드. (Python 2.7로 downgrade 한 후, pip install future 다운받아야됌. opencv 도 python2 version으로 받아야됌).
Python 3 로는 안돌아가며 구현하고 싶은 분들은 python 2.7로 downgrade해서 setting 설정후 돌려야된다.
Training code는 아래 링크에 남겨두겠다.
https://github.com/richzhang/colorization-pytorch
(1) automatic colorization (1p000)
(2) interactive colorization with a few random hints (0p125)
(3) interactive colorization with lots of random hints. (0p031)
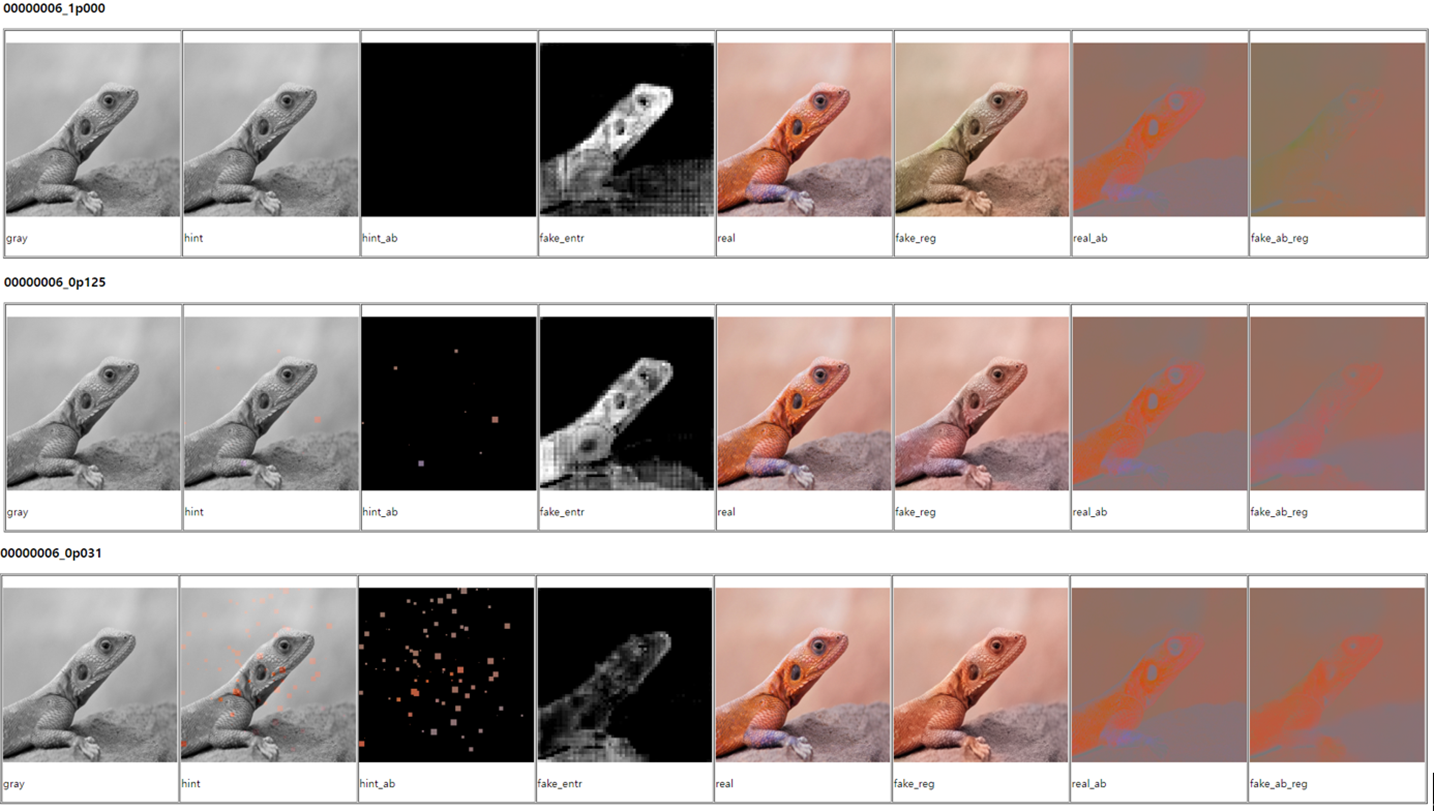
3가지 이미지를 hint 개수에따라 colorization의 차이를 볼 수 있다. Fake_reg가 생성된 이미지고 그 옆에있는 (5번째 이미지)는 ground-truth 이미지이다. 3번째 도마뱀 사진을 보면 fake_reg 이미지는 hint를 매우 많이 받았다. 이럴 시에 fake_reg에는 거의 완벽하게 ground truth 이미지랑 비슷한 색상을 볼 수 있다. 반대로 힌트를 아예 안받은 1번 이미지 같은 경우 fake_reg는 거의 real 이미지의 색을 구현하지 못했다. 결국 힌트 패치 개수에 따라 색구현 차이가 많이 난다.
Reference
- 본 논문: https://arxiv.org/pdf/1705.02999.pdf
- 코드구현 GUI: https://github.com/junyanz/interactive-deep-colorization/
- Training with PyTorch: https://github.com/richzhang/colorization-pytorch