내 개인적인 느낌에 코딩테스트에서 경로찾기 문제의 출제 의도는 네트워크 관련 알고리즘을 평가하기 위해서가 아닐까 생각한다. 경로찾기 혹은 네트워크 알고리즘은 라면의 스프 안에 들어간 미역조각처럼 코딩테스트에 있으나 없으나다. 하지만 "미역조각이 없겠지" 라고 생각하는 건 좀 안일하지 않을까?
오늘 비도 오는데 라면 먹고 싶다.
 오늘은 이 책을 공부하고 실습한 내용을 주로 다룬다.
그래프와 Dijkstra's Algorithm
데이터가 흐르는 경로 중 최단경로를 찾아낼 때는 세 가지 자료구조가 유용하게 쓰인다.
- Graph
- Adjacency List = 인접 리스트
- Priority Queue(Min priority) = 우선순위 큐(최소 우선순위)
그래프와 인접리스트는 그래프 자료구조를 표현하기 위함이고, Priority Queue 는 정점을 방문했을 때 겨쳐야 할(아직 방문하지 않은) 정점들을 저장하고 우선순위대로 방출하기 위해 존재한다. 모두 Dijkstra 알고리즘에서 쓰이게 될 것이다.
Dijstra 알고리즘을 고려하기 전 아래의 두 가지 특성을 생각해봐야 한다.
- Greedy(탐욕법) 알고리즘이다. 각 과정에 드는 비용이 크다면 좋은 선택이 아닐 수도 있다.
- Directed, Undirected 두 상황 다 사용 가능하다.
물론 대부분의 상황에선 잘 먹힌다고 얘기되는 것 같다.
필수 구현 요소
Priority Queue & Heap
우선 그래프나 Dijkstra 알고리즘을 배우기 전 선행학습요소인 Priority Queue 에 대해 알아보자. 이걸 먼저 해둬야 나중에 헷갈리지 않을 것 같다.
Priority Queue 는 기존 Queue 가 순서에 따라 FIFO 하는 것과 다르게, 우선순위에 따라 요소를 방출한다.
우선순위란 클로저를 이용해서 먼저 지정해야 한다. 우선순위는 일종의 순서를 정해주는데, 우선순위가 값의 크기에 따라 정해진다고 가정했을 때 Max-Priority 는 큰 값부터 방출될 것이고 Min-Priority 는 작은 값이 방출될 것이다.
Priority Queue 를 구현할 때는 정렬된 배열이나 BST 를 사용하기도 하지만 주로 Heap 을 이용해서 구현하는 경우가 많다. Heap 에서 정렬과 관련된 부분을 자동으로 처리해주기 때문에 시간복잡도에서 큰 이득을 볼 수 있기 때문이다.
앞으로 Heap 구현을 살펴볼 것인데 Heap 주제에 굉장히 고려할 것, 공부할 것이 많다(만약 이 글을 읽는 독자가 Heap 에 대해 모른다면 Heap 을 먼저 공부하길 바란다).
// sort 로 < 를 대입할 경우 Min-Heap, 반대일 경우는 Max-Heap
class Heap<T: Equatable> {
	typealias SORT = (T, T) -> Bool

    private(set) var elements: [T]
    let sort: SORT

    var isEmpty: Bool { elements.isEmpty }
    var count: Int { elements.count }
    var peek: T? { elements.first }

    init(
    	sort: @escaping SORT,
        elements: [T] = []) {

        	self.sort = sort
            self.elements = elements

            if self.elements.isEmpty == false {
            	for i in stride(from: elements.count / 2 - 1, through: 0, by: -1) {
                	siftDown(from: i)
                }
            }
        }

	func leftChildIndex(from index: Int) -> Int {
		(index * 2) + 1
	}

	func rightChildIndex(from index: Int) -> Int {
		(index * 2) + 2
	}

    func parentIndex(from index: Int) -> Int {
		guard index > 0 else { return 0 }
		return (index - 1) / 2
	}

    func siftUp(from index: Int) { // 0...index 까지 올라가면서 정렬(Swap)
    	// #1
    	var child = index
        var parent = parentIndex(from: child)

        while child > 0 && sort(elements[child], elements[parent]) {
        	// #2
        	elements.swapAt(child, parent)
            // #3
            child = parent
            parent = parentIndex(from: child)
        }
    } // 1-2-3 순서로 읽으면 되고, 3은 1을 반복하는 것으로 해석하면 됨.

    func siftDown(from index: Int) { // 0...index 까지 내려가면서 정렬(Swap)
		var candidate = 0
		var parent = index

        while true {
        	// #1
        	let lh = leftChildIndex(from: parent)
            let rh = rightChildIndex(from: parent)

            candidate = parent

            // #2
            if lh < elements.count && sort(elements[lh], elements[candidate]) {
            	candidate = lh
            }
            if rh < elements.count && sort(elements[rh], elements[candidate]) {
            	candidate = rh
            }
            if candidate == parent {
            	return // Swap 이 일어나지 않으면 루프 종료
            }

            //#3
            elements.swapAt(parent, candidate)
            parent = candidate
        }
    } // Child 인덱스를 이용해서(1) sort 가 제대로 되지 않은 child 를 찾아내고(2) Swap 한다(3).

    func insert(_ element: T) {
    	elements.append(element)
        siftUp(from: elements.count-1) // 맨 밑에서부터 siftUp
    }

    func remove(at index: Int) -> T? {
    	guard index < elements.count else { return nil }

        if index == elements.count - 1 {
        	return elements.removeLast()
        }
        else {
        	elements.swapAt(index, elements.count-1)

            defer {
            	siftDown(from: index)
                siftUp(from: index)
            }

            return elements.removeLast()
        }
    }
}
Priority Queue 는 Heap 의 insert, remove 가 필요하고
Heap 이 insert, remove 를 구현하기 위해서는 siftDown, siftUp 구현이 필요하다.
Heap 의 주요 메커니즘은 위에서 언급한 sift 이다. 체를 친다는 뜻인데, siftUp 의 경우는 파라미터로 전달된 시작점 인덱스부터 start-index 까지 차례대로 올라가면서 sort 클로저를 실행(원래는 parent, child 순서로 실행해야 하는 클로저를 반대로 실행) 하면서 Swap 을 계속 하는 것이다.
siftDown 은 위의 것보다 좀 더 복잡한데, start-index 부터 파라미터로 전달된 도착점 인덱스까지 두 Child 를 이용해 sort 클로저(원래는 parent, child 순서로 실행해야 하는 클로저를 반대로 실행)를 실행하면서 Swap 을 계속 하는 것이다.
siftDown, siftUp 은 Swap 이 일어나지 않으면 루프를 종료한다. Heap 은 내부에 데이터를 저장한 뒤 siftUp, siftDown 을 이용하여 내부적으로 정렬을 진행한다.
remove 는 좀 특별한데, 타겟 인덱스와 맨 마지막 인덱스 위치에 있는 데이터를 서로 바꿔준 뒤 삭제하고 타겟 인덱스를 중심으로 siftDown/siftUp 한다.
참고 : 시간복잡도
| 연산 | 빅오 표기법 |
|---|---|
| remove | O(log n) |
| insert | O(log n) |
| search | O(n) |
| peek | O(n) |
Heap 구현이 끝나면 Priority Queue 는 X밥이다.
// Queue 프로토콜은 enqueue, dequeue, peek, isEmpty 등을 구현하도록 정의해 두었음.
class PriorityQueue<Element: Equatable>: Queue {
	typealias SORT = (Element, Element) -> Bool

	private var heap: Heap<Element>

    init(sort: @escaping SORT, elements: [Element} = []) {
    	heap = Heap(sort: sort, elements: elements)
    }

    var isEmpty: Bool { heap.isEmpty }
    var peek: Element? { heap.peek() }

    func enqueue(_ element: Element) -> Bool {
    	heap.insert(element)
        return true
    }

    func dequeue(_ element: Element) -> Element? {
    	heap.remove()
	}
}
참고로 말하면 아직 딕스트라 알고리즘 안했다. 그리고 아직 못한다. 인접 리스트가 남았기 때문이다.
Adjacency List
그래프를 딕셔너리를 이용해서 나타낸다. 딕셔너리는 [Vertex<Element>: [Edge<Element>]] 타입인데, 각 정점마다 연결된 간선을 저장하기 위함이다.
정점은 데이터와 그래프에서의 자신의 위치를 저장하고
간선은 시작정점과 도착정점을 저장하고 있다.
아래의 구현은 내가 직접 공부한 코드인데 아래에 Chat-GPT 께서 작성하신 간단한 버전의 코드도 있다. 내가 사용하려는 API 는 둘 다 구현해 놓은 것이니 원하는 것을 보면 되겠다.
// MARK: - 정점 구현
struct Vertex<T> {
	let index: Int
    let data: T
}

extension Vertex: Hashable where T: Hashable {}
extension Vertex: Equatable where T: Equatable {}

// MARK: - 간선 구현
struct Edge<T> {
	let source: Vertex<T>
    let destination: Vertex<T>
    let weight: Double?
}

extension Edge: Equatable where T: Equatable {}

// MARK: - 그래프 구현
public protocol Graph {

    associatedtype Element

    func createVertex(data: Element) -> Vertex<Element>
    func addDirectedEdge(from source: Vertex<Element>,
                         to destination: Vertex<Element>,
                         weight: Double?)
    func addUndirectedEdge(between source: Vertex<Element>,
                           and destination: Vertex<Element>,
                           weight: Double?)
    func add(_ edge: EdgeType, from source: Vertex<Element>,
             to destination: Vertex<Element>,
             weight: Double?)
    func edges(from source: Vertex<Element>) -> [Edge<Element>]
    func weight(from source: Vertex<Element>,
                to destination: Vertex<Element>) -> Double?
}

extension Graph {
    public func addUndirectedEdge(between source: Vertex<Element>,
                                  and destination: Vertex<Element>,
                                  weight: Double?) {
        addDirectedEdge(from: source, to: destination, weight: weight)
        addDirectedEdge(from: destination, to: source, weight: weight)
    }

    public func add(_ edge: EdgeType, from source: Vertex<Element>,
                                        to destination: Vertex<Element>,
                                        weight: Double?) {
        switch edge {
        case .directed:
            addDirectedEdge(from: source, to: destination, weight: weight)
        case .undirected:
            addUndirectedEdge(between: source, and: destination, weight: weight)
        }
    }
}

// MARK: - 인접 리스트 구현
class AdjacencyList<T: Hashable>: Graph {
	var adjacencies: [Vertex<T>: [Edge<T>]] = [:]
    init() {}

    func createVertex(data: T) -> Vertex<T> {
    	let vertex = Vertex(index: adjacencies.count, data: data) // index 는 생성되는 순서대로 부여된다.
        adjacencies[vertex] = [] // 처음에는 간선이 없다.
        return vertex
    }

    func addDirectedEdge(
    	from source: Vertex<T>,
        to destination: Vertex<T>,
        weight: Double?) {

	        let edge = Edge(
    	    	source: source,
        	    destination: destination,
            	weight: weight)
	        adjacencies[source]?.append(edge)
    	}

    func edges(from source: Vertex<T>) -> [Edge<T>] {
    	adjacencies[source] ?? []
    }

    func weight(
    	from source: Vertex<T>,
        to destination: Vertex<T>) -> Double? {

        edges(from: source)
        	.first { $0.destination == destination }? // edge 가 같은지는 정점의 값으로 판단한다.
            .weight
        }
}
아래는 Chat-GPT 다. 네이밍만 살짝 바꿔주었을 뿐 나머지는 완전 복사 붙여넣기이다.
enum EdgeDirection {
    case directed
    case undirected
}

class Vertex<T> {
    var value: T
    var neighbors: [(node: Vertex<T>, weight: Double)]

    init(_ value: T) {
        self.value = value
        self.neighbors = []
    }

    func addNeighbor(_ vertex: Vertex<T>, weight: Double = 0.0, direction: EdgeDirection = .undirected) {
        self.neighbors.append((node: vertex, weight: weight))
        if direction == .undirected {
            vertex.neighbors.append((node: self, weight: weight))
        }
    }
}

class AdjacencyList<T> {
    var nodes: [GraphNode<T>]

    init(_ nodes: [GraphNode<T>]) {
        self.nodes = nodes
    }

    func addNode(_ node: GraphNode<T>) {
        self.nodes.append(node)
    }
}
Chat-GPT 는 5분도 안되서 뚝딱 하나 만들어줬다.
잠깐 사설을 하자면 이런식으로 빠르게 얻은 답을 쉽게 적용하고 싶어질 것만 같아 두렵다. 이럴 수록 기본을 잘 닦아놔서 이 코드에 허점이 있는지 없는지 빠르게 판단할 수 있는 능력을 길러야 할 것 같다.
확실히 개발자 시장은 양극화가 심해질 것 같다. AI 를 효율적으로 사용할 경우 1명은 잘하면 3명 4명도 커버할 수 있는 개발자가 될 것이다.
누군가에게는 위기이고 누군가에게는 기회다.
Dijkstra's Algorithm 알아보기
이제 Dijkstra's 알고리즘을 알아보자. 알고리즘은 앞에서 설명했다시피 Greedy 이다. 최단경로를 찾을 때 유용하다. 탐욕법이기 때문에 각 단계마다의 비용을 잘 따져보아야 한다.
우선 어떻게 작동하는지 알아보기 위해 내가 직접 그린 이미지를 보자... 이미지는 명저 중 하나인 Introduction to Algorithms 에서 가져왔다.
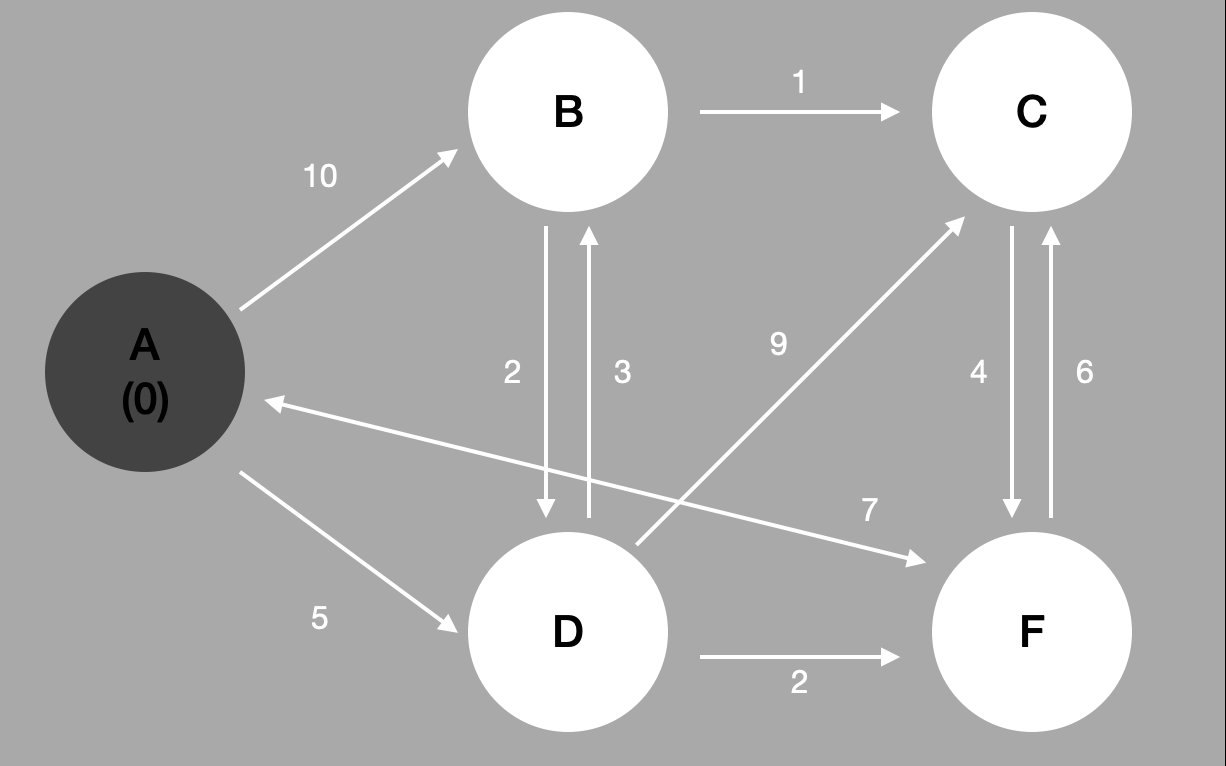
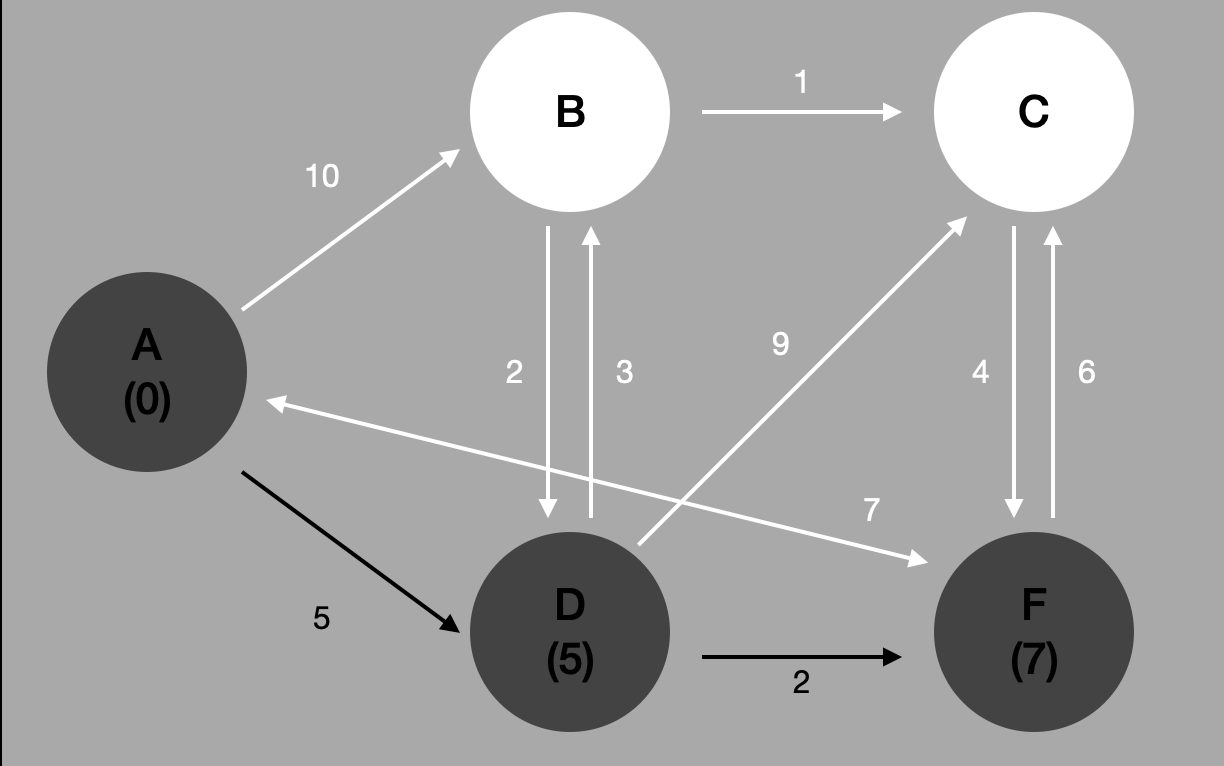
맨 왼쪽 정점부터 시작한다. 짙은 회색은 이동한 정점이라는 뜻이다.
#1 시작점에서 간선 찾고 이동하기.
시작점은 A 다. A 에서 간선들을 살펴보니 두 가지 선택지가 있다.
- A to D
- A to B
무엇이 더 가중치가 적은가? D 다. 그러므로 아래와 같이 이동하게 된다.
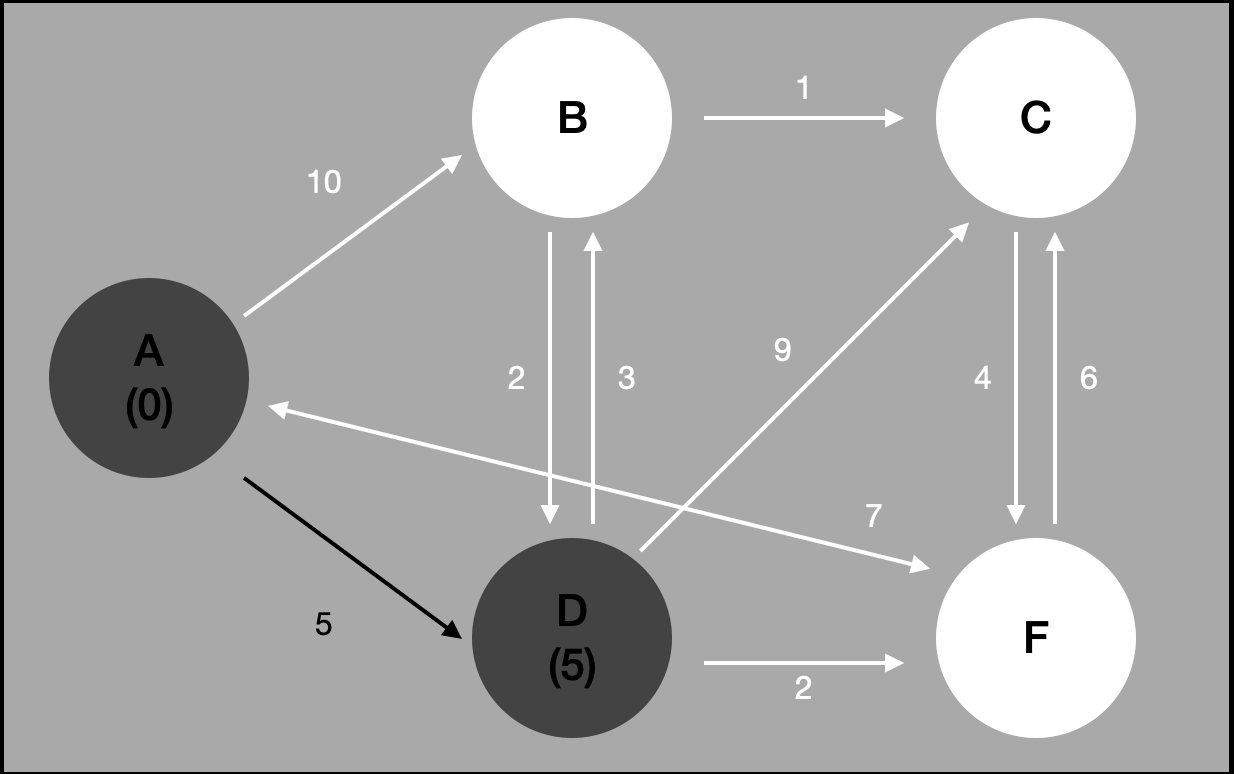
#2 여러 간선들에서 최소 가중치 찾기
D 로 이동했다. 가중치가 가장 적은 간선을 통해 이동할 수 있는 정점이기 때문이다.
이제 A 에서 그랬던 것처럼 D 에서도 똑같이 해주면 되겠다. 간선들을 살펴보고 선택지를 골라보자.
- D to B
- D to C
- D to F
이 중 가중치가 가장 적은 것은 F 이다. 그럼 F 로 이동하면 된다.
여기서 중요한데, 간선이 여러개일 경우, 최소 가중치를 가진 간선을 이동하고 나서 차례대로 이동하게 된다.
지금까지(A to D) 들어간 가중치는 5이다. 그리고 F 까지 이동하게 되면 2를 더해 7이 된다. 즉, 아래와 같은 상황이 된다.
#3 도착점에 방문했을 시
F 로 이동했다. F 에서 방문할 수 있는 정점은 하나뿐이다. C 이다.
즉, C 경로까지 가고 싶다면 A-D-F-C 로 갈 수도 있는 것이다. 그런데 뭔가 이상하다. 과연 이것은 최단경로라고 할 수 있을까?
결과와 표는 아래와 같다.
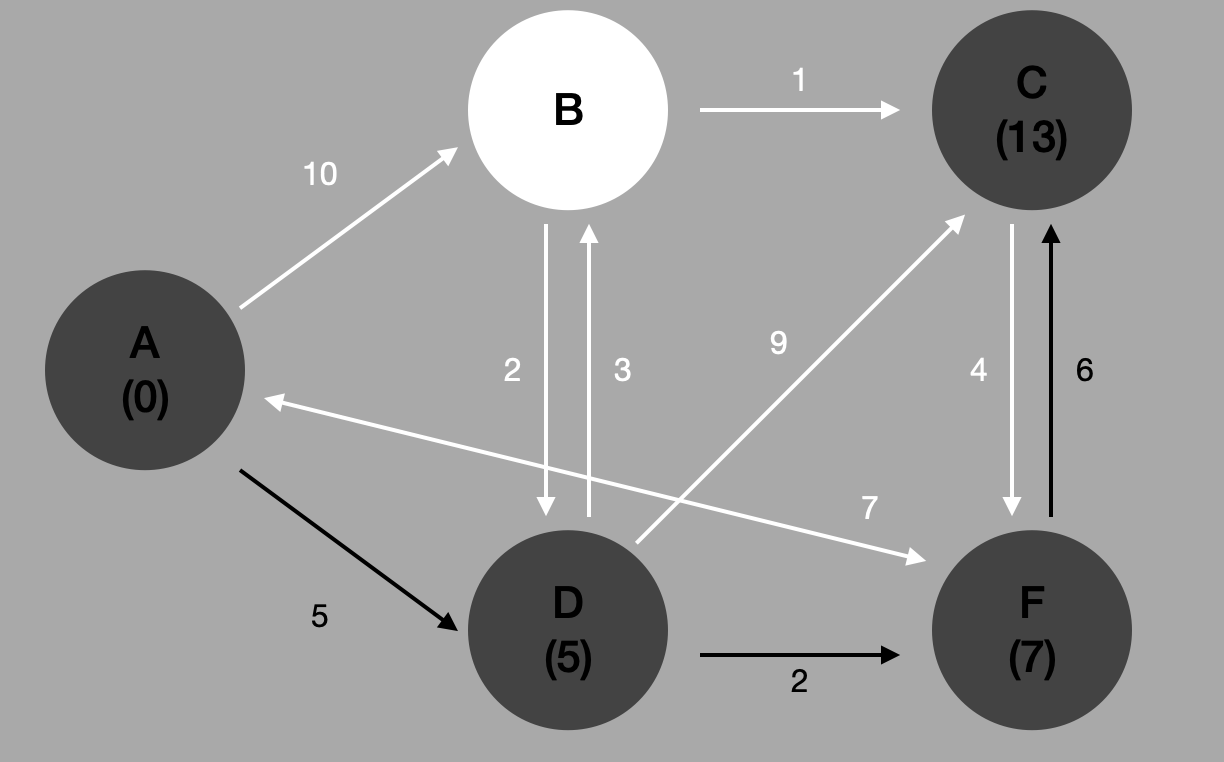
기억나는지 모르겠다. 간선이 여러개일 경우, 최소 가중치를 가진 간선을 이동하고 나서 차례대로 이동하게 된다.
#4 예전에 방문한 정점 중 다른 정점도 방문할 수 있는 정점이 있었던 것 같은데...?
다시 D 로 돌아와보자. 우리는 여기서 F 를 방문했다. 그리고 나머지는 그대로이다.
- D to B
- D to C
- D to F (방문)
B 로 이동하면 3 가중치를 갖는다. 여기서부터 다시 탐색을 시작해야 한다.
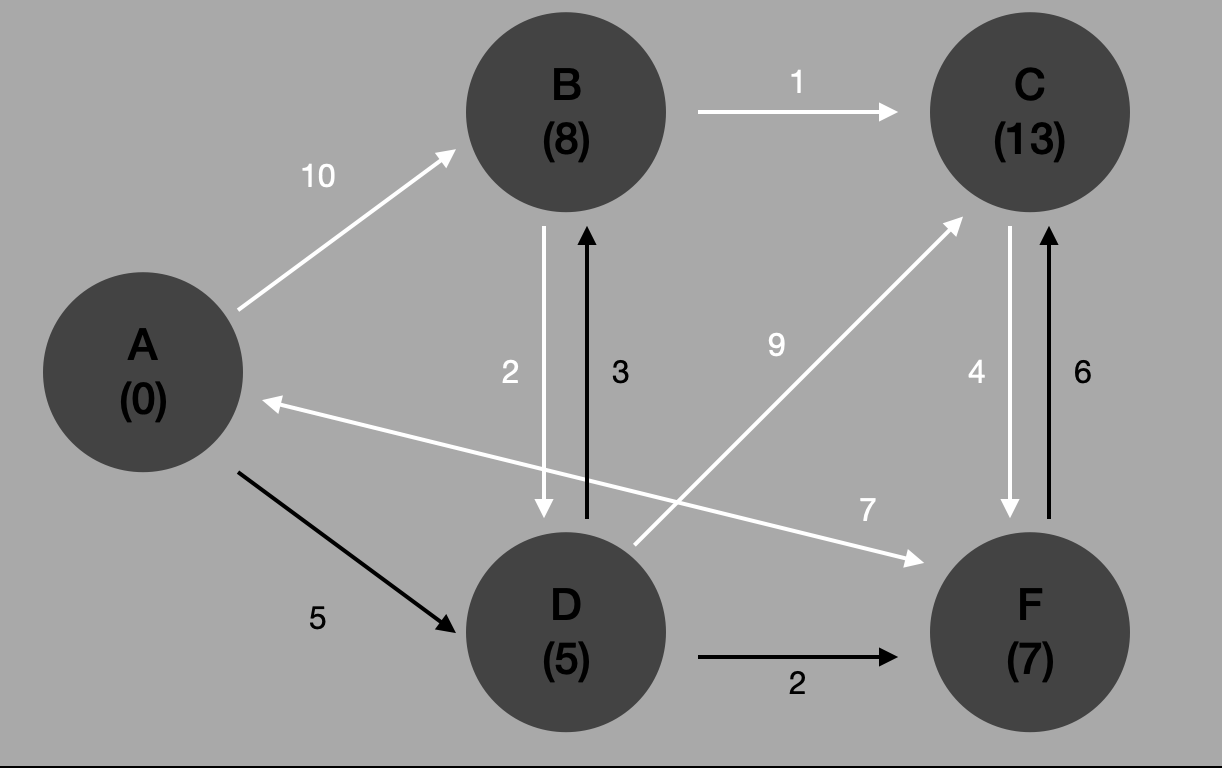
#5 최소 가중치를 가질 경우 업데이트되는 기존 정보
B 로 이동했을 경우 이동할 수 있는 정점은 C 이다. #3 에서 C 까지 오는 가중치는 13 이었다.
하지만 지금은? 9이다. 아까보다 더 낮은 가중치 경로를 찾았다.
지금까지 순회한 경로와 가중치는 다음과 같다.
- A-D-F-C = 13
- A-D-B-C = 9
최소경로인 A-D-B-C 로 이동했을 때 9 라는 최소 가중치를 갖는다.
Dijkstra's Algorithm 구현
enum Visit<T: Hashable> {
	case start
    case edge(Edge<T>)
}

class Dijkstra<T: Hashable> {
	typealias Graph = AdjacencyList<T>
    let graph: Graph

    init(graph: Graph) {
    	self.graph = graph
	}

    func shortestPath(from start: Vertex<T>) -> [Vertex<T>: Visit<T>] {
    	// #1
    	var paths = [start: .start]
        var priorityQueue = PriorityQueue<Vertex<T>>(sort: {
        	self.distance(to: $0, with: paths) < self.distance(to: $1, with: paths)
        })
        // #2
        priorityQueue.enqueue(start)

        // #3
        while let vertex = priorityQueue.dequeue() {
        	for edge in graph.edges(from: vertex) {
            	guard let weight = edge.weight else { continue }
                // #4
                if paths[edge.destination] == nil ||
                	distance(to: vertex, with: paths) + weight <
                    distance(to: edge.destination, with: paths) {

                    paths[edge.destination] = .edge(edge)
                    priorityQueue.enqueue(edge.destination)
                }
            }
        }

        return paths
    }

    private func route(
		to destination: Vertex<T>,
		with paths: [Vertex<T>: Visit<T>]) -> [Edge<T>] {

			var vertex = destination
			var path = [Edge<T>]()

			while
				let visit = paths[vertex],
				case .edge(let edge) = visit
			{
				path = [edge] + path
				vertex = edge.source
			}

			return path
		}

	private func distance(
		to destination: Vertex<T>,
		with paths: [Vertex<T>: Visit<T>]) -> Double {

			let path = route(to: destination, with: paths)
			let distances = path.compactMap({ $0.weight })

			return distance.reduce(0.0, +)
		}
}- 반환값은
[Vertex<T>: Visit<T>]이다. 파라미터를Vertex로 하였기 때문에 문제 없다. - Priority 큐는 지금까지 방문한 정점을 저장하고, 정점에서 뻗어나가나는 간선을 추출하기 위해 사용한다. Queue 에 저장할 정점의 우선순위는 시작점부터 주어진 paths 를 지났을 때 더 가중치가 낮은 정점부터 방출되도록 세팅한다.
- Priority 큐에서 간선을 추출해서 가중치에 따라 검색한다.
- 도착정점이 방문한 적 없는 정점이거나, 가중치가 가장 적은 경로일 경우에는 반환값을 업데이트하고 Priority 큐에 도착점을 삽입한다.
마무리
분량이 너무 커져서 문제풀이는 다음 포스팅에서 해야 할 것 같다.
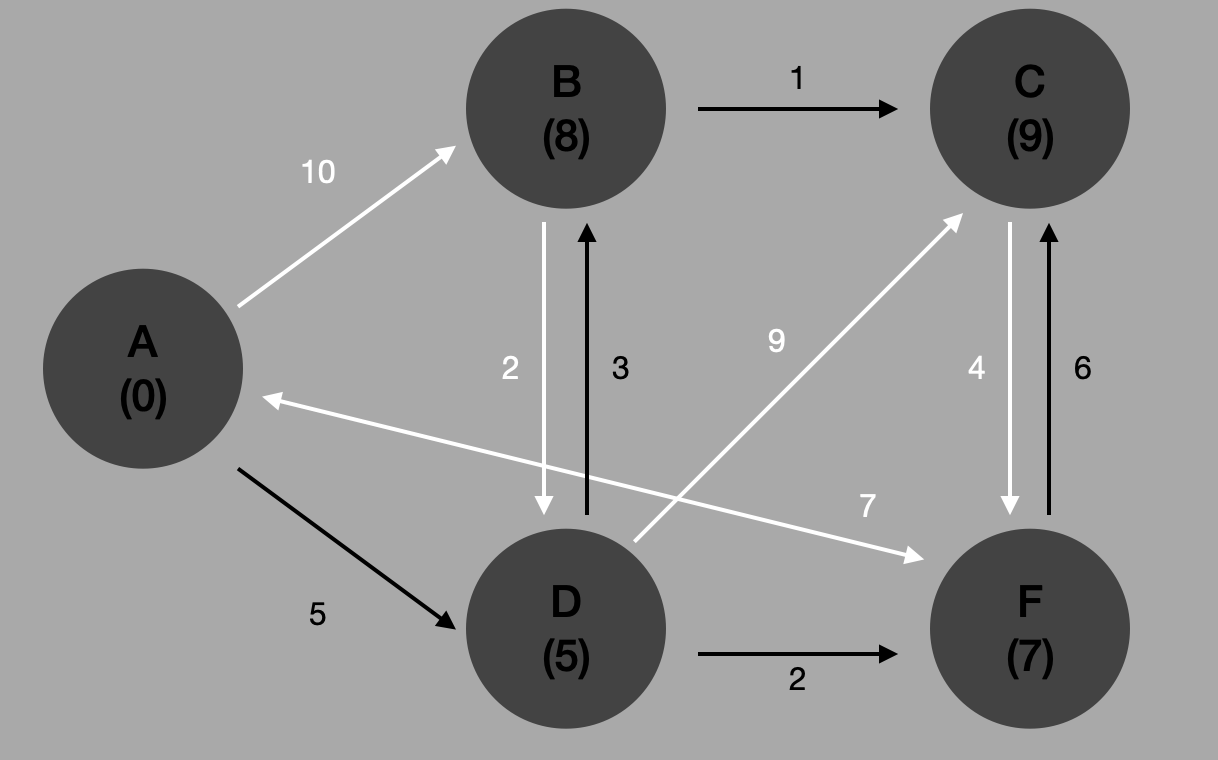
아직 순회하지 않은 나머지 경로와 가중치도 직접 해보면 다음과 같다.
- A-B-C = 11
- A-D-C = 14
다음 포스팅에서는 직접 백준에서 문제풀이를 해보고 추가할 내용에 대해 설명해보도록 하겠다.
출처
- 책 - Introduction to Algorithm
- 책 - Data Structure & Algorithms in Swift