React-query 설치하기
npm i react-queryReact-query 사용하기
my-api.js
import axios from "axios";

export const getTodos = () => axios.get("/api/todos").then((res) => res.data);

export const postTodo = (todo) =>
  axios.post("/api/todo", { todo }).then((res) => res.data);
handler.js
import { rest } from "msw";

const todos = [
  {
    id: `1 `,
    title: `park 1 `,
  },
  {
    id: `2 `,
    title: `park 2 `,
  },
  {
    id: `3 `,
    title: `park 3 `,
  },
  {
    id: `4 `,
    title: `park 4 `,
  },
  {
    id: `5 `,
    title: `park 5 `,
  },
];

export const handlers = [
  rest.get("http://localhost:3000/api/user/:userId", async (req, res, ctx) => {
    const { userId } = req.params;
    return res(
      ctx.json({
        name: `park ${userId}`,
      })
    );
  }),

  rest.get("http://localhost:3000/api/todos", async (req, res, ctx) => {
    return res(ctx.json(todos));
  }),
  rest.post("http://localhost:3000/api/todo", async (req, res, ctx) => {
    const { todo } = req.body;
    console.log(JSON.stringify(todo));
    todos.push(todo);
    return res(ctx.json(true));
  }),
];
QuickStared.jsx
import React from 'react'
import {useQueryClient,useQuery,useMutation} from 'react-query';
import {getTodos, postTodo} from './my-api';
export default function QuickStared() {
    const queryClient = useQueryClient();

    const query = useQuery("todos", getTodos);

    const mutation = useMutation(postTodo, {
        onSuccess:() =>{
            queryClient.invalidateQueries("todos");
        },
    })
    if(query.isLoading){
        return "Loading ...";
    }
    if(query.error){
        return "error"
    }
  return (
    <div>
        <ul>
            {query.data.map((todo)=>(
                <li key={todo.id}>{todo.title}</li>
            ))}
        </ul>
        <button onClick={() =>{
            mutation.mutate({
                id:Date.now(),
                title:"react-query"
            });
        }}
        >
            Add Todo
        </button>
    </div>
  )
}
onSuccess:() =>{ queryClient.invalidateQueries("todos"); }, 이코드를 주석시에는 Add todo 버튼 클릭시에는 개발자 도구 네트워킹탭을 통해 post가 된 것을 확인할 수 있지만 웹으로 바로바로 반영되지 않고 컴포넌트에 포커스가 일어 났을 때 내가 추가한 api 값이 호출되어 업데이트된다. 하지만 onSuccess:() =>{ queryClient.invalidateQueries("todos"); 코드를 통해 포커스가 필요 없이 버튼 클릭시 바로 업데이트 되는 것을 알 수 있다.
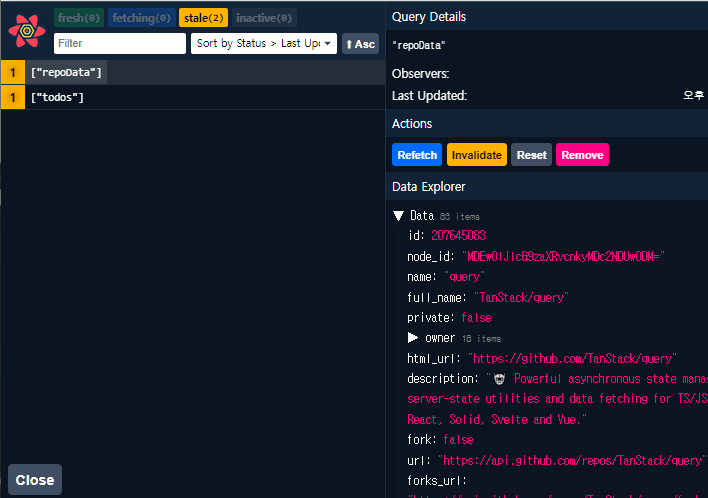
React-query devtools 사용하기
import Example from "./components/ReactQuery/Example";
import { QueryClientProvider, QueryClient } from "react-query";
import QuickStared from "./components/ReactQuery/QuickStared";
import { ReactQueryDevtools } from "react-query/devtools";

const queryClient = new QueryClient();

function App() {
  return (
    <div cassName="App">
      <QueryClientProvider client={queryClient}>
        <Example />
        <QuickStared />
        <ReactQueryDevtools />
      </QueryClientProvider>
    </div>
  );
}

export default App;
Pagenation
Pagenation.jsx
import axios from 'axios'
import React from 'react'
import { useQuery } from 'react-query'

export default function Pagenation() {
    const [page, setPage] = React.useState(0);
    const fetchProjects = (page = 0) => axios.get('/api/projects?page=' + page).then((res) => res.data);
    const {
          isLoading,
          isError,
          error,
          data,
          isFetching,
          isPreviousData,
     } = useQuery(['projects', page], () => fetchProjects(page), {
        //KeepPreviousData : true
    })
    return (
          <div>
            {isLoading ? (
              <div>Loading...</div>
            ) : isError ? (
              <div>Error: {error.message}</div>
            ) : (
              <div>
                {data.projects.map(project => (
                  <p key={project.id}>{project.name}</p>
                ))}
              </div>
            )}
            <span>Current Page: {page + 1}</span>
            <button
              onClick={() => setPage(old => Math.max(old - 1, 0))}
              disabled={page === 0}
            >
              Previous Page
            </button>{' '}
            <button
              onClick={() => {
                if (!isPreviousData && data.hasMore) {
                  setPage(old => old + 1)
                }
              }}
              // Disable the Next Page button until we know a next page is available
              disabled={isPreviousData || !data?.hasMore}
            >
              Next Page
            </button>
            {isFetching ? <span> Loading...</span> : null}{' '}
          </div>
    )
}
handler.js
import { rest } from "msw";

export const handlers = [
  rest.get("http://localhost:3000/api/projects", async (req, res, ctx) => {
    const pageIndex = req.url.searchParams.get("page");
    return res(
      ctx.json({
        projects: [
          {
            id: `1 ${pageIndex}`,
            name: `park 1 ${pageIndex}`,
          },
          {
            id: `2 ${pageIndex}`,
            name: `park 2 ${pageIndex}`,
          },
          {
            id: `3 ${pageIndex}`,
            name: `park 3 ${pageIndex}`,
          },
          {
            id: `4 ${pageIndex}`,
            name: `park 4 ${pageIndex}`,
          },
          {
            id: `5 ${pageIndex}`,
            name: `park 5 ${pageIndex}`,
          },
        ],
        hasMore: pageIndex < 4,
      })
    );
  }),


];
Pagenation에서 Previous Page button 이나 Next Page 버튼 클릭시에는 전체가 깜빡거리는것을 볼 수 있다. 이유는 key이 변동됨에 따라 useQuery가 api를 새로 재호출 하면서 기존에 data가 사라졌다가 다시 생성되면서 깜빡거리게 된다. 하지만 keepPrviousData: true를 통해 깜빡임을 없앨 수 있다.

풋살을 좋아하는 프론트엔드 개발자