Tomcat 설정 파일
- server.xml
<Connector port="8080" protocol="HTTP/1.1"
               connectionTimeout="20000"
               redirectPort="8443" />
JAR
- Java Archive
- jar 파일은 JVM 위에서 직접 실행거나 다른 곳에서 사용하는 라이브러리로 제공된다.
- 직접 실행하는
main()메서드가 필요하다.MANIFEST.MF파일에Main-Class를 설정해야 한다.
Manifest-Version: 1.0
Main-Class: com.example.demo.DemoApplication
WAR
- Web Application Archive
- war 파일은 Web Application Server 위에서 실행된다.
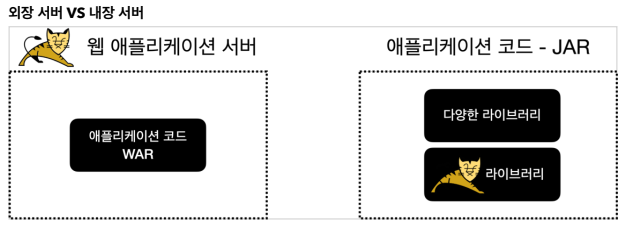
WAR 구조
WEB-INFclasses: 실행 클래스 모음lib: 라이브러리 모음web.xml: 웹 서버 설정 파일 (생략 가능)
- 정적 리소스
- js
- css
- image
- html
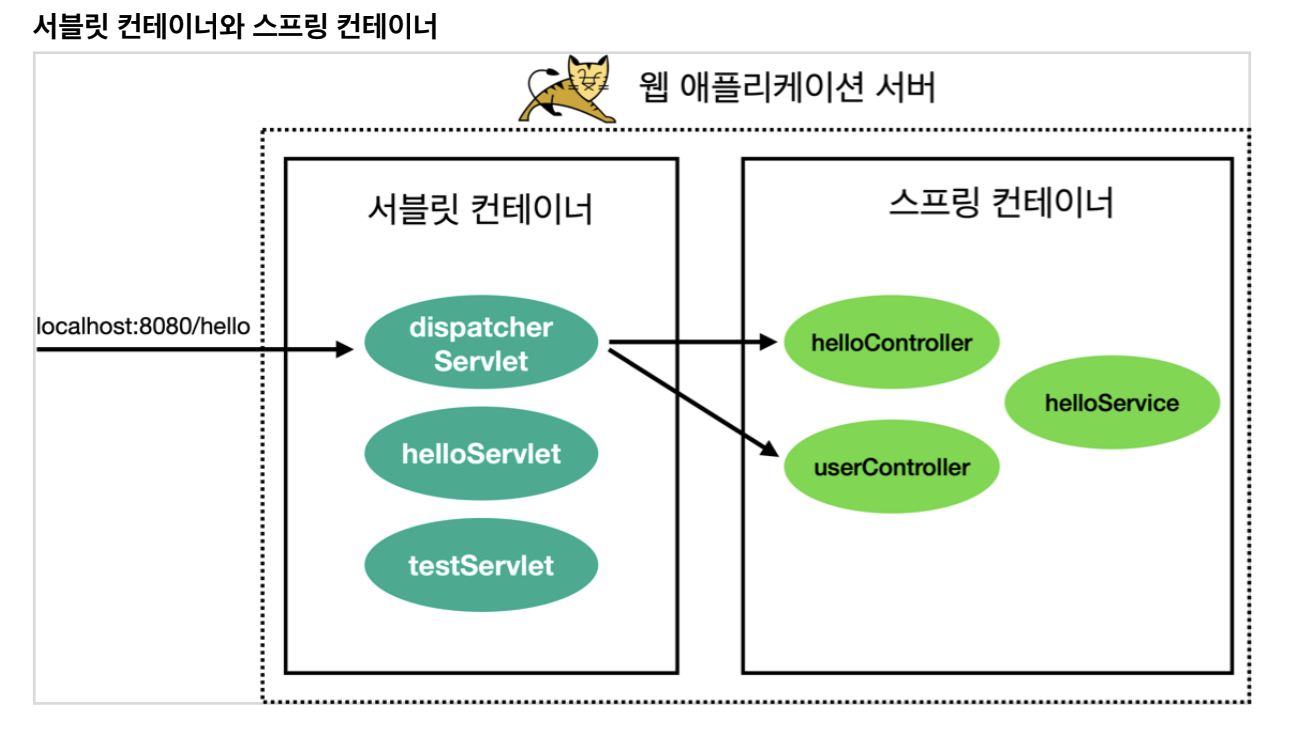
WAS 실행시 초기화 작업
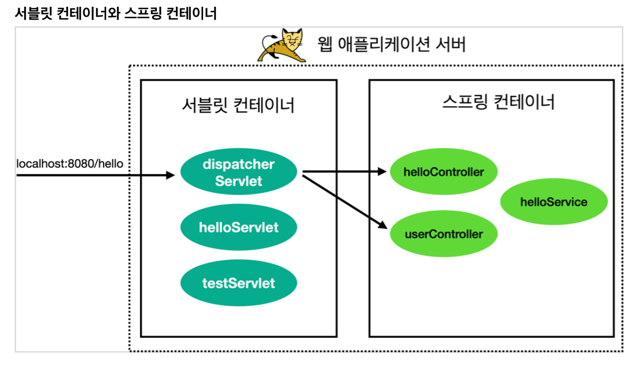
Servlet Container에Filter,Servlet을 등록한다.Spring Container를 만들고, 관련된Bean을 등록한다.Servlet Container와Spring Container를 연결하는DispatcherServlet을 등록한다.
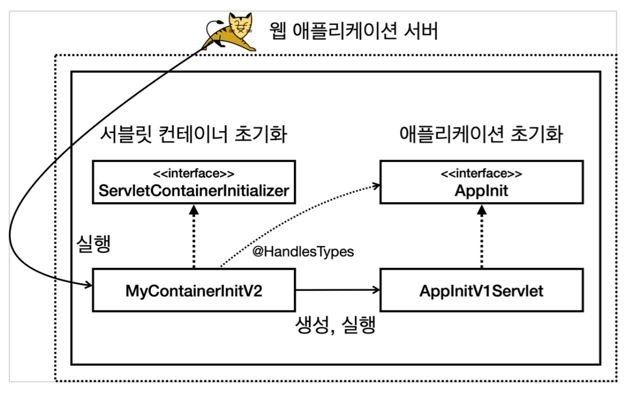
Servlet Container 초기화 방법
web.xml을 사용해서 초기화ServletContainerInitializer를 사용해서 초기화@HandlesTypes을 함께 사용onStartup첫번째 파라미터Set<Class<?>>에는@HandlesTypes어노테이션이 설정된 클래스들이 들어온다.
public interface ServletContainerInitializer {
    void onStartup(Set<Class<?>> c, ServletContext ctx) throws ServletException;
}
public class MyContainerInitV1 implements ServletContainerInitializer {
@Override
public void onStartup(Set<Class<?>> c, ServletContext ctx) throws ServletException {
// Servlet 등록
// Filter 등록
// Listener 등록
// ...
}
}추가적으로 WAS에게 실행할 초기화 클래스를 알려줘야 한다.
resources/META-INF/services/jakarta.servlet.ServletContainerInitializer파일을 생성한다.
com.example.demo.servlet.MyContainerInitV2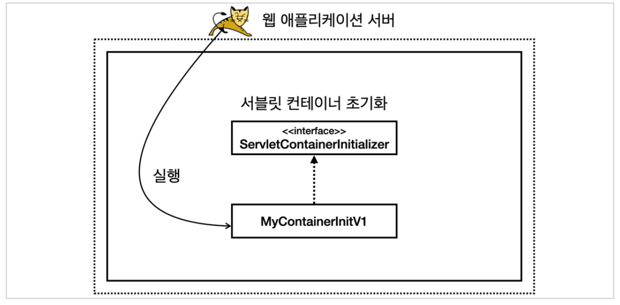
Servlet을 등록하는 2가지 방법
@WebServletAnnotation 사용- 프로그래밍 방식
ServletContainerInitializer,@HandlesTypes를 사용ServletContext에 Servlet 등록
1. @WebServlet
@WebServlet(urlPatterns = "/test")
@Slf4j
public class TestServlet extends HttpServlet {

    @Override
    protected void service(HttpServletRequest req, HttpServletResponse resp)
        throws ServletException, IOException {
        log.info("TestServlet.service");

        resp.getWriter().println("test");
    }
}
2. ServletContext에 직접 등록
public interface AppInit {
    void onStartup(ServletContext servletContext);
}

@HandlesTypes(AppInit.class)
public class MyContainerInitV2 implements ServletContainerInitializer {
  @Override
  public void onStartup(Set<Class<?>> c, ServletContext ctx) throws ServletException {
       for (Class<?> appInitClass : c) {
           try {
               AppInit appInit = (AppInit) appInitClass.getDeclaredConstructor().newInstance();

               appInit.onStartup(ctx);
           } catch (Exception e) {
               throw new RuntimeException(e);
           }
       }
  }
}
public class AppInitV1Servlet implements AppInit {
@Override
public void onStartup(ServletContext servletContext) {
ServletRegistration.Dynamic servletRegistration
= servletContext.addServlet("helloServlet", new HelloServlet());
servletRegistration.addMapping("/hello-servlet");
}
}
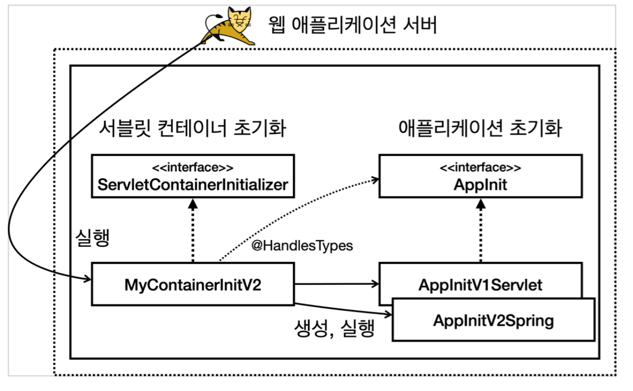
Spring Container
Spring Container만들기Spring Container에Bean등록하기Spring Container와Servlet Container연결해주는DispatcherServlet등록하기
public class AppInitV2Spring implements AppInit {
    @Override
    public void onStartup(ServletContext servletContext) {
        log.info("AppInitV2Spring.onStartup");

        // 1. Spring Container 생성
        AnnotationConfigWebApplicationContext applicationContext
            = new AnnotationConfigWebApplicationContext();

        applicationContext.register(HelloConfig.class);

        // 2. Spring MVC 프레임워크의 Front Controller 인 DispatcherServlet 생성, Spring Container 연결
        DispatcherServlet dispatcherServlet = new DispatcherServlet(applicationContext);

        // 3. DispatcherServlet을 Servlet Container에 등록
        servletContext
            .addServlet("dispatcherV2", dispatcherServlet)
            .addMapping("/spring/*");
    }
}
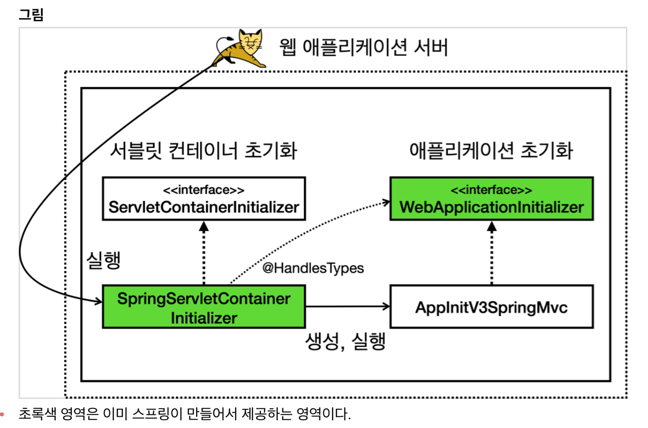
Spring MVC 에서 Servlet Container 초기화 지원
WebApplicationInitializer구현하면 된다.- Spring 에서 해당 구현체를 찾아서, 자동으로 Servlet Container 초기화 작업을 해준다.
public interface WebApplicationInitializer {
    void onStartup(ServletContext servletContext) throws ServletException;
}
예시
public class AppInitV3SpringMvc implements WebApplicationInitializer {
    @Override
    public void onStartup(ServletContext servletContext) throws ServletException {
        // 1. Spring Container 생성
        AnnotationConfigWebApplicationContext applicationContext
            = new AnnotationConfigWebApplicationContext();

        applicationContext.register(HelloConfig.class); // @Configuration 빈 등록

        // 2. Spring MVC 프레임워크의 Front Controller 인 DispatcherServlet 생성, Spring Container 연결
        DispatcherServlet dispatcherServlet = new DispatcherServlet(applicationContext);

        // 3. DispatcherServlet을 Servlet Container에 등록
        servletContext
            .addServlet("dispatcherV3", dispatcherServlet)
            .addMapping("/springboot/*");
    }
}
Spring MVC 가 제공하는 Servlet Container 초기화 분석
spring-web라이브러리에META-INF/services/jakarta.servlet.ServletContainerInitializer파일이 있다.
org.springframework.web.SpringServletContainerInitializerSpringServletContainerInitializer를 사용해서WebApplicationInitializer의 구현체를 찾아서 실행한다.
@HandlesTypes(WebApplicationInitializer.class)
public class SpringServletContainerInitializer implements ServletContainerInitializer {
    @Override
    public void onStartup(@Nullable Set<Class<?>> webAppInitializerClasses, ServletContext servletContext)
        throws ServletException {
        // ...
    }
}

Hello velog!