Numble 딥다이브 중 진행한 NCP Object Storage를 통한 파일 다운로드 api 구현을 이렇게 기록으로 남겨보고자 한다.
🔗 개발 환경
Java : ver. 17
Spring boot : ver. 3.1.2
IDLE : Intellij IDEA 2023.1 (Gradle)
⚙ NCP 연동 및 setting
기본적인 Object Storage 생성이 완료가 된 후 본격적으로 Spring에 연동해본다.
build.gradle - aws S3 의존성 추가
implementation 'org.springframework.cloud:spring-cloud-starter-aws:2.2.6.RELEASE'NCP Object Storage는 기본적으로 S3 API를 통해서 연동이 가능하다.
application.properties - ncp 연동
cloud.aws.s3.endpoint=https://kr.object.ncloudstorage.com
cloud.aws.credentials.access-key= [NCP access key]
cloud.aws.credentials.secret-key= [NCP secret key]
cloud.aws.region.static=ap-southeast-2
cloud.aws.region.auto=false
cloud.aws.stack.auto=false
cloud.aws.credentials.bucket= [NCP bucket name]
기본적인 연동과 자격을 추가한 뒤 Config를 만들어준다.
NcpConfig.java
@Configuration
public class NcpConfig {
    @Value("${cloud.aws.credentials.access-key}")
    private String accessKey;

    @Value("${cloud.aws.credentials.secret-key}")
    private String secretKey;

    @Value("${cloud.aws.region.static}")
    private String region;

    @Value("${cloud.aws.s3.endpoint}")
    private String endPoint;

    @Bean
    public AmazonS3 amazonS3() {
        BasicAWSCredentials credentials = new BasicAWSCredentials(accessKey, secretKey);

        return AmazonS3ClientBuilder
                .standard()
                .withEndpointConfiguration(new AwsClientBuilder.EndpointConfiguration(endPoint, region))
                .withCredentials(new AWSStaticCredentialsProvider(credentials))
                .build();
    }
}
이제 파일 다운로드를 한번 해보도록 하자.
📄TEST Code
Controller.java
@GetMapping("/filedownload/{fileNo}")
public ResponseEntity<byte[]> fileDownload(@PathVariable("fileNo") Long fileNo) {
       return service.downloadFile(fileNo);
}
Service.java
private final AmazonS3 amazonS3;

private final TransferManager transferManager;

@Value("${cloud.aws.credentials.bucket}")
private String bucketName;

public ResponseEntity<byte[]> downloadFile(Long fileNo) {
        byte[] bytes = null;
        HttpHeaders headers = null;
        try {
        	// 1)
            UserFile file = fileRepository.findById(fileNo).orElseThrow();

            // 2)
            S3Object s3Object = amazonS3.getObject(new GetObjectRequest(bucketName, file.getFileName()));
            S3ObjectInputStream inputStream = s3Object.getObjectContent();
            bytes = IOUtils.toByteArray(inputStream);

			// 3)
            headers = new HttpHeaders();
            headers.setContentType(MediaType.APPLICATION_OCTET_STREAM);
            headers.setContentDisposition(ContentDisposition.builder("attachment")
                    .filename(URLEncoder.encode(file.getFileOriginName(),"UTF-8")).build());
        } catch (IOException e) {
            e.printStackTrace();
        }

        return new ResponseEntity<byte[]>(bytes, headers, HttpStatus.OK);
}
간단히 흐름을 설명하자면,
1. DB에 저장된 정보를 호출해 Object Storage에 저장된 파일이름(FileName)을 가져온다.
2. bucketName, FileName과 매칭되는 파일을 S3Object로 반환하고 byte[]로 전환한다.
3. HttpHeaders에 원하는 Content-type와 filename를 지정하면 그에 맞게 이름이 지정되서 브라우저에서 호출된다.
( 파일 종류에 제한을 두기 싫다면 그냥 MediaType.APPLICATION_OCTET_STREAM으로 지정하도록 하자. )
💻TEST
test1
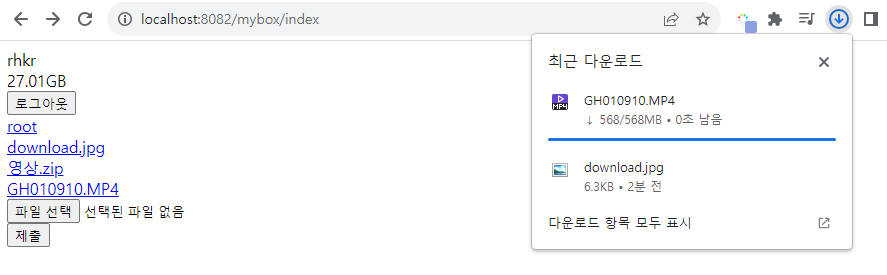
문제없이 다운로드가 잘되는 것을 확인할 수 있었다.
test2 ( error : java.lang.OutOfMemoryError )
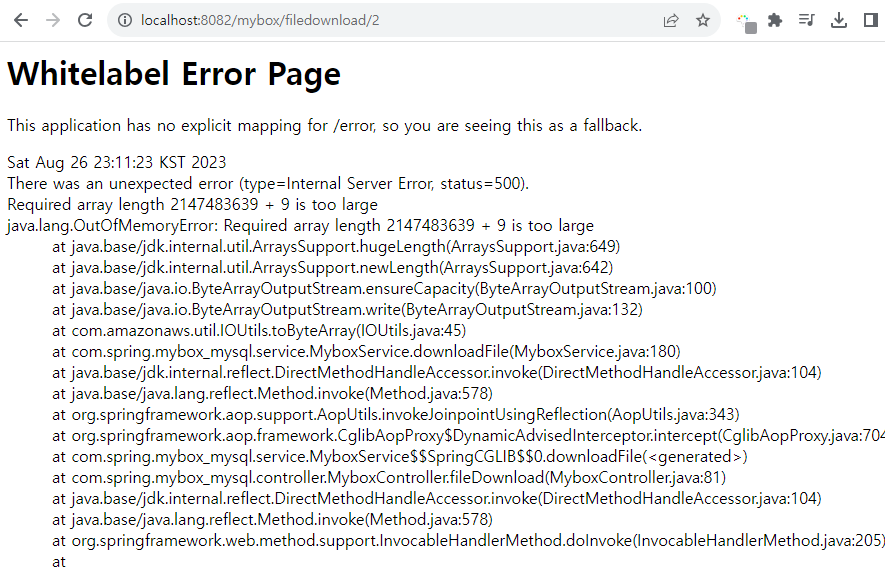
영상.zip(약 2.5GB) 다운 시 메모리 오버가 일어나는 것을 확인할 수 있었다.
이미지와 각종 문서 파일 등 용량이 큰 파일들은 문제없이 다운할 수 있지만 일정 용량을 초과할 경우 에러가 발생하므로 저용량 파일 다운로드에서 용이하게 사용할 수 있을 것이다.
하지만 Naver Mybox서비스에서는 대용량 파일도 다운받을 수 있기 때문에 해당 코드를 쓰긴 어려울 것을 판단된다.
다음엔 이부분에 대한 Trouble Shooting을 진행하도록 하겠다.
참고