Kubernetes설치
nodeName
apiVersion: apps/v1
kind: ReplicaSet
metadata:
  name: myweb-rs-nn
spec:
  replicas: 3
  selector:
    matchLabels:
      app: web
  template:
    metadata:
      labels:
        app: web
    spec:
      nodeName: node2
      containers:
        - name: myweb
          image: ghcr.io/c1t1d0s7/go-myweb
이렇게 특정 노드에만 배치시키는게 가능하다.
nodeSelector
노드 레이블
node1
beta.kubernetes.io/arch=amd64
beta.kubernetes.io/os=linux
kubernetes.io/arch=amd64
kubernetes.io/hostname=node1
kubernetes.io/os=linux
node-role.kubernetes.io/control-plane=
node-role.kubernetes.io/master=
node.kubernetes.io/exclude-from-external-load-balancers=
node2
beta.kubernetes.io/arch=amd64
beta.kubernetes.io/os=linux
kubernetes.io/arch=amd64
kubernetes.io/hostname=node2
kubernetes.io/os=linux
node3
beta.kubernetes.io/arch=amd64
beta.kubernetes.io/os=linux
kubernetes.io/arch=amd64
kubernetes.io/hostname=node3
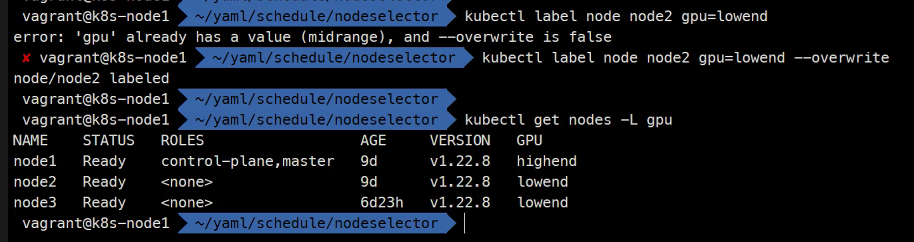
kubernetes.io/os=linuxkubectl label node node1 gpu=highend
kubectl label node node2 gpu=midrange
kubectl label node node3 gpu=lowendkubectl get nodes -L gpu
### -L은 레이블 여기서는 gpu레이블을 말함 -l은 검색
apiVersion: apps/v1
kind: ReplicaSet
metadata:
  name: myweb-rs-ns
spec:
  replicas: 3
  selector:
    matchLabels:
      app: web
  template:
    metadata:
      labels:
        app: web
    spec:
      nodeSelector:
        gpu: lowend
      containers:
        - name: myweb
          image: ghcr.io/c1t1d0s7/go-myweb
kubectl create -f .
gpu: lowend설정에 의해node3에만 배치된 것을 확인할 수 있다.

만약
node2에도gpu: lowend설정을 해주면
아래와같이
node2와node3에 골고루 배치된 것을 확인할 수 있다.

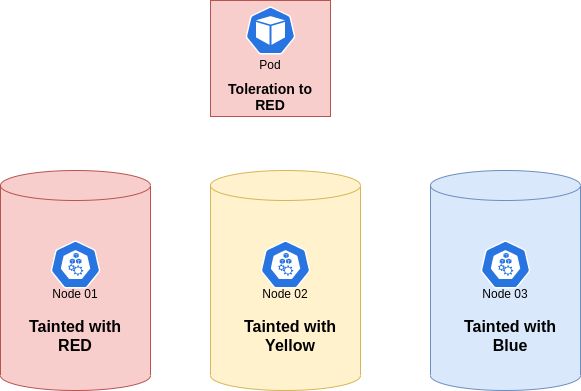
Affinity
어피니티는 선호도이다.
그래서 가능하면 선호하는 노드를 사용하게하고 아니어도 된다라는 유연성을 두는 스케쥴링이다.
이런식으로
같은 Pod끼리는 배척하고같이 동작하는 Pod끼리는 선호하게만드는 스케쥴링 정책이다.
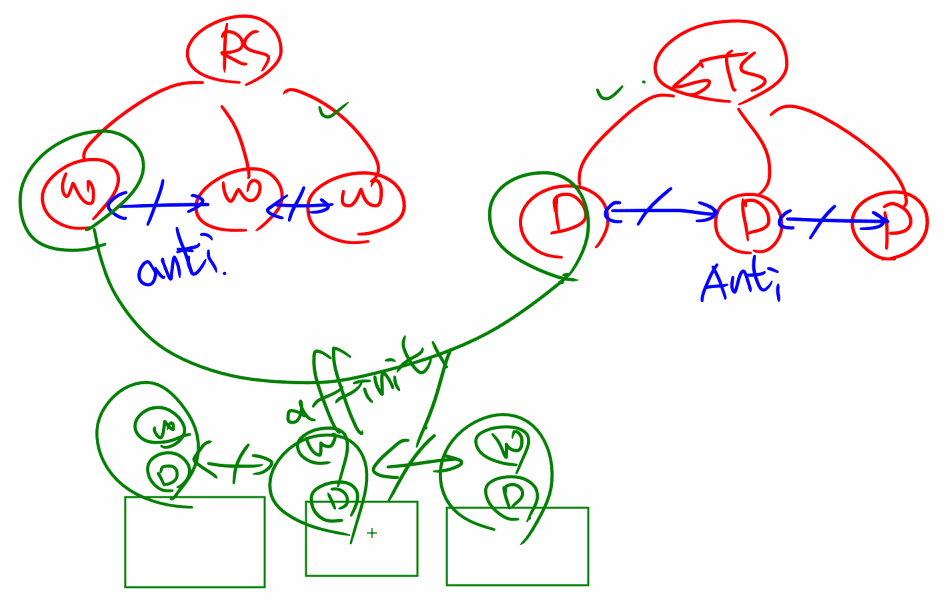
- affinity
- pod
- node - anti-affinty
- pod
myweb-a.yaml
apiVersion: apps/v1
kind: ReplicaSet
metadata:
  name: myweb-a
spec:
  replicas: 2
  selector:
    matchLabels:
      app: a
  template:
    metadata:
      labels:
        app: a
    spec:
      affinity:
        nodeAffinity:
          preferredDuringSchedulingIgnoredDuringExecution:
            - weight: 10
              preference:
                matchExpressions:
                  - key: gpu
                    operator: Exists
        podAntiAffinity:
          requiredDuringSchedulingIgnoredDuringExecution:
            - labelSelector:
                 matchLabels:
                   app: a
              topologyKey: "kubernetes.io/hostname"
      containers:
        - name: myweb
          image: ghcr.io/c1t1d0s7/go-myweb

### node마다 hostname이 있을꺼니까 anti-affinity를 해주면
### node마다 서로 배척하는 식으로 구성이 된다고 한다.
myweb-b.yaml
apiVersion: apps/v1
kind: ReplicaSet
metadata:
name: myweb-b
spec:
replicas: 2
selector:
matchLabels:
app: b
template:
metadata:
labels:
app: b
spec:
affinity:
nodeAffinity:
preferredDuringSchedulingIgnoredDuringExecution:
- weight: 10
preference:
matchExpressions:
- key: gpu
operator: Exists
podAntiAffinity:
requiredDuringSchedulingIgnoredDuringExecution:
- labelSelector:
matchLabels:
app: b
topologyKey: "kubernetes.io/hostname"
podAffinity:
requiredDuringSchedulingIgnoredDuringExecution:
- labelSelector:
matchLabels:
app: a
topologyKey: "kubernetes.io/hostname"
containers:
- name: myweb
image: ghcr.io/c1t1d0s7/go-myweb
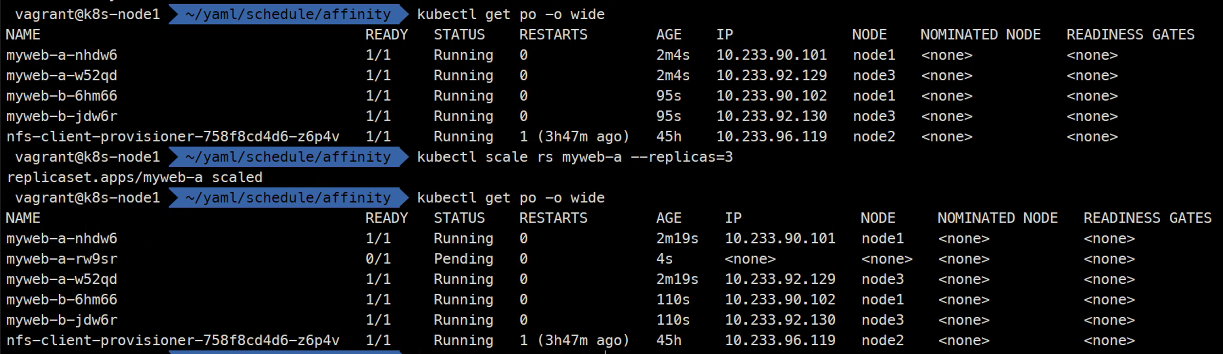
### 그리고 여기서는 a의 hostname을 선호하는식으로 해서 a에 b가 붙도록 만들어주었다.kubectl create -f myweb-b.yaml
kubectl get po -o wide
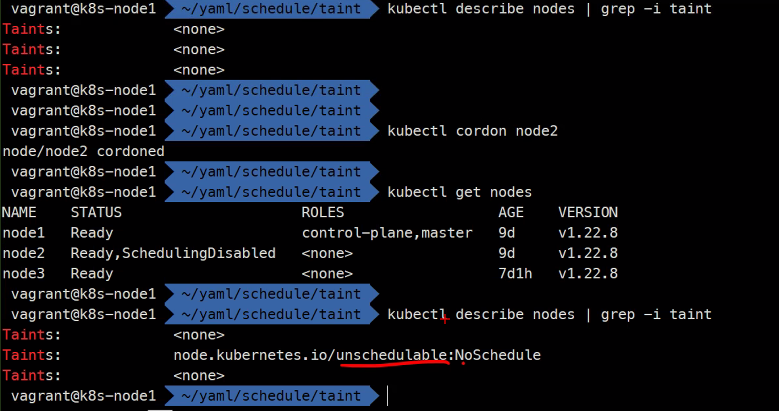
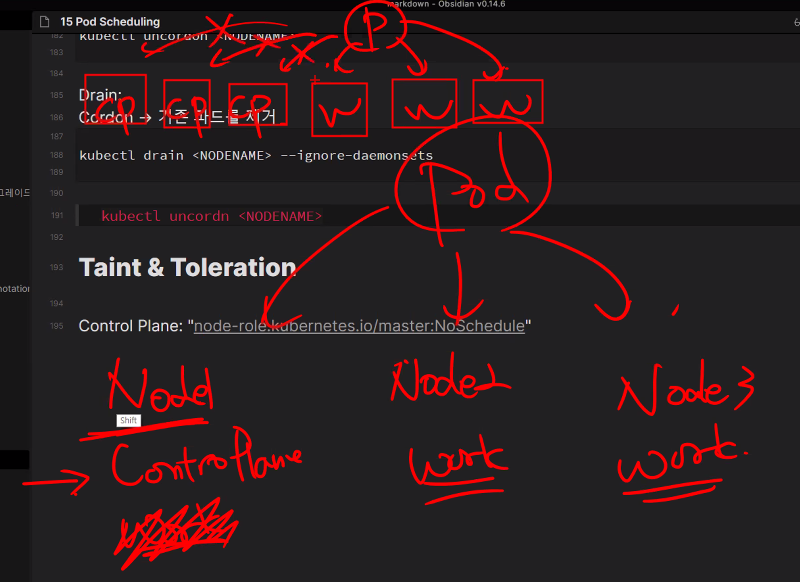
Cordon & Drain
Cordon:
스케줄링 금지
kubectl cordon <NODENAME>새롭게 만들어지는
Pod는 더이상해당 노드에 배치되지 않는다는 의미임
새롭게 배치되는Pod들이pending걸리거나 배치되지 않는 것을 볼 수 있다.
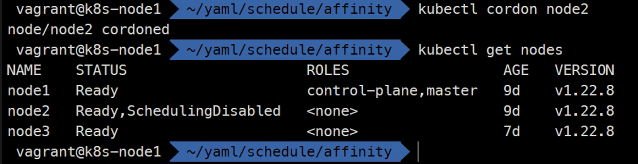
스케줄링 허용
kubectl uncordon <NODENAME>Drain:
Cordon -> 기존 파드를 제거
kubectl drain <NODENAME> --ignore-daemonsets

### drain 통해 강제로 데몬셋도 삭제를 하고 물론
### drain을 하면 cordon도 되어있다.
### 커널 패치나 업데이트를 하기 전에 drain작업을 하게 된다고 함
kubectl uncordn <NODENAME>
Taint & Toleration
https://kubernetes.io/ko/docs/concepts/scheduling-eviction/taint-and-toleration/
Control Plane
Taint: "node-role.kubernetes.io/master:NoSchedule"
Taint: 특정 노드에 역할을 부여
Toleration: Taint 노드에 스케줄링 허용
taint는 컨트롤 플레인과 워커노드를 분리시키기 위한 설정이다.
그리고toleration은taint되더라도Pod를 배치시키게 해줌
kubectl taint node node1 node-role.kubernetes.io/master:NoSchedule
taint된node1에는Pod가 배치되지 못하는 것을 확인할 수 있다.


이제 이것을 toleration 해주면 node1에도 배치할 수 있게 된다.
      tolerations:
        - key: node-role.kubernetes.io/master
          operator: Exists
          effect: NoSchedule
myweb-a.yaml
apiVersion: apps/v1
kind: ReplicaSet
metadata:
  name: myweb-a
spec:
  replicas: 3
  selector:
    matchLabels:
      app: a
  template:
    metadata:
      labels:
        app: a
    spec:
      tolerations:
        - key: node-role.kubernetes.io/master
          operator: Exists
          effect: NoSchedule
      affinity:
        nodeAffinity:
          preferredDuringSchedulingIgnoredDuringExecution:
            - weight: 10
              preference:
                matchExpressions:
                  - key: gpu
                    operator: Exists
        podAntiAffinity:
          requiredDuringSchedulingIgnoredDuringExecution:
            - labelSelector:
                 matchLabels:
                   app: a
              topologyKey: "kubernetes.io/hostname"
      containers:
        - name: myweb
          image: ghcr.io/c1t1d0s7/go-myweb
kubectl create -f .
kubectl get po -i wide
그리고 cordon 역시 방금 배운 taint를 기반으로 동작하는 것을 알 수 있다.
kubectl cordon node2kubectl describe nodes | grep -i taintkubectl uncordon node2kubdectl describe nodes | grep -i taint