Kubernetes설치
기본 개념
https://kubernetes.io/ko/docs/concepts/configuration/manage-resources-containers/
시작하기에 앞서서 request와 limit의 차이를 알아야한다.
request는 리소스를 미리 할당해놓는 것이고
limit는 사용량이 늘었을 경우 최대 사용할 수 있는 리소스를 제한 하는 것이다.
그리고
QoS : Quality of Service 은 다음과 같다.
BestEffort: 가장 우선순위가 낮음 #기본값Burstable: #요청 < 제한Guaranteed: 가장 우선순위가 높음 #요청 = 제한
CPU 요청 & 제한: milicore
ex) 1500m -> 1.5개, 1000m -> 1개
ex) 1.5, 0.1
Memory 요청 & 제한: M, G, T, Mi, Gi, Ti
| 단위가 헷갈린다면.. |
|---|
| https://brunch.co.kr/@leedongins/133 |
QoS 실습
myweb-reqlim.yaml
apiVersion: v1
kind: Pod
metadata:
  name: myweb-reqlim
spec:
  containers:
    - name: myweb
      image: ghcr.io/c1t1d0s7/go-myweb
      resources:
        requests:
          cpu: 200m
          memory: 200M
        limits:
          cpu: 200m
          memory: 200M
노드별 CPU/Memory 사용량 확인
kubectl create -f .
kubectl replace -f myweb-reqlim.yaml --force

### --force옵션을 붙이면 완전히 삭제했다가 다시 생성한다.

kubectl top nodes
파드별 CPU/Memory 사용량 확인
kubectl top pods
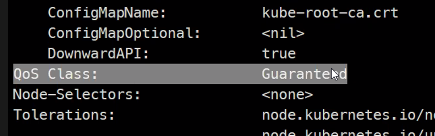
kubectl top pods -Arequests와 limits가 같으므로
QoS가Guaranteed로 된걸 확인할 수 있다.
노드별 요청/제한 양 확인
kubectl describe nodes node1
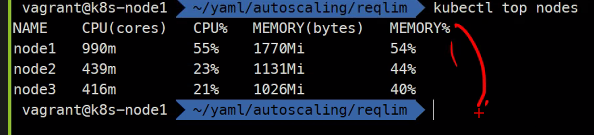
kubectl top nodes할당된
CPU가2000m인데990m사용중에도 사용률이55%인 이유는커널에서도CPU를 사용하고 있기 때문이다.
실행 할 수 없는 리소스
myweb-big.yaml
apiVersion: v1
kind: Pod
metadata:
  name: myweb-big
spec:
  containers:
    - name: myweb
      image: ghcr.io/c1t1d0s7/go-myweb
      resources:
        limits:
          cpu: 3000m
          memory: 4000M
kubectl create -f myweb-big.yaml
kubectl describe po myweb-big.yaml
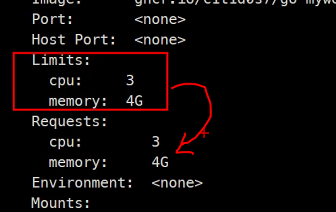
Limits만 설정했을 경우 자동으로Requests도 같은 값으로 설정된다.
그리고 할당된
Node의 리소스보다 오버되기 때문에 스케쥴링이 안된 것을 확인할 수 있다.

HPA: Horisontal Pod AutoScaler
AutoScaling
- Pod
- HPA
- VPA: Vertical Pod Autoscaler - Node
- ClusterAutoScaler
HPA: Deployment, ReplicaSet, StatefulSet의 복제본 개수를 조정
Default 스케일 아웃: 180초 --> 15초
Default 스케인 인: 300초
HPA yaml 파일
myweb-deploy.yaml
apiVersion: apps/v1
kind: Deployment
metadata:
  name: myweb-deploy
spec:
  replicas: 2
  selector:
    matchLabels:
      app: web
  template:
    metadata:
      labels:
        app: web
    spec:
      containers:
        - name: myweb
          image: ghcr.io/c1t1d0s7/go-myweb:alpine
          ports:
            - containerPort: 8080
          resources:
            requests:
              cpu: 200m
            limits:
              cpu: 200m

### HPA를 위해 최소 request는 설정되여 함
myweb-hpa.yaml
apiVersion: autoscaling/v1
kind: HorizontalPodAutoscaler
metadata:
name: myweb-hpa
spec:
minReplicas: 1
maxReplicas: 10
targetCPUUtilizationPercentage: 50
scaleTargetRef:
apiVersion: apps/v1
kind: Deployment
name: myweb-deploy
### minReplicas 최소 복제본 수
### maxReplicas 최대 복제본 수
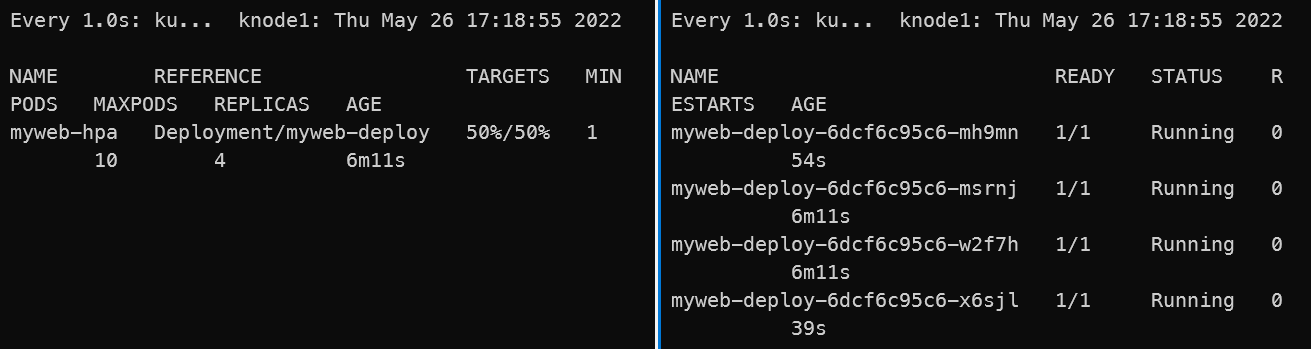
### targetCPUUtilizationPercentage 목표 CPU 사용량서비스 실행 및 결과 확인
kubectl create -f .
watch -n1 kubectl get hpa #터미널 추가로 띄워놓고
watch -n1 kubectl get pods #이것도 터미널 추가
kubectl exec <POD> -- sha256sum /dev/zero #부하를 임의로 증가시킴
kubectl exec myweb-deploy-6dcf6c95c6-msrnj -- sha256sum /dev/zero
kubectl exec myweb-deploy-6dcf6c95c6-w2f7h -- sha256sum /dev/zero
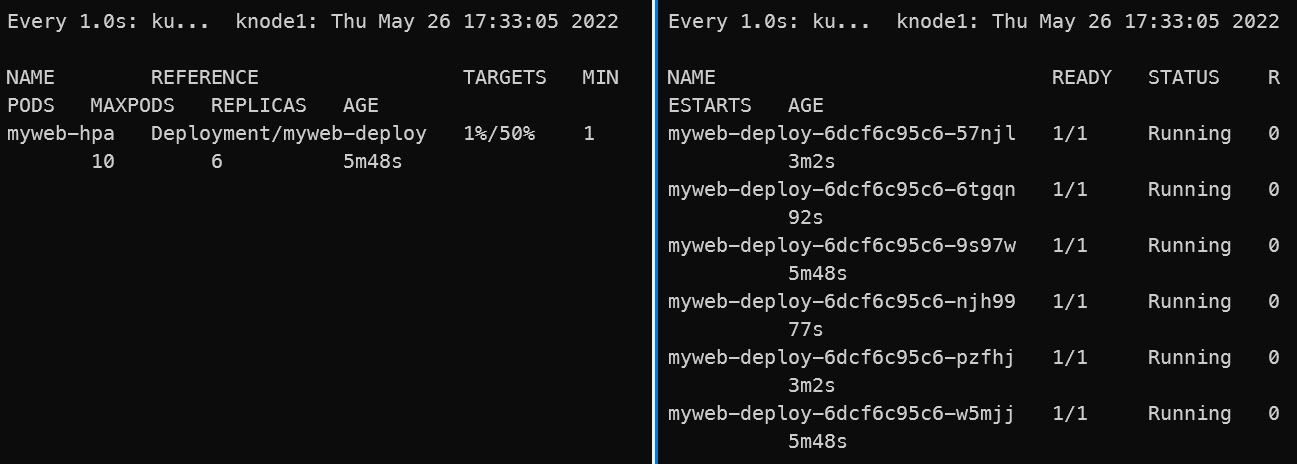
### 터미널을 추가로 열어서 2개 Pod의 CPU를 100%까지 올려보았다.
### 시간상 15초만에 스케일 아웃이 된 것을 확인할 수 있었다.
### 스케일 인은 

autoscaling/v2beta2
위의 실습과 결과적으로 같은 내용이지만 metrics라는 설정으로 더 세부적인 스케일 타겟 지정이 가능하고 안정화 윈도우를 사용할 수 있다는 차이점이 있다.
myweb-hpa-v2beta2.yaml
apiVersion: autoscaling/v2beta2
kind: HorizontalPodAutoscaler
metadata:
  name: myweb-hpa
spec:
  minReplicas: 1
  maxReplicas: 10
  metrics:
    - type: Resource
      resource:
        name: cpu
        target:
          type: Utilization
          avarageUtilization: 50
  scaleTargetRef:
    apiVersion: apps/v1
    kind: Deployment
    name: myweb-deploy