개체명인식(NER)
- 텍스트에서 사람, 조직, 위치 같은 개체명을 식별하는 nlp task
(예제) 데이터셋
* PAN-X & BIO표기
- pan-x : 교차 언어 전이 평가 벤치마크 데이터
- 독일어(63%) , 프랑스어(23%), 이탈리아어(8%), 영어(6%)로 구성
- IOB2 포맷(책의 내용에 맞춤, BIO라고도 씀) : LOC(위치) & PER(사람) & ORG(조직)와 B-개체명 토큰 시작, I-개체명 토큰(시작제외) O 개체명에 속하지 않음,

1) 데이터확인하기
from datasets import get_dataset_config_names

xtreme_subsets = get_dataset_config_names("xtreme")
print(f"XTREME has {len(xtreme_subsets)} configurations")

panx_subsets = [s for s in xtreme_subsets if s.startswith("PAN")]
panx_subsets[:3] # ['PAN-X.af', 'PAN-X.ar', 'PAN-X.bg']
[참고] "udpos.Korean"도 있음.
2) 데이터 로드
# hide_output
from collections import defaultdict
from datasets import DatasetDict

langs = ["de", "fr", "it", "en"] # 독일어, 프랑스어, 이탈리아어, 영어
fracs = [0.629, 0.229, 0.084, 0.059] # 스위스에서 사용하는 언어 비율로 조정
# Return a DatasetDict if a key doesn't exist
panx_ch = defaultdict(DatasetDict)

for lang, frac in zip(langs, fracs):
    # Load monolingual corpus
    ds = load_dataset("xtreme", name=f"PAN-X.{lang}")
    # Shuffle and downsample each split according to spoken proportion
    for split in ds:
        panx_ch[lang][split] = (
            ds[split]
            .shuffle(seed=0) # 데이터 편향을 줄이기 위한 suffle() 메서드 사용
            .select(range(int(frac * ds[split].num_rows)))) # 비율 조정을 위한 row 선택 부분
3) 데이터 샘플 확인
element = panx_ch["de"]["train"][0]
for key, value in element.items():
    print(f"{key}: {value}")
4) ner_tag의 숫자를 IOB2의 태그로 변환
tags = panx_ch["de"]["train"].features["ner_tags"].feature
# tags == ClassLabel(names=['O', 'B-PER', 'I-PER', 'B-ORG', 'I-ORG', 'B-LOC', 'I-LOC'], id=None)

# hide_output
def create_tag_names(batch):
    return {"ner_tags_str": [tags.int2str(idx) for idx in batch["ner_tags"]]} # int의 태그를 str(name)으로 변환

panx_de = panx_ch["de"].map(create_tag_names)
5) ner_tag 변환 결과 샘플 데이터 확인
# hide_output
de_example = panx_de["train"][0]
pd.DataFrame([de_example["tokens"], de_example["ner_tags_str"]],
['Tokens', 'Tags'])
- polnischen : 폴란드
다중 언어 트랜스포머
-
CoNLL-2002 & CoNLL-2003 데이터셋을 밴치마크로 많이 사용함
-
PAN-X와 동일하게 LOC, PER, ORG 태그로 된 뉴스기사이지만 3개 이외의 카테고리에 속하는 MISC 레이블도 추가됨
-
en : 영어 훈련 데이터에서 미세 튜닝한 다음에 각 언어의 테스트 세트 평가
-
each : 언어별 성능을 측정하기 위해 단일 언어의 테스트 세트에서 미세 튜닝하고 평가
-
all : 모든 훈련 데이터에서 미세 튜닝해 각 언어의 테스트 세트에서 평가
roBERTa VS XLM-R
- roBERTa : 단일언어모델, BERT의 다음문장 예측 task를 제거하여 성능 향상, 토큰수 55000개
- XNL-R : 100개 언어, 이전 모델에 비해 사전 훈련 말뭉치가 큼, XLM에서 사용하는 언어 임베딩 제거, SentencePiece를 사용하여 토큰화, 토큰수 250000개
XLM-R 토큰화
text = "Jack Sparrow loves New York!"
bert_tokens = bert_tokenizer(text).tokens()
xlmr_tokens = xlmr_tokenizer(text).tokens()

df = pd.DataFrame([bert_tokens, xlmr_tokens], index=["BERT", "XLM-R"])
df
- BERT는 [CLS][SEP] 사용하여 처음 끝 표기
- XLM-R 사용하여 처음 끝 표기
* 토크화 파이프라인

1) 정규화
- NFC, NFD, NFKC, NFKD 등으로 유니코드 정규화 진행
=> 어휘사전의 크기를 줄일 수 있음
=> tpye : str
2) 사전 토큰화
- 텍스트를 더 작은 객체로 분할하여 훈련 마지막에 생성되는 토큰의 상한선을 제공함
=> type : list # [str, str, str, ...]
3) 토크나이저 모델
- 단어를 부분단어로 나눠 어휘사전의 크기와 OOV 토큰의 개수를 줄임
- 방법 : BPE, 유니그램, WordPiece 등이 있음
=> type : list # [int, int, int, ...]
4) 사후처리
- 토큰 리스트에 부가적인 변환 적용(예: 시퀀스 시작과 끝 표기)
=> type : list # [[CLS], int, int, ..., [SEP]]
SentencePiece 토크나이저
- 유니그램으로 입력 텍스트를 유니코드 문자 시퀀스로 인코딩함
- 구두점, 악센트 등이 필요없음
- '_': 블록문자 : 공백문자가 유지됨
개체명 인식을 위한 트랜스포머
-
시퀀스 분류를 위해 인코더 기반 트랜스포머 미세 튜닝
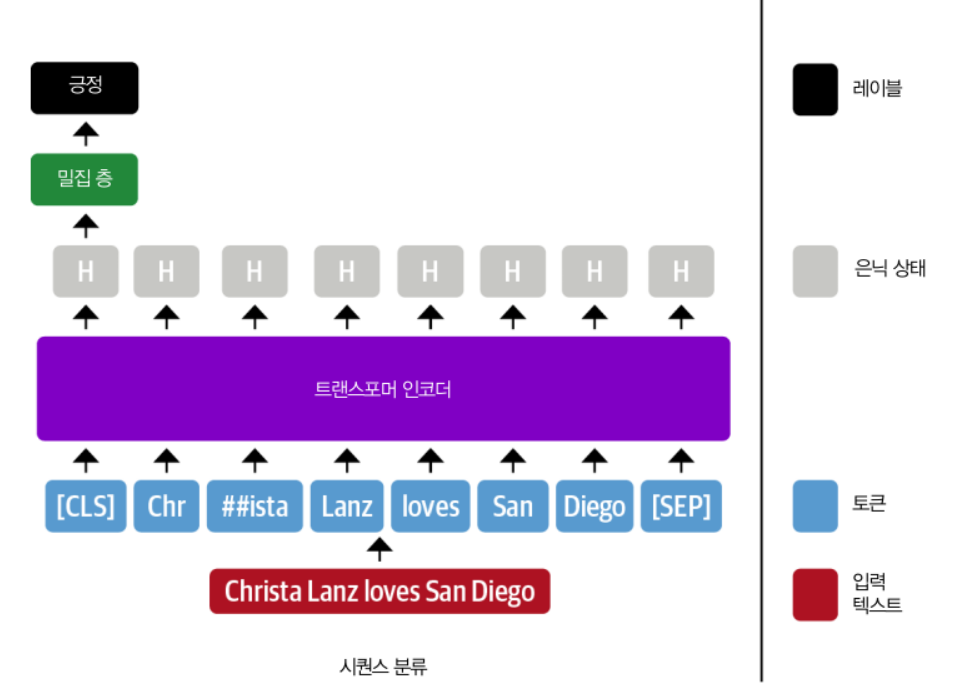
-
모든 입력 토큰의 표현이 완전 연결 층에 주입되어 해당 토큰의 개체명을 인식함
=> 토큰 분류 작업으로 생각하기도 함
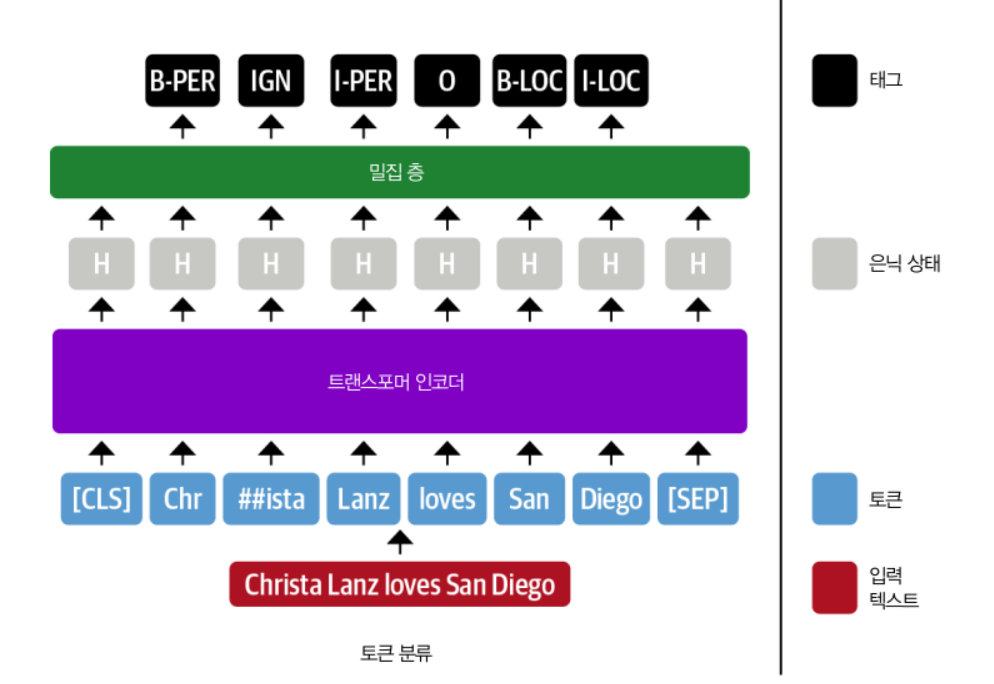
- 부분단어(##ista)는 ING로 표기
트랜스포머 모델 클래스
- 트랜스포머에는 아키텍처와 작업마다 전용 클래스를 제공함
* 표기는 <ModelName>For<Task> 형식을 따름 (예:AudoModelFor<Task>)바디와 헤드
- 바디 : 헤드를 제외한 모델의 부분
- 헤드 : 모델의 마지막 층으로 Task에 특화되어 작업에 맞는 층으로 된 부분

* 토큰 분류를 위한 사용자 정의 만들기
import torch.nn as nn
from transformers import XLMRobertaConfig
from transformers.modeling_outputs import TokenClassifierOutput
from transformers.models.roberta.modeling_roberta import RobertaModel
from transformers.models.roberta.modeling_roberta import RobertaPreTrainedModel

class XLMRobertaForTokenClassification(RobertaPreTrainedModel):
    config_class = XLMRobertaConfig # 새로운 모델을 초기화할 때 표준 XLM-R 설정을 사용하도록 함

    def __init__(self, config):
        # super() : RobertaPreTrainedModel 클래스의 초기화 함수 호출
        # 사전 훈련된 가중치의 초기화나 셋팅
        super().__init__(config)
        self.num_labels = config.num_labels
        # 모델(RobertaModel) 바디 로드
        # add_pooling_layer=False : 모든 은닉 상태 반환([CLS] 토큰에 해당하는 은식 상태 외 다수)
        self.roberta = RobertaModel(config, add_pooling_layer=False)
        # 드롭아웃과 피드 포워드 층으로 구성된 분류 헤드 추가
        self.dropout = nn.Dropout(config.hidden_dropout_prob)
        self.classifier = nn.Linear(config.hidden_size, config.num_labels)
        # 가중치 초기화(모델바디 가중치 : 사전 훈련된 가중치 로드, 토큰 헤드의 가중치 : 랜덤 초기화)
        self.init_weights()

    # 객체와 출력 생성 부분
    def forward(self, input_ids=None, attention_mask=None, token_type_ids=None,
                labels=None, **kwargs):
        # Use model body to get encoder representations
        # 정방향 패스 과정에서 모델의 바디에 데이터 주입
        outputs = self.roberta(input_ids, attention_mask=attention_mask,
                               token_type_ids=token_type_ids, **kwargs)
        # Apply classifier to encoder representation
        # 바디가 출력한 은닉 상태를 드롭아웃 층과 분류 층에 통과
        sequence_output = self.dropout(outputs[0])
        logits = self.classifier(sequence_output)
        # Calculate losses
        # 정방향 패스에서 전달하여 바로 손실이 계산
        loss = None
        if labels is not None:
            loss_fct = nn.CrossEntropyLoss()
            loss = loss_fct(logits.view(-1, self.num_labels), labels.view(-1))
        # Return model output object
        return TokenClassifierOutput(loss=loss, logits=logits,
                                     hidden_states=outputs.hidden_states,
                                     attentions=outputs.attentions)
* 사용자 정의 모델 로드하기
1) 프리 트레인된 모델에 적용할 NER tag값 만들기
index2tag = {idx: tag for idx, tag in enumerate(tags.names)}
# {0: 'O',
#   1: 'B-PER',
#   2: 'I-PER',
#   3: 'B-ORG',
#   4: 'I-ORG',
#   5: 'B-LOC',
#   6: 'I-LOC'}
tag2index = {tag: idx for idx, tag in enumerate(tags.names)}
# {'O': 0,
#   'B-PER': 1,
#   'I-PER': 2,
#   'B-ORG': 3,
#   'I-ORG': 4,
#   'B-LOC': 5,
#   'I-LOC': 6}
2) 프리 트레인된 모델에 오버라이드 하기
- AutoConfig 클래스
- 모델 구조의 청사진을 가짐
- 모델을 로드할 때, 모델에 연관된 설정 파일이 자동으로 다운로드됨
- 커스터마이징하려면, 매개변수로 먼저 설정 파일을 로드함
# hide_output
from transformers import AutoConfig

xlmr_config = AutoConfig.from_pretrained(xlmr_model_name,
                                         num_labels=tags.num_classes,
                                         id2label=index2tag, label2id=tag2index)
3) 모델 로드
# hide_output
import torch

device = torch.device("cuda" if torch.cuda.is_available() else "cpu")
xlmr_model = (XLMRobertaForTokenClassification
              .from_pretrained(xlmr_model_name, config=xlmr_config)
              .to(device))
모델 로드시 정보 및 주의사항 알림
Some weights of the model checkpoint at xlm-roberta-base were not used when initializing XLMRobertaForTokenClassification: ['lm_head.dense.weight', 'roberta.pooler.dense.bias', 'lm_head.dense.bias', 'lm_head.layer_norm.weight', 'lm_head.bias', 'lm_head.layer_norm.bias', 'roberta.pooler.dense.weight']
- This IS expected if you are initializing XLMRobertaForTokenClassification from the checkpoint of a model trained on another task or with another architecture (e.g. initializing a BertForSequenceClassification model from a BertForPreTraining model).
- This IS NOT expected if you are initializing XLMRobertaForTokenClassification from the checkpoint of a model that you expect to be exactly identical (initializing a BertForSequenceClassification model from a BertForSequenceClassification model).
Some weights of XLMRobertaForTokenClassification were not initialized from the model checkpoint at xlm-roberta-base and are newly initialized: ['roberta.embeddings.position_ids', 'classifier.weight', 'classifier.bias']
You should probably TRAIN this model on a down-stream task to be able to use it for predictions and inference.
- 토크나이저와 모델이 초기화 되어 있는지 확인하기
=> 방법 : 개체명을 알고 있는 작은 시퀀스 예측 결과 확인
# hide_output
input_ids = xlmr_tokenizer.encode(text, return_tensors="pt")
pd.DataFrame([xlmr_tokens, input_ids[0].numpy()], index=["Tokens", "Input IDs"])
outputs = xlmr_model(input_ids.to(device)).logits
predictions = torch.argmax(outputs, dim=-1)
print(f"Number of tokens in sequence: {len(xlmr_tokens)}")
# Number of tokens in sequence: 10
print(f"Shape of outputs: {outputs.shape}")
# Shape of outputs: torch.Size([1, 10, 7]) [batch_size, num_tokens, num_tags]

# 예측
preds = [tags.names[p] for p in predictions[0].cpu().numpy()]
pd.DataFrame([xlmr_tokens, preds], index=["Tokens", "Tags"])
함수로 정리
def tag_text(text, tags, model, tokenizer):
    # 토큰 준비
    tokens = tokenizer(text).tokens()
    # 시퀀스를 입력 ID로 인코딩
    input_ids = xlmr_tokenizer(text, return_tensors="pt").input_ids.to(device)
    # 일곱 개의 클래스에 대한 로짓 출력
    outputs = model(input_ids)[0]
    # 가능성이 높은 클래스 선택
    predictions = torch.argmax(outputs, dim=2)
    # 결과를 데이터 프레임으로 변환
    preds = [tags.names[p] for p in predictions[0].cpu().numpy()]
    return pd.DataFrame([tokens, preds], index=["Tokens", "Tags"])
NER 작업을 위해 텍스트 토큰화
words, labels = de_example["tokens"], de_example["ner_tags"]

# is_split_into_words=True : 입력 단위가 이미 단어로 나눠진 데이터를 사용한다는 의미
tokenized_input = xlmr_tokenizer(de_example["tokens"], is_split_into_words=True)
tokens = xlmr_tokenizer.convert_ids_to_tokens(tokenized_input["input_ids"])

# 단어 아이디는 토크나이저로 두 개의 부분 단어로 나눠진 '_Einwohner'와 'n'이 하나의 단어이며, 첫 번째 부분단어 이후 마스킹 단어임을 구분할 수 있는 기준임
word_ids = tokenized_input.word_ids()


#hide_output
# 특수 토큰과 부분단어의 레이블을 -100으로 설정하여 마스킹함
# -100인 이유는 파이토치에 있는 크로스 엔트로피 손실 클래스 torch.nn.CrossEntropyLoss의 ignore_index 속성 값이 -100이기 때문임
previous_word_idx = None
label_ids = []

for word_idx in word_ids:
    if word_idx is None or word_idx == previous_word_idx:
        label_ids.append(-100)
    elif word_idx != previous_word_idx:
        label_ids.append(labels[word_idx])
    previous_word_idx = word_idx


labels = [index2tag[l] if l != -100 else "IGN" for l in label_ids]
index = ["Tokens", "Word IDs", "Label IDs", "Labels"]

pd.DataFrame([tokens, word_ids, label_ids, labels], index=index)
- 함수로 만들기
# 토크나이징 및 라벨링 변환
def tokenize_and_align_labels(examples):
    tokenized_inputs = xlmr_tokenizer(examples["tokens"], truncation=True,
                                      is_split_into_words=True)
    labels = []
    for idx, label in enumerate(examples["ner_tags"]):
        word_ids = tokenized_inputs.word_ids(batch_index=idx)
        previous_word_idx = None
        label_ids = []
        for word_idx in word_ids:
            if word_idx is None or word_idx == previous_word_idx:
                label_ids.append(-100)
            else:
                label_ids.append(label[word_idx])
            previous_word_idx = word_idx
        labels.append(label_ids)
    tokenized_inputs["labels"] = labels
    return tokenized_inputs

# 반복해서 실행할 부분
def encode_panx_dataset(corpus):
    return corpus.map(tokenize_and_align_labels, batched=True,
                      remove_columns=['langs', 'ner_tags', 'tokens'])

# 데이터셋 : 독일어 말뭉치 인코딩
panx_de_encoded = encode_panx_dataset(panx_ch["de"])
성능 측정
- 정밀도, 재현율, F1-Score + 한 개체명에 있는 모든 단어를 올바르게 예측해야 함(seqeval 라이브러리 활용)
seqeval 라이브러리 예시
from seqeval.metrics import classification_report

y_true = [["O", "O", "O", "B-MISC", "I-MISC", "I-MISC", "O"],
          ["B-PER", "I-PER", "O"]]
y_pred = [["O", "O", "B-MISC", "I-MISC", "I-MISC", "I-MISC", "O"],
          ["B-PER", "I-PER", "O"]]
print(classification_report(y_true, y_pred))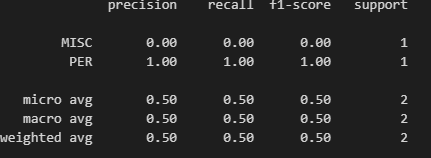
실제 라벨과 예측 라벨 데이터 만드는 함수
import numpy as np

def align_predictions(predictions, label_ids):
    preds = np.argmax(predictions, axis=2)
    batch_size, seq_len = preds.shape
    labels_list, preds_list = [], []

    for batch_idx in range(batch_size):
        example_labels, example_preds = [], []
        for seq_idx in range(seq_len):
            # Ignore label IDs = -100
            if label_ids[batch_idx, seq_idx] != -100:
                example_labels.append(index2tag[label_ids[batch_idx][seq_idx]])
                example_preds.append(index2tag[preds[batch_idx][seq_idx]])

        labels_list.append(example_labels)
        preds_list.append(example_preds)

    return preds_list, labels_list
XLM-RoBERTa 미세 튜닝
1) 모델 훈련 속성 정의
# hide_output
from transformers import TrainingArguments # 모델 훈련 속성 정의 클래스 import

num_epochs = 3
batch_size = 24
logging_steps = len(panx_de_encoded["train"]) // batch_size
model_name = f"{xlmr_model_name}-finetuned-panx-de"

training_args = TrainingArguments(
    output_dir=model_name, log_level="error", num_train_epochs=num_epochs,
    per_device_train_batch_size=batch_size,
    per_device_eval_batch_size=batch_size, evaluation_strategy="epoch", # 에포크가 끝날 때마다 모델 예측 평가 수행
    save_steps=1e6, # 체크포인트 저장하지 않도록 큰 수로 설정하여 훈련 속도 향상
    weight_decay=0.01, # 가중치 감쇠 값 조정
    disable_tqdm=False,
    logging_steps=logging_steps, push_to_hub=True)
2) 허깅 페이스 로그인
-
허깅페이스에서 토큰 발급
-
cmd에서 huggingface-cli login 입력

-
토큰 입력
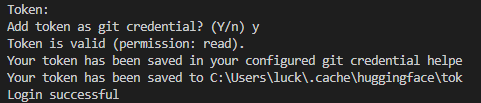
-
허깅 페이스 로그인하기
#hide_output
from huggingface_hub import notebook_login

notebook_login()
3) 평가지표 함수 생성
- f1-score 사용
from seqeval.metrics import f1_score

def compute_metrics(eval_pred):
    y_pred, y_true = align_predictions(eval_pred.predictions,
                                       eval_pred.label_ids)
    return {"f1": f1_score(y_true, y_pred)}
4) 레이블 시퀀스 패딩
- -100(기본값으로 설정되어 있음)으로 패딩
from transformers import DataCollatorForTokenClassification

data_collator = DataCollatorForTokenClassification(xlmr_tokenizer)
5) 모델 정의
- 여러 모델을 훈련하기 때문에 매번 새로운 모델을 만들지 않도록 model_init() 함수를 만들어서 활용
def model_init():
    return (XLMRobertaForTokenClassification
            .from_pretrained(xlmr_model_name, config=xlmr_config)
.to(device))- 인코딩한 데이터셋과 모델 훈련 정보를 Trainer에 전달
# hide_output
from transformers import Trainer

trainer = Trainer(model_init=model_init, args=training_args,
                  data_collator=data_collator, compute_metrics=compute_metrics,
                  train_dataset=panx_de_encoded["train"],
                  eval_dataset=panx_de_encoded["validation"],
                  tokenizer=xlmr_tokenizer)
6) 모델 트레이닝
#hide_input
trainer.train()
# 모델 결과를 허브에 업로드
trainer.push_to_hub(commit_message="Training completed!")
7) 모델 훈련 결과 확인
- 모델 평가 지표로 확인
# hide_input
df = pd.DataFrame(trainer.state.log_history)[['epoch','loss' ,'eval_loss', 'eval_f1']]
df = df.rename(columns={"epoch":"Epoch","loss": "Training Loss", "eval_loss": "Validation Loss", "eval_f1":"F1"})
df['Epoch'] = df["Epoch"].apply(lambda x: round(x))
df['Training Loss'] = df["Training Loss"].ffill()
df[['Validation Loss', 'F1']] = df[['Validation Loss', 'F1']].bfill().ffill()
df.drop_duplicates()- 샘플 데이터로 모델 훈련 결과 확인
# hide_output
text_de = "Jeff Dean ist ein Informatiker bei Google in Kalifornien"
tag_text(text_de, tags, trainer.model, xlmr_tokenizer)
오류 분석
모델 훈련이 실패하는 유형
- 많은 토큰을 마스킹하고 일부 레이블도 마스킹하는 경우
=> 훈련되는 것처럼 손실이 감소함 - compute_metrics() 함수에 실제 성능을 과대평가하는 버그 존재
- NER의 0 클래스(O)가 다수 클래스이여 정확도화 F1-score 점수가 왜곡될 수 있음
from torch.nn.functional import cross_entropy

def forward_pass_with_label(batch):
    # 데이터 변환
    features = [dict(zip(batch, t)) for t in zip(*batch.values())]
    # 입력과 레이블 패당
    batch = data_collator(features)
    # 모든 텐서를 장치에 배치
    input_ids = batch["input_ids"].to(device)
    attention_mask = batch["attention_mask"].to(device)
    labels = batch["labels"].to(device)
    with torch.no_grad():
        # 데이터를 모델에 전달
        output = trainer.model(input_ids, attention_mask)
        # Logit.size: [batch_size, sequence_length, classes]
        # 가장 큰 로짓 값을 가진 클래스 선택
        predicted_label = torch.argmax(output.logits, axis=-1).cpu().numpy()

    # 배치 차원을 펼쳐 다음 토큰마다 손실 계산
    loss = cross_entropy(output.logits.view(-1, 7),
                         labels.view(-1), reduction="none")

    # 배치 차원을 다시 만들고 넘파이 배열로 변환
    loss = loss.view(len(input_ids), -1).cpu().numpy()

    return {"loss":loss, "predicted_label": predicted_label}

# hide_output
# hide_output
valid_set = panx_de_encoded["validation"]
# 검증 세트에 적용
valid_set = valid_set.map(forward_pass_with_label, batched=True, batch_size=32)
df = valid_set.to_pandas()

# 데이터 보기 쉽게 토큰화 레이블을 문자열로 변환
index2tag[-100] = "IGN"
df["input_tokens"] = df["input_ids"].apply(
    lambda x: xlmr_tokenizer.convert_ids_to_tokens(x))
df["predicted_label"] = df["predicted_label"].apply(
    lambda x: [index2tag[i] for i in x])
df["labels"] = df["labels"].apply(
    lambda x: [index2tag[i] for i in x])
df['loss'] = df.apply(
    lambda x: x['loss'][:len(x['input_ids'])], axis=1)
df['predicted_label'] = df.apply(
    lambda x: x['predicted_label'][:len(x['input_ids'])], axis=1)
df.head(1)

결과 샘플
# hide_output
df_tokens = df.apply(pd.Series.explode)
df_tokens = df_tokens.query("labels != 'IGN'")
df_tokens["loss"] = df_tokens["loss"].astype(float).round(2)
df_tokens.head(7)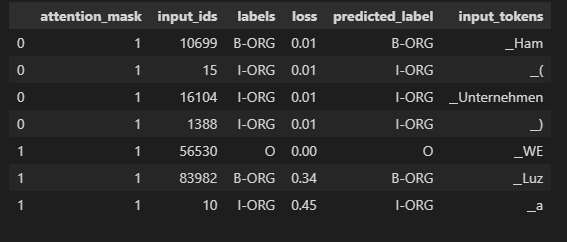
- 누적 손실이 가장 큰 토큰 확인
(
    df_tokens.groupby("input_tokens")[["loss"]]
    .agg(["count", "mean", "sum"])
    .droplevel(level=0, axis=1)  # Get rid of multi-level columns
    .sort_values(by="sum", ascending=False)
    .reset_index()
    .round(2)
    .head(10)
    .T
)
시각화
from sklearn.metrics import ConfusionMatrixDisplay, confusion_matrix

def plot_confusion_matrix(y_preds, y_true, labels):
    cm = confusion_matrix(y_true, y_preds, normalize="true")
    fig, ax = plt.subplots(figsize=(6, 6))
    disp = ConfusionMatrixDisplay(confusion_matrix=cm, display_labels=labels)
    disp.plot(cmap="Blues", values_format=".2f", ax=ax, colorbar=False)
    plt.title("Normalized confusion matrix")
    plt.show()

plot_confusion_matrix(df_tokens["labels"], df_tokens["predicted_label"],
                      tags.names)
데이터 상세 확인
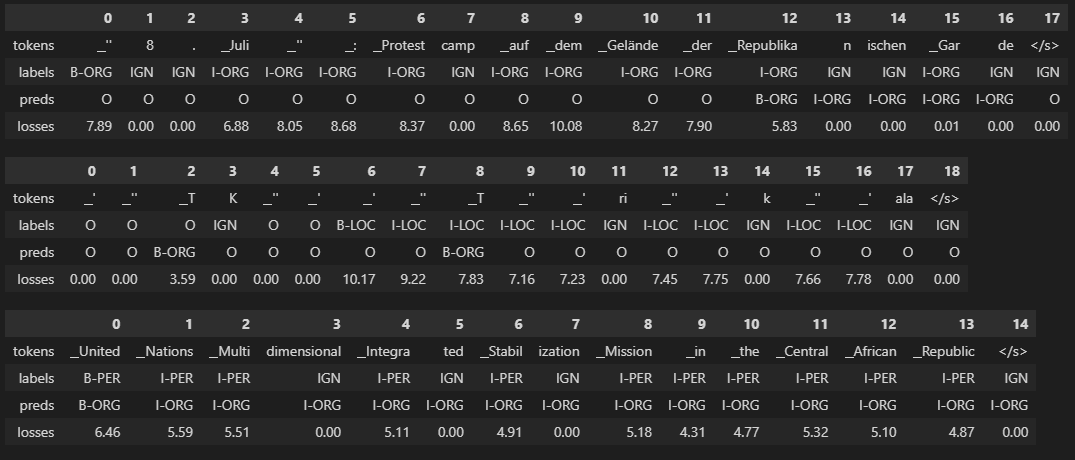
# hide_output
def get_samples(df):
    for _, row in df.iterrows():
        labels, preds, tokens, losses = [], [], [], []
        for i, mask in enumerate(row["attention_mask"]):
            if i not in {0, len(row["attention_mask"])}:
                labels.append(row["labels"][i])
                preds.append(row["predicted_label"][i])
                tokens.append(row["input_tokens"][i])
                losses.append(f"{row['loss'][i]:.2f}")
        df_tmp = pd.DataFrame({"tokens": tokens, "labels": labels,
                               "preds": preds, "losses": losses}).T
        yield df_tmp

df["total_loss"] = df["loss"].apply(sum)
df_tmp = df.sort_values(by="total_loss", ascending=False).head(3)

for sample in get_samples(df_tmp):
    display(sample)