Backup and Restore Methods
etcd 백업하기
etcdctl --endpoints=127.0.0.1:2379 \
--cacert=/etc/kubernetes/pki/etcd/ca.crt \
--cert=/etc/kubernetes/pki/etcd/server.crt \
--key=/etc/kubernetes/pki/etcd/server.key \
snapshot save /opt/snapshot-pre-boot.db \


>> Snapshot saved at /opt/snapshot-pre-boot.db
백업 파일로 복구하기
- 복구
etcdctl \
snapshot restore /opt/snapshot-pre-boot.db \
--data-dir /var/lib/etcd-new

>> 2023-02-26 11:19:56.437724 I | mvcc: restore compact to 1682
>> 2023-02-26 11:19:56.444317 I | etcdserver/membership: added member 8e9e05c52164694d [http://localhost:2380] to cluster cdf818194e3a8c32- hostPath 볼륨 변경
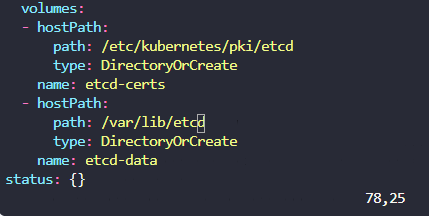
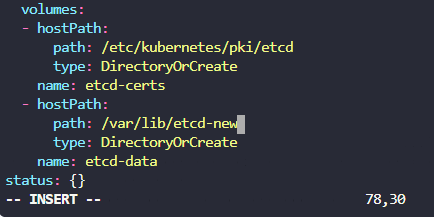
- snap 복구된 것 확인
controlplane lib/etcd-new/member ➜  ls
snap  wal

controlplane lib/etcd-new/member ➜  cd snap

controlplane etcd-new/member/snap ➜  ls
0000000000000001-0000000000000001.snap db- deployments: 2, services: 3 인 것 확인 (복구완료!)
controlplane etcd-new/member/snap ✖ k get deploy,svc
NAME                   READY   UP-TO-DATE   AVAILABLE   AGE
deployment.apps/blue   3/3     3            3           37m
deployment.apps/red    2/2     2            2           37m

NAME                   TYPE        CLUSTER-IP     EXTERNAL-IP   PORT(S)        AGE
service/blue-service   NodePort    10.96.31.214   <none>        80:30082/TCP   37m
service/kubernetes     ClusterIP   10.96.0.1      <none>        443/TCP        40m
service/red-service    NodePort    10.96.67.45    <none>        80:30080/TCP   37m
실습 완료!

How many clusters are defined in the kubeconfig on the student-node?
You can make use of the kubectl config command.
- 클러스터 찾는 방법
student-node ~ ➜  kubectl config

...
Available Commands:
...
  get-clusters    Display clusters defined in the kubeconfig
...
view Display merged kubeconfig settings or a specified kubeconfig- 방법 1
student-node ~ ➜  kubectl config view


apiVersion: v1
clusters:
- cluster:
    certificate-authority-data: DATA+OMITTED
    server: https://cluster1-controlplane:6443
  name: cluster1
- cluster:
    certificate-authority-data: DATA+OMITTED
    server: https://192.22.197.23:6443
  name: cluster2
contexts:
- context:
    cluster: cluster1
    user: cluster1
  name: cluster1
- context:
    cluster: cluster2
    user: cluster2
  name: cluster2
current-context: cluster1
kind: Config
preferences: {}
users:
- name: cluster1
  user:
    client-certificate-data: REDACTED
    client-key-data: REDACTED
- name: cluster2
  user:
    client-certificate-data: REDACTED
client-key-data: REDACTED- 방법 2
student-node ~ ➜ kubectl config get-clusters


NAME
cluster1
cluster2
How many nodes (both controlplane and worker) are part of cluster1?
- 연결할 클러스터 지정하는 방법
student-node ~ ➜  kubectl config


...
Available Commands:
...
  use-context     Set the current-context in a kubeconfig file
student-node ~ ➜  kubectl config use-context cluster1

>> Switched to context "cluster1".

student-node ~ ➜  kubectl get nodes

>>
NAME                    STATUS   ROLES           AGE   VERSION
cluster1-controlplane   Ready    control-plane   63m   v1.24.0
cluster1-node01         Ready    <none>          62m   v1.24.0
What is the name of the controlplane node in cluster2?
student-node ~ ➜  kubectl config use-context cluster2

>> Switched to context "cluster2".

student-node ~ ➜  kubectl get nodes

>>
NAME                    STATUS   ROLES           AGE   VERSION
cluster2-controlplane   Ready    control-plane   64m   v1.24.0
cluster2-node01         Ready    <none>          64m   v1.24.0
You can SSH to all the nodes (of both clusters) from the student-node.
- 다른 클러스터에 있는 노드에 SSH 접속 가능하다!
student-node ~ ➜  ssh cluster1-controlplane


Welcome to Ubuntu 18.04.6 LTS (GNU/Linux 5.4.0-1100-gcp x86_64)

 * Documentation:  https://help.ubuntu.com
 * Management:     https://landscape.canonical.com
 * Support:        https://ubuntu.com/advantage
This system has been minimized by removing packages and content that are
not required on a system that users do not log into.

To restore this content, you can run the 'unminimize' command.
How is ETCD configured for cluster1?
student-node ~ ➜  ssh cluster1-controlplane


Welcome to Ubuntu 18.04.6 LTS (GNU/Linux 5.4.0-1100-gcp x86_64)

 * Documentation:  https://help.ubuntu.com
 * Management:     https://landscape.canonical.com
 * Support:        https://ubuntu.com/advantage
This system has been minimized by removing packages and content that are
not required on a system that users do not log into.

To restore this content, you can run the 'unminimize' command.


cluster1-controlplane ~ ➜  ls /etc/kubernetes/manifests/ | grep -i etcd
etcd.yaml


cluster1-controlplane ~ ➜  kubectl get pod -n kube-system


NAME                                            READY   STATUS    RESTARTS      AGE
...
etcd-cluster1-controlplane                      1/1     Running   0             66m
...cluster1의 etcd server는 파드로 구성한 stack etcd 인 것을 알 수 있다.
How is ETCD configured for cluster2?
student-node ~ ➜  ssh cluster2-controlplane

Welcome to Ubuntu 18.04.6 LTS (GNU/Linux 5.4.0-1028-gcp x86_64)

 * Documentation:  https://help.ubuntu.com
 * Management:     https://landscape.canonical.com
 * Support:        https://ubuntu.com/advantage
This system has been minimized by removing packages and content that are
not required on a system that users do not log into.

To restore this content, you can run the 'unminimize' command.
Last login: Sun Feb 26 16:50:40 2023 from 192.22.197.18


cluster2-controlplane ~ ➜  ls /etc/kubernetes/manifests/ | grep -i etcd
etcd server에 대한 구성 파일이 존재하지 않으므로 stack etcd는 아니다.
cluster2-controlplane ~ ➜  ps -ef | grep etcd
root        1731    1353  0 15:41 ?        00:04:00 kube-apiserver --advertise-address=192.22.197.23 --allow-privileged=true --authorization-mode=Node,RBAC --client-ca-file=/etc/kubernetes/pki/ca.crt --enable-admission-plugins=NodeRestriction --enable-bootstrap-token-auth=true --etcd-cafile=/etc/kubernetes/pki/etcd/ca.pem --etcd-certfile=/etc/kubernetes/pki/etcd/etcd.pem --etcd-keyfile=/etc/kubernetes/pki/etcd/etcd-key.pem --etcd-servers=https://192.22.197.12:2379 --kubelet-client-certificate=/etc/kubernetes/pki/apiserver-kubelet-client.crt --kubelet-client-key=/etc/kubernetes/pki/apiserver-kubelet-client.key --kubelet-preferred-address-types=InternalIP,ExternalIP,Hostname --proxy-client-cert-file=/etc/kubernetes/pki/front-proxy-client.crt --proxy-client-key-file=/etc/kubernetes/pki/front-proxy-client.key --requestheader-allowed-names=front-proxy-client --requestheader-client-ca-file=/etc/kubernetes/pki/front-proxy-ca.crt --requestheader-extra-headers-prefix=X-Remote-Extra- --requestheader-group-headers=X-Remote-Group --requestheader-username-headers=X-Remote-User --secure-port=6443 --service-account-issuer=https://kubernetes.default.svc.cluster.local --service-account-key-file=/etc/kubernetes/pki/sa.pub --service-account-signing-key-file=/etc/kubernetes/pki/sa.key --service-cluster-ip-range=10.96.0.0/12 --tls-cert-file=/etc/kubernetes/pki/apiserver.crt --tls-private-key-file=/etc/kubernetes/pki/apiserver.key
root        9416    9183  0 16:54 pts/0    00:00:00 grep etcd
하지만 프로세스를 확인한 결과, kube-apiserver가 외부 etcd가 존재함을 알려주고 있다.
cluster2-controlplane ~ ➜  kubectl get pods -A
NAMESPACE     NAME                                            READY   STATUS    RESTARTS      AGE
...
kube-system   kube-apiserver-cluster2-controlplane            1/1     Running   0             76m
...
cluster2-controlplane ~ ➜ kubectl describe pod/kube-apiserver-cluster2-controlplane -n kube-system
Name: kube-apiserver-cluster2-controlplane
Namespace: kube-system
Priority: 2000001000
Priority Class Name: system-node-critical
Node: cluster2-controlplane/192.22.197.23
...
Command:
kube-apiserver
--advertise-address=192.22.197.23
--allow-privileged=true
--authorization-mode=Node,RBAC
--client-ca-file=/etc/kubernetes/pki/ca.crt
--enable-admission-plugins=NodeRestriction
--enable-bootstrap-token-auth=true
--etcd-cafile=/etc/kubernetes/pki/etcd/ca.pem
--etcd-certfile=/etc/kubernetes/pki/etcd/etcd.pem
--etcd-keyfile=/etc/kubernetes/pki/etcd/etcd-key.pem
--etcd-servers=https://192.22.197.12:2379
...kube-apiserver를 통해 외부 etcd 가 존재함을 확인했다.
What is the IP address of the External ETCD datastore used in cluster2?
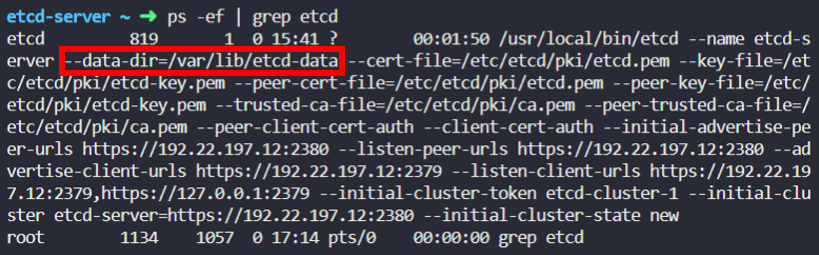
cluster2-controlplane ~ ➜ ps -ef | grep etcd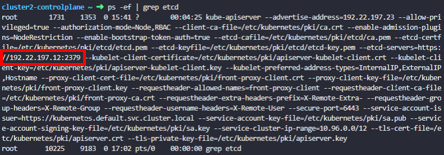
What is the default data directory used the for ETCD datastore used in cluster1?
Remember, this cluster uses a Stacked ETCD topology.
student-node ~ ➜ ssh cluster1-controlplane- 방법 1
cluster1-controlplane ~ ➜ ps -ef | grep etcd | grep data-dir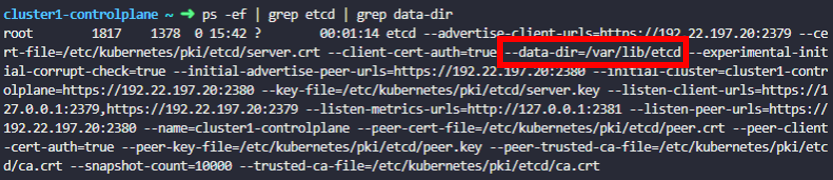
- 방법 2
cluster1-controlplane ~ ➜  kubectl -n kube-system describe pod etcd-cluster1-controlplane | grep data-dir
      --data-dir=/var/lib/etcd
What is the default data directory used the for ETCD datastore used in cluster2?
Remember, this cluster uses an External ETCD topology.
student-node ~ ➜  ssh etcd-server
...

etcd-server ~ ➜  ps -ef | grep etcd
...
How many nodes are part of the ETCD cluster that etcd-server is a part of?
student-node ~ ➜  ssh etcd-server
...


etcd-server ~ ➜  export ETCDCTL_API=3


etcd-server ~ ➜  etcdctl \
  --endpoints=https://127.0.0.1:2379 \
  --cacert=/etc/etcd/pki/ca.pem \
  --cert=/etc/etcd/pki/etcd.pem \
  --key=/etc/etcd/pki/etcd-key.pem \
   member list

55a3bfa621a0f5b7, started, etcd-server, https://192.23.103.18:2380, https://192.23.103.18:2379, false
1개 인 것을 확인했다.
Take a backup of etcd on cluster1 and save it on the student-node at the path /opt/cluster1.db
- client-url 알아내기
cluster1-controlplane ~ ➜  kubectl describe  pods -n kube-system etcd-cluster1-controlplane  | grep advertise-client-urls
Annotations:          kubeadm.kubernetes.io/etcd.advertise-client-urls: https://192.22.197.20:2379
--advertise-client-urls=https://192.22.197.20:2379- 스냅샷(백업) 저장
ETCDCTL_API=3 etcdctl --endpoints=https://192.23.103.3:2379 \
--cacert=/etc/kubernetes/pki/etcd/ca.crt \
--cert=/etc/kubernetes/pki/etcd/server.crt \
--key=/etc/kubernetes/pki/etcd/server.key \
snapshot save /opt/cluster1.db


>> Snapshot saved at /opt/cluster1.db- student-node로 백업 내용 복사하기
student-node ~ ➜  scp cluster1-controlplane:/opt/cluster1.db /opt
cluster1.db                                                                  100% 2136KB  82.4MB/s   00:00
An ETCD backup for cluster2 is stored at /opt/cluster2.db. Use this snapshot file to carryout a restore on cluster2 to a new path /var/lib/etcd-data-new.
- 1) 백업 파일을 cluster2에 복사하기
student-node ~ ➜  kubectl config use-context cluster2
Switched to context "cluster2".

student-node ~ ➜  cd /opt

student-node /opt ➜  ls
cluster1.db.part  cluster2.db

student-node /opt ➜  scp /opt/cluster2.db etcd-server:/root
cluster2.db 100% 2024KB 93.0MB/s 00:00- 2) cluster2에서 지정한 디렉터리에 복구
etcd-server ~ ➜  ETCDCTL=3 etcdctl --endpoints=127.0.0.1:2379 --cacert=/etc/etcd/pki/ca.crt --cert=/etc/etcd/pki/etcd.pem --key=/etc/etcd/pki/etcd-key.pem snapshot restore /root/cluster2.db --data-dir /var/lib/etcd-data-new
{"level":"info","ts":1677434242.5575264,"caller":"snapshot/v3_snapshot.go:296","msg":"restoring snapshot","path":"/root/cluster2.db","wal-dir":"/var/lib/etcd-data-new/member/wal","data-dir":"/var/lib/etcd-data-new","snap-dir":"/var/lib/etcd-data-new/member/snap"}
{"level":"info","ts":1677434242.5756545,"caller":"mvcc/kvstore.go:388","msg":"restored last compact revision","meta-bucket-name":"meta","meta-bucket-name-key":"finishedCompactRev","restored-compact-revision":7905}
{"level":"info","ts":1677434242.5844479,"caller":"membership/cluster.go:392","msg":"added member","cluster-id":"cdf818194e3a8c32","local-member-id":"0","added-peer-id":"8e9e05c52164694d","added-peer-peer-urls":["http://localhost:2380"]}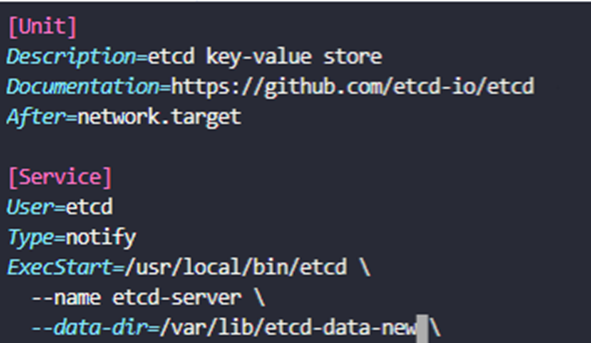
{"level":"info","ts":1677434242.5947335,"caller":"snapshot/v3_snapshot.go:309","msg":"restored snapshot","path":"/root/cluster2.db","wal-dir":"/var/lib/etcd-data-new/member/wal","data-dir":"/var/lib/etcd-data-new","snap-dir":"/var/lib/etcd-data-new/member/snap"}- 3)
--data-dir변경
etcd-server ~ ➜ vi /etc/systemd/system/etcd.service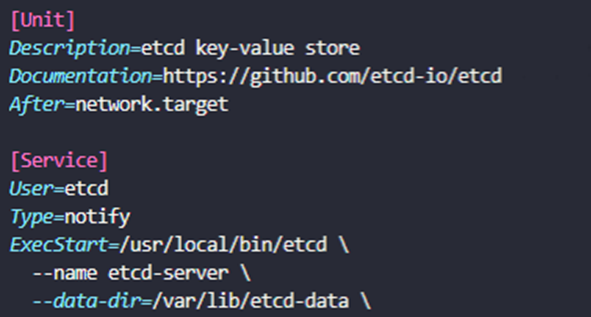
- 4)
etcd사용자에게 디렉터리 권한 부여
etcd-server ~ ➜  ls -ld /var/lib/etcd-data-new
drwx------ 3 root root 4096 Feb 26 17:57 /var/lib/etcd-data-new

etcd-server ~ ➜  chown -R etcd:etcd /var/lib/etcd-data-new

etcd-server ~ ➜  ls -ld /var/lib/etcd-data-new
drwx------ 3 etcd etcd 4096 Feb 26 17:57 /var/lib/etcd-data-new- 5)
etcdreload 및 restart
etcd-server ~ ➜  systemctl daemon-reload

etcd-server ~ ➜  systemctl restart etcd
실습 완료!