
DOM(문서 객체 모델)
➡️ 웹 페이지(HTML이나 XML 문서)의 콘텐츠 및 구조, 그리고 스타일 요소를 구조화 시켜 표현하여 프로그래밍 언어가 해당 문서에 접근하여 읽고 조작할 수 있도록 API를 제공하는 일종의 인터페이스다.
➡️ html태그를 조작하는것. 아이디로 가져다 쓰기를 해보자.
➡️ javaScript를 참고해보자.
id 가져와서 사용해보자.(study2.html)
addEventListener() 참고 blog
➡️ addEventListener()는 document의 특정요소(Id,class,tag 등등..) event(ex - click하면 함수를 실행하라, 마우스를 올리면 함수를 실행하라 등등.. )를 등록할 때 사용합니다.
<script>
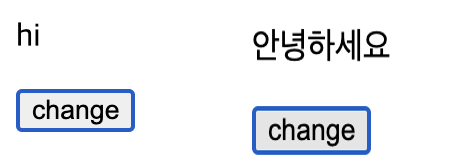
console.log(document.getElementById("hi").innerText) // id가 hi인 것의 텍스트를 가져옴.
// id가 changeBtn인 것에
document.getElementById("changeBtn").addEventListener('click', function() {
document.getElementById("hi").innerHTML = 'hi' //도큐먼트 안에서 이 아이디랑 같은 것을 찾아오는 것.
})
</script> ➡️ '안녕하세요'에서 'hi로 한번만 바꿀 수 있다.
<script>
 console.log( document.getElementById("hi").innerHTML)
    document.getElementById("changeBtn").addEventListener('click',function(){
        const hi = document.getElementById("hi")
        if(hi.innerText === 'hi'){
            hi.innerHTML = '안녕하세요'
        }
        else{
            hi.innerHTML = 'hi'
        }
    })
</script><body>
<p id="hi">안녕하세요</p>
<!-- 버튼을 눌렀을 때 '안녕하세요'를 'hi'로 바꾸도록 -->
<button id = "changeBtn" onclick="changeAction()">change</button>
</body>
<script>
//버튼 클릭해서 바꾸기
function changeAction(){
const hi = document.getElementById("hi")
if(hi.innerText === 'hi'){
hi.innerHTML = '안녕하세요'
}
else{
hi.innerHTML = 'hi'
}
}
</script>
➡️ '안녕하세요'에서 'hi로, 'hi'에서 '안녕하세요'로 계속 바꿀 수 있다.
➡️ 두번째 것은 첫번째 것의 function(함수)를 변수로 바꿔준 것.
drag
<body>
    <p id="hi">안녕하세요</p>
    <p id = "drag">0</p>

</body>
<script>
     //drag하기
     document.getElementById("drag").addEventListener('drag',function(){
        const drag = document.getElementById("drag")
        drag.innerHTML = Number(drag.innerText) + 1
    })
</script>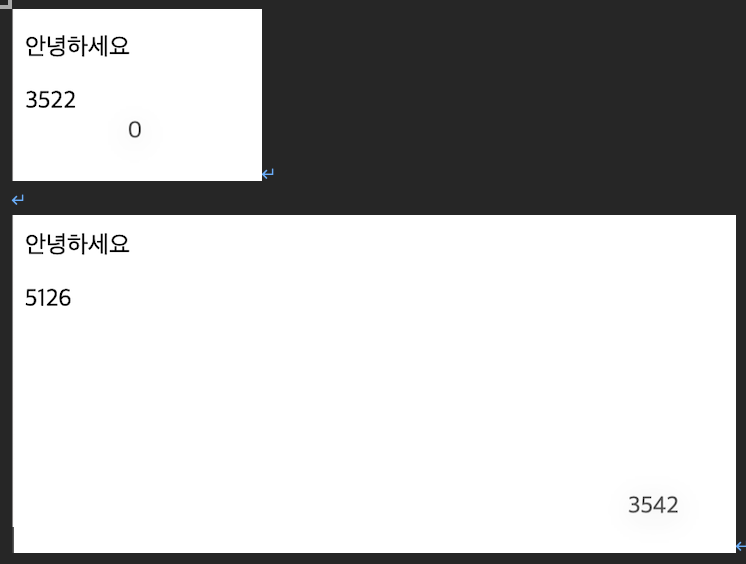
➡️ 숫자를 긁어서 drag를 하면 숫자가 올라간다. (잘 긁어야함)
add 하면 ui에 나타나게 하기(ul 안에 li 넣기)
실습하며 만든 것
<body>
    <ul id = "textList">

    </ul>
    <input id = "text">
    <button onclick="addText()">add</button> <!--버튼이 눌리면 이 함수를 실행하겠다. -->

    <script>
        function addText () {
            const ul = document.getElementById("textList")
            const li = document.createElement('li')

            // li안에 넣는 text는 id가 text인 것의 value인 것을 넣어줄거다.
            li.innerText = document.getElementById("text").value

            ul.appendChild(li) // ul에 li를 넣어주겠다.

        }
    </script>
</body>
➡️ 버튼에 onclick을 넣고 함수 이름을 넣을 때 ()를 빼먹지 말자!!!!!
< button > 이렇게 ()가 없으면 실행 안된다!

강사님 코드
<body>
    <ul id = "textList">

    </ul>
    <input id = "text">
    <button onclick="addText2()">add</button> <!--버튼이 눌리면 이 함수를 실행하겠다. -->

<script>
 function addText2() {
            const text = document.getElementById("text")
            const li = document.createElement('li')

            // li안에 id가 text인 것의 value값을 넣겠다.
            li.innerText = text.value

            // value값을 넣은 li를 ul에(id가 textList) 바로 넣어버리기.
            document.getElementById("textList").appendChild(li)

            // ''로 하면 입력받은 값을 넣은 후 입력창을 비워줌.
            text.value = ''
         }
 </script>
</body>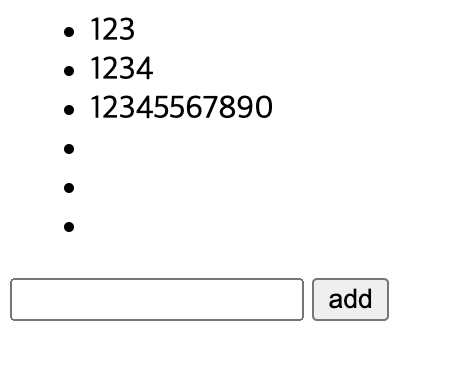
➡️ 내가 해본 것은 add를 눌러도 입력창에 숫자가 사라지지 않아서 직접 지워줘야 한다.
➡️ 강사님 코드로는 add를 누르면 입력되고 자동으로 입력창을 비워준다.
예외처리 - 아무 입력값 없이 add를 누르면 들어가지 않도록
<script>
		// 예외처리된 코드 - if를 만들어서 안에 넣어줬다.
         function addText3() {
            const text = document.getElementById("text")

            if(text.value !== '') { // 비어있지 않을 때 넣도록.
                const li = document.createElement('li')
                li.innerText = text.value
                document.getElementById("textList").appendChild(li)
                text.value = ''
            }
         }
 </script>
Enter만 눌러도 값이 들어가도록 만들어보자
✅ 파라미터를 넣어줄 수 있다.(event)
<input id = "text" onkeydown="addText4(event)">
<button onclick="addText4()">add</button>

<script>
	function addText4(event) {
            console.log(event)
            const text = document.getElementById("text")
            if(event.keyCode === 'Enter') {
                const li = document.createElement('li')
                li.innerText = text.value
                document.getElementById("textList").appendChild(li)
                text.value = ''
            }
         }
</script>
➡️ input에 onkeydown을 넣어줬다.
➡️ 콘솔에만 찍히고 ui에 넣지는 못한다.
 이렇게 마구마구 찍힌다.
✅ 그러나 우린 값을 하나씩만 넘겨줄게 아니라 객체로 만들어서 넘겨줘야 한다.
객체 만들어 넣기(study3.html)
<body>
<label>이름</label>
<input id ="name">
<label>나이</label>
<input id ="age" type="number">
<button onclick="rowAdd1()">추가</button><br>
<table id ="tbl">
<!-- <td>
<tr>name</tr>
<tr>age</tr>
</td> -->
<tr>
<td>name</td>
<td>age</td>
</tr>
</table>
<script>
//객체 만들어서 테이블에 넣기
const persons = [] // 배열
function rowAdd1() {
const name = document.getElementById("name").value
const age = document.getElementById("age").value
//객체로 만들어주기
persons.push({name: name, age : age})
const tr = document.createElement("tr")
const tdName = document.createElement("td")
const tdAge = document.createElement("td")
tdName.innerHTML = name
tdAge.innerHTML = age
tr.appendChild(tdName)
tr.appendChild(tdAge)
console.log(tr)
document.getElementById("tbl").appendChild(tr)
}
</script>
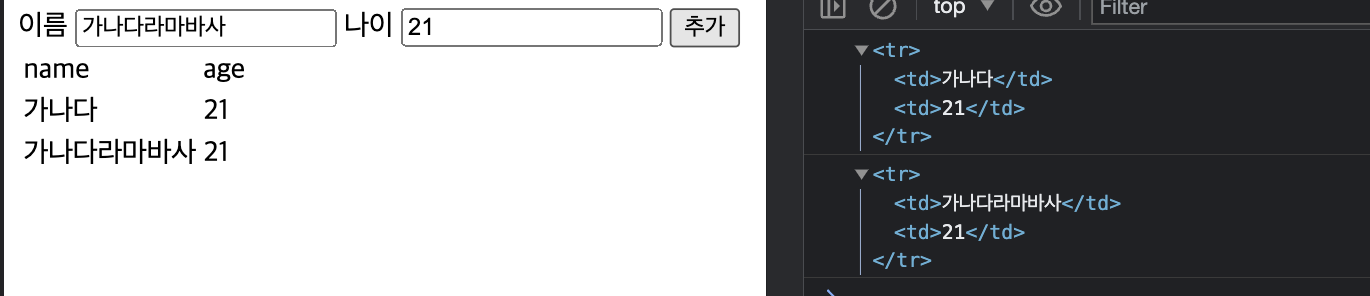
</body>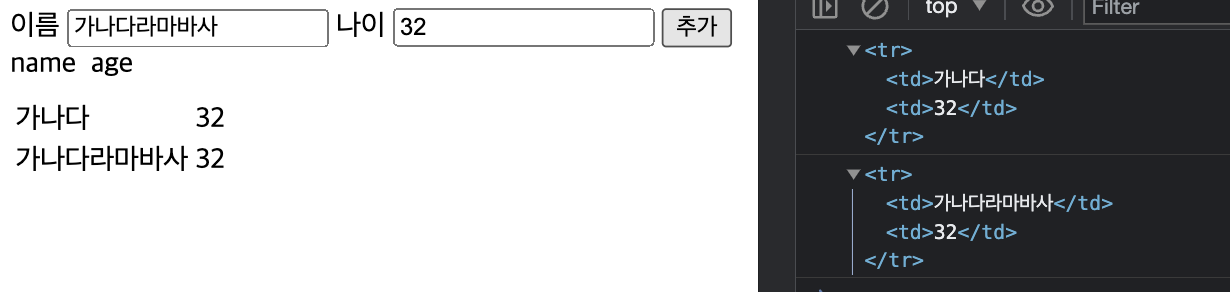 ➡️ 글자수에 상관없이 age가 고정되어 있다.
➡️ 코드를 잘못 보고 친건지,, 아닌지 지금은 코드가 다 바껴있는 상태라 확인은 할 수 없지만, 문제를 풀어보라고 예시까지 만들어주신 상황에서 내가 만들어본 것과 강사님의 풀이를 볼 때 뭔가 코드가 이해되지 않았다.
오늘 다시 코드를 보면서 하나씩 코드를 읽고 다시 만들어 보는 과정에서도 도저히.. tr과 td의 위치? 만든 순서? 가 이해가 되지 않았다.
그래서 이리저리 바꿔보고 테스트해본 결과. tr과 td를 넣는 순서가 잘못되지 않았을까 싶다. 왜냐하면 그렇게해야 코드도 이해가 되고 ui에 나타나는 것도 깔끔하기 때문이다.
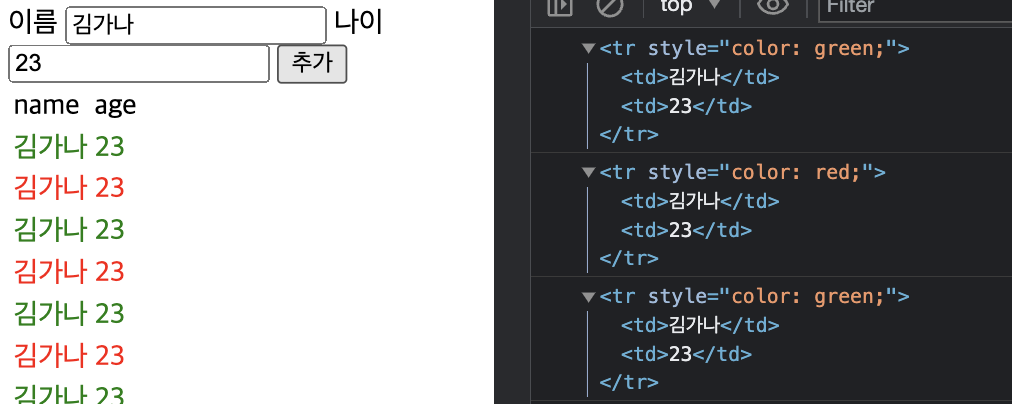
 ➡️ 글자수에 따라 age가 간격에 맞춰서 만들어진다.
글자에 색입히기
if(persons.length % 2 === 0) {
                tr.style.color = "red"
            }else {
                tr.style.color = "green"
            }
➡️ 이것만 추가해주면된다.
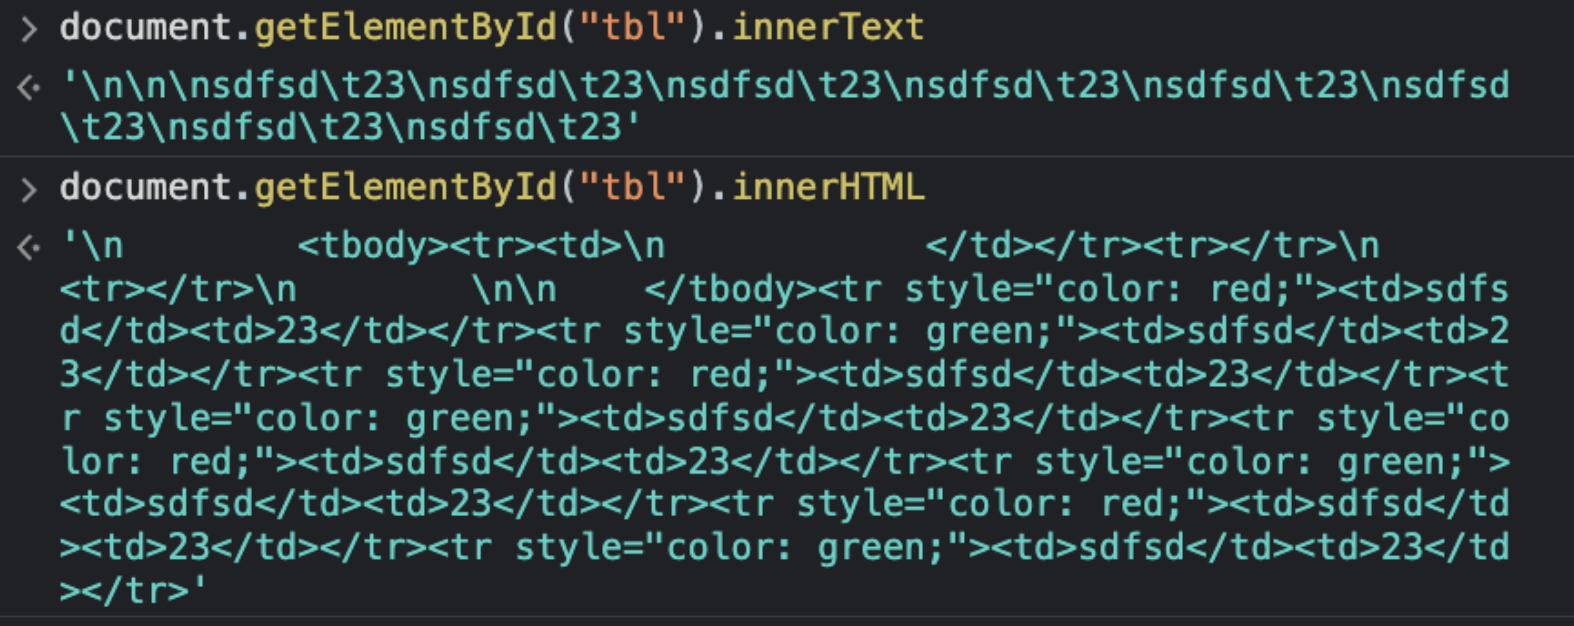
☝🏻 잠시 innerText와 innserHTML 비교
clear
<body>
    <label>이름</label>
    <input id ="name">
    <label>나이</label>
    <input id ="age" type="number">

    <button onclick="rowAdd1()">추가</button><br>
    <button onclick="clearBody2()">clear</button><br>

    <table id ="tbl">
        <thead>
            <td>name</td>
            <td>age</td>
        </thead>
        <tbody id ="body">

        </tbody>
    </table>
    <script>
        //클리어 함수
        function clearBody2() {
            document.getElementById("body").innerHTML = ""
        }

        //객체 만들어서 테이블에 넣기
        const persons = [] // 배열
        function rowAdd1() {
            const name = document.getElementById("name").value
            const age = document.getElementById("age").value

            //객체로 만들어주기
            persons.push({name: name, age : age})

            const tr = document.createElement("tr")
            const tdName = document.createElement("td")
            const tdAge = document.createElement("td")

            tdName.innerHTML = name
            tdAge.innerHTML = age

            tr.appendChild(tdName)
            tr.appendChild(tdAge)
            console.log(tr)
            document.getElementById("body").appendChild(tr)

            //색 입히기
            if(persons.length % 2 === 0) {
                tr.style.color = "red"
            }else {
                tr.style.color = "green"
            }
        }
    </script>
</body>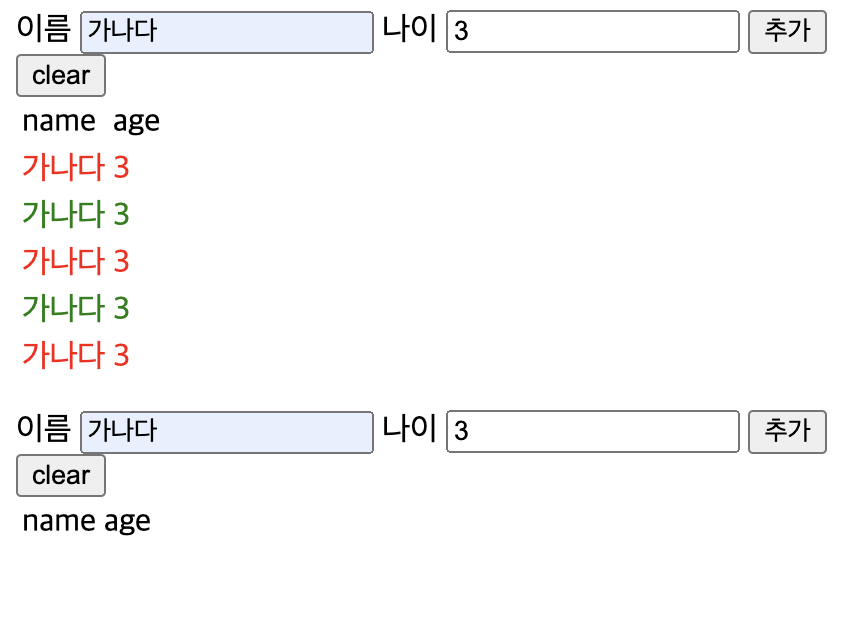
➡️ clear를 누르면 body가 지워진다.
✅ clear버튼 추가 -> () 빼먹지 말기!!
✅ body에 있는 것만 지우기 위해 thead와 tbody를 넣어주고 tbody에 id입력.
✅ clearBody 함수 만들기.
여기까지 하고 실행하는데 실행이 안된다. 왜지????
✅ tbl을 body로 바꿔줘야 한다!
 document.getElementById("tbl").appendChild(tr)
 document.getElementById("body").appendChild(tr)
와 정리 정말 잘하셨네요
제가 궁금하던 부분도 해결이 됐습니다
글 퀄리티도 점점 👏🏻👍🏻
같이 화이팅해요!