✔️ 리펙토링
[기존코드]
짧은 시간 안에 개발하다 보니, 클린 코드보다는 기능 구현에 집중하게 되었습니다.
그로 인해 유지보수가 어려워졌고, 버그도 많았습니다.
그래서 리펙토링을 진행했습니다.
아래에 좋은 참고사항이 있어서 이를 바탕으로 진행하였습니다.
어떤 부분을 변경했는지 공유하는 시간을 갖고자 합니다.
클린 코드 작성법(javaScript)
MVC 패턴 적용
기존에는 api , constant, content, data, highlight, popup 모든 로직을 넣다 보니 기능 도메인을 구별하기가 힘들었습니다. 🤔🔧
그래서 MVC패턴으로 기능을 구분하기로 하였습니다.
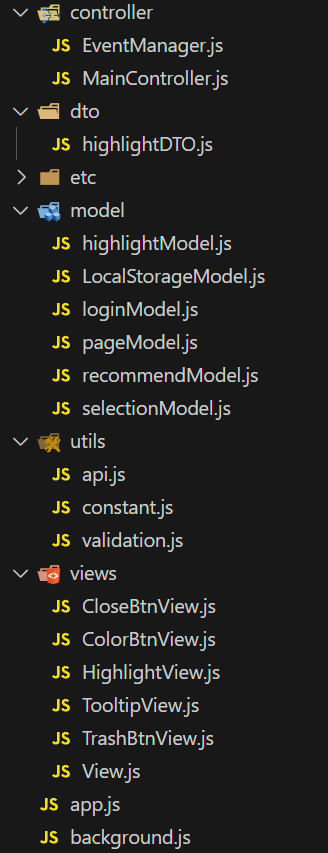
결과는 다음과 같은데요.
기능 도메인별로 파일을 구분하니 유지보수가 훨씬 편리해졌음을 알 수 있었습니다.
MVC패턴으로 개발하면서 다음 원칙을 지키려고 노력했습니다.
-
model,view의존성 최소화view에는 해당 기능에 필요한 내용만 포함되어야 하며, 다른view나model이 포함되지 않도록 하였습니다.
-
view에는이벤트,렌더링,렌더링 관한 로직들로만 구성 -
model에는데이터,API함수,데이터 관리 로직들로만 구성 -
controller에는view,model간 연결
하지만 Controller가 무거워진다는 단점이 있었습니다.
의미있는 함수명, 변수명 짓기
가장 어려운 부분이었습니다.
이 코드를 모르는 사람이 봐도 어떠한 함수인지 알 수 있도록 함수명을 지을려고 노력하였습니다.
[기존 코드]
decideDragOrUpdate
[변경 코드]
onDecideInsertOrUpdate
on으로 시작하는 함수는 Event 처리 함수이고, 동사 + 명사 형태로 지을려고 했습니다.
함수는 한 가지 일을 해야 한다
[기존 코드]
function highLightHover(id, color, colorh, range) {
  const elements = document.querySelectorAll(`[data-id="${id}"]`);

  elements.forEach((element) => {
    element.addEventListener("mouseover", () => {
      elements.forEach((el) => {
        el.style.backgroundColor = colorh; // 호버 시 배경색
      });
    });

    element.addEventListener("mouseout", () => {
      elements.forEach((el) => {
        el.style.backgroundColor = color; // 호버 시 배경색
      });
    });

    element.addEventListener("click", (event) => {
      elements.forEach((el) => {
        event.stopPropagation();
        const clickedElement = event.currentTarget;
        const clickedId = Number(clickedElement.dataset.id);

        SELECTED_ID = clickedId;

        const left = event.clientX + window.scrollX + 10;
        const top = event.clientY + window.scrollY + 10;

        displayTooltip(left, top);
      });
    });
  });
}
함수가 mouseover, mouseout, click, displayTooltip 다양한 작업을 수행하고 있는 것을 확인할 수 있습니다.
[변경 코드]
HighlightView.create = function(id, color) {
  const highlightBeeTag = HighlightView.getHtmlElement(id, color);
  const colorHover = HighlightView.getHoverColor(color);

  highlightBeeTag.addEventListener("mouseover", () => HighlightView.onMouseOver(id, colorHover));
  highlightBeeTag.addEventListener("mouseout", () => HighlightView.onMouseOut(id, color));
  highlightBeeTag.addEventListener("click", (event) => HighlightView.onClick(event));

  return highlightBeeTag;
}

HighlightView.onMouseOver = function(id, colorHover) {
  const elements = document.querySelectorAll(`[data-id="${id}"]`);

  elements.forEach((el) => {
    const backgroundColor = window.getComputedStyle(el).backgroundColor;
    const hoverColor = HighlightView.getHoverColor(backgroundColor);

    el.style.backgroundColor = hoverColor;
  });
}

HighlightView.onMouseOut = function(id, color) {
  const elements = document.querySelectorAll(`[data-id="${id}"]`);

  elements.forEach((el) => {
    const hoverColor = window.getComputedStyle(el).backgroundColor;
    const backgroundColor = HighlightView.getOriginalColor(hoverColor);

    el.style.backgroundColor = backgroundColor;
  });
}


HighlightView.onClick = function(event) {
  event.stopPropagation();
  const clickedElement = event.currentTarget;
  const clickedId = Number(clickedElement.dataset.id);

  selectionModel.SELECTED_ID = clickedId;

  const left = event.clientX + window.scrollX + 10;
  const top = event.clientY + window.scrollY + 10;
  eventManager.emit('showTooltip', { left, top });
  // TooltipView.render(left, top);
}
다음과 같이 함수를 분리했습니다. 아직 개선할 여지가 있지만, 확실히 코드 가독성 측면에서 더 나아졌습니다.
메서드 체이닝을 사용하라
TrashBtnView.setup(trashBtn)
     .on('mousedown', e => this.onDelete())

   CloseBtnView.setup(CloseBtn)
     .on('mousedown', e => loginModel.logout())

   BTN_COLOR.forEach(({ color, hoverColor }) => {
     const colorButton = ColorBtnView.getHtmlElement();
     ColorBtnView.setup(colorButton)
       .on('mousedown', e => this.onDecideInsertOrUpdate(color, hoverColor, e) );
이벤트를 적용할 때 메서드 체이닝을 활용하여 가독성이 향상시켰습니다. 현재는 체이닝한 이벤트가 1개뿐이지만, 여러 개의 이벤트를 체이닝하면 그 효과가 더욱 두드러질 것으로 기대됩니다.
개방/폐쇄 원칙 OCP
[기존 코드]
 function createTooltip() {
   const tooltip = document.createElement("div");
   tooltip.id = "tooltip";
   tooltip.style.visibility = "hidden";
   tooltip.style.opacity = "0";
   tooltip.style.position = "absolute";
   tooltip.style.padding = `${TOOLTIP_PT} ${TOOLTIP_PL}`;
   tooltip.style.backgroundColor = TOOLTIP_BGC;
   tooltip.style.borderRadius = TOOLTIP_BORDER_RADIUS;
   tooltip.style.fontSize = TOOLTIP_FONTSIZE;
   tooltip.style.zIndex = "1000";
   tooltip.style.boxShadow = "0 4px 8px rgba(0, 0, 0, 0.3)";
   tooltip.style.display = "flex";
   tooltip.style.flexDirection = "row";
   tooltip.style.alignItems = "center";
   tooltip.style.justifyContent = "center";
   tooltip.style.gap = "8px";
   return tooltip;
 }

 function createColorButton(color, colorh) {
   const button = document.createElement("button");
   button.style.width = BTN_WIDTH;
   button.style.height = BTN_HEIGHT;
   button.style.borderRadius = BTN_BORDER_RADIUS;
   button.style.backgroundColor = color;
   button.style.border = "none";
   button.style.cursor = "pointer";

   button.addEventListener("mousedown", (event) => {
     hideTooltip();
     decideDragOrUpdate(color, colorh);
     deleteRange();
     event.stopPropagation();
   });

   return button;
 }

 function createIconButton(iconClass, fontSize, onClick) {
   const button = document.createElement("button");
   button.style.width = BTN_WIDTH;
   button.style.height = BTN_HEIGHT;
   button.style.borderRadius = BTN_BORDER_RADIUS;
   button.style.backgroundColor = "transparent";
   button.style.border = "none";
   button.style.cursor = "pointer";
   button.style.display = "flex";
   button.style.alignItems = "center";
   button.style.justifyContent = "center";

   const icon = document.createElement("span");
   icon.style.display = "flex";
   icon.style.alignItems = "center";
   icon.style.justifyContent = "center";
   icon.innerHTML = `
     <svg
       xmlns="http://www.w3.org/2000/svg"
       viewBox="0 0 24 24"
       fill="none"
       stroke="currentColor"
       stroke-width="2"
       stroke-linecap="round"
       stroke-linejoin="round"
       class="${iconClass}"
       style="width: ${fontSize}; height: ${fontSize};"
     >
       <polyline points="3 6 5 6 21 6"></polyline>
       <path d="M19 6l-2 14H7L5 6"></path>
       <path d="M10 11v6"></path>
       <path d="M14 11v6"></path>
       <rect x="9" y="2" width="6" height="4" rx="1" ry="1"></rect>
     </svg>
   `;

   // const icon = document.createElement("i");
   // icon.className = iconClass;
   // icon.style.fontSize = fontSize;

   button.appendChild(icon);
   button.addEventListener("mousedown", (event) => {
     onClick();
     event.stopPropagation();
   });

   return button;
 }
뭔가 상당히 복잡하고 확장하는데 어려움이 있는 코드입니다.
[변경 코드]
const View = {
    init(el) {
      if (!el) throw new Error('Element is required');
      this.el = el;
      return this;
    },

    on(event, handler) {
      this.el.addEventListener(event, handler);
      return this;
    },

    emit(event, data) {
      const evt = new CustomEvent(event, { detail: data });
      this.el.dispatchEvent(evt);
      return this;
    },

    hide() {
      this.el.style.visibility = "hidden";
      this.el.style.opacity = "0";
      return this;
    },

    show() {
      this.el.style.visibility = "visible";
      this.el.style.opacity = "1";
      return this;
    }
  };
이거는 View에 뼈대를 나타내는 코드입니다.
/* eslint-disable no-undef */
const TooltipView = Object.create(View);

TooltipView.setup = function (el) {
 this.init(el)
 eventManager.on('showTooltip', (data) => {
   this.render(data.left, data.top);
 });
 return this
}

TooltipView.getHtmlElement = function() {
 const tooltip = document.createElement("div");

 tooltip.id = "tooltip";
 tooltip.style.visibility = "hidden";
 tooltip.style.opacity = "0";
 tooltip.style.position = "absolute";
 tooltip.style.padding = `${"5px"} ${"5px"}`;
 tooltip.style.backgroundColor = "#fff"
 tooltip.style.borderRadius = "5px";
 tooltip.style.fontSize = "14px";
 tooltip.style.zIndex = "1000";
 tooltip.style.boxShadow = "0 4px 8px rgba(0, 0, 0, 0.3)";
 tooltip.style.display = "flex";
 tooltip.style.flexDirection = "row";
 tooltip.style.alignItems = "center";
 tooltip.style.justifyContent = "center";
 tooltip.style.gap = "8px";

 return tooltip;
};


TooltipView.render = async function (left, top) {
 this.el.style.left = `${left}px`;
 this.el.style.top = `${top}px`;
 this.show();
}
이런 방식으로 View를 생성하고 상속받으면, 기존 코드를 수정하지 않고도 확장성 있는 코드를 작성할 수 있습니다.
의존성 줄이기
HighlightView.onClick = function(event) {
  event.stopPropagation();
  const clickedElement = event.currentTarget;
  const clickedId = Number(clickedElement.dataset.id);

  selectionModel.SELECTED_ID = clickedId;

  const left = event.clientX + window.scrollX + 10;
  const top = event.clientY + window.scrollY + 10;
  TooltipView.render(left, top);
}
이 코드에 문제는 HighlightView에 TooltipView 의존성을 가진다는 점인데요.
저는 이 문제를 EventManager를 통해 해결했습니다.
[변경 코드]
class EventManager {
  constructor() {
    this.events = {};
  }

  on(event, listener) {
    if (!this.events[event]) {
      this.events[event] = [];
    }
    this.events[event].push(listener);
  }

  emit(event, data) {
    if (this.events[event]) {
      this.events[event].forEach(listener => listener(data));
    }
  }
}

HighlightView.onClick = function(event) {
  event.stopPropagation();
  const clickedElement = event.currentTarget;
  const clickedId = Number(clickedElement.dataset.id);

  selectionModel.SELECTED_ID = clickedId;

  const left = event.clientX + window.scrollX + 10;
  const top = event.clientY + window.scrollY + 10;
  eventManager.emit('showTooltip', { left, top });

}


TooltipView.setup = function (el) {
  this.init(el)
  eventManager.on('showTooltip', (data) => {
    this.render(data.left, data.top);
  });
  return this
}
EventManager를 통해 의존성을 해결하였습니다.
getter와 setter를 사용하라
class HighlightDTO {
  #url
  #thumbnailUrl
  #title
  #content
  #color
  #startIndex
  #startOffset
  #lastIndex
  #lastOffset
  #type
  #is_deleted
  #is_updated
  #id

  constructor({ color, range, url, thumbnailUrl, title, type, is_deleted, is_updated, startIndex,  startOffset, lastIndex, lastOffset }) {
    this.#url = url;
    this.#thumbnailUrl = thumbnailUrl;
    this.#title = title;
    this.#color = color;
    this.#type = type;
    this.#is_deleted = is_deleted;
    this.#is_updated = is_updated;
    this.#startIndex = startIndex;
    this.#startOffset = startOffset
    this.#lastIndex = lastIndex;
    this.#lastOffset = lastOffset;

    if (range){
      this.#content = range.toString();
      this.#startIndex = JSON.stringify(this.#getTrack(range.startContainer));
      this.#startOffset = range.startOffset;
      this.#lastIndex = JSON.stringify(this.#getTrack(range.endContainer));
      this.#lastOffset = range.endOffset;

      return;
    }

    this.#content = this.getParseRange().toString();

  }

  #getTrack(Node) {
    const track = [];
    while (Node.nodeName !== "BODY") {
      const siblingNodes = Array.from(Node.parentNode.childNodes);
      for (let i = 0; i < siblingNodes.length; i++) {
        if (siblingNodes[i] === Node) track.push(i);
      }

      Node = Node.parentNode;
    }

    return track;
  }

  #getReverseTrack(rootNode, track) {
    let currentNode = rootNode;
    for (let i = track.length - 1; i >= 0; i--) {
      currentNode = currentNode.childNodes[track[i]];
    }
    return currentNode;
  }

  getParseRange() {
    const startNode = this.#getReverseTrack(
      document.body,
      JSON.parse(this.#startIndex)
    );

    const endNode = this.#getReverseTrack(
      document.body,
      JSON.parse(this.#lastIndex)
    );

    const highlightRange = document.createRange();
    highlightRange.setStart(startNode, this.#startOffset);
    highlightRange.setEnd(endNode, this.#lastOffset);
    return highlightRange;
  }

  getStringifyRange() {
    return {
      url: this.#url,
      thumbnailUrl: this.#thumbnailUrl,
      title: this.#title,
      color: this.#color,
      content: this.#content,
      startIndex: this.#startIndex,
      startOffset: this.#startOffset,
      lastIndex: this.#lastIndex,
      lastOffset: this.#lastOffset,
      type: this.#type,
      is_deleted: this.#is_deleted,
      is_updated: this.#is_updated,
      id: this.#id
    };
  }

  get url() {
    return this.#url;
  }

  get thumbnailUrl() {
    return this.#thumbnailUrl;
  }

  get title() {
    return this.#title;
  }

  get color() {
    return this.#color;
  }

  get content() {
    return this.#content;
  }

  get startIndex() {
    return this.#startIndex;
  }

  get startOffset() {
    return this.#startOffset;
  }

  get lastIndex() {
    return this.#lastIndex;
  }

  get lastOffset() {
    return this.#lastOffset;
  }

  get type() {
    return this.#type;
  }

  get is_deleted() {
    return this.#is_deleted;
  }

  get is_updated() {
    return this.#is_updated;
  }

  setId(id) {
    this.#id = id;
  }

  getId() {
    return this.#id;
  }
}
백엔드와 통신을 할 때 필요한 데이터를 DTO라는 파일로 분리하였습니다.
지금 외부에서 변경을 최소화하기 위해 Private 변수를 적극 사용하였고, setter를 최소화하였습니다.
또한 데이터 관한 로직을 DTO 파일 내에서 처리하도록 하여 코드의 응집도를 높였습니다.

감사합니다 덕분에 구글 취업했습니다