✔️ tooltip UI 만들기
드래그 한 문장 오른쪽 하단 위치에 toolTip Bar가 생성되어야 한다.
📄 range.getClientRects()
range객체에서 getClientRect 메서드는 범위에 해당하는 텍스트 영역의 직사각형을 나타내는 DomRect 객체들의 배열을 반환합니다.
이해가 잘 안가시죠?
예제를 통해서 이해해 봅시다.
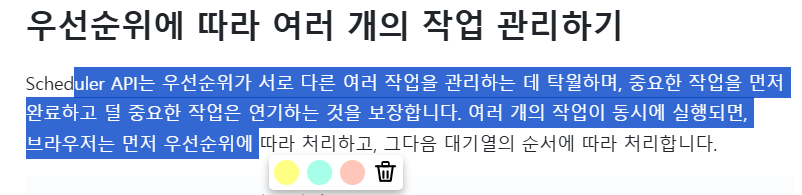
사용자가 uler API는 ~~~~~ 우선순위에 까지 드래그를 했다고 가정해 봅시다.
getClientRect을 콘솔에 찍으면 다음과 같습니다.

각 줄 마다 DOMRect객체를 반환하는 것을 볼 수 있네요
툴팁을 하단 오른쪽에 생성하려면, right와 bottom 값을 잘 활용하면 됩니다.
눈치를 채셨겠지만, 스크롤 위치를 잘 활용하면 됩니다.
이제 코드를 통해 확인해 보겠습니다.
  function getDragRectPos(range) {
    const rects = range.getClientRects();
    if (rects.length <= 0) return [null, null];
    const lastRect = rects[rects.length - 1];
    const left = lastRect.right + window.scrollX + 10;
    const top = lastRect.bottom + window.scrollY;
    return [left, top];
  }
이렇게 한다면 left, top 위치에 tooltip이 생성될 수 있습니다.
이제 툴팁 UI를 자바스크립트로 생성하고 left, top 위치에 display 해주면 됩니다.
    function createTooltip() {
    const tooltip = document.createElement("div");
    tooltip.id = "tooltip";
    tooltip.style.visibility = "hidden";
    tooltip.style.opacity = "0";
    tooltip.style.position = "absolute";
    tooltip.style.padding = `${TOOLTIP_PT} ${TOOLTIP_PL}`;
    tooltip.style.backgroundColor = TOOLTIP_BGC;
    tooltip.style.borderRadius = TOOLTIP_BORDER_RADIUS;
    tooltip.style.fontSize = TOOLTIP_FONTSIZE;
    tooltip.style.zIndex = "1000";
    tooltip.style.boxShadow = "0 4px 8px rgba(0, 0, 0, 0.3)";
    tooltip.style.display = "flex";
    tooltip.style.flexDirection = "row";
    tooltip.style.alignItems = "center";
    tooltip.style.justifyContent = "center";
    tooltip.style.gap = "8px";
    return tooltip;
  }
이렇게 하면 드래그한 위치에 tooltip UI가 표시됩니다.

알고리즘 정리 블로그입니다.