
React 실전 (Project)
Udemy - 한입크기로 잘라 먹는 리액트
📌 감정일기장 페이지 구현 - 일기 상세(/diary)
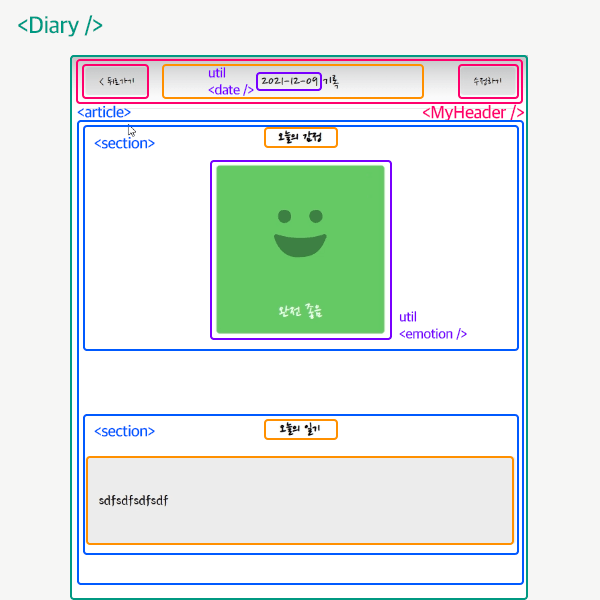
☑️ 일기 상세페이지(/diary) Layout
Diary 컴포넌트
.... ㄴMyHeader 컴포넌트: 2개의 MyButton (back, onEdit)과 headText
.... ㄴ article
........ ㄴ section : 오늘의 감정 데이터
........ ㄴ section : 오늘의 일기 내용 데이터
☑️ Diary 컴포넌트 수정
- react-router-dom을 배울 때 사용했던 useParams 그대로 사용
- Diary 컴포넌트에서 가장 먼저 해야할 일은
조회(READ)하고자 하는 일기 데이터를 가져올 수 있어야 함
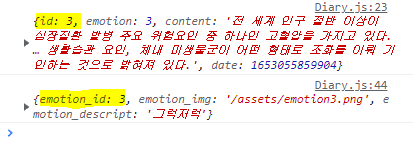
따라서, 이전 시간의 Edit 컴포넌트에서 pathvariable로 받은 id를 가지고, DiaryStateContext가 공급하는 diaryList로부터 find를 사용하여현재 찾으려는 일기 데이터의 id를 구해오는 과정을 Diary 컴포넌트에도 동일하게 진행 - 현재 상세페이지에서 보여줘야 하는 데이터를
id를 기준으로 찾기 - 가져 온 데이터를 console로 출력해서 확인
☑️ util 만들기
중복 사용할 수 있는 공통 코드가 있다면 별도로 디렉토리를 생성 후 해당 코드를 이동시켜 export해재사용- Edit 컴포넌트, DiaryEditor 컴포넌트 등에서 사용했던 함수를 별도로 이동, 분리하여
공통화시키기 - util을 사용하는 요소에 import하여 사용 가능
- 오늘 날짜를 YY-MM-DD 형식으로 구하는 getStringDate 함수 > date.js
src/util/date.js
export const getStringDate = (date) => {
  return date.toISOString().slice(0, 10);
};- 감정점수 1~5점을 나타내는 emotionList 함수 > emotion.js
src/util/emotion.js
const env = process.env;
env.PUBLIC_URL = env.PUBLIC_URL || "";

export const emotionList = [
  {
    emotion_id : 1,
    emotion_img : process.env.PUBLIC_URL + `/assets/emotion1.png`,
    emotion_descript : '완전 좋음'
  },
  {
    emotion_id : 2,
    emotion_img : process.env.PUBLIC_URL + `/assets/emotion2.png`,
    emotion_descript : '좋음'
  },
  {
    emotion_id : 3,
    emotion_img : process.env.PUBLIC_URL + `/assets/emotion3.png`,
    emotion_descript : '그럭저럭'
  },
  {
    emotion_id : 4,
    emotion_img : process.env.PUBLIC_URL + `/assets/emotion4.png`,
    emotion_descript : '나쁨'
  },
  {
    emotion_id : 5,
    emotion_img : process.env.PUBLIC_URL + `/assets/emotion5.png`,
    emotion_descript : '끔찍함'
  },
];
☑️ Diary.js
src/pages/Diary.js
import { useContext, useEffect, useState } from "react";
import { useNavigate, useParams } from "react-router-dom";
import { DiaryStateContext } from "../App";
import { getStringDate } from "../util/date";
import { emotionList } from "../util/emotion";
import MyHeader from "./../components/MyHeader";
import MyButton from "./../components/MyButton";
const Diary = () => {
const { id } = useParams(); // pathVariable = id
const diaryList = useContext(DiaryStateContext); // diaryList 가져오기
const navigate = useNavigate(); // 이동
const [data, setData] = useState();
// 데이터는 컴포넌트가 mount된 시점에서 가져온다
// 조건 : 일기데이터가 1개라도 있을 때만 가져온다 (id 오류 방지 형변환)
// deps : id나 diaryList가 변할 때만 가져온다
useEffect(()=>{
if(diaryList.length >= 1) {
const targetDiary = diaryList.find((it)=>parseInt(it.id) === parseInt(id));
console.log(targetDiary); // 가져온 id의 일기데이터 출력
// 현재 상세페이지에서 보여줘야 하는 데이터를 id를 기준으로 찾아온다면
if(targetDiary) { // 일기가 존재할 때
setData(targetDiary);
}
else { // 일기가 없을 때 홈으로 이동
alert("없는 일기 입니다.");
navigate('/', {replace:true});
}
}
},[id, diaryList, navigate]);
// 데이터가 없으면
if(!data) {
return <div className="DiaryPage">로딩중입니다...</div>;
}
// 데이터가 존재하면
else {
// 오늘의 감정 불러오기
const curEmotionData = emotionList.find((it)=>parseInt(it.emotion_id) === parseInt(data.emotion));
console.log(curEmotionData);
return (
<div className="DiaryPage">
{/* header의 조회한 일기 데이터의 날짜를 가져오기 (getStringDate를 받아서 시간객체로) */}
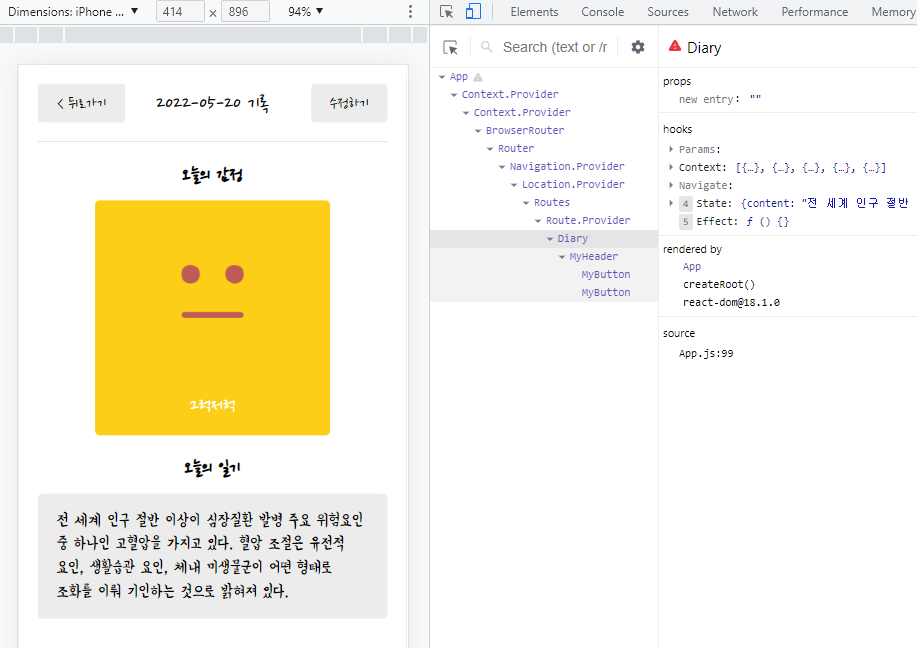
<MyHeader
headText={`${getStringDate(new Date(data.date))} 기록`}
leftChild={<MyButton text={"< 뒤로가기"} onClick={()=>navigate(-1)} />}
rightChild={<MyButton text={"수정하기"} onClick={()=>navigate(`/edit/${data.id}`)} />}
/>
<article>
<section>
<h4>오늘의 감정</h4>
{/* 원본 데이터의 감정 가져오기 */}
<div className={["diaryImgWrapper", `diaryImgWrapper${data.emotion}`].join(" ")}>
<img src={curEmotionData.emotion_img} alt={`${curEmotionData.emotion_descript}`} />
<span className="emotionDesc">{curEmotionData.emotion_descript}</span>
</div>
</section>
<section>
<h4>오늘의 일기</h4>
{/* 원본 데이터의 일기 내용 가져오기 */}
<div className="diaryContentWrapper">
<p>{data.content}</p>
</div>
</section>
</article>
</div>
);
}
}
export default Diary;☑️ CSS Styling
/* Diary */
.DiaryPage { text-align:center; }
.DiaryPage section { width:100%;display:flex;flex-direction:column;align-items:center;text-align:center; }
.DiaryPage h4 { padding:24px 0 16px;font-size:22px;font-weight:600; }
.DiaryPage .diaryImgWrapper { width:250px;height:250px;border-radius:5px;display:flex;flex-direction:column;align-items:center;justify-content:space-around;background-color:#ececec; }
.DiaryPage .diaryImgWrapper1 { background-color:#64c964;color:#fff; }
.DiaryPage .diaryImgWrapper2 { background-color:#9dd772;color:#fff; }
.DiaryPage .diaryImgWrapper3 { background-color:#fdce17;color:#fff; }
.DiaryPage .diaryImgWrapper4 { background-color:#fd8446;color:#fff; }
.DiaryPage .diaryImgWrapper5 { background-color:#fd565f;color:#fff; }
.DiaryPage .diaryImgWrapper .emotionDesc { display:block;font-size:20px; }

/* Diary Content */
.DiaryPage .diaryContentWrapper { width:100%;background-color:#ececec;border-radius:5px;word-break:keep-all;overflow-wrap:break-word; }
.DiaryPage .diaryContentWrapper p { padding:16px 20px;text-align:left;font-family:'Yeon Sung', cursive;font-size:18px;font-weight:400;line-height:1.4; }
☑️ Directory
☑️ Results
💬 CRUD 구현 완성 (하하하 😁) 실전편은 앞 챕터의 기본편의 반복/업그레이드로 이루어져 있는데, 사소하지만 이런 과정을 통해 JavaScript의 Method나 왜 이 React Hooks이 쓰이게 되는지 자연스럽게 학습할 수 있다(!)
💬 Problems에 뭔가가 뜬다면 ESLint 꼭 체킹하기

필요한 내용을 공부하고 저장합니다.