
스프링 시큐리티와 OAuth 2.0으로 로그인 기능 구현하기
구글 서비스 등록
- 구글 클라우드 플랫폼으로 들어가서 새 프로젝트를 하나 만들어주고
- 해당 프로젝트의 API 및 서비스 페이지로 들어가서 사용자 인증 정보를 만들어 줍니다.
- 사용자 인증 정보를 만들기 위해서는 동의 화면을 구성해야하기때문에 먼저 해주고
- 이때 Google API 범위는 email,profile,openid 이러게 딱 기본 범위만 사용합니다.
- 동의 화면 구성을 끝내고 이제 OAuth 클라이언트 ID 만들기 화면으로 이동해서
승인된 리디렉션 URI 를 설정해줄 건데 이때 스프링 시큐리티에서 기본적으로 사용하는 리다이렉트 URL은 {도메인}/login/oauth2/code/google 이렇게 지원해주고 있습니다. - OAuth 클라이언트 ID를 생성해주면 클라이언트 ID와 클라이언트 보안 비밀 코드를 프로젝트에서 설정
인텔리제이로 돌아와서 OAuth 클라이언트 ID를 생성해서 얻는 ID와 비밀번호를 yml에 저장하자
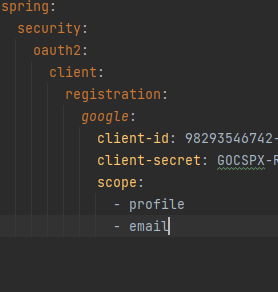
application-oauth.yml 이라고 설정해주었는데 이렇게 작성해주게되면 profile이 oauth로 지정되게된다.
그래서
spring:
  profiles:
    include: oauth
구문을 사용해서 해당 yml를 가져올수도있다
먼저 사용자 정보를 저장할
User 클래스와 사용자의 권한을 알려준느 Role Enum 클래스와 UserRepository를 만든다.
package com.qkrtprjs.springbootproject.domain.user;

import lombok.Getter;
import lombok.RequiredArgsConstructor;

@Getter
@RequiredArgsConstructor
public enum Role {
//시큐리티에서는 권한 코드에 항상ROLE_ 가 붙어야한다!
    GUEST("ROLE_GUEST", "손님"),
    USER("ROLE_USER", "일반 사용자");

    private final String key;
    private final String title;

}
package com.qkrtprjs.springbootproject.domain.user;
import com.qkrtprjs.springbootproject.domain.BaseTimeEntity;
import lombok.Builder;
import lombok.Getter;
import lombok.NoArgsConstructor;
import javax.persistence.Column;
import javax.persistence.Entity;
import javax.persistence.EnumType;
import javax.persistence.Enumerated;
import javax.persistence.GeneratedValue;
import javax.persistence.GenerationType;
import javax.persistence.Id;
@Getter
@NoArgsConstructor
@Entity
public class User extends BaseTimeEntity {
@Id
@GeneratedValue(strategy = GenerationType.IDENTITY)
private Long id;
@Column(nullable = false)
private String name;
@Column(nullable = false)
private String email;
@Column
private String picture;
@Enumerated(EnumType.STRING)
@Column(nullable = false)
private Role role;
@Builder
public User(String name, String email, String picture, Role role) {
this.name = name;
this.email = email;
this.picture = picture;
this.role = role;
}
public User update(String name, String picture) {
this.name = name;
this.picture = picture;
return this;
}
public String getRoleKey() {
return this.role.getKey();
}
}package com.qkrtprjs.springbootproject.domain.user;
import org.springframework.data.jpa.repository.JpaRepository;
import java.util.Optional;
public interface UserRepository extends JpaRepository<User, Long> {
Optional<User> findByEmail(String email);
}
build.gradle에 의존성 추가
implementation("org.springframework.boot:spring-boot-starter-oauth2-client")
Spring Security, OAuth 클래스 설정
총 4가지의 클래스를 설정해준다.
- SecurityConfig : 스프링 시큐리티 설정 내용
package com.qkrtprjs.springbootproject.config.auth;

import com.qkrtprjs.springbootproject.domain.user.Role;
import lombok.RequiredArgsConstructor;
import org.springframework.context.annotation.Bean;
import org.springframework.security.config.annotation.web.builders.HttpSecurity;
import org.springframework.security.config.annotation.web.configuration.EnableWebSecurity;
import org.springframework.security.config.annotation.web.configuration.WebSecurityConfigurerAdapter;
import org.springframework.security.web.SecurityFilterChain;

@RequiredArgsConstructor
@EnableWebSecurity  //spring security 설정 활성화
public class SecurityConfig {

    private final CustomOAuth2UserService customOAuth2UserService;

    @Bean
    protected SecurityFilterChain filterChain(HttpSecurity httpSecurity) throws Exception {
        httpSecurity
                .csrf().disable()
                .headers().frameOptions().disable() //h2-console 화면을 사용하기위한 해당 옵션들 disable
                .and()
                .authorizeRequests()    //antMatchers 옵션을 사용하기위한 설정, url별 권한 관리를 설정하는 시작점
                .antMatchers("/", "/css/**", "/images/**", "/js/**", "/h2-console/**").permitAll()//권한 관리 대상 지정 url, html 관리 , permitAll() 누구한테나 열람가능
                .antMatchers("/api/v1/**").hasRole(Role.USER.name())//해당 주소는 USER의 권한을 가직 사람만 열람
                .anyRequest().authenticated()//나머지 요청들을 인증이 된 사용자만 허용
                .and()
                .logout()//로그아웃 설정 시작
                .logoutSuccessUrl("/")  //로그아웃시에 /로 이동
                .and()
                .oauth2Login()//OAuth2 로그인 기능에대한 설정의 시작
                .userInfoEndpoint()//로그인 성공시에 사용자 정보를 가져올때 설정 담당
                .userService(customOAuth2UserService);  //로그인 성공시에 후속 조치를 진행할 UserService 인터페이스 구현체 등록, 리소스 서버에서 가져온 정보갖고 추가로 진행하고싶은 기능 추가가능
        return httpSecurity.build();
    }

}- CustomOAuth2UserService : 구글 로그인 이후 가져온 사용자의 정보들을 기반으로 가입 및 정보수정, 세션 저장 등 기능을 지원
package com.qkrtprjs.springbootproject.config.auth;

import com.qkrtprjs.springbootproject.config.auth.dto.OAuthAttributes;
import com.qkrtprjs.springbootproject.config.auth.dto.SessionUser;
import com.qkrtprjs.springbootproject.domain.user.User;
import com.qkrtprjs.springbootproject.domain.user.UserRepository;
import lombok.RequiredArgsConstructor;
import org.springframework.security.core.authority.SimpleGrantedAuthority;
import org.springframework.security.oauth2.client.userinfo.DefaultOAuth2UserService;
import org.springframework.security.oauth2.client.userinfo.OAuth2UserRequest;
import org.springframework.security.oauth2.client.userinfo.OAuth2UserService;
import org.springframework.security.oauth2.core.OAuth2AuthenticationException;
import org.springframework.security.oauth2.core.user.DefaultOAuth2User;
import org.springframework.security.oauth2.core.user.OAuth2User;
import org.springframework.stereotype.Service;

import javax.servlet.http.HttpSession;
import java.util.Collections;

@RequiredArgsConstructor
@Service
public class CustomOAuth2UserService implements OAuth2UserService<OAuth2UserRequest, OAuth2User> {
    //구글 로그인 이후 가져온 사용자의 정보들을 기반으로 가입 및 정보수정, 세션 저장 등 기능을 지원
    private final UserRepository userRepository;
    private final HttpSession httpSession;


    @Override
    public OAuth2User loadUser(OAuth2UserRequest userRequest) throws OAuth2AuthenticationException {
        OAuth2UserService<OAuth2UserRequest, OAuth2User> delegate = new DefaultOAuth2UserService();
        OAuth2User oAuth2User = delegate.loadUser(userRequest);

        String registrationId = userRequest.getClientRegistration().getRegistrationId();    //구글인지 네이버인지 확인하기위한 코드
        String userNameAttributeName = userRequest.getClientRegistration().getProviderDetails() //로그인 진행시에 키가되는 필드값 PK값
                .getUserInfoEndpoint().getUserNameAttributeName();

        OAuthAttributes attributes = OAuthAttributes.of(registrationId, userNameAttributeName, oAuth2User.getAttributes()); //OAuth2User의 속성값들을 담을 클래스

        User user = saveOrUpdate(attributes);
        httpSession.setAttribute("user", new SessionUser(user));

        return new DefaultOAuth2User(
                Collections.singleton(new SimpleGrantedAuthority(user.getRoleKey())),
                attributes.getAttributes(),
                attributes.getNameAttributeKey());
    }


    private User saveOrUpdate(OAuthAttributes attributes) {
        User user = userRepository.findByEmail(attributes.getEmail())
                .map(entity -> entity.update(attributes.getName(), attributes.getPicture()))
                .orElse(attributes.toEntity());

        return userRepository.save(user);
    }
}
- SessionUser : 세션에 사용자 정보를 저장하기위한 DTO
package com.qkrtprjs.springbootproject.config.auth.dto;

import com.qkrtprjs.springbootproject.domain.user.User;
import lombok.Getter;

import java.io.Serializable;

@Getter
public class SessionUser implements Serializable {  //세션에 사용자 정보를 저장하기위한 DTO
    private String name;
    private String email;
    private String picture;

    public SessionUser(User user) {
        this.name = user.getName();
        this.email = user.getEmail();
        this.picture = user.getPicture();
    }
}
- OAuthAttributes : OAuth를 통해서 가져온 값들을 매핑해주기위한 DTO
package com.qkrtprjs.springbootproject.config.auth.dto;

import com.qkrtprjs.springbootproject.domain.user.Role;
import com.qkrtprjs.springbootproject.domain.user.User;

import lombok.Builder;
import lombok.Getter;
import lombok.NoArgsConstructor;

import java.util.Map;

@Getter
@NoArgsConstructor
public class OAuthAttributes {
    private Map<String, Object> attributes;
    private String nameAttributeKey;
    private String name;
    private String email;
    private String picture;

    @Builder
    public OAuthAttributes(Map<String, Object> attributes, String nameAttributeKey, String name, String email, String picture) {
        this.attributes = attributes;
        this.nameAttributeKey = nameAttributeKey;
        this.name = name;
        this.email = email;
        this.picture = picture;
    }

    public static OAuthAttributes of(String registrationId, String userNameAttributeName, Map<String, Object> attributes) {
//        if("naver".equals(registrationId)) {
//            return ofNaver("id", attributes);
//        }

        return ofGoogle(userNameAttributeName, attributes);
    }

    private static OAuthAttributes ofGoogle(String userNameAttributeName, Map<String, Object> attributes) {
        return OAuthAttributes.builder()
                .name((String) attributes.get("name"))
                .email((String) attributes.get("email"))
                .picture((String) attributes.get("picture"))
                .attributes(attributes)
                .nameAttributeKey(userNameAttributeName)
                .build();
    }

//    private static OAuthAttributes ofNaver(String userNameAttributeName, Map<String, Object> attributes) {
//        Map<String, Object> response = (Map<String, Object>) attributes.get("response");
//
//        return OAuthAttributes.builder()
//                .name((String) response.get("name"))
//                .email((String) response.get("email"))
//                .picture((String) response.get("profile_image"))
//                .attributes(response)
//                .nameAttributeKey(userNameAttributeName)
//                .build();
//    }

    public User toEntity() {
        return User.builder()
                .name(name)
                .email(email)
                .picture(picture)
                .role(Role.GUEST)
                .build();
    }
}
이전에 카카오 로그인 API를 이용해서 로그인을 구현할때에는 인가 코드를 받고 인가 코드를 뜯어서 토큰을 받고 이 토큰으로 로그인한 사람의 정보들을 가져올 수 있었는데 이번에 구글 로그인 API는 인가 코드를 받고 뜯어서 토큰을 얻어내는 이러한 과정들이 있지않았다 코드를 뜯어보니
작성한 CustomOAuth2UserService는 OAuth2UserService<OAuth2UserRequest, OAuth2User>를 상속받고있는데 여기에서 이러한 과정들을 대신 수행해주는 것 같았다. 카카오 로그인 API적용하는 것보다 더 수월하게 진행할 수 있었다.
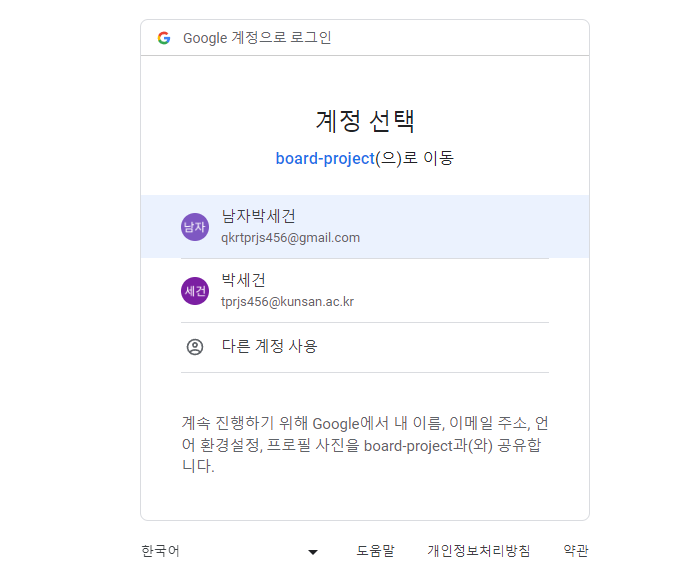

정상적으로 작동!
h2-console에서도 정상적으로 저장이 완료된것을 확인할 수 있다.

우리가 securityConfig에서 우리가 만든api를 사용하기위해서는 USER의 등급이여야한다.
처음 구글 로그인으로 회원가입을 진행한사람은 GUEST의 등급으로 설정되기때문에 SQL로 따로 변경해주면 정상적으로 작동한다.