
이전에 머스테치를 사용해서 화면을 구성하고 js와 ajax를 사용해서 요청받은 데이터를 서버로 갖고와서 저장시키는 작업까지 해보았다 그러면 본격적으로 머스테치의 문법을 사용해서 적용시켜보자
전체 조회
우선 전체 조회를 하기위해서
controller,
    @GetMapping("/")
    public String index(Model model) {	//model로 mustache로 정보 보내기
        model.addAttribute("posts", postsService.findAllDesc());
        return "index";
    }
service,
    @Transactional(readOnly = true)	//readOnly 속성을 통해서 속도를 높인다 대신 조회만 가능
    public List<PostsListResponseDto> findAllDesc() {
        return postsRepository.findAllDesc().stream()	//stream() 메서드를 사용해서 체이닝 사용
                .map(PostsListResponseDto::new)	//PostsListResponseDto 생성자를 이용해서 mapping
                .collect(Collectors.toList());	//List로 만들어주기
    }
repository
package com.qkrtprjs.springbootproject.domain.posts;

import org.springframework.data.jpa.repository.JpaRepository;
import org.springframework.data.jpa.repository.Query;

import java.util.List;

public interface PostsRepository extends JpaRepository<Posts, Long> {
//@Query 어노테이션을 사용해서 직접 쿼리르 작성해서 적용시킬 수 있다는 것을 보여줌, JPQL쿼리라고 한다
    @Query("SELECT p FROM Posts p order by p.id DESC ")
    List<Posts> findAllDesc();
}
를 수정해줍니다.
각각 코드에대한 설명들은 주석으로 적어 놓았습니다
index.mustache 추가
<table class="table table-horizontal table-bordered">
        <thead class="thead-strong">
        <tr>
            <th>게시글번호</th>
            <th>제목</th>
            <th>작성자</th>
            <th>최종수정일</th>
        </tr>
        </thead>
        <tbody id="tbody">
        {{#posts}}
            <tr>
                <td>{{id}}</td>
                <td><a href="/posts/update/{{id}}">{{title}}</a></td>
                <td>{{author}}</td>
                <td>{{modifiedDate}}</td>
            </tr>
        {{/posts}}
        </tbody>
    </table>
{{#}} 문법을 사용해서 순회합니다. for문과 비슷
{{}} 를 사용해서 해당 필드값을 가져옵니다. ex) posts.id

정상적으로 작동
정보 수정
이제 정보을 수정하는 과정을 진행해보자
정보를 수정하는 api는 이전에 만들어놓았고 해당 mustache 를 구현해보자
posts-update.mustache
{{>layout/header}}

<h1>게시글 수정</h1>

<div class="col-md-12">
    <div class="col-md-4">
        <form>
            <div class="form-group">
                <label for="title">글 번호</label>
                <input type="text" class="form-control" id="id" value="{{post.id}}" readonly>
            </div>
            <div class="form-group">
                <label for="title">제목</label>
                <input type="text" class="form-control" id="title" value="{{post.title}}">
            </div>
            <div class="form-group">
                <label for="author"> 작성자 </label>
                <input type="text" class="form-control" id="author" value="{{post.author}}" readonly>
            </div>
            <div class="form-group">
                <label for="content"> 내용 </label>
                <textarea class="form-control" id="content">{{post.content}}</textarea>
            </div>
        </form>
        <a href="/" role="button" class="btn btn-secondary">취소</a>
        <button type="button" class="btn btn-primary" id="btn-update">수정 완료</button>
        <button type="button" class="btn btn-danger" id="btn-delete">삭제</button>
    </div>
</div>

{{>layout/footer}}
문법
{{posts.id}} . 을 통해서 객체에 필드에 접근
이전과 마찬가지로 btn-update 버튼을 클릭시에 수정 기능을 호출할 수 있게 index.js 파일에 udpate function을 추가합니다.
 $('#btn-update').on('click', function () {
            _this.update();
        });

        update : function () {
        let data = {
            title: $('#title').val(),
            content: $('#content').val()
        };

        let id = $('#id').val();

        $.ajax({
            type: 'PUT',
            url: '/api/v1/posts/'+id,
            dataType: 'json',
            contentType:'application/json; charset=utf-8',
            data: JSON.stringify(data)
        }).done(function() {
            alert('글이 수정되었습니다.');
            window.location.href = '/';
        }).fail(function (error) {
            alert(JSON.stringify(error));
        });
    }
이번 ajax에서는 type을 PUT으로 설정해놓았는데 이는 REST 규악에 맞게설정되었습니다.
REST규약에맞게 수정 API를 @PutMapping() 으로 설정했기때문입니다.
REST규약
- 생성 : POST
- 읽기 : GET
- 수정 : PUT
- 삭제 : DELETE
해당 기능을 수행할 수 있는 페이지로 이동시켜주는 controller도 추가해줍니다
    @GetMapping("/posts/update/{id}")
    public String postsUpdate(@PathVariable Long id, Model model) {
        PostsResponseDto postsResponseDto = postsService.findById(id);
        model.addAttribute("post", postsResponseDto);
        return "posts-update";
    }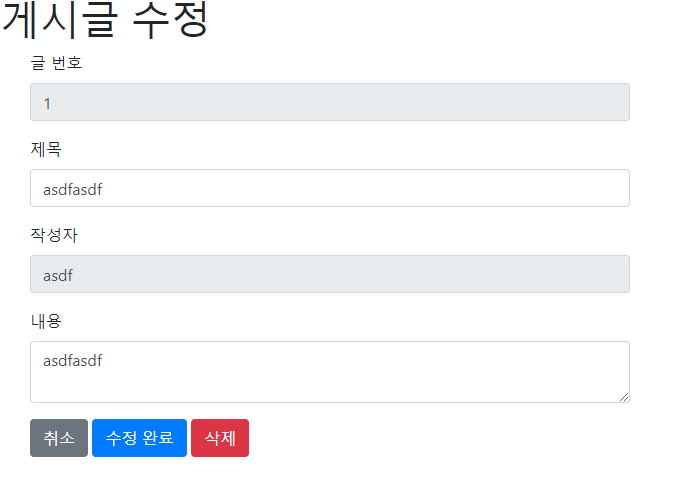
정상적으로 페이지 이동이되고
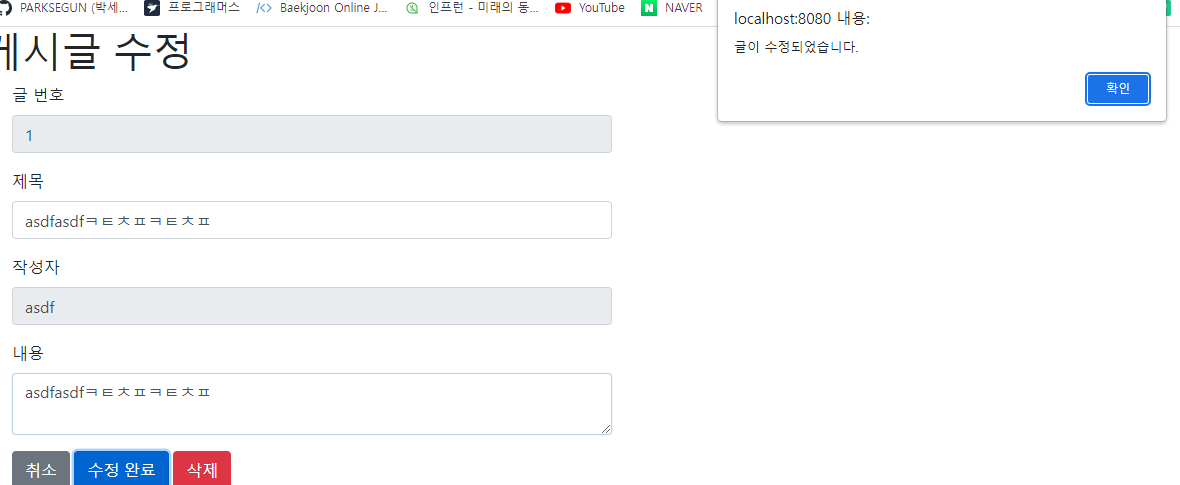

정상적으로 수정 기능이 완료된것을 확인할 수 있습니다!
삭제 기능
이어서 삭제 기능을 추가해 보도록 하자
해당 서비스 구현
   @Transactional
    public void delete(Long id) {
        Posts posts = postsRepository.findById(id).orElseThrow(() -> new IllegalArgumentException("해당 게시글이 존재하지 않습니다! ID : " + id));
        postsRepository.delete(posts);
    }
이전 프로젝트를 스스로 진행할때에는 바로 delete를 수행하였는데 여기서는 findById로 해당 게시글이 존재하는지를 확인한 후에 삭제를 진행한다.
확실히 안전하고 단단한 로직을 구현하는 습관을 길러야겠다..
PostsApiController 추가
    @DeleteMapping("/api/v1/posts/{id}")
    public Long delete(@PathVariable Long id) {
        postsService.delete(id);
        return id;
    }
책을 공부하닥 느낀점이있다.
이전에 혼자서 프로젝트를 만들어볼때에는 컨트롤러를 막무가내로 사용했다면 이 책에서는 url을 입력했을 때에 화면을 옮겨주는 controller와 내가 만들어 놓은 API 들을 연결시켜주는 controller를 확실하게 구분해놓는다는 것이다.
같은 controller라도 역할에 따라 구분하는 것이 직관성이 더 좋아보이기때문에 기능에 따라 구분해 놓는 습관을 길으자!

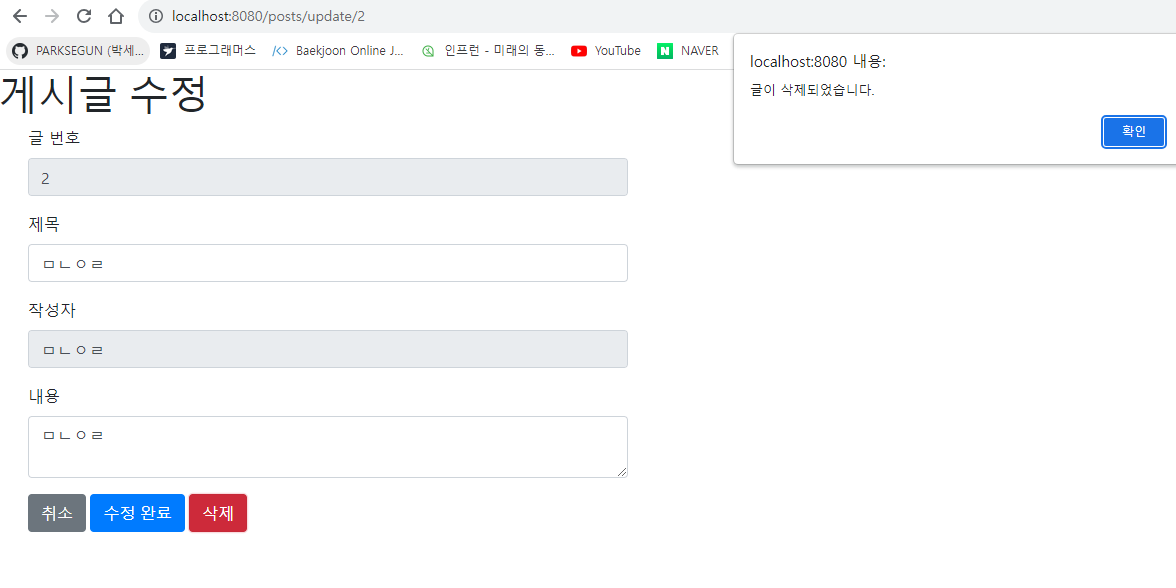

정상적으로 삭제
사실 이번에는 API 기능이나 화면 개발을 진행했지만 사실 나는 테스트코드 작성에 더 관심이 있었기 때문에 한번 삭제기능에대해서 웹 요청 방법으로 스스로 테스트 코드를 만들어보자
삭제 기능 테스트
테스트를 하기위해서 Posts객체를 하나 만들어서 save 해주고 restTemplate의 exchange() 메서드를 사용해서 삭제 기능을 담당하는 API로 보내서 해당 객체를 삭제한뒤에 postRepository가 비워져 있는지를 확인한다!
    @Test
    public void posts_삭제된다() {
        //given
        Posts build = Posts.builder()
                .title("title")
                .content("content")
                .author("author")
                .build();
        postsRepository.save(build);

        List<Posts> all = postsRepository.findAll();
        Posts posts = all.get(0);
        Long id = posts.getId();
        //when
        ResponseEntity<Long> responseEntity = restTemplate.exchange(
                "http://localhost:"+port+"/api/v1/posts/" + id,
                HttpMethod.DELETE,
                null,
                Long.class);
        //then
        assertThat(responseEntity.getStatusCode()).isEqualTo(HttpStatus.OK);
        assertThat(responseEntity.getBody()).isGreaterThan(0L);
        List<Posts> postsList = postsRepository.findAll();
        assertThat(postsList.size()).isEqualTo(0);
    }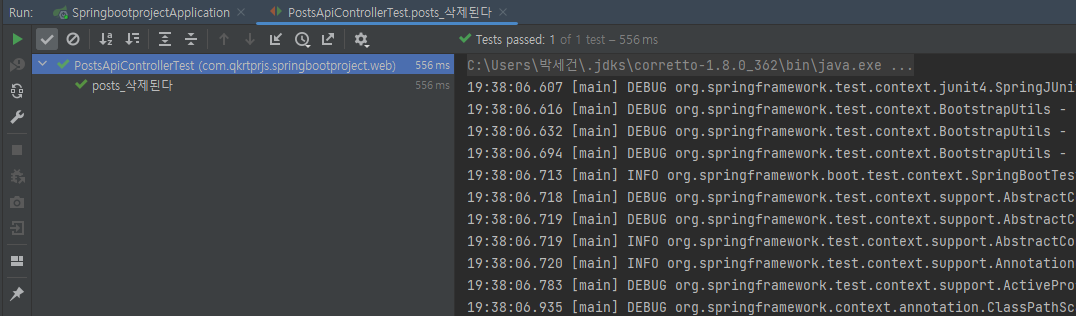
정상적으로 통과!
웹 요청에서의 테스트 코드 작성 방법을 잘 익혀가자!