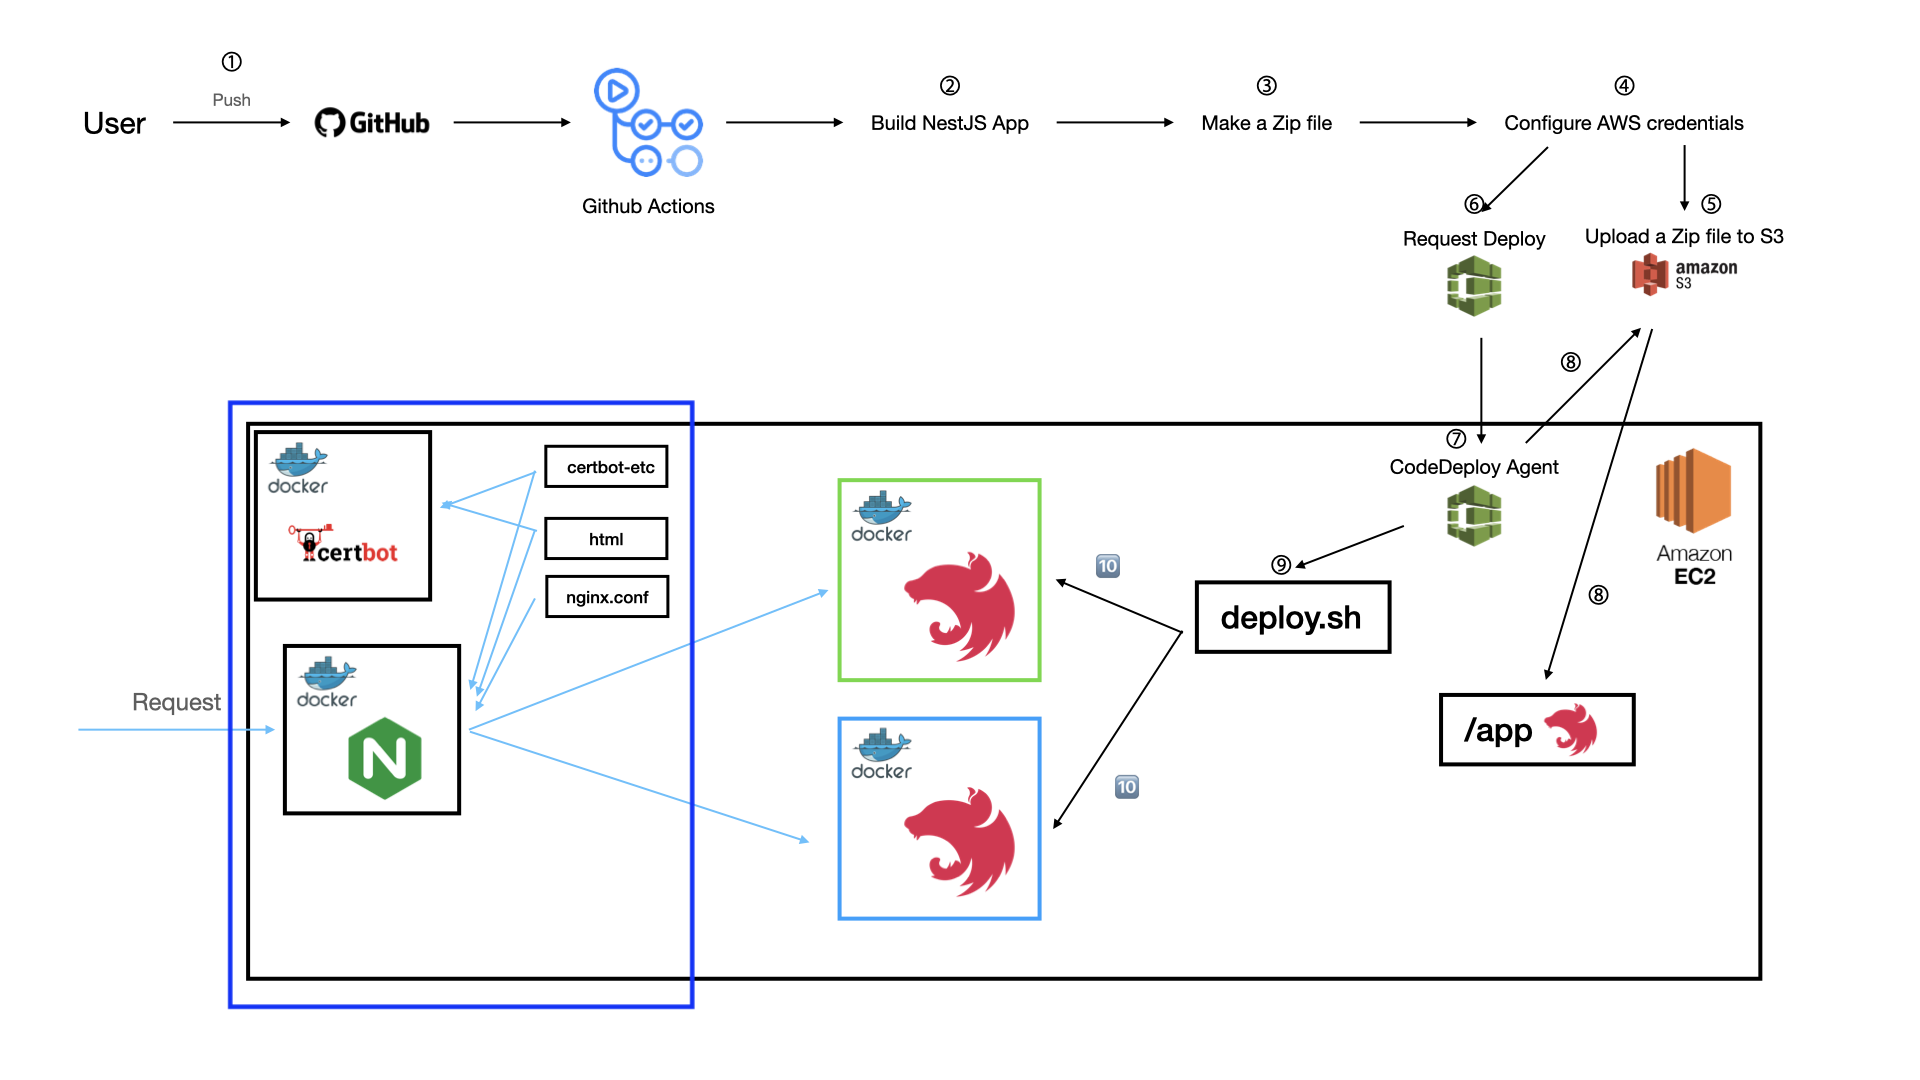
[完] Github Actions, Code Deploy, Nginx를 이용한 무중단 배포 및 SSL 적용 (5)
저번 포스팅에서는 배포할 때마다 그린-블루 컨테이너가 스위칭되는 기능을 구현하였습니다.
이번에는 nginx와 certbot을 이용하여 SSL 인증서를 발급받고 HTTPS를 적용하는 것을 구현해보겠습니다.
🚨 여기에서는 자잘한 실수 때문에 적용이 안되는 경우가 있기 때문에 꼼꼼하게 확인하시기 바랍니다. 🚨
14. configuration 파일 준비하기

저는 my-nest-app과 같은 위치에 https 폴더를 만들어주었습니다.
여기서는 헷갈리지 않도록 폴더 구조로 나타내겠습니다.
https
├── certbot-etc -> 추가적인 보안을 위한 파일들
│   ├── options-ssl-nginx.conf
│   └── ssl-dhparams.pem
├── docker-compose.yml -> nginx, certbot을 위한 docker-compose
├── myweb -> SSL 인증서 발급을 위한 index.html
│   └── index.html
└── nginx -> 프록시 및 로드밸런싱을 위한 nginx configuration 파일
    ├── nginx.conf
    └── nginx.conf.https
certbot-etc
이 폴더의 파일들을 수정없이 붙여넣기 하시면 됩니다. 파일의 이름을 변경하는 경우 nginx.conf.https 파일에서도 수정을 해주셔야합니다.
options-ssl-nginx.conf
# This file contains important security parameters. If you modify this file
# manually, Certbot will be unable to automatically provide future security
# updates. Instead, Certbot will print and log an error message with a path to
# the up-to-date file that you will need to refer to when manually updating
# this file.

ssl_session_cache shared:le_nginx_SSL:10m;
ssl_session_timeout 1440m;
ssl_session_tickets off;

ssl_protocols TLSv1.2 TLSv1.3;
ssl_prefer_server_ciphers off;

ssl_ciphers "ECDHE-ECDSA-AES128-GCM-SHA256:ECDHE-RSA-AES128-GCM-SHA256:ECDHE-ECDSA-AES256-GCM-SHA384:ECDHE-RSA-AES256-GCM-SHA384:ECDHE-ECDSA-CHACHA20-POLY1305:ECDHE-RSA-CHACHA20-POLY1305:DHE-RSA-AES128-GCM-SHA256:DHE-RSA-AES256-GCM-SHA384";
ssl-dhparams.pem
-----BEGIN DH PARAMETERS-----
MIIBCAKCAQEA//////////+t+FRYortKmq/cViAnPTzx2LnFg84tNpWp4TZBFGQz
+8yTnc4kmz75fS/jY2MMddj2gbICrsRhetPfHtXV/WVhJDP1H18GbtCFY2VVPe0a
87VXE15/V8k1mE8McODmi3fipona8+/och3xWKE2rec1MKzKT0g6eXq8CrGCsyT7
YdEIqUuyyOP7uWrat2DX9GgdT0Kj3jlN9K5W7edjcrsZCwenyO4KbXCeAvzhzffi
7MA0BM0oNC9hkXL+nOmFg/+OTxIy7vKBg8P+OxtMb61zO7X8vC7CIAXFjvGDfRaD
ssbzSibBsu/6iGtCOGEoXJf//////////wIBAg==
-----END DH PARAMETERS-----
docker-compose.yml
맨 밑 certbot.command 제일 끝 부분에 있는 your.domain, www.your.domain에는 SSL 인증서를 발급 받고싶은 도메인을 넣어주세요.
version: "3"

services:
  webserver:
    image: nginx:latest
    container_name: proxy
    network_mode: "host"
    restart: always
    ports:
      - "80:80"
      - "443:443"
    volumes:
      - ./myweb:/usr/share/nginx/html
      - ./nginx/nginx.conf:/etc/nginx/nginx.conf
      - ./certbot-etc:/etc/letsencrypt

  nginx:
    image: nginx:latest
    container_name: myweb
    restart: always
    volumes:
      - ./myweb:/usr/share/nginx/html

  certbot:
    depends_on:
      - webserver
    image: certbot/certbot
    container_name: certbot
    volumes:
      - ./certbot-etc:/etc/letsencrypt												# 여기를 수정해주세요.									#    여기를 수정해주세요. 도메인을 추가할 때마다 -d를 넣어주셔야합니다.
      - ./myweb:/usr/share/nginx/html												  # vvvvvvvvvvv														 # vvvvvvvvvvvvvvvvvvvvv
    command: certonly --dry-run --webroot --webroot-path=/usr/share/nginx/html --email test@test.com --agree-tos --no-eff-email --keep-until-expiring -d your.domain -d www.your.domain
myweb
index.html
<h1>INDEX.HTML</h1>nginx
nginx.conf
이 파일은 수정없이 붙여넣기 하시면 됩니다.
user nginx;
worker_processes  auto;

error_log  /var/log/nginx/error.log warn;
pid        /var/run/nginx.pid;

events {
    worker_connections 1024;
}

http {
    include       /etc/nginx/mime.types;
    default_type  application/octet-stream;
    log_format  main  '$remote_addr - $remote_user [$time_local] "$request" '
                      '$status $body_bytes_sent "$http_referer" "$request_uri" "$uri"'
                      '"$http_user_agent" "$http_x_forwarded_for"';
    access_log  /var/log/nginx/access.log  main;
    sendfile on;
    keepalive_timeout 65;

    server {
        location ~ /.well-known/acme-challenge {
                allow all;
                root /usr/share/nginx/html;
                try_files $uri =404;
        }

        location / {
                allow all;
                root /usr/share/nginx/html;
                try_files $uri =404;
        }
    }
}
nginx.conf.https
ssl_certificate, ssl_certificate_key, server_name에 개인 도메인을 넣어주셔야합니다.
user nginx;
worker_processes  auto;

error_log  /var/log/nginx/error.log warn;
pid        /var/run/nginx.pid;

events {
    worker_connections 1024;
}

http {
    include       /etc/nginx/mime.types;
    default_type  application/octet-stream;
    log_format  main  '$remote_addr - $remote_user [$time_local] "$request" '
                      '$status $body_bytes_sent "$http_referer" "$request_uri" "$uri"'
                      '"$http_user_agent" "$http_x_forwarded_for"';
    access_log  /var/log/nginx/access.log  main;
    sendfile on;
    keepalive_timeout 65;

    upstream docker-nest {
        least_conn;
        server localhost:3001;
        server localhost:3002;
    }

    server {
        listen 80;
        		   #       여기를 수정해주세요.
        		   # vvvvvvvvvvvvvvvvvvvvvvvvvv
        server_name your.domain www.your.domain;

        location ~ /.well-known/acme-challenge {
                allow all;
                root /usr/share/nginx/html;
                try_files $uri =404;
        }

        location / {
                return 301 https://$host$request_uri;
        }
    }

    server {
        listen 443 ssl;
        		   #       여기를 수정해주세요.
        		   # vvvvvvvvvvvvvvvvvvvvvvvvvv
        server_name your.domain www.your.domain;
        									# 여기를 수정해주세요.
											# vvvvvvvvvvvv
        ssl_certificate /etc/letsencrypt/live/your.domain/fullchain.pem;
                								# 여기를 수정해주세요.
												# vvvvvvvvvvvv
        ssl_certificate_key /etc/letsencrypt/live/your.domain/privkey.pem;
        include /etc/letsencrypt/options-ssl-nginx.conf; # certbot-etc 안의 파일 이름에 맞춰주세요.
        ssl_dhparam /etc/letsencrypt/ssl-dhparams.pem; # certbot-etc 안의 파일 이름에 맞춰주세요.

        location / {
            proxy_pass         http://docker-nest;
            proxy_redirect     off;
            proxy_set_header   Host $host;
            proxy_set_header   X-Real-IP $remote_addr;
            proxy_set_header   X-Forwarded-For $proxy_add_x_forwarded_for;
            proxy_set_header   X-Forwarded-Host $server_name;
            proxy_set_header   X-Forwarded-Proto $scheme;
        }
    }
}
15. SSL 발급 받기
https 폴더에 들어간 상태에서 docker-compose를 실행해줍니다.
docker-compose.yml의 certbot.command를 보면 --dry-run 옵션이 있는데, SSL 인증서를 받을 수 있는지 테스트를 해보는 것입니다. 해당 옵션없이 자주 실행하시면 막힐 수 있습니다.
docker-compose up -dcertbot 컨테이너의 로그를 확인해봅시다.
> docker ps -a
> docker logs certbot_container_id
위와 같은 메세지가 뜨면 성공적으로 SSL 인증서를 발급받을 수 있다는 것입니다.
그 다음 docker-compose down -v를 실행하셔셔 모든 컨테이너를 내려줍니다.
이제 docker-compose.yml의 certbot.command에서 --dry-run을 없애고 다시 실행합니다.
다시 certbot 컨테이너의 로그를 확인해봅시다.
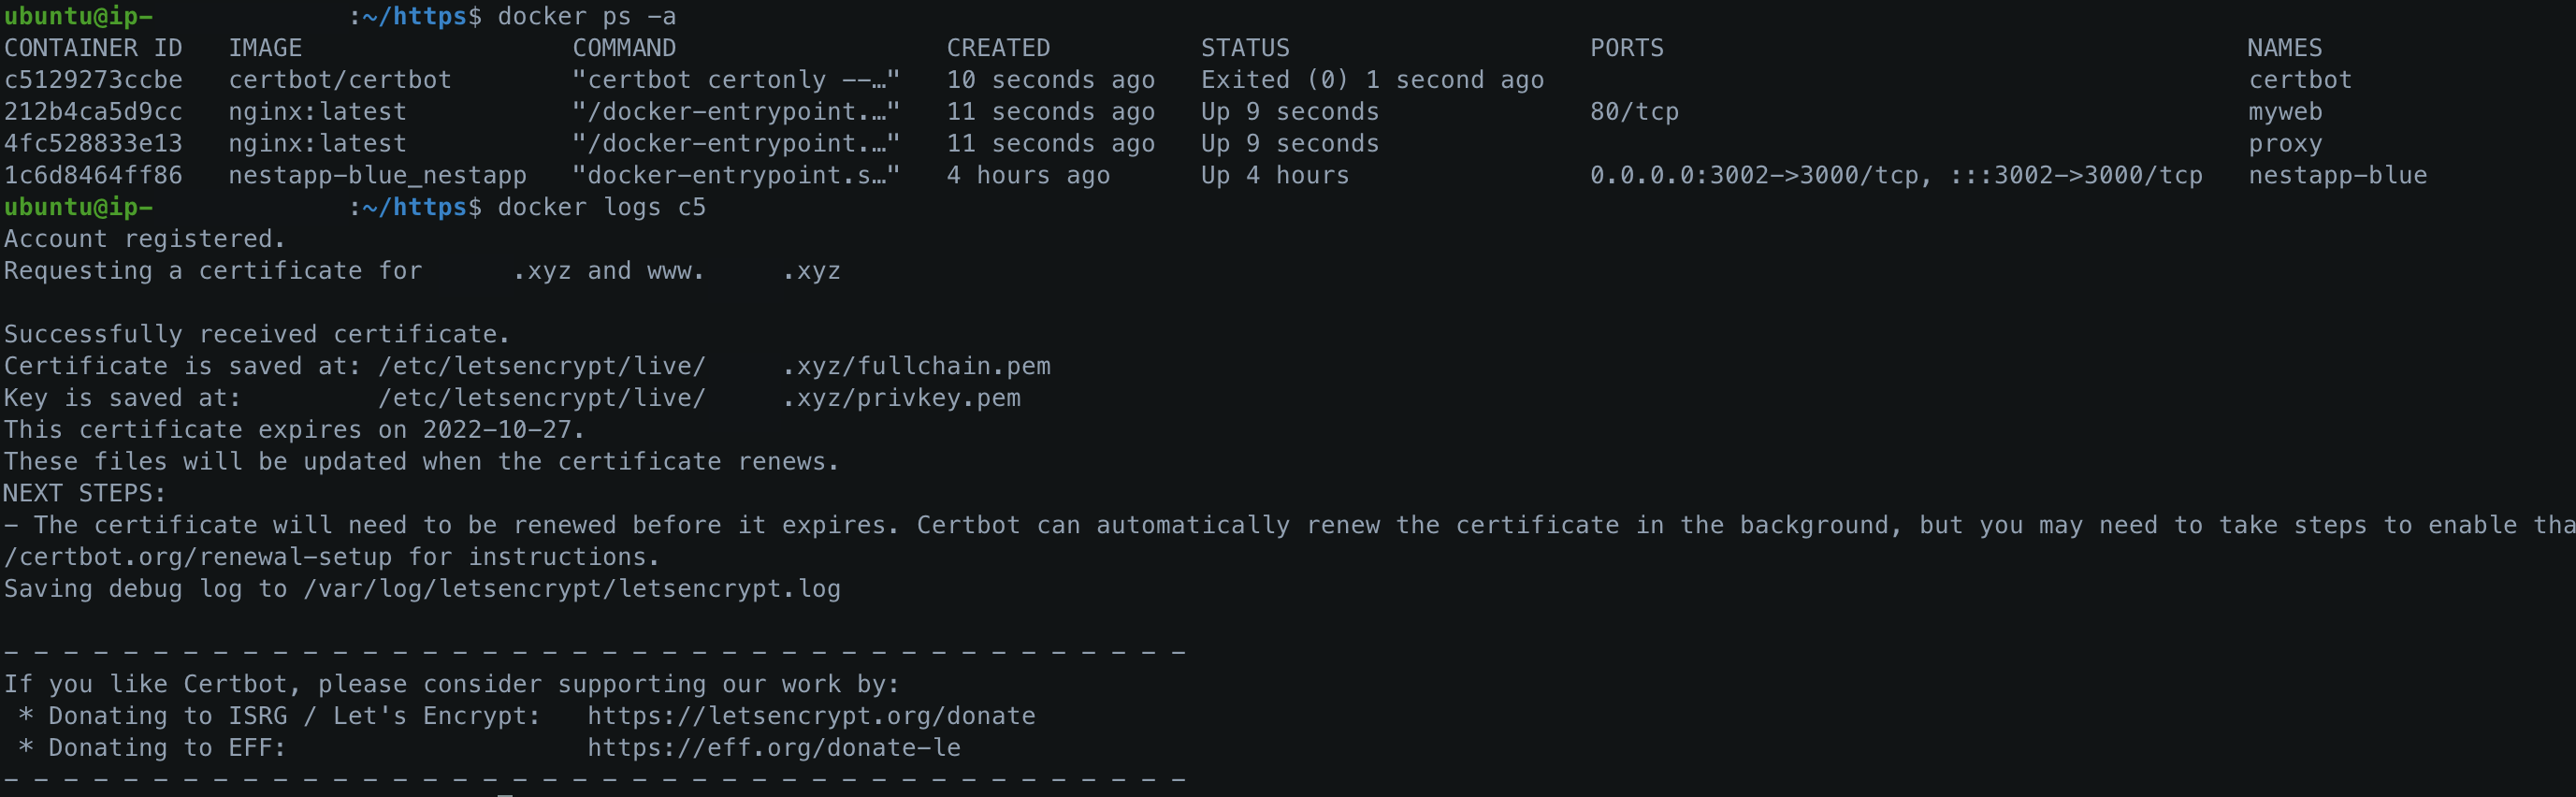
위와 같은 메세지가 드면 인증서를 성공적으로 발급받으신겁니다! 🎉
certbot-etc 폴더를 보면 인증서 관련된 폴더들이 생긴 것을 확인할 수 있습니다.

16. SSL 적용하기
docker-compose down -v를 실행하셔서 모든 컨테이너를 내려줍니다.
그 다음 docker-compose.yml을 수정해주겠습니다. nginx.conf를 nginx.conf.https로 바꿔줍니다.
version: "3"
services:
webserver:
image: nginx:latest
container_name: proxy
network_mode: "host"
restart: always
ports:
- "80:80"
- "443:443"
volumes:
- ./myweb:/usr/share/nginx/html
# 여기를 nginx.conf.https로 바꿔주세요
# vvvvvvvv
- ./nginx/nginx.conf:/etc/nginx/nginx.conf
- ./certbot-etc:/etc/letsencrypt
nginx:
image: nginx:latest
container_name: myweb
restart: always
volumes:
- ./myweb:/usr/share/nginx/html
certbot:
depends_on:
- webserver
image: certbot/certbot
container_name: certbot
volumes:
- ./certbot-etc:/etc/letsencrypt
- ./myweb:/usr/share/nginx/html
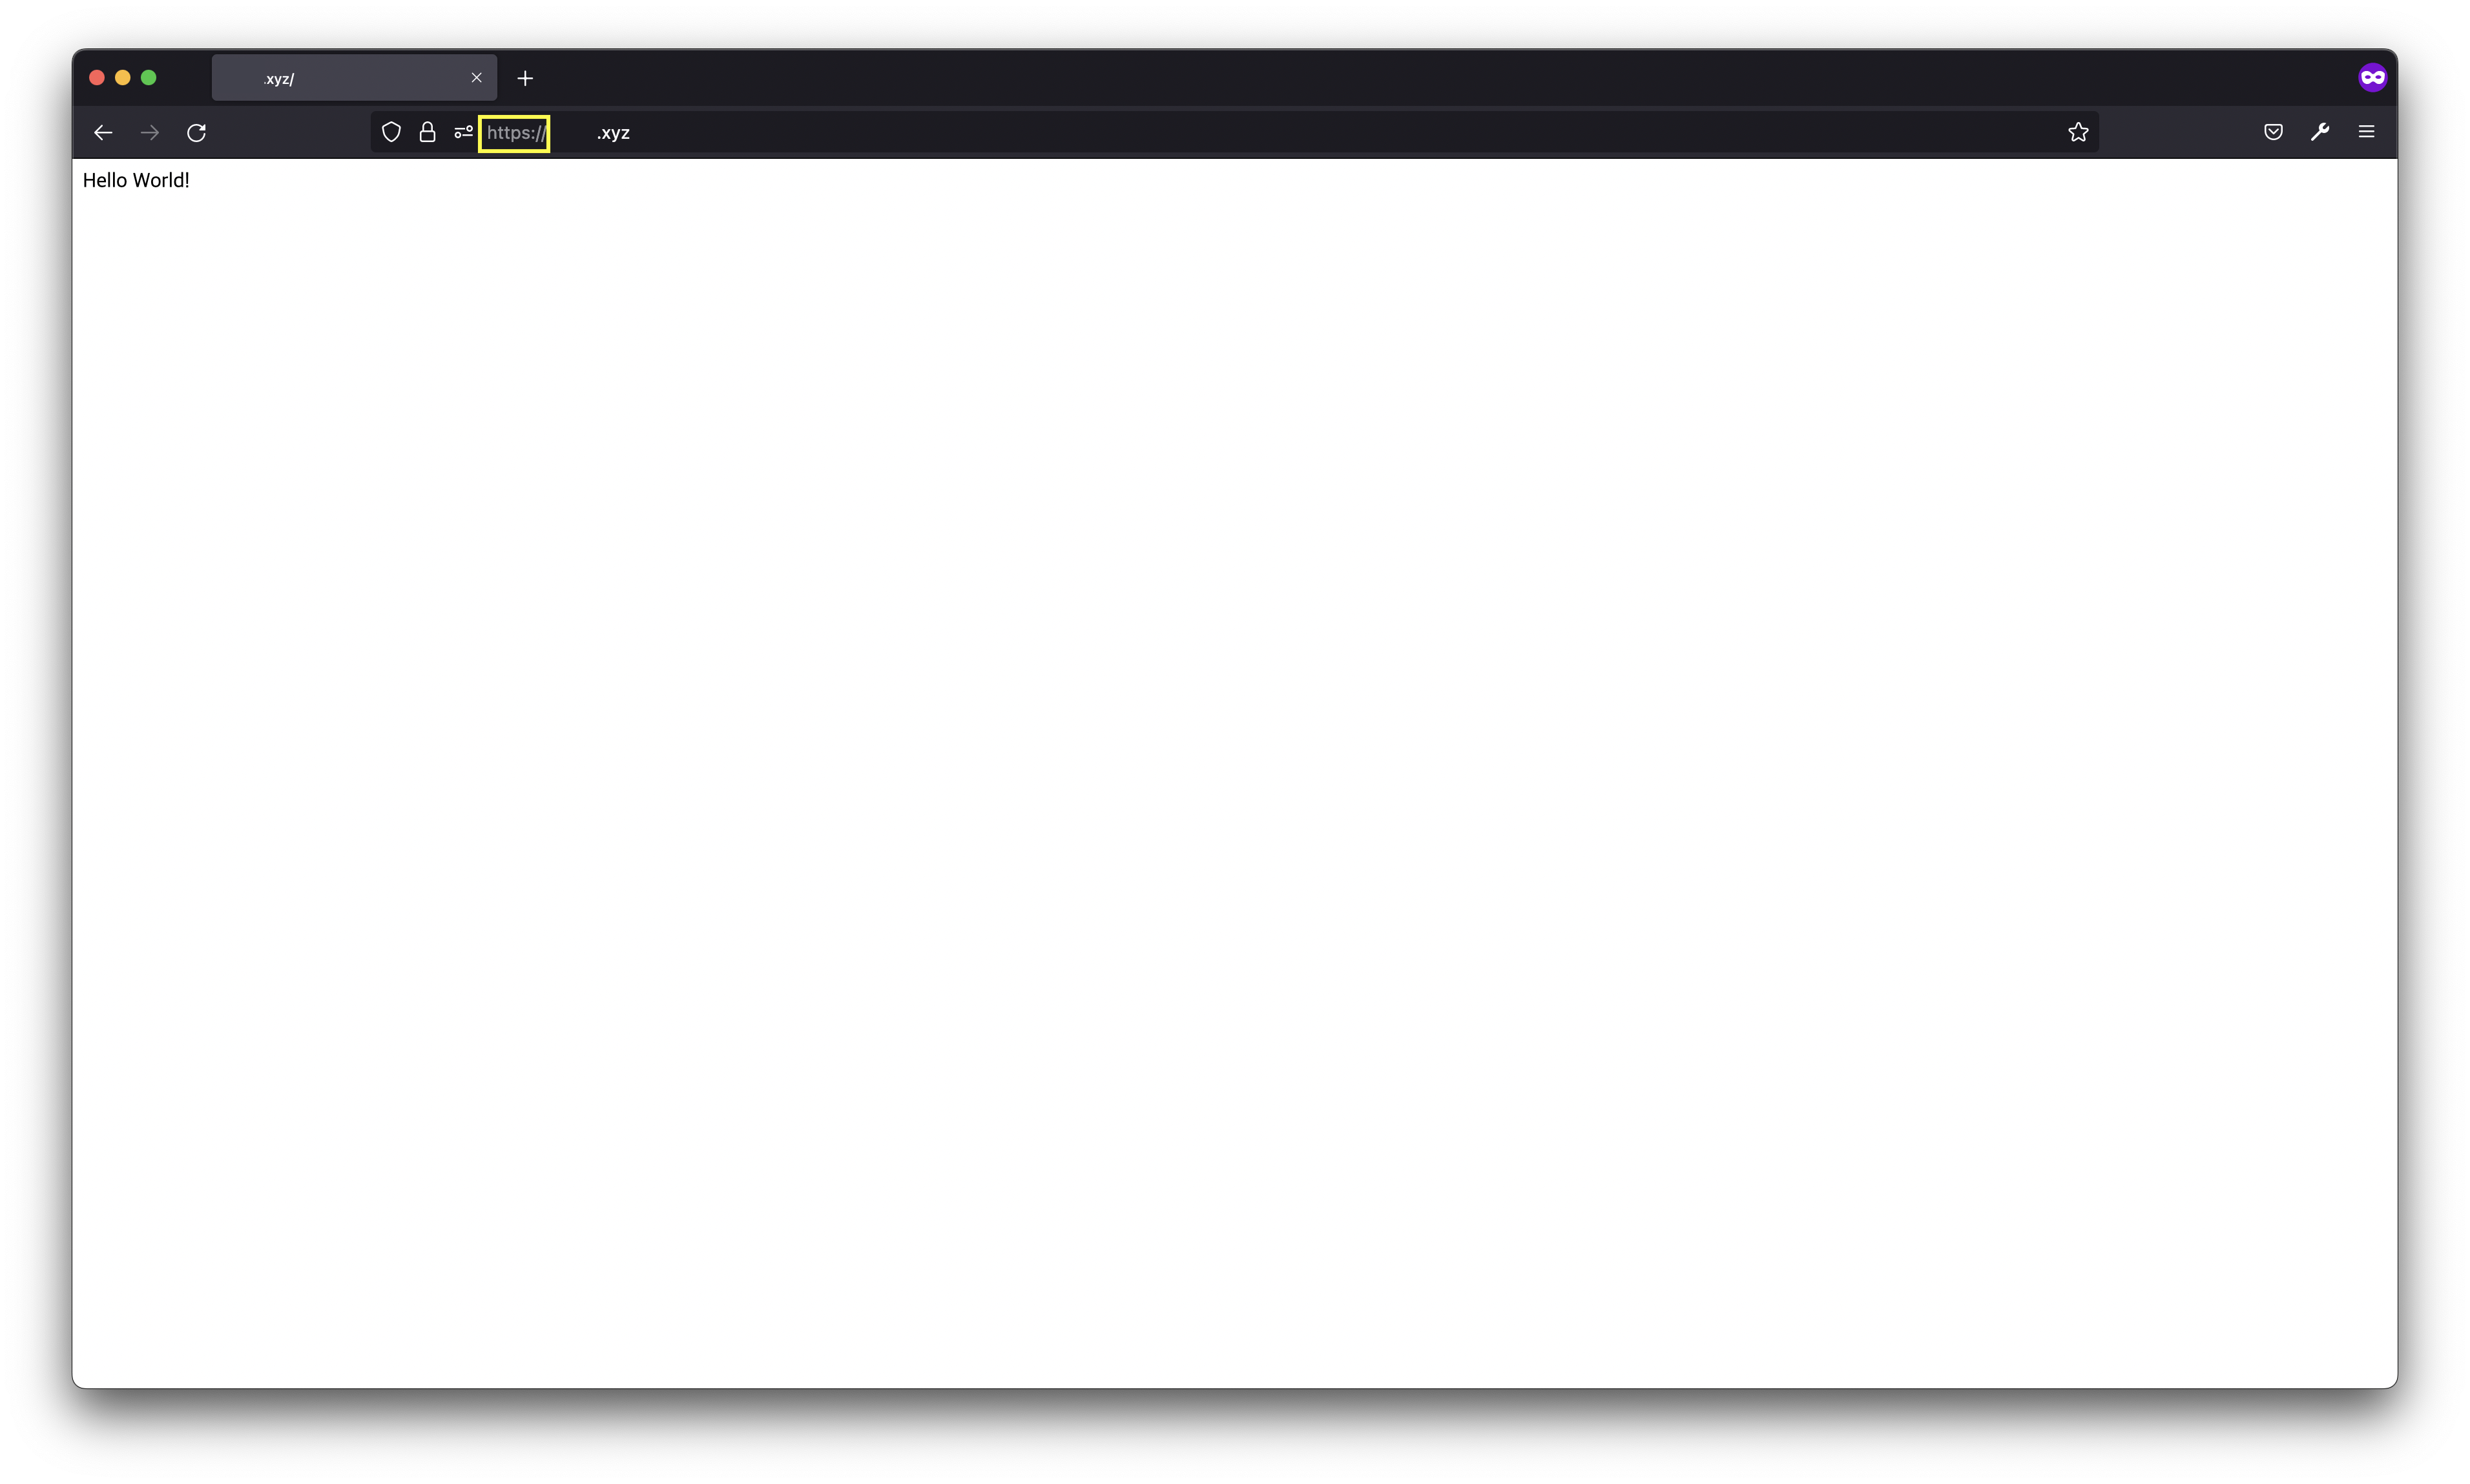
command: certonly --webroot --webroot-path=/usr/share/nginx/html --email test@test.com --agree-tos --no-eff-email --keep-until-expiring -d your.domain www.your.domain그 다음 docker-compose up -d를 실행하세요. 그린, 블루 컨테이너 중 하나라도 켜져있고, / 경로에 대한 응답이 있다면 HTTPS가 정상적으로 적용될 것 입니다.
저는 Nest 애플리케이션을 수정없이 배포했기 때문에 / 경로에 Hello World!가 나옵니다.
저는 무중단 배포 및 SSL 적용을 이렇게 했습니다. 읽어주셔서 감사합니다.