요약
public interface UserDetails extends Serializable {

	Collection<? extends GrantedAuthority> getAuthorities();

	String getPassword();

	String getUsername();

	boolean isAccountNonExpired();

	boolean isAccountNonLocked();

	boolean isCredentialsNonExpired();

	boolean isEnabled();

}
각각의 기능이 어떻게 작동되는지 알아보았다.
getAuthorities
가장 기본, 추후 권한 체크에 사용된다.
getPassword
비밀 번호를 리턴하면 된다.
Spring Security 에서 제공하는 기본 구현체(org.springframework.security.core.userdetails.User)에서 보면 CredentialsContainer 를 함께 구현하여 비밀번호를 지우도록 구현하고 있다.
public class User implements UserDetails, CredentialsContainer {

	//...
	@Override
		public void eraseCredentials() {
			this.password = null;
		}
getUsername
보통 식별될 수 있는 pk같은 것을 많이 사용한다.
왜냐하면, 이는 UserDetailsService에서 사용되기 때문이다.
public interface UserDetailsService {

	UserDetails loadUserByUsername(String username) throws UsernameNotFoundException;

}
이는 약간 findById와 같은 메서드로, 다른 클래스 들에서 이 UserDetails를 username을 통해 조회한다는 것을 알 수 있다.
나머지 4개
여기가 약간 애매한데, 간단하게 말하면, 다양하게 구현된 UserDetailsChecker 에 의해 체크가 되게 된다.
이 체커는 UserDetailsService를 사용해 UserDetails를 리턴 받은 클래스들에 의해 사용되게 된다.
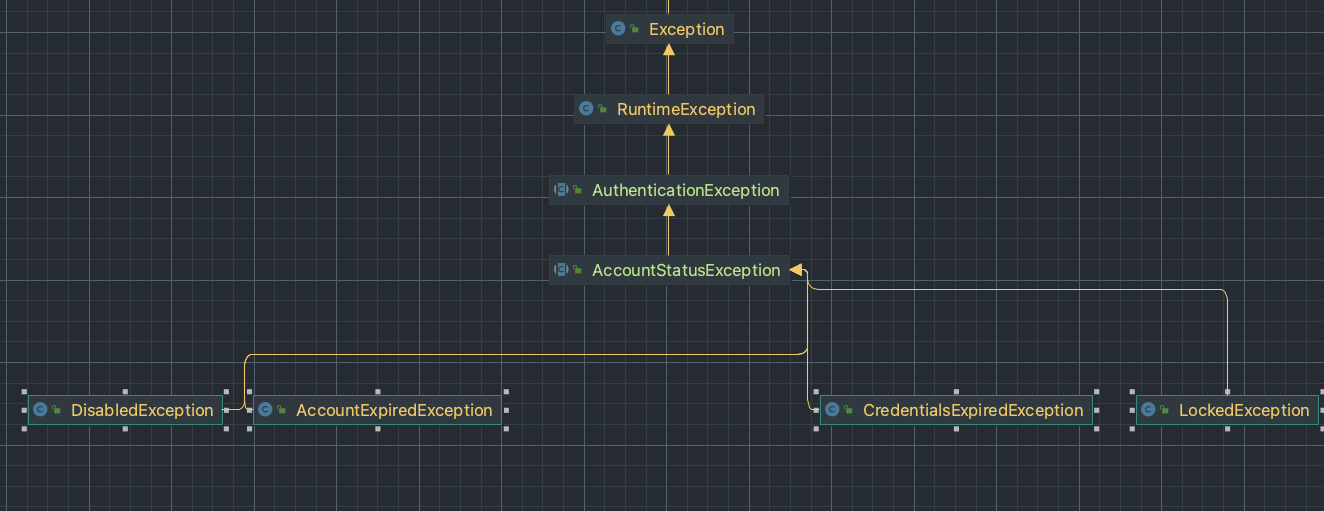
그리고 여기서 테스트를 통과하지 못하면 AccountStatusException 이 발생하게 된다.
대표적인 구현체로는 아래의 구현체가 있다.
public class AccountStatusUserDetailsChecker implements UserDetailsChecker, MessageSourceAware {

	//...

	@Override
	public void check(UserDetails user) {
		if (!user.isAccountNonLocked()) {
			this.logger.debug("Failed to authenticate since user account is locked");
			throw new LockedException(
					this.messages.getMessage("AccountStatusUserDetailsChecker.locked", "User account is locked"));
		}
		if (!user.isEnabled()) {
			this.logger.debug("Failed to authenticate since user account is disabled");
			throw new DisabledException(
					this.messages.getMessage("AccountStatusUserDetailsChecker.disabled", "User is disabled"));
		}
		if (!user.isAccountNonExpired()) {
			this.logger.debug("Failed to authenticate since user account is expired");
			throw new AccountExpiredException(
					this.messages.getMessage("AccountStatusUserDetailsChecker.expired", "User account has expired"));
		}
		if (!user.isCredentialsNonExpired()) {
			this.logger.debug("Failed to authenticate since user account credentials have expired");
			throw new CredentialsExpiredException(this.messages
					.getMessage("AccountStatusUserDetailsChecker.credentialsExpired", "User credentials have expired"));
		}
	}

	//...

}
보면 알겠지만, 각각을 확인한뒤 다양한 예외를 던지는 것으로 보이는데, 이는 모두 AccountStatusException 의 자손이다.
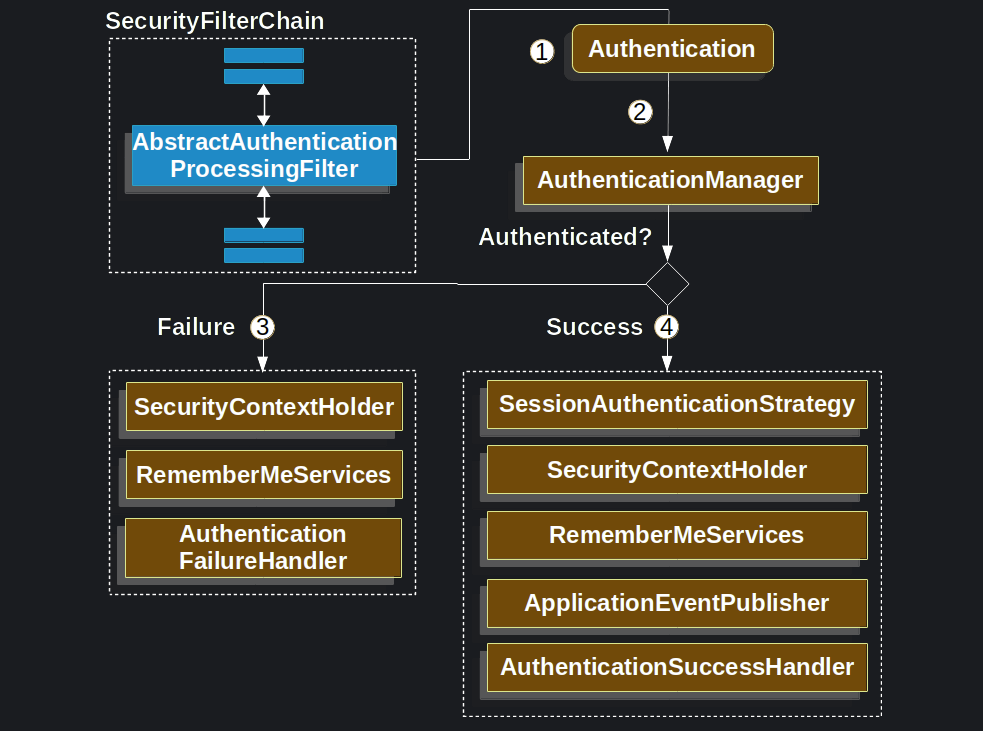
대표적인 처리 과정
차례대로 어떠한 과정을 통해 처리가 이루어지는지 알아보자,
AuthenticationManager의 기본 구현체인 ProviderManager를 기준으로 설명하면
- for 루프를 순회하면서 적합한 AuthenticationProvider를 찾는다.
- 찾으면,
authenticate메서드를 호출하여 인증을 진행한다. - 여기서
AccountStatusException이 발생하면,prepareException메서드를 호출해 이벤트를 발생시킨다. (AuthenticationEventPublisher참고) Authentication가CredentialsContainer타입이면,eraseCredentials메서드를 호출해준다
이는 매우매우 간추린 설명이고, 직접 메서드 코드를 보는게 빠르다
이런 과정 속에서 UserDetails 는 AbstractUserDetailsAuthenticationProvider 가 담당한다.
이 authentication provider는 UsernamePasswordAuthenticationToken 타입의 Authentication 객체에 반응한다.
@Override
	public Authentication authenticate(Authentication authentication) throws AuthenticationException {
		Assert.isInstanceOf(UsernamePasswordAuthenticationToken.class, authentication,
				() -> this.messages.getMessage("AbstractUserDetailsAuthenticationProvider.onlySupports",
						"Only UsernamePasswordAuthenticationToken is supported"));
		String username = determineUsername(authentication);
		boolean cacheWasUsed = true;
		UserDetails user = this.userCache.getUserFromCache(username);
		if (user == null) {
			cacheWasUsed = false;
			try {
				user = retrieveUser(username, (UsernamePasswordAuthenticationToken) authentication);
			}
			catch (UsernameNotFoundException ex) {
				this.logger.debug("Failed to find user '" + username + "'");
				if (!this.hideUserNotFoundExceptions) {
					throw ex;
				}
				throw new BadCredentialsException(this.messages
						.getMessage("AbstractUserDetailsAuthenticationProvider.badCredentials", "Bad credentials"));
			}
			Assert.notNull(user, "retrieveUser returned null - a violation of the interface contract");
		}
		try {
			this.preAuthenticationChecks.check(user);
			additionalAuthenticationChecks(user, (UsernamePasswordAuthenticationToken) authentication);
		}
		catch (AuthenticationException ex) {
			if (!cacheWasUsed) {
				throw ex;
			}
			// There was a problem, so try again after checking
			// we're using latest data (i.e. not from the cache)
			cacheWasUsed = false;
			user = retrieveUser(username, (UsernamePasswordAuthenticationToken) authentication);
			this.preAuthenticationChecks.check(user);
			additionalAuthenticationChecks(user, (UsernamePasswordAuthenticationToken) authentication);
		}
		this.postAuthenticationChecks.check(user);
		if (!cacheWasUsed) {
			this.userCache.putUserInCache(user);
		}
		Object principalToReturn = user;
		if (this.forcePrincipalAsString) {
			principalToReturn = user.getUsername();
		}
		return createSuccessAuthentication(principalToReturn, authentication, user);
	}
여기가 인증의 핵심이며, 자세한 내용은 원본의 코드를 보는 것을 추천한다.
- userCache 는
UserCache타입이며, 이 인터페이스는 캐시된 UserDetails를 반환하는 메서드를 가지고 있다. - UserDetailsChecker의 경우, 여기서는 두개로 나뉘어 있다. this.preAuthenticationChecks 와 this.postAuthenticationChecks 이다.
두개로 나뉘어 있지만 동작은 크게 다르지 않다.
여기서 좀 중요한 정보는, 다음과 같다
- AuthenticationManager의 구현체인 ProviderManager에서는
AccountStatusException,InternalAuthenticationServiceException이 발생하면 이벤트를 발생시킨다. 이는 추후 이벤트 리스너로 적절한 처리를 하기 유용할 것 같다. - ProviderManager는
CredentialsContainer로 구성된Authentication의 메서드를 호출해준다. - UserDetails의 락이나, 만료나, 비활성화나 하는 것들은 UserDetailsChecker의 구현체들이 담당하며
AccountStatusException를 발생시킨다.(각각에 따른AccountStatusException이 정의되어 있음)
그러면 AccountStatusException 은 어디에서 처리할까?
이러한 고민을 하게된 이유는 각각을 다르게 처리할 필요가 있기 때문이다. 모두 그냥 뭉뚱그려서 로그인 실패로 처리하고 싶지 않을 수 있다.
예를 들어 boolean isCredentialsNonExpired(); 의 경우 비밀번호가 만료되었다고 그냥 로그인 실패를 띄우는 것이 아니라, 비밀번호를 갱신하라는 알림을 보낸다던지.
비활성화된 유저는 활성화하라는 정보를 준다던지 하는 처리가 가능할 것이다.
또한 이를 응용해서 AccountStatusException 을 상속해서 계정정보에 부족한 정보가 있을 경우, 추가 정보를 요구하도록 한다던지 하는 처리가 가능할 것이다.
아래는 ProviderManager의 일부 코드이다.
catch (AccountStatusException | InternalAuthenticationServiceException ex) {
				prepareException(ex, authentication); //이벤트 발생
				throw ex;
			}
이벤트를 발생시키고 예외를 메서드 밖으로 던지게 된다.
그렇다면 이 예외는 어디에서 처리해줘야 한다는 말인가?
정답은 바로 AuthenticationFailureHandler이다.
Authentication을 시도하다가 Authentication이 실패하게 되면 AuthenticationException을 발생시키게 되며, 이는 Authentication 이 실패했다는 것을 의미한다. 이 실패에는 비밀번호가 잘못 되었을 수도, 만료되었을 수도 Lock에 걸렸을 수도 있다.
이것은 AuthenticationFailureHandler에 해당 로직을 구현하여 처리하여야 한다.
/**
 * Strategy used to handle a failed authentication attempt.
 * <p>
 * Typical behaviour might be to redirect the user to the authentication page (in the case
 * of a form login) to allow them to try again. More sophisticated logic might be
 * implemented depending on the type of the exception. For example, a
 * {@link CredentialsExpiredException} might cause a redirect to a web controller which
 * allowed the user to change their password.
 *
 * @author Luke Taylor
 * @since 3.0
 */
public interface AuthenticationFailureHandler {

	/**
	 * Called when an authentication attempt fails.
	 * @param request the request during which the authentication attempt occurred.
	 * @param response the response.
	 * @param exception the exception which was thrown to reject the authentication
	 * request.
	 */
	void onAuthenticationFailure(HttpServletRequest request, HttpServletResponse response,
			AuthenticationException exception) throws IOException, ServletException;

}
AuthenticationException 이 AccountStatusException 타입인지 검증하고, 그 안에서 락인지, 비활성화 때문인지, 비밀번호 만료 때문인지를 체크하는 코드를 넣고, 이에 따라 적절한 응답을 하도록 구현하면 되겠다.
굿굿
다음편에서는 글을 쓰면서 헷갈렸던 AuthenticationEntryPoint와 AuthenticationFailureHandler 를 비교해 보겠다.

유익한 글이었습니다.