글 요약
Spring Security의 Authentication 의 전 과정을 명확하게 파악하자
Spring Security의 주요 개념이 파악된 이후 보는 것을 추천합니다. (세부 내용을 모두 설명하다보면 글이 산으로 감)
Spring Security의 공식 문서와 JavaDoc 을 참조하였으며 기준 버전은 6.1.2 입니다.
주요 필터 동작
저의 이전 글에 보시면 각각의 필터 순서와 각각에 역할에 대해 정리해 놓았습니다.
그런데 옛날에 처음 공부할 때 작성한 것이라 다소 부정확한 내용들이 있습니다.
전반부 핵심 필터 요약
모두 나열한 것은 아니고 핵심만 나열함
- ChannelProcessingFilter - 프로토콜, 채널 체크
- SecurityContextHolderFilter - 컨텍스트 홀더 배치, 비우기 (try - finally)
- HeaderWriterFilter - 보안 헤더 자동 추가
- CorsFilter - CORS 관련 처리 담당 (preflight 라던가)
- CsrfFilter
- LogoutFilter - LogoutHandler 로 로그아웃 처리, LogoutSuccessHandler 로 후처리
	private void doFilter(HttpServletRequest request, HttpServletResponse response, FilterChain chain)
			throws IOException, ServletException {
		if (requiresLogout(request, response)) {
			Authentication auth = SecurityContextHolder.getContext().getAuthentication();
			if (this.logger.isDebugEnabled()) {
				this.logger.debug(LogMessage.format("Logging out [%s]", auth));
			}
			this.handler.logout(request, response, auth);
			this.logoutSuccessHandler.onLogoutSuccess(request, response, auth);
			return;
		}
		chain.doFilter(request, response);
}- AbstractPreAuthenticatedProcessingFilter - 사전인증된 요청(웹서버 앞단에 인증을 둔다던지)에서 Principal이나 Credential을 뽑아내는 역할
AbstractAuthenticationProcessingFilter
이것을 구현한 필터들이 이제 쭉 나온다.
이 필터가 인증과정의 핵심 필터로 내부에 인증과 관련된 로직이 작성되어있다.
	private void doFilter(HttpServletRequest request, HttpServletResponse response, FilterChain chain)
			throws IOException, ServletException {
		if (!requiresAuthentication(request, response)) {
			chain.doFilter(request, response);
			return;
		}
		try {
			Authentication authenticationResult = attemptAuthentication(request, response);
			if (authenticationResult == null) {
				// return immediately as subclass has indicated that it hasn't completed
				return;
			}
			this.sessionStrategy.onAuthentication(authenticationResult, request, response);
			// Authentication success
			if (this.continueChainBeforeSuccessfulAuthentication) {
				chain.doFilter(request, response);
			}
			successfulAuthentication(request, response, chain, authenticationResult);
		}
		catch (InternalAuthenticationServiceException failed) {
			this.logger.error("An internal error occurred while trying to authenticate the user.", failed);
			unsuccessfulAuthentication(request, response, failed);
		}
		catch (AuthenticationException ex) {
			// Authentication failed
			unsuccessfulAuthentication(request, response, ex);
		}
	}
핵심 로직인데, 저기서 attemptAuthentication이 핵심 추상 메서드이다.
여기서는 인증 결과인 Authentication을 반환한다.
attemptAuthentication 메서드
아래는 대표적인 구현체인 UsernamePasswordAuthenticationFilter의 해당 메서드 이다.
	@Override
	public Authentication attemptAuthentication(HttpServletRequest request, HttpServletResponse response)
			throws AuthenticationException {
		if (this.postOnly && !request.getMethod().equals("POST")) {
			throw new AuthenticationServiceException("Authentication method not supported: " + request.getMethod());
		}
		String username = obtainUsername(request);
		username = (username != null) ? username.trim() : "";
		String password = obtainPassword(request);
		password = (password != null) ? password : "";
		UsernamePasswordAuthenticationToken authRequest = UsernamePasswordAuthenticationToken.unauthenticated(username,
				password);
		// Allow subclasses to set the "details" property
		setDetails(request, authRequest);
		return this.getAuthenticationManager().authenticate(authRequest);
	}
이 메서드의 핵심은 AuthenticationManager를 통해 authenticationManager를 통해 인증을 진행하는 것이다.
핵심은 AuthenticationManager의 구현체에 있다. 한번 대표적인 구현체를 살펴보자.
AuthenticationManager
대표적인 구현체인 ProviderManager의 코드의 일부이다.
	@Override
	public Authentication authenticate(Authentication authentication) throws AuthenticationException {
    	//...
		for (AuthenticationProvider provider : getProviders()) {
			if (!provider.supports(toTest)) {
				continue;
			}
			if (logger.isTraceEnabled()) {
				logger.trace(LogMessage.format("Authenticating request with %s (%d/%d)",
						provider.getClass().getSimpleName(), ++currentPosition, size));
			}
			try {
				result = provider.authenticate(authentication);
				if (result != null) {
					copyDetails(authentication, result);
					break;
				}
			}
			catch (AccountStatusException | InternalAuthenticationServiceException ex) {
				prepareException(ex, authentication);
				// SEC-546: Avoid polling additional providers if auth failure is due to
				// invalid account status
				throw ex;
			}
			catch (AuthenticationException ex) {
				lastException = ex;
			}
            //...
어려운 코드는 아니다. for-each 구문으로 Authentication Provider를 순회하면서 먼저 적합하다고 반응한 Provider에게 인증을 맡기는 방식이다.
여기서 경우가 몇가지 나뉜다.
1. 정상적으로 인증되는 경우 -> copyDetails 후 for문 탈출, 여러가지 후처리 후 result 리턴
2. UserDetailsChecker 같은 녀석들에 의해 AccountStatusException이 발생하는 경우(계정잠김, 비밀번호 만료 등) -> 이벤트 발생 후 밖으로 throw
3. InternalAuthenticationServiceException 가 발생 (이건 내부적으로 뭔가 예외발생) -> 마찬가지로 이벤트 발생 후 밖으로 던짐
4. AuthenticationException -> 여러 추가 체크 후 처리 안되면 밖으로 던짐(이는 전체 코드 보는것 추천)
요약해 보면
1. 인증이 안되거나
2. 계정 상태(만료, 락, 비활성 등)에 문제가 있거나
3. 해당 요청을 처리해줄 AuthenticationProvider가 없거나
4. 인증으로 넘겨준 정보가 잘못됬거나
하면 밖으로 예외를 던지는 구조이다.
successfulAuthentication, unsuccessfulAuthentication
중간 과정을 생략하고, 최종적으로 이 메서드들중 하나로 도달하게 된다. (try catch가 걸려있기 때문에)
	protected void successfulAuthentication(HttpServletRequest request, HttpServletResponse response, FilterChain chain,
			Authentication authResult) throws IOException, ServletException {
		SecurityContext context = SecurityContextHolder.createEmptyContext();
		context.setAuthentication(authResult);
		SecurityContextHolder.setContext(context);
		this.securityContextRepository.saveContext(context, request, response);
		if (this.logger.isDebugEnabled()) {
			this.logger.debug(LogMessage.format("Set SecurityContextHolder to %s", authResult));
		}
		this.rememberMeServices.loginSuccess(request, response, authResult);
		if (this.eventPublisher != null) {
			this.eventPublisher.publishEvent(new InteractiveAuthenticationSuccessEvent(authResult, this.getClass()));
		}
		this.successHandler.onAuthenticationSuccess(request, response, authResult);
	}
구지 설명없이 코드를 보면 이해가 될것이다.
이벤트도 발생시켜주고(추후 이벤트 리스너로 재미있는 처리도 가능 할 것이다.)
맨 마지막으로 successHandler.onAuthenticationSuccess 를 호출해준다.
따라서 우리가 로그인 성공시 request나 response에 어떤 작업을 하고 싶다면 AuthenticationSuccessHandler를 적절히 구현해서 등록하면 될것이다.
딱히 요청과 상관없이 이벤트에 기반해서 작업을 등록하고 싶다면 그냥 이벤트 기반으로 작성할 수도 있을 것이다.
	protected void unsuccessfulAuthentication(HttpServletRequest request, HttpServletResponse response,
			AuthenticationException failed) throws IOException, ServletException {
		SecurityContextHolder.clearContext();
		this.logger.trace("Failed to process authentication request", failed);
		this.logger.trace("Cleared SecurityContextHolder");
		this.logger.trace("Handling authentication failure");
		this.rememberMeServices.loginFail(request, response);
		this.failureHandler.onAuthenticationFailure(request, response, failed);
	}
이 코드도 매우 간단하다. 로그인 실패시 할 작업들을 작성하면 될것이다.(핸들러에)
근데 중요한 점은 AuthenticationException failed 변수를 보라 AuthenticationException의 경우 단순히 로그인이 잘못됬다는 것만 의미하지 않는다. 그 하위 클래스의 AccountStatusException 의 타입이라면 계정의 락, 비활성화, 비밀번호 갱신기간 만료 등을 의미할 수 있다. (이는 저의 이전글에 자세히 나와있습니다.)
이 경우 AuthenticationFailureHandler에 적절한 로직을 추가함으로써 동작을 제어할 수 있다.
예를 들어
1. 비밀번호 만료시 그냥 거부하는 것이 아니라, 비밀번호 교체 페이지로 리다이렉트 시킨다던지
2. 락이 걸린 경우 왜 락이 걸렸는지 보안 설명 페이지로 보낸다던지 하는 작업 말이다.
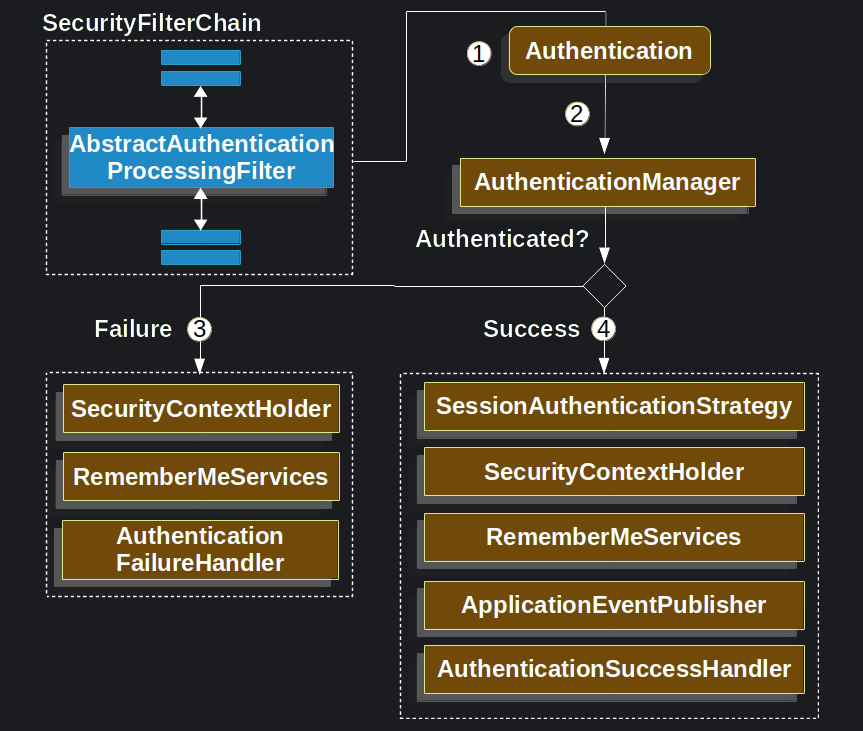
이 모든 과정의 코드를 그림으로 표현한 것이
이 그림이다 이제 잘 이해가 되는가?
그 이후 핵심 필터 정리
이 또한 모두 나열한 것이 아니고 핵심만 정리했다.
1. ConcurrentSessionFilter - 세션의 업데이트(기한), 만료 체크를 담당한다.
2. RequestCacheAwareFilter - 로그인 이전에 시도했던 요청을 캐싱하고 기억하고 있다가, 로그인이 성공적으로 이루어졌을 때 이를 리플레이한다. 이는 RequestCache라는 객체를 통해 이루어진다.
3. RememberMeAuthenticationFilter - 장기 로그인을 위한 필터이다. (세션이 만료되어도 로그인) 여기서 성공하면 이벤트가 발생한다.(자세한 내용은 메서드 코드 보는것 추천)
4. AnonymousAuthenticationFilter - 여기까지 인증되지 않으면, Anonymous 유저로써 인증되어 처리됩니다.(스프링 시큐리티 어나니머스 처리 정책 참고)
SessionManagementFilter
	private void doFilter(HttpServletRequest request, HttpServletResponse response, FilterChain chain)
			throws IOException, ServletException {
		if (request.getAttribute(FILTER_APPLIED) != null) {
			chain.doFilter(request, response);
			return;
		}
		request.setAttribute(FILTER_APPLIED, Boolean.TRUE);
		if (!this.securityContextRepository.containsContext(request)) {
			Authentication authentication = SecurityContextHolder.getContext().getAuthentication();
			if (authentication != null && !this.trustResolver.isAnonymous(authentication)) {
				// The user has been authenticated during the current request, so call the
				// session strategy
				try {
					this.sessionAuthenticationStrategy.onAuthentication(authentication, request, response);
				}
				catch (SessionAuthenticationException ex) {
					// The session strategy can reject the authentication
					this.logger.debug("SessionAuthenticationStrategy rejected the authentication object", ex);
					SecurityContextHolder.clearContext();
					this.failureHandler.onAuthenticationFailure(request, response, ex);
					return;
				}
				// Eagerly save the security context to make it available for any possible
				// re-entrant requests which may occur before the current request
				// completes. SEC-1396.
				this.securityContextRepository.saveContext(SecurityContextHolder.getContext(), request, response);
			}
			else {
				// No security context or authentication present. Check for a session
				// timeout
				if (request.getRequestedSessionId() != null && !request.isRequestedSessionIdValid()) {
					if (this.logger.isDebugEnabled()) {
						this.logger.debug(LogMessage.format("Request requested invalid session id %s",
								request.getRequestedSessionId()));
					}
					if (this.invalidSessionStrategy != null) {
						this.invalidSessionStrategy.onInvalidSessionDetected(request, response);
						return;
					}
				}
			}
		}
		chain.doFilter(request, response);
	}
SessionManagementFilter
이 필터 또한 중요한데, 코드를 보면 알겠지만, 요청에 FILTER_APPLIED 값이 있으면 패스한다.
만약 없으면, TRUE로 집어넣고, 검사를 진행한다.
만약 세션 컨텍스트 레파지토리에 요청이 존재하지 않으면 작업을 실행한다.
1. 만약 authentication이 존재하고, 익명사용자가 아니면(일반적으로 로그인한 사용자) 세션 전략에 의해 세션을 생성한다. 그리고 레파지토리에 저장한다.
2. 만약 익명이거나, authentication이 없으면서, 세션 아이디가 있으면서 유효한 세션 아이디가 아니면, onInvalidSessionDetected 메서드를 호출한다.
여기서 부정한 세션에 대한 처리를 해줄 수 있다.
이 메서드가 호출되었다는 것은 아래의 것을 나타낸다.
1. 익명사용자다(일반 로그인 사용자가 아니다.)
2. 인증되지 않았다.
3. 세션아이디가 존재하면서 이게 유효하지 않다.
여기서 적절한 보안상 처리를 해주거나, 타임아웃된 세션이 존재하는지 체크해 줄 수 있다.
옛날에 유튜브에서 봤는데, 모 신문사의 좋아요를 누르는 봇을 개발할 때 쿠키의 세션 아이디를 랜덤으로 바꿔가며 좋아요를 누르도록 했다는 영상을 보았다. 여기서 적절한 처리를 하지 않으면 이와 같이 유효하지 않은 세션 아이디가 아무런 제재를 받지 못한다.
ExceptionTranslationFilter
이 필터도 중요한데, 코드를 잘 봐야한다.
	private void doFilter(HttpServletRequest request, HttpServletResponse response, FilterChain chain)
			throws IOException, ServletException {
		try {
			chain.doFilter(request, response);
		}
		catch (IOException ex) {
			throw ex;
		}
		catch (Exception ex) {
			// Try to extract a SpringSecurityException from the stacktrace
			Throwable[] causeChain = this.throwableAnalyzer.determineCauseChain(ex);
			RuntimeException securityException = (AuthenticationException) this.throwableAnalyzer
					.getFirstThrowableOfType(AuthenticationException.class, causeChain);
			if (securityException == null) {
				securityException = (AccessDeniedException) this.throwableAnalyzer
						.getFirstThrowableOfType(AccessDeniedException.class, causeChain);
			}
			if (securityException == null) {
				rethrow(ex);
			}
			if (response.isCommitted()) {
				throw new ServletException("Unable to handle the Spring Security Exception "
						+ "because the response is already committed.", ex);
			}
			handleSpringSecurityException(request, response, chain, securityException);
		}
	}
맨 앞에서 chain.doFilter()를 호출하고 있다. 즉 바로 다음 필터에게 넘겨주고 있으며, 이 다음 필터들에서 예외가 발생할시 작동하도록 설계되어 있다. (try - catch)
즉 이 필터보다 앞에서 발생하는 AuthenticationException을 비롯한 예외들을 이 필터에서 처리한다고 오해하면 안된다.(내가 오해했기 때문)
이 필터의 다음부터 호출되는 쪽에서 나타나는 예외에 대해 반응한다고 생각하면 된다.
코드를 살펴보면 앞의 체크를 한뒤(이것도 중요) 결국 handleSpringSecurityException 을 호출한다.
	private void handleSpringSecurityException(HttpServletRequest request, HttpServletResponse response,
			FilterChain chain, RuntimeException exception) throws IOException, ServletException {
		if (exception instanceof AuthenticationException) {
			handleAuthenticationException(request, response, chain, (AuthenticationException) exception);
		}
		else if (exception instanceof AccessDeniedException) {
			handleAccessDeniedException(request, response, chain, (AccessDeniedException) exception);
		}
	}
이러한 코드가 있는데 그냥 간단하게 말하자면, ExceptionTranslationFilter의 자바독의 설명을 보는게 빠르다.
설명을 요약하면
- AccessDeniedException and AuthenticationException 을 처리한다.
- 이 필터는 필수적이다.
- 예외와 HTTP Response간의 변환 작업을 실시한다.
경우의 수는 다음과 같다.
1. AuthenticationException 이 발생했으면, AuthenticationEntryPoint의 메서드를 호출한다.
2. AccessDeniedException 이 발생하고 anonymous 유저이면, AuthenticationEntryPoint의 로 보낸다.
3. AccessDeniedException 이 발생하고 일반 유저이면, AccessDeniedHandler로 보낸다.
AuthenticationEntryPoint의 경우 사용자가 인증을 시작할 수 있도록 하는 접근점의 역할이다 전형적으로 로그인페이지로 보내는 행동을 많이 정의한다.
AccessDeniedHandler의 경우 접근할 수 없는 리소스에 접근했을 때 호출되며, 적절한 로직을 짜면 된다.(403이나 404 같은거)
이런 코드가 있는 이유는 바로 다음에 나올 녀석이 인가와 관련된 필터이기 때문이다. 즉 인가쪽에서 예외가 발생하면 이 필터가 예외처리를 해주는 느낌이다.

이 그림을 보면 더 잘 이해가 되는데, EntryPoint로 보내기 전 아까 썼던 RequestCache에 요청을 저장하는 과정도 포함된다.
AuthorizationFilter
설정된 인가 규칙에 따라 권한 체크를 체크한다.
		try {
			AuthorizationDecision decision = this.authorizationManager.check(this::getAuthentication, request);
			this.eventPublisher.publishAuthorizationEvent(this::getAuthentication, request, decision);
			if (decision != null && !decision.isGranted()) {
				throw new AccessDeniedException("Access Denied");
			}
인가에 실패하게 되면 AccessDeniedException 을 던져서 거부한다.
SwitchUserFilter
글쎄 이것은 그렇게 까지 중요한 필터는 아니지만, 맨 마지막 필터라 그냥 하나를 잡았다
특수한 필터로, 유저 Context를 전환할 수 있게 해준다. 예를 들어 관리자 권한의 사용자가 특정 기능을 요청하여 일반 유저로 활동할 수 있게 한다던지 하는 것이다.
