
Stack
이번에는 abstract data type 중에서 stack에 대해 살펴보겠습니다. stack은 기본적으로 push, pop을 기본적인 operation으로 수행하는 data structure로, push는 stack에 object를 추가하는 operation, pop은 반대로 object를 stack에서 빼내는 operation입니다. 이 두 operation은 모두 stack의 한 쪽 끝인 top에서 수행하기 때문에 항상 마지막으로 들어온 object가 pop을 수행할 때 가장 먼저 나오게 됩니다. 이러한 성질을 LIFO(last-in first-out) behavior라고 합니다.

stack은 기본적으로 linear한 구조를 가지고 있기 때문에 앞서 살펴봤던 linear data structure인 linked list와 array를 통해서 구현해줄 수 있습니다. 구현할 때 유의할 점은, stack의 operation을 수행할 때 되도록 time에 수행할 수 있도록 해야 stack을 활용할 때 좋은 성능을 보장할 수 있습니다. 이를 고려하여 linked list와 array를 통해 stack을 구현한 것을 살펴보도록 하겠습니다.
- Stack implementation using linked list
stack을 구현하기 이전에 singly linked list의 operation들에 대한 property를 먼저 살펴보겠습니다. 아래 표는 singly linked list의 find, insert, erase operation에 대해 front와 back에서의 수행 시간을 정리한 것입니다. 우리가 stack을 구현할 때 top에 있는 object를 find하거나 top에 push, pop을 진행하는 operation이 중요하기 때문에 한 쪽 끝에서의 property가 우수해야 합니다. singly linked list의 경우 front에서의 operation time이 모두 이지만, back에서의 operation은 erase에 time이 필요하므로 front를 stack의 top으로 하여 구현하는 것이 적합합니다.
Front(1st) | Back(nth) | |
|---|---|---|
| Find | ||
| Insert | ||
| Erase |
위의 사실을 이용하여 다음과 같이 stack을 구현할 수 있습니다.
template <typename T>
class stack {
public:
	stack() {};
    bool empty() const;
    T top() const;
    void push(T const &);
    T pop();

private:
    Single_list<T> next;
};

template <typename T>
bool stack<T>::empty() const {
	return list.empty();
}

template <typename T>
T stack<T>::top() const {
	if (empty()) {
    	throw underflow();
    }
	return list.front();
}

template <typename T>
void push(T const &obj) {
	list.push_front(obj);
}

template <typename T>
T stack<T>::pop() {
	if (empty()) {
    	throw underflow();
    }
	return list.pop_front();
}
위와 같이 기존 c++에 내장된 singly linked list의 function을 가져와서 stack의 functionality를 간편하게 구현할 수 있습니다. 이와 같이 이미 구현된 function을 가져와 새로운 function을 구현하는 것을 function wrapping이라 합니다. 위의 방법 외에도 직접 node를 define해 singly linked list와 같이 동작하도록 function을 직접 만들어 구현할 수도 있습니다.
- Stack implementation using array
아래 표는 array의 operation에 대한 property를 정리한 것입니다. linked list와 달리 front에서의 insert, erase에 대한 성능이 좋지 못한 반면, back에서의 operation은 모두 time으로 수행할 수 있습니다. 따라서 array로 stack을 구현할 때에는 back을 stack의 top으로 하여 구현하는 것이 적합합니다.
Front(1st) | Back(nth) | |
|---|---|---|
| Find | ||
| Insert | ||
| Erase |
위의 property를 활용해 array로 구현한 stack은 다음과 같습니다.
template <typename T>
class stack {
public:
	stack(int = 10);
    ~stack();
    bool empty() const;
    T top() const;
    void push(T const &);
    T pop();

private:
	int stack_size;
    int array_capacity;
    T *array;
};

template <typename T>
stack<T>::stack(int n) :
stack_size(0),
array_capacity(std::max(1, n)),
array(new T[array_capacity])
{
	// empty constructor
}

template <typename T>
stack<T>::~stack() {
	delete[] array;
}

template <typename T>
bool stack<T>::empty() const{
	return (stack_size == 0)
}

template <typename T>
T stack<T>::top() const{
	if (empty()) {
    	throw underflow();
    }
	return array[stack_size - 1];
}

template <typename T>
void stack<T>::push(T const &obj) {
	if (stack_size == array_capacity) {
    	throw overflow();
    }

    array[stack_size] = obj;
    ++stack_size;
}

template <typename T>
T stack<T>::pop() {
	if (empty()) {
    	throw underflow();
    }

    --stack_size;
    return array[stack_size];
}
linked list를 통해 구현한 것과 가장 두드러지게 나타나는 차이점은 array로 구현할 때에는 array size가 정의되어야 한다는 점입니다. array size를 미리 정의해야 array를 사용할 수 있으므로, array size를 넘는 data를 push하기 위해서는 exception 처리가 필요합니다. exception 방법에는 push 명령을 무시하거나, stack에 공간이 생길 때까지 sleep 시키는 등 여러 가지 방법이 있으나, stack의 functionality를 해치지 않기 위해 array capacity를 증가시키는 구현을 살펴보겠습니다.
array size를 증가시키는 방법에는 다음과 같은 방법이 있습니다.
- constant value만큼 증가 (
array_capacity += c;) - array size를 multiplicate (
array_capacity *= c;)
결론부터 말씀드리면 두 번째 방법이 더 좋은 성능을 이끌어내는 방법입니다. array의 size를 증가시키기 위해서는 새로운 array를 allocate받고 기존의 array에서 새로운 array로 data를 copy and paste를 해야 합니다. 이는 기존 array가 가득 차있을 때 진행하게 되므로 만큼의 시간이 필요합니다. 하지만, 이를 단순히 하나의 에 대해서 분석하기에는 array size를 증가시키기 위한 operation을 모든 push에 대해 수행하는 것이 아니기 때문에 의 값에 따라 수행하지 않는 경우가 존재하기 때문입니다. 따라서 이를 정확히 분석하기 위한 것이 amortized time analysis입니다.
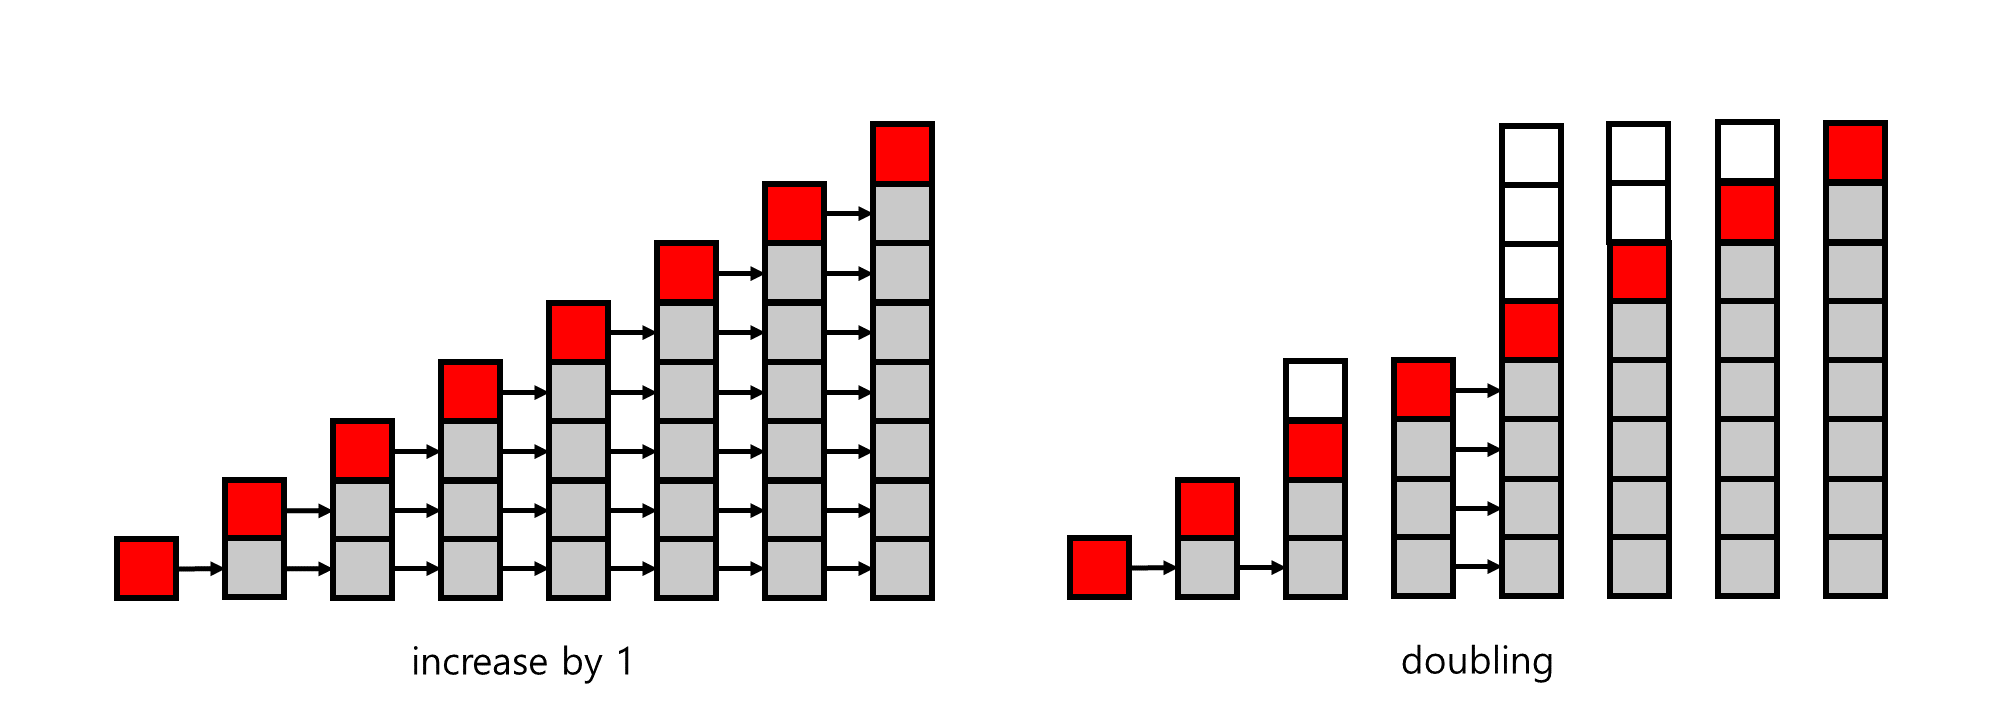
amortized analysis는 n번의 operation을 진행한 것에 대한 평균을 구하는 것, 즉 을 구해 비교하는 것입니다. 위의 두 그림을 통해 더 자세히 알아보겠습니다. 왼쪽의 그림은 size를 1만큼 증가시키는 경우이며 오른쪽 그림은 size를 doubling 경우입니다. size를 1씩 증가시키는 경우 매 push마다 size를 증가시키게 되며 시간 또한 n에 비례하여 증가하게 됩니다. 따라서 amortized tkme은 이 됩니다. 반면 size를 doubling 경우는 size가 2의 거듭제곰인 경우에만 array size만큼 data를 copy하게 되므로 일 때 amortized time은 이 됩니다. 따라서 array size를 배수로 증가시키는 것이 더 efficient한 구현이 됩니다.
Queue
다음은 queue에 대해서 알아보겠습니다. queue는 stack과 비슷하게 push와 pop을 기본 operation으로 하는 linear data structure입니다. 하지만 두 data structure의 두드러지는 차이점은 queue는 push, pop을 하는 위치가 서로 반대쪽 끝에 위치한다는 점입니다. 따라서 마지막으로 push한 object는 가장 마지막에 pop이 이루어지며 이러한 특성을 FIFO(first-in first-out) behavior라고 합니다. queue 또한 linear data structure이므로 linked list와 array를 통한 구현이 가능하며, 마찬가지로 push와 pop operation의 time이 이 되도록 구현해야 efficient하다고 할 수 있습니다.

- Queue implementation using linked list
queue를 구현하기 위해 앞의 singly linked list의 property를 다시 살펴보겠습니다. 구현에서 고려할 수 있는 두 가지 option으로 push를 front, pop을 back에서 하도록 하는 것과 push를 back에서, pop을 front에서 하도록 하는 것이 있습니다. 여기서 첫 번째 option은 pop을 진행할 때 time이 필요하므로 두 번재 option이 더 efficient한 구현이 될 것입니다.
Front(1st) | Back(nth) | |
|---|---|---|
| Find | ||
| Insert | ||
| Erase |
마찬가지로 linked list를 활용해 queue를 구현한 code는 다음과 같습니다. stack과 마찬가지로 function wrapping을 활용해 구현해 주었으며 node를 define하는 구현도 list의 functionality를 활용해 만들어줄 수 있습니다.
template <typename T>
class queue{
public:
	bool empty() const;
    T front() const;
    void push(T const &);
    T pop();
private:
	single_list<T> list;
};

template <typename T>
bool queue<T>::empty() const{
	return list.empty();
}

template <typename T>
T queue<T>::front() const{
	if (empty()) {
    	throw underflow();
    }
	return list.front();
}

template <typename T>
void queue<T>::push(T const &obj) {
	list.push_back(obj);
}

template <typename T>
T queue<T>::pop() {
	if (empty()) {
    	throw underflow();
    }
	return list.pop_front();
}
- Queue implementation using array
마찬가지로 앞의 array의 property를 살펴보면, array의 front에서의 insert, erase가 모두 time이 필요하므로 단순한 array로는 efficient한 구현이 어렵습니다. 따라서 front와 back에서의 property를 모두 우수하게 만들기 위해서는 double ended array로 구현하는 것이 좋습니다.
- array
Front(1st) | Back(nth) | |
|---|---|---|
| Find | ||
| Insert | ||
| Erase |
- double ended array
Front(1st) | Back(nth) | |
|---|---|---|
| Find | ||
| Insert | ||
| Erase |
double ended array를 통해 구현한 queue는 다음과 같습니다.
template <typename T>
class queue{
public:
	queue(int = 10);
    ~queue();
    bool empty() const;
    T front() const;
    void push(T const &);
    T pop();
private:
	int queue_size;
    int array_capacity;
    int ifront;
    int iback;
    T *array;
};

template <typename T>
queue<T>::queue(int n) :
queue_size(0),
array_capacity(std::max(1, n)),
ifront(0),
iback(-1),
array(new T[array_capacity])
{
	// empty constructor
}

template <typename T>
queue<T>::~queue() {
	delete[] array;
}

template <typename T>
bool queue<T>::empty() const{
	return (queue_size == 0)
}

template <typename T>
T queue<T>::front() const{
	if (empty()) {
    	throw underflow();
	}
    return array[ifront];
}

template <typename T>
void queue<T>::push(T const &obj) {
	if (queue_size == array_capacity) {
    	throw overflow();
    }
    if (iback == array_capacity) iback = -1;
    ++iback;
    array[iback] = obj;
    ++queue_size;
}

template <typename T>
T queue<T>::pop() {
	if (empty()) {
    	throw underflow();
    }
    if (ifront == array_capacity) ifront = 0;
    --queue_size;
    ++ifront;
    return array[ifront - 1];
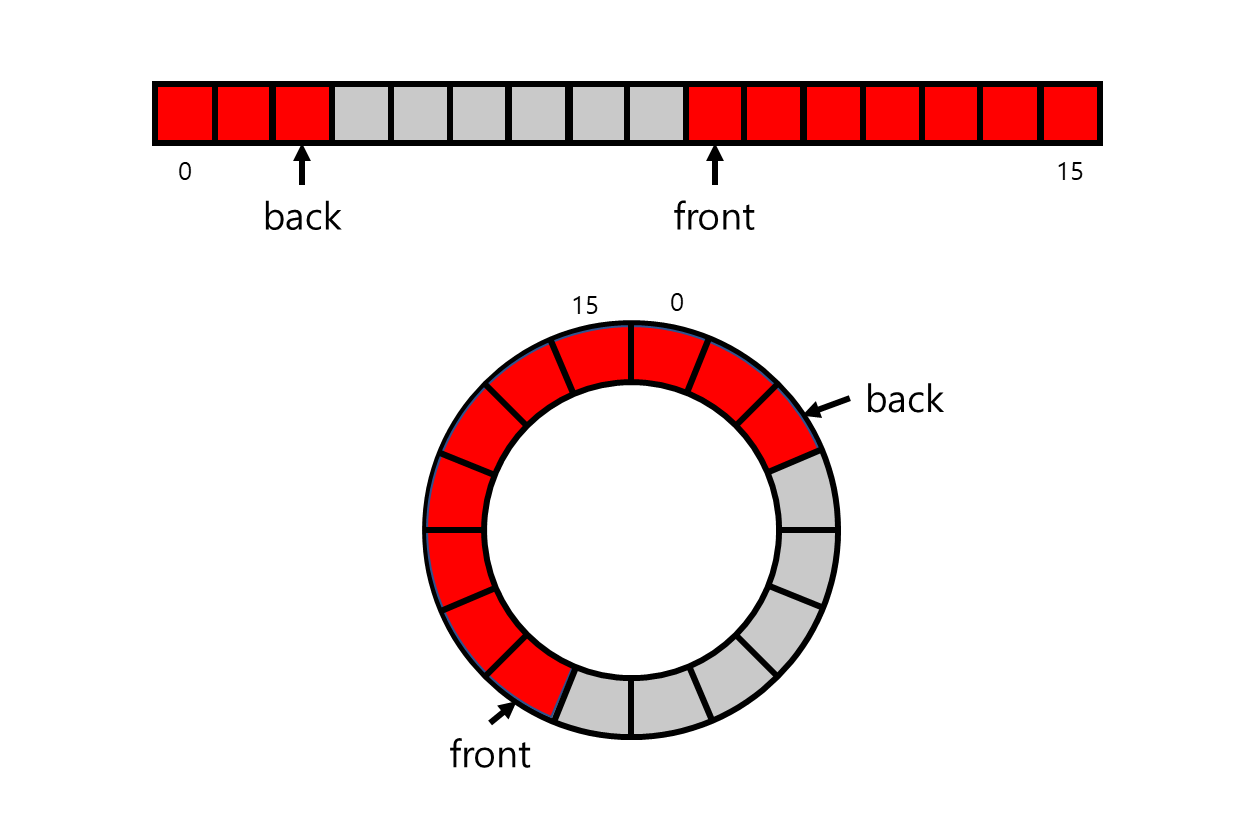
위의 code에서 주의깊게 볼 점은 ifront와 iback의 존재와 push, pop에서의 예외 처리 부분이다. ifront는 queue의 front에 해당하는 index이고 iback은 queue의 back에 해당하는 index이다. 일반적인 array라면 이들이 index를 벗어날 경우 overflow가 발생해 원하는 동작이 나타나지 않을 것이다. 이를 방지하기 위해 circular array를 적용시킨 구현이다. circular array는 array의 양 끝을 연결해 마지막 index의 다음 index를 array의 맨 처음으로 만들어주는 structure로 queue에서 index에 의한 overflow가 발생하지 않도록 방지해주는 역할을 해준다.
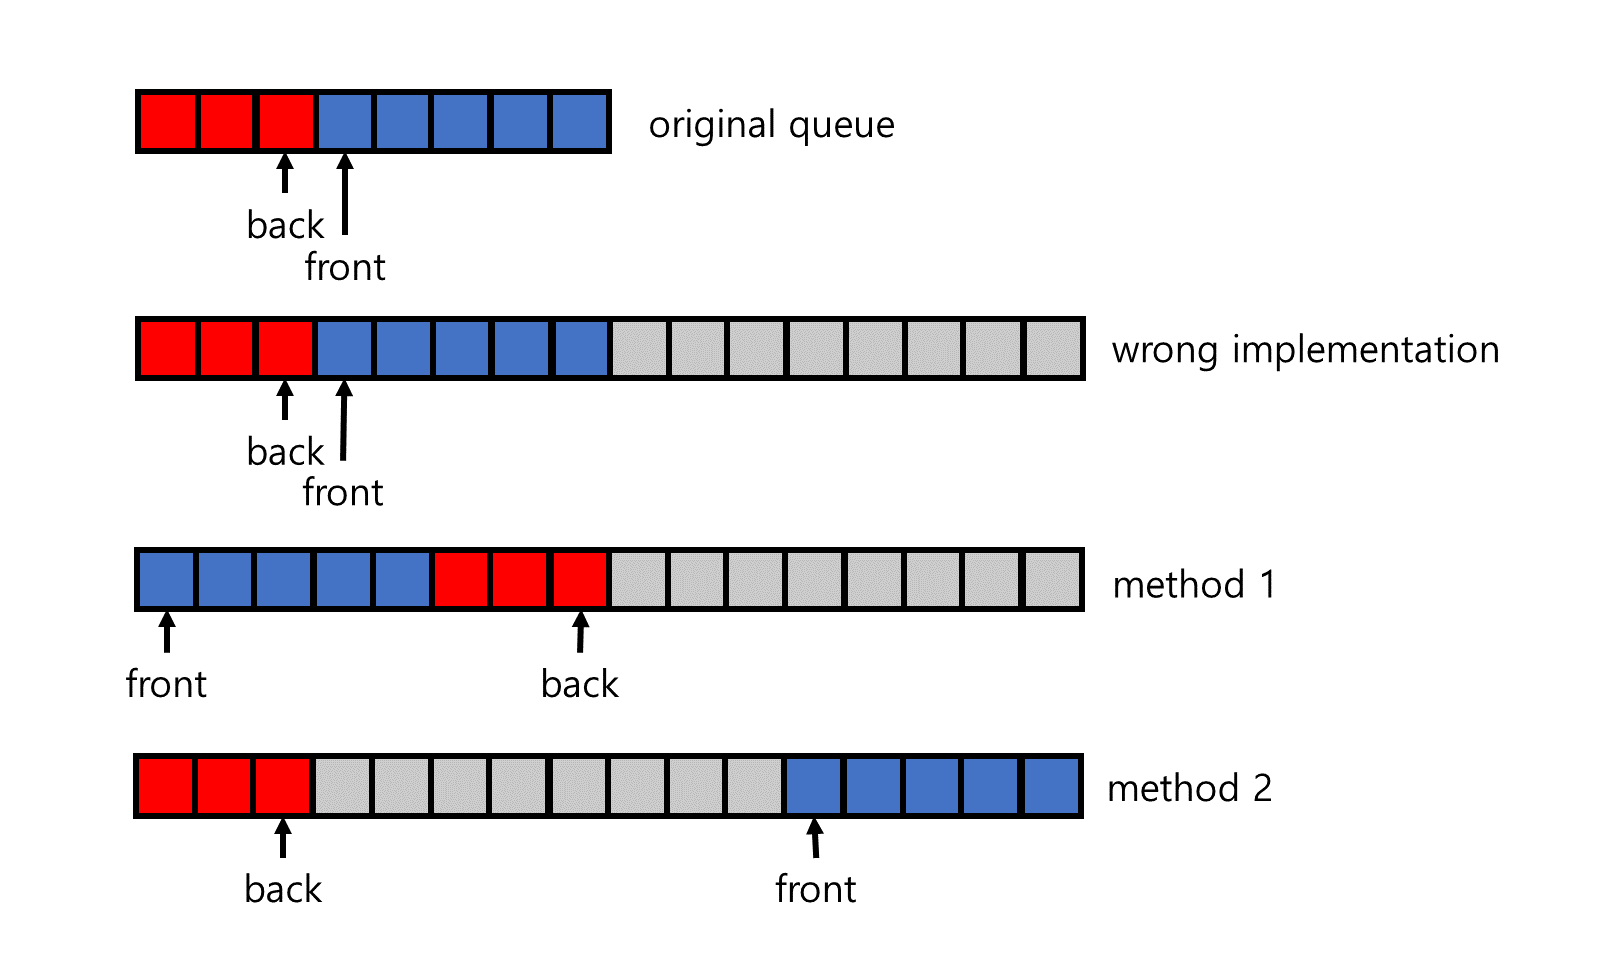
stack의 구현과 마찬가지로 queue 또한 array가 가득 차면 size를 증가시켜야 한다. 여기서 queue를 circular array로 구현했기 때문에 단순히 size를 증가시키고 data를 copy and paste하면 queue 내의 data 사이에 빈 공간이 생겨 올바른 동작을 하지 못하게 된다. 이를 해결하는 데에는 두 가지 방법이 있다. 하나는 front를 array의 index가 0인 곳으로 위치하도록 조정하는 방법이며 다른 하나는 front가 포함된 block을 array의 뒤쪽에 꽉 차도록 하는 방법이다. 어떤 방법을 선택하는 지는 design에 대한 차이이며 두 방법 모두 올바른 queue의 동작이 진행되도록 만들어준다.
Reference
"Data Structure & Algorithm Analysis in C++", 4th ed, Pearson, M. A. Weiss
