
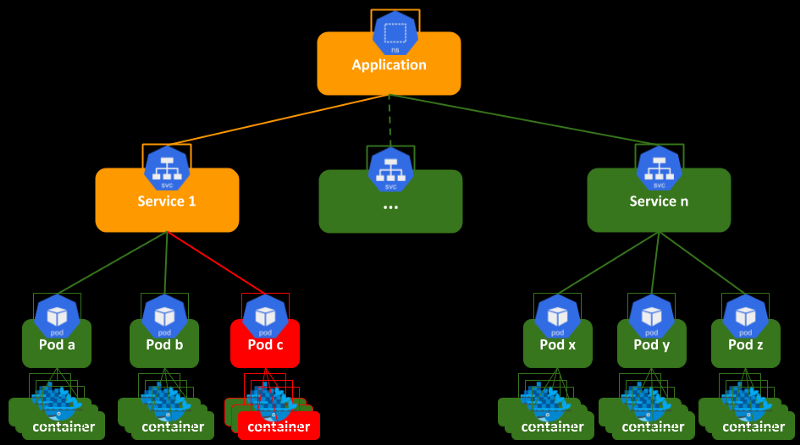
kubernetes api resource
: object
application -> container -> pod(기본 배포 단위) -> ReplicaSet -> Deployment
Pod vs Service
: Pod + Service : docker run -p
Web Service
RDBMS(SQL) -> MySQL
Pod + Service(client, workbench) => DB 입장에서 Service가 필요한 이유
-> 개발자, 운영자에게 필요. 실제로 데이터를 바라볼 때는 VPN을 사용해야 한다.
제약 사항 : 3306 port, 환경변수(MYSQL_ROOT_PASSWORD)
NoSQL -> mongoDB
Pod + Service(client, Robo3T)
제약 사항 : 27017 port, JSON 구조=> 생성 및 실행 중 오류가 발생하면?
: kubectl logs -f [pod_name]
- mongoDB
## node1, node2에 image pull
kevin@k8s-node1:~$ sudo docker pull mysql:5.7
kevin@k8s-node1:~$ sudo docker pull mongo:4.0

## mongoDB pod + Service 생성
## 만들기 전에 pod의 version 확인
kevin@k8s-master:~$ kubectl api-resources | grep pod
pods                              po           v1                                     true         Pod
podtemplates                                   v1                                     true         PodTemplate
horizontalpodautoscalers          hpa          autoscaling/v2                         true         HorizontalPodAutoscaler
poddisruptionbudgets              pdb          policy/v1                              true         PodDisruptionBudget
podsecuritypolicies               psp          policy/v1beta1                         false        PodSecurityPolicy

## 이동
kevin@k8s-master:~$ cd LABs/
kevin@k8s-master:~/LABs$ mkdir mydb && cd $_

## yaml 파일 생성
kevin@k8s-master:~/LABs/mydb$ vi mongodb-pod.yaml
apiVersion: v1
kind: Pod
metadata:
  name: mongo-pod
  labels:
    db: mongodb
spec:
  containers:
  - image: mongo:4.0
    name: mydb-mongo
    ports:
    - containerPort: 27017

## apply
kevin@k8s-master:~/LABs/mydb$ kubectl apply -f mongodb-pod.yaml

## 확인
kevin@k8s-master:~/LABs/mydb$ kubectl get po -o wide
NAME        READY   STATUS    RESTARTS   AGE   IP              NODE        NOMINATED NODE   READINESS GATES
mongo-pod   1/1     Running   0          36s   10.109.131.26   k8s-node2   <none>           <none>

## log 확인
kevin@k8s-master:~/LABs/mydb$ kubectl logs mongo-pod

## Service 생성
## 만들기 전에 Service의 version 확인
kevin@k8s-master:~/LABs/mydb$ kubectl api-resources | grep service
serviceaccounts                   sa           v1                                     true         ServiceAccount
services                          svc          v1                                     true         Service
apiservices                                    apiregistration.k8s.io/v1              false        APIService

## service yaml 파일 작성
## pod의 key: value 그대로 사용한다.
kevin@k8s-master:~/LABs/mydb$ vi mongodb-svc.yaml
apiVersion: v1
kind: Service
metadata:
  name: mongo-svc
spec:
  selector:
    db: mongodb
  ports:
  - port: 17017
    targetPort: 27017
  externalIPs:
  - 192.168.56.102

## apply
kevin@k8s-master:~/LABs/mydb$ kubectl apply -f mongodb-svc.yaml

## 확인
kevin@k8s-master:~/LABs/mydb$ kubectl get po,svc -o wide
NAME            READY   STATUS    RESTARTS   AGE    IP              NODE        NOMINATED NODE   READINESS GATES
pod/mongo-pod   1/1     Running   0          8m3s   10.109.131.26   k8s-node2   <none>           <none>

## label까지 확인
kevin@k8s-master:~/LABs/mydb$ kubectl get po,svc -o wide --show-labels
NAME            READY   STATUS    RESTARTS   AGE   IP              NODE        NOMINATED NODE   READINESS GATES   LABELS
pod/mongo-pod   1/1     Running   0          16m   10.109.131.26   k8s-node2   <none>           <none>            db=mongodb

NAME                 TYPE        CLUSTER-IP     EXTERNAL-IP      PORT(S)     AGE    SELECTOR     LABELS
service/kubernetes   ClusterIP   10.96.0.1      <none>           443/TCP     44h    <none>       component=apiserver,provider=kubernetes
service/mongo-svc    ClusterIP   10.108.185.8   192.168.56.102   17017/TCP   9m4s   db=mongodb   <none>

## endpoint 확인
kevin@k8s-master:~/LABs/mydb$ kubectl describe svc mongo-svc
Name:              mongo-svc
Namespace:         default
Labels:            <none>
Annotations:       <none>
Selector:          db=mongodb
Type:              ClusterIP
IP Family Policy:  SingleStack
IP Families:       IPv4
IP:                10.108.185.8
IPs:               10.108.185.8
External IPs:      192.168.56.102
Port:              <unset>  17017/TCP
TargetPort:        27017/TCP
Endpoints:         10.109.131.26:27017
Session Affinity:  None
Events:            <none>

## node2에서도 cali를 확인할 수 있다
kevin@k8s-node2:~$ route
Destination     Gateway         Genmask         Flags Metric Ref    Use Iface
10.109.131.26   0.0.0.0         255.255.255.255 UH    0      0        0 cali2927e48e21d
...

## pod 안으로 들어가서 데이터 추가하기
kevin@k8s-master:~/LABs/mydb$ kubectl exec -it mongo-pod -- mongo
> use k8sDB
> db
> db.k8scollection.insert({name:"hylee",job:"AWS.AAI"})
> db.k8scollection.find()
> exit

## Robo3T에서 192.168.56.102:17017 연결해서 확인 가능
: Robo3T
- mysql
## 환경변수 넣지 않고 yaml 파일 생성
kevin@k8s-master:~/LABs/mydb$ vi mysql-pod.yaml
apiVersion: v1
kind: Pod
metadata:
  name: mydb-pod
  labels:
    db: mysql
spec:
  containers:
  - image: mysql:5.7
    name: mydb-mysql
    ports:
    - containerPort: 3306

## apply
kevin@k8s-master:~/LABs/mydb$ kubectl apply -f mysql-pod.yaml

## Error 발생
kevin@k8s-master:~/LABs/mydb$ kubectl get po
NAME        READY   STATUS    RESTARTS     AGE
mongo-pod   1/1     Running   0            41m
mydb-pod    0/1     Error     1 (2s ago)   26s

## log를 확인하면 환경변수가 필요한 것을 알 수 있다.
kevin@k8s-master:~/LABs/mydb$ kubectl logs mydb-pod
2022-10-04 01:08:15+00:00 [Note] [Entrypoint]: Entrypoint script for MySQL Server 5.7.39-1.el7 started.
2022-10-04 01:08:15+00:00 [Note] [Entrypoint]: Switching to dedicated user 'mysql'
2022-10-04 01:08:15+00:00 [Note] [Entrypoint]: Entrypoint script for MySQL Server 5.7.39-1.el7 started.
2022-10-04 01:08:16+00:00 [ERROR] [Entrypoint]: Database is uninitialized and password option is not specified
    You need to specify one of the following:
    - MYSQL_ROOT_PASSWORD
    - MYSQL_ALLOW_EMPTY_PASSWORD
    - MYSQL_RANDOM_ROOT_PASSWORD

## 삭제
kevin@k8s-master:~/LABs/mydb$ kubectl delete -f mysql-pod.yaml

## yaml 파일에 환경변수 추가해서 수정한다
kevin@k8s-master:~/LABs/mydb$ vi mysql-pod.yaml
apiVersion: v1
kind: Pod
metadata:
  name: mydb-pod
  labels:
    db: mysql
spec:
  containers:
  - image: mysql:5.7
    name: mydb-mysql
    env:
    - name: MYSQL_ROOT_PASSWORD
      value: k8spass#
    ports:
    - containerPort: 3306

## apply
kevin@k8s-master:~/LABs/mydb$ kubectl apply -f mysql-pod.yaml

## 확인
kevin@k8s-master:~/LABs/mydb$ kubectl get po
NAME        READY   STATUS    RESTARTS   AGE
mydb-pod    1/1     Running   0          24s

## 안으로 들어가서 데이터 넣기
kevin@k8s-master:~/LABs/mydb$ kubectl exec -it mydb-pod -- mysql -u root -p
Enter password: [[k8spass#]]
mysql> create database item;
mysql> show databases;
+--------------------+
| Database           |
+--------------------+
| information_schema |
| item               |
| mysql              |
| performance_schema |
| sys                |
+--------------------+
mysql> use item;
mysql> create table products(prod_id int, prod_name varchar(20));
mysql> insert into products values(1, 'phone');
mysql> select * from products;
+---------+-----------+
| prod_id | prod_name |
+---------+-----------+
|       1 | phone     |
+---------+-----------+
mysql> exit;

## workbench에 연결하기 위해 Service 생성
## service yaml 파일 생성
kevin@k8s-master:~/LABs/mydb$ vi mysql-svc.yaml
apiVersion: v1
kind: Service
metadata:
  name: mydb-svc
spec:
  selector:
    db: mysql
  ports:
  - port: 13306
    targetPort: 3306
  externalIPs:
  - 192.168.56.102

## apply
kevin@k8s-master:~/LABs/mydb$ kubectl apply -f mysql-svc.yaml

## 확인
kevin@k8s-master:~/LABs/mydb$ kubectl get po,svc -o wide
NAME            READY   STATUS    RESTARTS   AGE     IP              NODE        NOMINATED NODE   READINESS GATES
pod/mydb-pod    1/1     Running   0          7m49s   10.109.131.28   k8s-node2   <none>           <none>

NAME                 TYPE        CLUSTER-IP       EXTERNAL-IP      PORT(S)     AGE   SELECTOR
service/kubernetes   ClusterIP   10.96.0.1        <none>           443/TCP     45h   <none>
service/mydb-svc     ClusterIP   10.105.136.110   192.168.56.102   13306/TCP   8s    db=mysql

## workbench에서 192.168.56.102:13306으로 연결해서 확인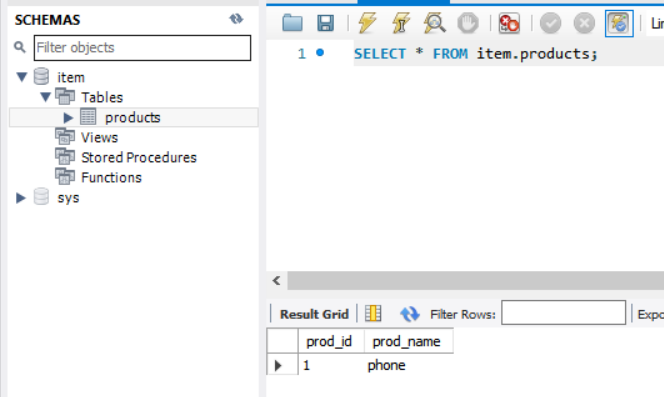
: workbench
- Go 언어를 활용한 Pod & Service 배포 테스트
Ubuntu 기반으로 App. 환경 구성하고 -> GKE에서 k8s resource 배포
kevin@k8s-master:~/LABs$ git clone https://github.com/brayanlee/goapp.git
kevin@k8s-master:~/LABs$ cd goapp/
kevin@k8s-master:~/LABs/goapp$ vi goapp.go

kevin@k8s-master:~/LABs/goapp$ sudo docker image build -t goapp:2.0 .
kevin@k8s-master:~/LABs/goapp$ sudo docker tag goapp:2.0 oeckikekk/goapp:2.0
kevin@k8s-master:~/LABs/goapp$ sudo docker run -it --name=goappcon -p 9090:9090 oeckikekk/goapp:2.0
Go! Go! Application ......
kevin@k8s-master:~/LABs/goapp$ sudo docker login
kevin@k8s-master:~/LABs/goapp$ sudo docker push oeckikekk/goapp:2.0

## Google Cloud SDK Shell에서 실행
C:\k8s>cd LABs

## yaml 파일 작성
C:\k8s\LABs>notepad goapp.yaml
apiVersion: v1
kind: Service
metadata:
  name: goapp-svc
spec:
  selector:
    run: go
  ports:
  - port: 9090
    targetPort: 9090
  type: LoadBalancer
---
apiVersion: v1
kind: Pod
metadata:
  name: goapp-pod
  labels:
    run: go
spec:
  containers:
  - image: oeckikekk/goapp:2.0
    name: goapp-container
    ports:
    - containerPort: 9090

## apply
C:\k8s\LABs>kubectl apply -f goapp.yaml

## 확인
C:\k8s\LABs>kubectl get po,svc -o wide
NAME            READY   STATUS    RESTARTS   AGE   IP          NODE                                         NOMINATED NODE   READINESS GATES
pod/goapp-pod   1/1     Running   0          63s   10.12.2.4   gke-k8s-cluster-k8s-nodepool-bc541242-jgo3   <none>           <none>

NAME                 TYPE           CLUSTER-IP    EXTERNAL-IP    PORT(S)          AGE     SELECTOR
service/goapp-svc    LoadBalancer   10.16.8.190   34.64.153.65   9090:31319/TCP   64s     run=go
service/kubernetes   ClusterIP      10.16.0.1     <none>         443/TCP          4d17h   <none>

## 접속 확인
C:\k8s\LABs>curl 34.64.153.65:9090
My Go-Application. -soyeon-
hostname:  goapp-pod
IP:  [10.12.2.4]

## 삭제
C:\k8s\LABs>kubectl delete -f goapp.yaml- kubernetes microservice 배포하기
Ubuntu 기반으로 테스트 환경 구성하고 GKE에서 k8s resource 생성
## 이동
kevin@k8s-master:~/LABs$ cd 'What is your motto'/

## index.html 수정
kevin@k8s-master:~/LABs/What is your motto$ vi index.html

## Dockerfile 생성
kevin@k8s-master:~/LABs/What is your motto$ vi Dockerfile
FROM nginx
COPY . /usr/share/nginx/html

## image build
kevin@k8s-master:~/LABs/What is your motto$ sudo docker build -t mymotto:1.0 .

## tag 달기
kevin@k8s-master:~/LABs/What is your motto$ sudo docker tag mymotto:1.0 oeckikekk/mymotto:1.0

## container run 확인
kevin@k8s-master:~/LABs/What is your motto$ sudo docker run -it --name=mymotto -p 8090:80 oeckikekk/mymotto:1.0

## yaml 파일 생성
kevin@k8s-master:~/LABs/What is your motto$ vi mymotto-deploy.yaml
apiVersion: apps/v1
kind: Deployment
metadata:
  name: devweb-deployment
spec:
  selector:
    matchLabels:
      app: my-devweb
    replicas: 3
    template:
      metadata:
        labels:
          app: my-devweb
      spec:
        containers:
        - name: devweb-containers
          image: oeckikekk/mymotto:1.0
          ports:
          - containerPort: 80

## image push
kevin@k8s-master:~/LABs/What is your motto$ sudo docker login
kevin@k8s-master:~/LABs/What is your motto$ sudo docker push oeckikekk/mymotto:1.0

## Google Cloud SDK Shell에서 실행
C:\k8s>cd LABs

C:\k8s\LABs>notepad mymotto.yaml
apiVersion: apps/v1
kind: Deployment
metadata:
  name: devweb-deployment
spec:
  selector:
    matchLabels:
      app: my-devweb
  replicas: 3
  template:
    metadata:
      labels:
        app: my-devweb
    spec:
      containers:
      - name: devweb-containers
        image: oeckikekk/mymotto:1.0
        ports:
        - containerPort: 80
---
apiVersion: v1
kind: Service
metadata:
  name: devweb-svc
spec:
  selector:
    app: my-devweb
  ports:
  - port: 8090
    targetPort: 80
  type: LoadBalancer

## apply
C:\k8s\LABs>kubectl apply -f mymotto.yaml

## 확인
C:\k8s\LABs>curl 34.64.156.187:8090

## 삭제
C:\k8s\LABs>kubectl delete -f mymotto.yaml
Pod를 위한 object
: Container, Label, Node schedule
Pod
: 고래, 물개 등의 작은 무리(떼) -> container(app)
하나의 pod는 여러개의 container를 보유할 수 있다.
pod는 container의 host와 같다. pod의 IP를 통해 container에 접근할 수 있다는 의미이다.
Pod name : container의 host name
spec : container의 사양
port(containerPort)에는 image에서 expose된 port를 써야 한다.
container type
- 일반적인 application container -> runtime container
- 특정 조건을 담고 있는 container -> init container
조건을 충족하게 되면 runtime container가 돌아가게 된다. - runtime container의 log 수집을 위한 container -> sidecar container
ㄴ sidecar, ambassader, adapter(pod 설계시 유용한 설계 기법)
추상화 object
: 격리된 container를 포함하고 있다.
: 격리된 network(network namespace), storage(namespace) 자원 등을 공유한다.
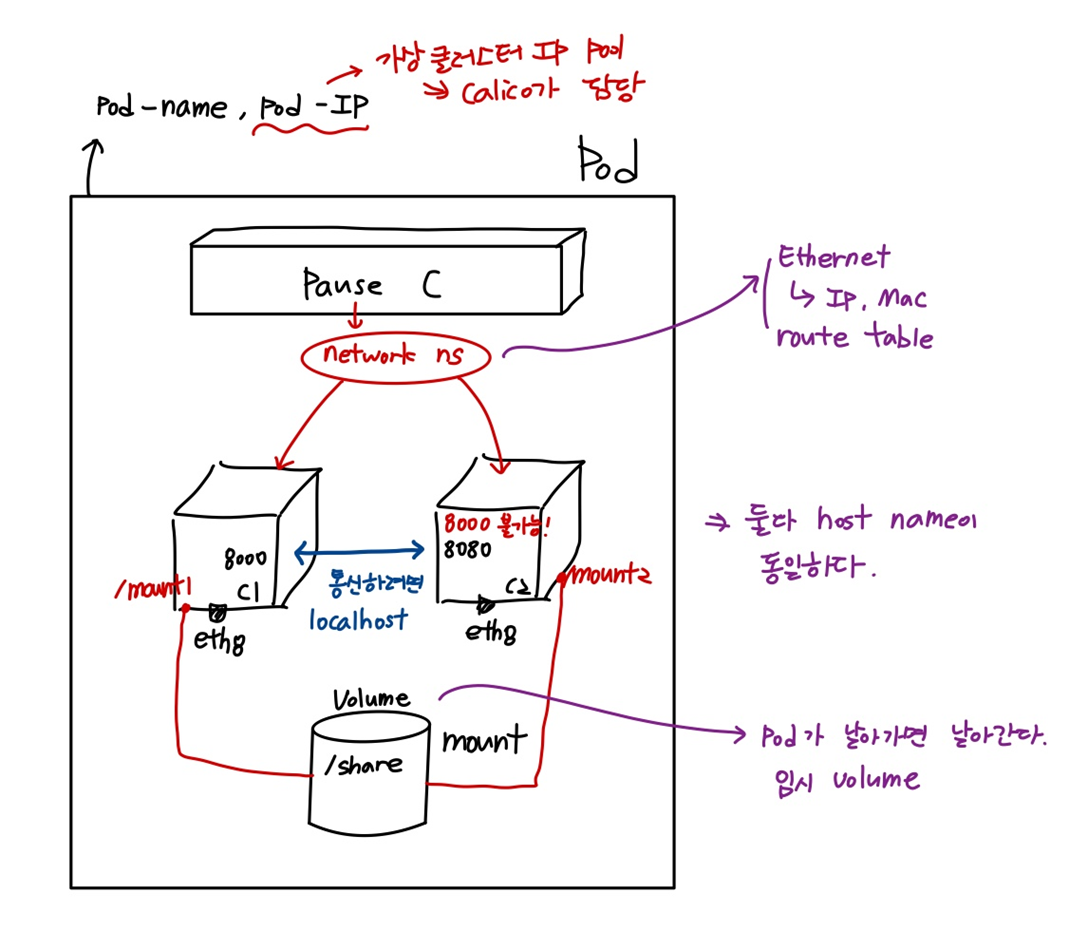
- 한 pod 안에서 container 끼리의 통신
## node1, node2에서 image pull
kevin@k8s-node1:~$ sudo docker pull dbgurum/k8s-lab:p8000
kevin@k8s-node1:~$ sudo docker pull dbgurum/k8s-lab:p8080

## 이동
kevin@k8s-master:~/LABs$ mkdir multi-pod && cd $_

## yaml 파일 작성
kevin@k8s-master:~/LABs/multi-pod$ vi multi-pod.yaml
apiVersion: v1
kind: Pod
metadata:
  name: multi-pod
spec:
  containers:
  - image: dbgurum/k8s-lab:p8000
    name: c1
    ports:
    - containerPort: 8000
  - image: dbgurum/k8s-lab:p8080
    name: c2
    ports:
    - containerPort: 8080

## apply
kevin@k8s-master:~/LABs/multi-pod$ kubectl apply -f multi-pod.yaml

## 확인
kevin@k8s-master:~/LABs/multi-pod$ kubectl get po -o wide
NAME        READY   STATUS    RESTARTS   AGE    IP              NODE        NOMINATED NODE   READINESS GATES
multi-pod   2/2     Running   0          44s    10.111.156.86   k8s-node1   <none>           <none>

## hostname이 같은지 확인
kevin@k8s-master:~/LABs/multi-pod$ kubectl exec -it multi-pod -c c1 -- hostname
multi-pod
kevin@k8s-master:~/LABs/multi-pod$ kubectl exec -it multi-pod -c c2 -- hostname
multi-pod

## 직접 들어가서 서로 컨테이너에 접속해보기
kevin@k8s-master:~/LABs/multi-pod$ kubectl exec -it multi-pod -c c1 -- bash
root@multi-pod:/# curl localhost:8080
containerPort : 8080
root@multi-pod:/# exit
exit
kevin@k8s-master:~/LABs/multi-pod$ kubectl exec -it multi-pod -c c2 -- bash
root@multi-pod:/# curl localhost:8000
containerPort : 8000
root@multi-pod:/# exit
exit

## 서로 컨테이너에 접속해보기
kevin@k8s-master:~/LABs/multi-pod$ kubectl exec -it multi-pod -c c1 -- curl 10.111.156.86:8080
containerPort : 8080
kevin@k8s-master:~/LABs/multi-pod$ kubectl exec -it multi-pod -c c2 -- curl 10.111.156.86:8000
containerPort : 8000- 같은 port를 pod 안에서 사용하면 안된다.
## 복사
kevin@k8s-master:~/LABs/multi-pod$ cp multi-pod.yaml multi-pod2.yaml

## port를 모두 8000으로 바꾸기
kevin@k8s-master:~/LABs/multi-pod$ vi multi-pod2.yaml
apiVersion: v1
kind: Pod
metadata:
  name: multi-pod2
spec:
  containers:
  - image: dbgurum/k8s-lab:p8000
    name: c1
    ports:
    - containerPort: 8000
  - image: dbgurum/k8s-lab:p8000
    name: c2
    ports:
    - containerPort: 8000

## apply
kevin@k8s-master:~/LABs/multi-pod$ kubectl apply -f multi-pod2.yaml

## 확인 - 에러 발생
kevin@k8s-master:~/LABs/multi-pod$ kubectl get po -o wide | grep multi
multi-pod2   1/2     CrashLoopBackOff   1 (3s ago)   22s     10.109.131.29   k8s-node2   <none>           <none>

## c1이 먼져 만들어졌기 때문에 오류가 나지 않는다.
kevin@k8s-master:~/LABs/multi-pod$ kubectl logs multi-pod2 -c c1

## c2에서 오류가 발생한다.
kevin@k8s-master:~/LABs/multi-pod$ kubectl logs multi-pod2 -c c2
...
Error: listen EADDRINUSE: address already in use :::8000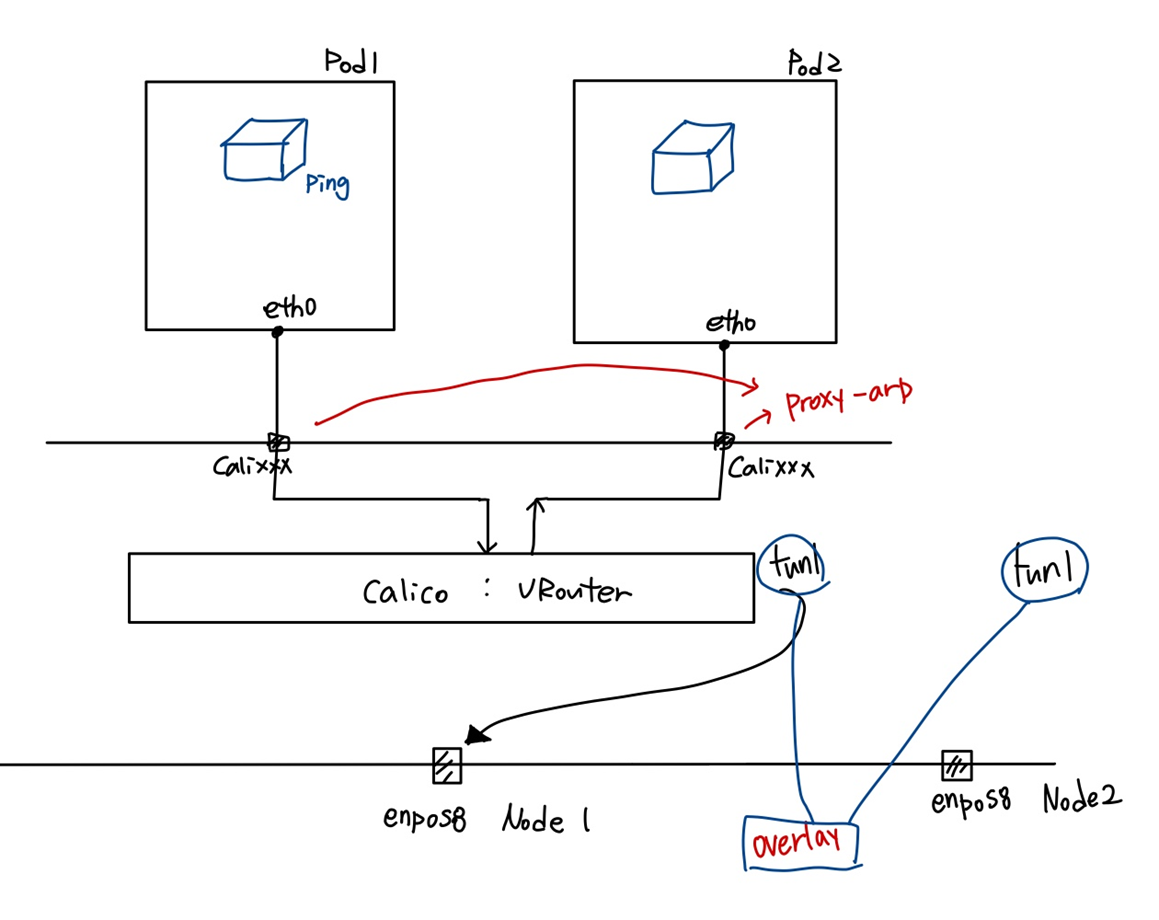
...- pod to pod(같은 노드에서)
kevin@k8s-master:~/LABs$ mkdir podtopod && cd $_

## yaml 파일 생성
kevin@k8s-master:~/LABs/podtopod$ vi pod1to2.yaml
apiVersion: v1
kind: Pod
metadata:
  name: net-pod1
spec:
  nodeName: k8s-node1
  containers:
  - image: ubuntu:14.04
    name: pod1-container
    command: ['/bin/bash', '-c', 'tail -f /dev/null']
---
apiVersion: v1
kind: Pod
metadata:
  name: net-pod2
spec:
  nodeName: k8s-node1
  containers:
  - image: ubuntu:14.04
    name: pod2-container
    command: ['/bin/bash', '-c', 'tail -f /dev/null']

## apply
kevin@k8s-master:~/LABs/podtopod$ kubectl apply -f pod1to2.yaml

## 확인
kevin@k8s-master:~/LABs/podtopod$ kubectl get po -o wide
NAME         READY   STATUS             RESTARTS       AGE     IP              NODE        NOMINATED NODE   READINESS GATES
net-pod1     1/1     Running            0              39s     10.111.156.88   k8s-node1   <none>           <none>
net-pod2     1/1     Running            0              39s     10.111.156.87   k8s-node1   <none>           <none>

## 1번 pod 들어가기. eth 확인
kevin@k8s-master:~/LABs/podtopod$ kubectl exec -it net-pod1 -- bash
root@net-pod1:/# ip a
...
4: eth0@if16: <BROADCAST,MULTICAST,UP,LOWER_UP> mtu 1480 qdisc noqueue state UP group default
    link/ether f6:f5:b3:6f:10:0f brd ff:ff:ff:ff:ff:ff

## 2번 pod 들어가기. eth 확인
kevin@k8s-master:~/LABs/podtopod$ kubectl exec -it net-pod2 -- bash
root@net-pod2:/# ip a
...
4: eth0@if15: <BROADCAST,MULTICAST,UP,LOWER_UP> mtu 1480 qdisc noqueue state UP group default
    link/ether 1a:7b:9a:57:a8:0b brd ff:ff:ff:ff:ff:ff

## node1에서 route 확인 88: pod1, 87: pod2
kevin@k8s-node1:~$ route
Destination     Gateway         Genmask         Flags Metric Ref    Use Iface
10.111.156.87   0.0.0.0         255.255.255.255 UH    0      0        0 cali153dd8aa6e6
10.111.156.88   0.0.0.0         255.255.255.255 UH    0      0        0 cali75567eb3d27
...

## 88이 87에게 ping을 보낸다
root@net-pod1:/# ping 10.111.156.87

## node1에서 88의 iface 확인
kevin@k8s-node1:~$ route
Destination     Gateway         Genmask         Flags Metric Ref    Use Iface
10.111.156.88   0.0.0.0         255.255.255.255 UH    0      0        0 cali75567eb3d27

## node1에서 tcpdump로 확인
kevin@k8s-node1:~$ sudo tcpdump -i cali75567eb3d27 -an
...
14:22:21.462706 IP 10.111.156.88 > 10.111.156.87: ICMP echo request, id 38, seq 190, length 64
14:22:21.462785 IP 10.111.156.87 > 10.111.156.88: ICMP echo reply, id 38, seq 190, length 64
14:22:21.526449 ARP, Request who-has 10.111.156.88 tell 10.0.2.15, length 28
14:22:21.526622 ARP, Reply 10.111.156.88 is-at f6:f5:b3:6f:10:0f, length 28
## ping을 던져서 f6:f5:b3:6f:10:0f 받았다.

## pod1의 mac 주소와 동일함을 확인
kevin@k8s-master:~$ kubectl exec -it net-pod1 -- ifconfig
eth0      Link encap:Ethernet  HWaddr f6:f5:b3:6f:10:0f
...

## pod1에서 gateway 확인
kevin@k8s-master:~$ kubectl exec -it net-pod1 -- bash
root@net-pod1:/# route
Kernel IP routing table
Destination     Gateway         Genmask         Flags Metric Ref    Use Iface
default         169.254.1.1     0.0.0.0         UG    0      0        0 eth0
169.254.1.1     *               255.255.255.255 UH    0      0        0 eth0
root@net-pod1:/# arp -an
## enp0s3 ip 주소이다.
? (10.0.2.15) at ee:ee:ee:ee:ee:ee [ether] on eth0
? (169.254.1.1) at ee:ee:ee:ee:ee:ee [ether] on eth0

## pod2에서 gateway 확인
kevin@k8s-master:~$ kubectl exec -it net-pod2 -- bash
root@net-pod2:/# route
Kernel IP routing table
Destination     Gateway         Genmask         Flags Metric Ref    Use Iface
default         169.254.1.1     0.0.0.0         UG    0      0        0 eth0
169.254.1.1     *               255.255.255.255 UH    0      0        0 eth0
root@net-pod2:/# arp -an
? (169.254.1.1) at ee:ee:ee:ee:ee:ee [ether] on eth0
? (10.0.2.15) at ee:ee:ee:ee:ee:ee [ether] on eth0

kevin@k8s-node1:~$ sudo su -
root@k8s-node1:~# cat /proc/sys/net/ipv4/conf/cali75567eb3d27/proxy_arp
1
root@k8s-node1:~# echo '0' > /proc/sys/net/ipv4/conf/cali75567eb3d27/proxy_arp
## ping이 멈추게 된다.
ubuntu 14에는 network 명령이 설치되어 있다.
container에서 특정 명령어를 실행하게 하고 싶을 때
: command, args, command+args
- pod to pod(다른 노드에서)
## 복사
kevin@k8s-master:~/LABs/podtopod$ cp pod1to2.yaml pod1to2tohost.yaml

## yaml 파일 작성
## node1과 node2로 나눠주기
kevin@k8s-master:~/LABs/podtopod$ vi pod1to2tohost.yaml
apiVersion: v1
kind: Pod
metadata:
  name: net-pod3
spec:
  nodeName: k8s-node1
  containers:
  - image: ubuntu:14.04
    name: pod1-container
    command: ['/bin/bash', '-c', 'tail -f /dev/null']
---
apiVersion: v1
kind: Pod
metadata:
  name: net-pod4
spec:
  nodeName: k8s-node2
  containers:
  - image: ubuntu:14.04
    name: pod2-container
    command: ['/bin/bash', '-c', 'tail -f /dev/null']

## apply
kevin@k8s-master:~/LABs/podtopod$ kubectl apply -f pod1to2tohost.yaml

## 확인
kevin@k8s-master:~/LABs/podtopod$ kubectl get po -o wide
NAME       READY   STATUS    RESTARTS   AGE   IP              NODE        NOMINATED NODE   READINESS GATES
net-pod1   1/1     Running   0          32m   10.111.156.88   k8s-node1   <none>           <none>
net-pod2   1/1     Running   0          32m   10.111.156.87   k8s-node1   <none>           <none>
net-pod3   1/1     Running   0          22s   10.111.156.89   k8s-node1   <none>           <none>
net-pod4   1/1     Running   0          22s   10.109.131.30   k8s-node2   <none>           <none>

## pod3 들어가기
kevin@k8s-master:~/LABs/podtopod$ kubectl exec -it net-pod3 -- bash

## pod4로 ping 던지기
root@net-pod3:/# ping 10.109.131.30

## packet 캡쳐
kevin@k8s-node1:~$ sudo tcpdump -i enp0s8 -nn proto 4 -w calico-tunl-ipip.pcap

## wireshark로 확인
pod - Label
key: value 구조로 작성한다. 여러개 지정이 가능하다. 복합적 의미를 지정할 수 있다.
Pod를 식별할 수 있다.
pod1, pod2, pod3에 동일한 label을 부여하여 service에 연결한다. (=그룹화, LB)
label 조회 방법
kubectl get po --show-labels로 확인할 수 있다.
kubectl get po -l key : 특정 key에 해당하는 label 확인하기
kubectl get po --selector=key=value
node에도 label 설정이 유용하다!
kevin@k8s-master:~/LABs/podtopod$ kubectl describe no k8s-node1
...
Labels:             beta.kubernetes.io/arch=amd64
                    beta.kubernetes.io/os=linux
                    kubernetes.io/arch=amd64
                    kubernetes.io/hostname=k8s-node1  ## 이 부분이 다르다
                    kubernetes.io/os=linux
...
label의 확장 기능 제공
: "annotations"
추가적인 메타 정보 제공을 위해 사용한다.
- kubernetes API Resource -> label 실습 1
## namespace 생성
kevin@k8s-master:~/LABs$ kubectl create namespace infra-team-ns1

## 확인
kevin@k8s-master:~/LABs$ kubectl get namespaces
NAME                   STATUS   AGE
default                Active   5d1h
infra-team-ns1         Active   4s
...

## yaml 파일 생성
kevin@k8s-master:~/LABs$ vi label-1.yaml
apiVersion: v1
kind: Pod
metadata:
  name: label-pod-a
  namespace: infra-team-ns1
  labels:
    type: infra1
spec:
  containers:
  - name: pod-a-container
    image: dbgurum/k8s-lab:initial
---
apiVersion: v1
kind: Pod
metadata:
  name: label-pod-b
  namespace: infra-team-ns1
  labels:
    type: infra1
spec:
  containers:
  - name: pod-b-container
    image: dbgurum/k8s-lab:initial
---
apiVersion: v1
kind: Pod
metadata:
  name: label-pod-c
  namespace: infra-team-ns1
  labels:
    type: infra1
spec:
  containers:
  - name: pod-c-container
    image: dbgurum/k8s-lab:initial
---
apiVersion: v1
kind: Service
metadata:
  name: label-svc1
  namespace: infra-team-ns1
spec:
  selector:
    type: infra1
  ports:
  - port: 7777

## apply
kevin@k8s-master:~/LABs$ kubectl apply -f label-1.yaml

## 확인
kevin@k8s-master:~/LABs$ kubectl get po,svc -o wide -n infra-team-ns1
NAME              READY   STATUS    RESTARTS   AGE   IP              NODE        NOMINATED NODE   READINESS GATES
pod/label-pod-a   1/1     Running   0          69s   10.109.131.31   k8s-node2   <none>           <none>
pod/label-pod-b   1/1     Running   0          69s   10.109.131.32   k8s-node2   <none>           <none>
pod/label-pod-c   1/1     Running   0          69s   10.111.156.90   k8s-node1   <none>           <none>

NAME                 TYPE        CLUSTER-IP      EXTERNAL-IP   PORT(S)    AGE   SELECTOR
service/label-svc1   ClusterIP   10.105.236.19   <none>        7777/TCP   69s   type=infra1

## infra-team-ns1 namespace 것 조회
kevin@k8s-master:~/LABs$ kubectl get all -n infra-team-ns1
NAME              READY   STATUS    RESTARTS   AGE
pod/label-pod-a   1/1     Running   0          80s
pod/label-pod-b   1/1     Running   0          80s
pod/label-pod-c   1/1     Running   0          80s

NAME                 TYPE        CLUSTER-IP      EXTERNAL-IP   PORT(S)    AGE
service/label-svc1   ClusterIP   10.105.236.19   <none>        7777/TCP   80s

## infra-team-ns1 namespace service 조회
## endpoint가 3개가 있다.
kevin@k8s-master:~/LABs$ kubectl describe service/label-svc1 -n infra-team-ns1
Name:              label-svc1
Namespace:         infra-team-ns1
Labels:            <none>
Annotations:       <none>
Selector:          type=infra1
Type:              ClusterIP
IP Family Policy:  SingleStack
IP Families:       IPv4
IP:                10.105.236.19
IPs:               10.105.236.19
Port:              <unset>  7777/TCP
TargetPort:        7777/TCP
Endpoints:         10.109.131.31:7777,10.109.131.32:7777,10.111.156.90:7777
Session Affinity:  None
Events:            <none>

## infra-team-ns1 namespace label 조회
kevin@k8s-master:~/LABs$ kubectl get pods --show-labels -n infra-team-ns1
NAME          READY   STATUS    RESTARTS   AGE     LABELS
label-pod-a   1/1     Running   0          2m55s   type=infra1
label-pod-b   1/1     Running   0          2m55s   type=infra1
label-pod-c   1/1     Running   0          2m55s   type=infra1

## infra-team-ns1 namespace에서 type을 가진 pod 조회
kevin@k8s-master:~/LABs$ kubectl get pods --selector='type' -n infra-team-ns1
NAME          READY   STATUS    RESTARTS   AGE
label-pod-a   1/1     Running   0          3m14s
label-pod-b   1/1     Running   0          3m14s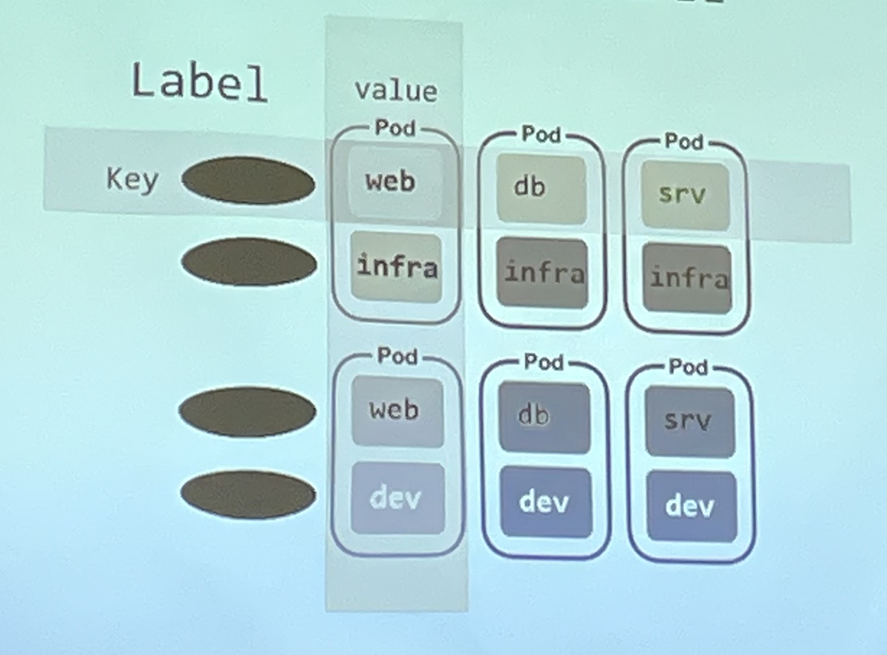
label-pod-c 1/1 Running 0 3m14s- kubernetes API Resource -> Label
Label을 이용한 Pod 생성 -> Service 연결
pod에 label을 여려개 정해놓고, Service에 원하는 것을 selector에 넣어서 사용한다.
## yaml 파일 작성
kevin@k8s-master:~/LABs$ vi sixpod.yaml
## pod 6개 생성
apiVersion: v1
kind: Pod
metadata:
  name: label-p1
  labels:
    type: infra
    job: web
spec:
  containers:
  - name: p1-container
    image: dbgurum/k8s-lab:initial
---
apiVersion: v1
kind: Pod
metadata:
  name: label-p2
  labels:
    type: infra
    job: db
spec:
  containers:
  - name: p1-container
    image: dbgurum/k8s-lab:initial
---
apiVersion: v1
kind: Pod
metadata:
  name: label-p3
  labels:
    type: infra
    job: srv
spec:
  containers:
  - name: p1-container
    image: dbgurum/k8s-lab:initial
---
apiVersion: v1
kind: Pod
metadata:
  name: label-p4
  labels:
    type: dev
    job: web
spec:
  containers:
  - name: p1-container
    image: dbgurum/k8s-lab:initial
---
apiVersion: v1
kind: Pod
metadata:
  name: label-p5
  labels:
    type: dev
    job: db
spec:
  containers:
  - name: p1-container
    image: dbgurum/k8s-lab:initial
---
apiVersion: v1
kind: Pod
metadata:
  name: label-p6
  labels:
    type: dev
    job: srv
spec:
  containers:
  - name: p1-container
    image: dbgurum/k8s-lab:initial
---
## frontend web 개발자
apiVersion: v1
kind: Service
metadata:
  name: front-web-svc
spec:
  selector:
    job: web
  ports:
  - port: 8081
---
## 운영팀
apiVersion: v1
kind: Service
metadata:
  name: infra-svc
spec:
  selector:
    type: infra
  ports:
  - port: 8082
---
## infra 팀의 웹 개발
apiVersion: v1
kind: Service
metadata:
  name: infra-web-svc
spec:
  selector:
    job: web
    type: infra
  ports:
  - port: 8083

## apply
kevin@k8s-master:~/LABs$ kubectl apply -f sixpod.yaml

## 확인
kevin@k8s-master:~/LABs$ kubectl get po -o wide
NAME       READY   STATUS    RESTARTS   AGE   IP              NODE        NOMINATED NODE   READINESS GATES
label-p1   1/1     Running   0          18s   10.111.156.92   k8s-node1   <none>           <none>
label-p2   1/1     Running   0          18s   10.109.131.33   k8s-node2   <none>           <none>
label-p3   1/1     Running   0          18s   10.109.131.34   k8s-node2   <none>           <none>
label-p4   1/1     Running   0          18s   10.111.156.91   k8s-node1   <none>           <none>
label-p5   1/1     Running   0          18s   10.109.131.35   k8s-node2   <none>           <none>
label-p6   1/1     Running   0          18s   10.111.156.93   k8s-node1   <none>           <none>

## 운영팀에 3개의 endpoint가 붙어있다.
kevin@k8s-master:~/LABs$ kubectl describe svc/infra-svc
Name:              infra-svc
Namespace:         default
Labels:            <none>
Annotations:       <none>
Selector:          type=infra
Type:              ClusterIP
IP Family Policy:  SingleStack
IP Families:       IPv4
IP:                10.111.47.202
IPs:               10.111.47.202
Port:              <unset>  8082/TCP
TargetPort:        8082/TCP
Endpoints:         10.109.131.33:8082,10.109.131.34:8082,10.111.156.92:8082
Session Affinity:  None
Events:            <none>
pod - Schedule
kube-scheduler-k8s-master에 의해 특정 계산 알고리즘으로 노드에 할당(지정)된다.
nodeName
: hostname으로 노드를 지정한다.
-> kubelet을 통해 직접 할당하는 방식
    spec:
      nodeName: k8s-node1
nodeSelector
: 해당 노드의 label을 통해 지정한다.
-> control plane의 scheduler에 의해 할당되는 방식. 계산 알고리즘을 사용하지 않는다.
    spec:
      nodeSelector:
kubernetes.io/hostname: k8s-node2- 실습
## 이동
kevin@k8s-master:~/LABs$ mkdir labels && cd $_

## yaml 파일 생성
kevin@k8s-master:~/LABs/labels$ vi pod-label1.yaml
apiVersion: v1
kind: Pod
metadata:
  name: mynode-pod1
spec:
  nodeName: k8s-node1
  containers:
  - image: oeckikekk/mynode:1.0
    name: mynode-container
    ports:
    - containerPort: 8000
---
apiVersion: v1
kind: Pod
metadata:
  name: mynode-pod2
spec:
  nodeSelector:
    kubernetes.io/hostname: k8s-node2
  containers:
  - image: oeckikekk/mynode:1.0
    name: mynode-container
    ports:
    - containerPort: 8000

## apply
kevin@k8s-master:~/LABs/labels$ kubectl apply -f pod-label1.yaml

## 확인 - 각각 node1과 node2에 만들어졌다
kevin@k8s-master:~/LABs/labels$ kubectl get po -o wide | grep mynode
NAME          READY   STATUS    RESTARTS   AGE   IP              NODE        NOMINATED NODE   READINESS GATES
mynode-pod1   1/1     Running   0          28s   10.111.156.94   k8s-node1   <none>           <none>
mynode-pod2   1/1     Running   0          28s   10.109.131.36   k8s-node2   <none>           <none>
object는 이미 100퍼센트의 코드를 가지고 있다. pod를 만들면 그에 맞게 수정해서 만들어 주는 것이다.
- 전체 100 확인해보기
kevin@k8s-master:~/LABs/labels$ kubectl get po mynode-pod1 -o yaml
사용자 지정 방식
: node에 label을 붙여서 사용한다.
- 시나리오
우리 회사는 150대의 k8s cluster를 운영 중이다. 이 중 140대는 worker node로 사용 중이다. 특정 worker node는 disktype=ssd로 사용중이다. disktype=ssd인 worker node에 pod를 지정하고자 한다. 또는 GPU로 운영중(gpu=true)인 worker node를 pod에 지정해야 한다.
## node1에 label 붙이기
kevin@k8s-master:~/LABs/labels$ kubectl label nodes k8s-node1 disktype=ssd

## 확인
kevin@k8s-master:~/LABs/labels$ kubectl get no k8s-node1 --show-labels
NAME        STATUS   ROLES    AGE    VERSION   LABELS
k8s-node1   Ready    <none>   5d2h   v1.24.5   beta.kubernetes.io/arch=amd64,beta.kubernetes.io/os=linux,disktype=ssd,kubernetes.io/arch=amd64,kubernetes.io/hostname=k8s-node1,kubernetes.io/os=linux

## yaml 파일 생성
kevin@k8s-master:~/LABs/labels$ vi node-label-1.yaml
apiVersion: v1
kind: Pod
metadata:
  name: mynode-pod3
spec:
  nodeSelector:
    disktype: ssd
  containers:
  - image: oeckikekk/mynode:1.0
    name: mynode-container
    ports:
    - containerPort: 8000

## apply
kevin@k8s-master:~/LABs/labels$ kubectl apply -f node-label-1.yaml

## nodeSelector로 disktype이 ssd인 node에 pod가 생성되었다.
kevin@k8s-master:~/LABs/labels$ kubectl get po -o wide
NAME          READY   STATUS    RESTARTS   AGE   IP              NODE        NOMINATED NODE   READINESS GATES
mynode-pod3   1/1     Running   0          6s    10.111.156.95   k8s-node1   <none>           <none>

## node2에 label 붙이기
kevin@k8s-master:~/LABs/labels$ kubectl label nodes k8s-node2 gpu=true

## 확인
kevin@k8s-master:~/LABs/labels$ kubectl get no k8s-node2 --show-labels
NAME        STATUS   ROLES    AGE    VERSION   LABELS
k8s-node2   Ready    <none>   5d2h   v1.24.5   beta.kubernetes.io/arch=amd64,beta.kubernetes.io/os=linux,gpu=true,kubernetes.io/arch=amd64,kubernetes.io/hostname=k8s-node2,kubernetes.io/os=linux

## yaml 파일 생성. true를 string으로 해주어야 한다
kevin@k8s-master:~/LABs/labels$ vi node-label-2.yaml
apiVersion: v1
kind: Pod
metadata:
  name: mynode-pod4
spec:
  nodeSelector:
    gpu: "true"
  containers:
  - image: oeckikekk/mynode:1.0
    name: mynode-container
    ports:
    - containerPort: 8000

## apply
kevin@k8s-master:~/LABs/labels$ kubectl apply -f node-label-2.yaml

## gpu가 true인 node에 pod가 생성되었다
kevin@k8s-master:~/LABs/labels$ kubectl get po -o wide
NAME          READY   STATUS    RESTARTS   AGE     IP              NODE        NOMINATED NODE   READINESS GATES
mynode-pod4 1/1 Running 0 21s 10.109.131.37 k8s-node2 <none> <none>- label 삭제
kevin@k8s-master:~/LABs/labels$ kubectl label nodes k8s-node1 disktype-
kevin@k8s-master:~/LABs/labels$ kubectl label nodes k8s-node2 gpu-