Front-end 국비지원 #062일
JavaScript
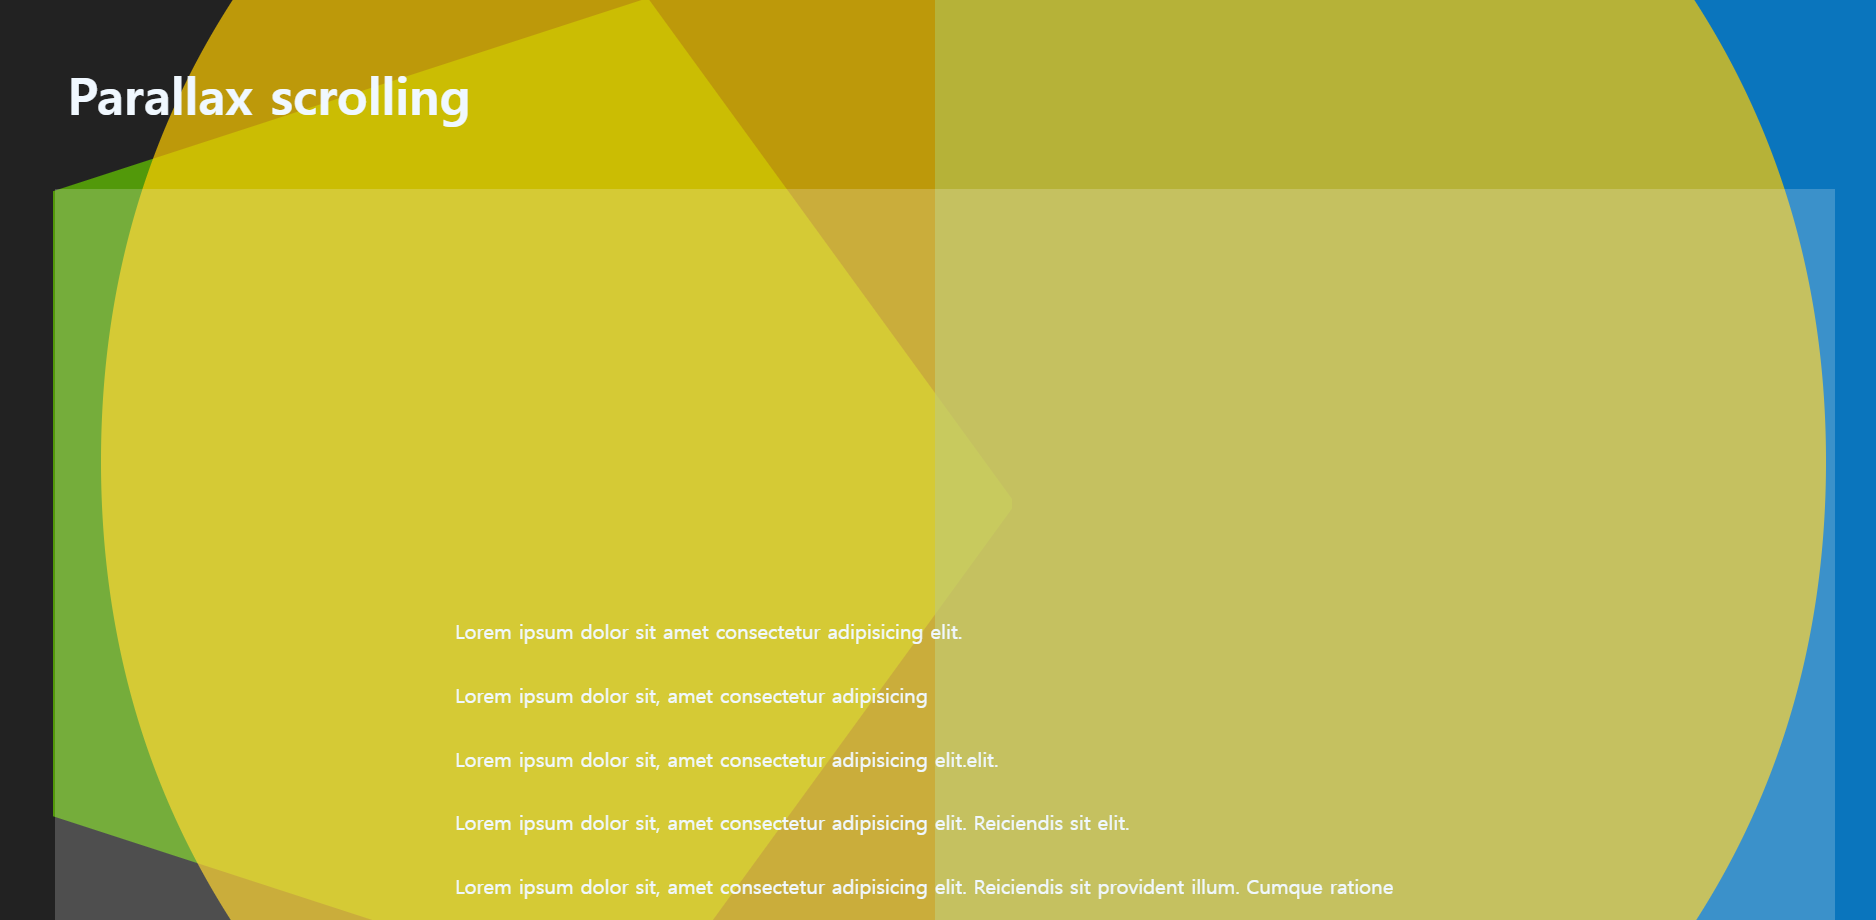
Parallax Scrolling
Parallax Scrolling 이란?
패럴랙스 스크롤링(parallax scrolling)은 사용자가 마우스를 스크롤할 때, 원거리에 있는 배경 이미지는 느리게 움직이게 하고, 근거리에 있는 사물 이미지는 빠르게 움직이도록 함으로써 입체감을 느낄 수 있게 만든 디자인 기법이다. 하나의 이미지를 여러 개의 레이어(layer)로 분리한 후 스크롤에 반응하는 속도를 다르게 조정하는 방식으로 구현한다. 1930년대부터 애니메이션 분야에 사용되던 기법이었으나, 웹 디자인 분야는 HTML5와 CSS3 기법이 도입됨으로써 사용이 가능해졌다.
[출처] : https://ko.wikipedia.org/
결과
HTML
<h1>Parallax scrolling</h1>
    <div id="content">
        <p>Lorem ipsum dolor sit amet consectetur adipisicing elit.</p>
        <p>Lorem ipsum dolor sit, amet consectetur adipisicing </p>
        <p>Lorem ipsum dolor sit, amet consectetur adipisicing elit.elit.</p>
        <p>Lorem ipsum dolor sit, amet consectetur adipisicing elit. Reiciendis sit elit. </p>
        <p>Lorem ipsum dolor sit, amet consectetur adipisicing elit. Reiciendis sit provident illum. Cumque ratione doloribus, distinctio ducimus ea blanditiis consequuntur laboriosam nisi, alias a, deleniti ipsam sint dolorem sequi modi.</p>
        <p>Lorem ipsum dolor sit, amet consectetur adipisicing elit. Reiciendis sit elit. Reiciendis sit provident illum. Cumque ratione doloribus, distinctio ducimus ea blanditiis consequuntur laboriosam nisi, alias a, deleniti ipsam sint dolorem sequi modi.provident illum. Cumque ratione doloribus, distinctio ducimus ea blanditiis consequuntur laboriosam nisi, alias a, deleniti ipsam sint dolorem sequi modi.</p>
        <p>Lorem ipsum dolor sit, amet consectetur adipisicing elit. Reiciendis sit </p>
        <p>Lorem ipsum dolor sit, amet consectetur adipisicing elit. Reiciendis sit elit. Reiciendis sit provident illum. Cumque ratione doloribus, distinctio ducimus ea blanditiis consequuntur laboriosam nisi, alias a, deleniti ipsam </p>
        <p>Lorem ipsum dolor sit, amet consectetur adipisicing elit. Reiciendis sit provident illum. Cumque ratione doloribus, distinctio ducimus ea blanditiis consequuntur laboriosam nisi, alias a, deleniti ipsam sint dolorem sequi modi.</p>
        <p>Lorem ipsum dolor sit, amet consectetur adipisicing </p>
        <p>Lorem ipsum dolor sit, amet consectetur adipisicing </p>
        <p>Lorem ipsum dolor sit, amet consectetur adipisicing elit. </p>
    </div>
    <div id="bigYellowCircle"></div>
    <div id="blueSquare"></div>
    <div id="greenPentagon"></div>
CSS
body{background: #222;}
h1{font-size: 40px; color: aliceblue; font-weight: bold; padding: 10px; margin: 40px;}
#content{padding: 20em; margin: 40px; background: rgba(255, 255, 255, .2);}
#content p{color: aliceblue; font: 24px; line-height: 35px;}
#bigYellowCircle{background: url(./img/yellow_circle.svg) no-repeat center center/90%; width: 100vw; height: 100vh; position: fixed; z-index: -1; top: 0; opacity: .7;}
#blueSquare{background: url(./img/blue_square.svg) no-repeat 97% bottom/50%; width: 100vw; height: 100vh; position: fixed; z-index: -2; top: 0; opacity: .7;}
#greenPentagon{background: url(./img/green_pentagon.svg) no-repeat 5% top/50%; width: 100vw; height: 100vh; position: fixed; z-index: -3; top: 0; opacity: .7;}
script
const bigYellowCircle=document.querySelector("#bigYellowCircle"),
    blueSquare=document.querySelector("#blueSquare"),
    greenPentagon=document.querySelector("#greenPentagon");
let xScrollPosition;
let yScrollPosition;
window.addEventListener("DOMContentLoaded", scrollLoop)
function setTranslate(xPos, yPos, el){//파라미터, 매개변수선언
    //""따옴표 문법
    //el.style.transform="translate3d("+ xPos + "," + yPos + "px, 0)"//0은 Z축
    //벡틱문법
    el.style.transform=`translate3d(${xPos}px,${yPos}px, 0)`;//px을 안써도 px을 기본인식
}

function scrollLoop(){
    xScrollPosition=window.scrollX;
    yScrollPosition=window.scrollY;
    //console.log(yScrollPosition);

    setTranslate(0, yScrollPosition * -0.2, bigYellowCircle)
    setTranslate(0, yScrollPosition * -1.5, blueSquare)
    setTranslate(0, yScrollPosition * 0.5, greenPentagon)
    requestAnimationFrame(scrollLoop); //웹브라우저에게 수행하기를 원하는 애니메이션을 알리고 업데이트하는 함수
}
HTML에서 작성한bigYellowCircle,blueSquare,greenPentagon를 변수로 지정한다. 각 변수 지정을 할 때마다const,let을 쓰기 싫을경우에는,를 써서 이어서 작성한 후 마지막;으로 마무리 하면 변수지정이 가능하다. 그 뒤에 만들어 놓은 변수는let xScrollPosition; let yScrollPosition;함수안에서 사용하기위해 만들어 놓았다. (전역변수를 사용하기 위해)
잠깐! [복습] 전역변수 & 지역변수 란?
- 전역변수 : 함수에 상관없이 프로그램 전체에서 사용할 수 있는 변수를 전역 변수라고 합니다.
- 지역변수 : 하나의 함수 안에서만 사용되는 변수를 지역 변수
*설명 : 예를 들어, 하나의 함수 내에서 이름을 정해 변수를 지정해주면 그것은 지역 변수가 됩니다. 그 함수 안에서만 사용할 수 있기 때문에 함수가 종료되면 지역 변수도 메모리에서 없어집니다.
반면, 변수를 함수 외부에서 선언하면 모든 함수에서 사용할 수 있는 전역 변수가 만들어 집니다. 특정하게 정해진 하나의 함수에서만 사용되는 지역 변수와는 달리 프로그램 전체에 있는 함수에서 사용될 수 있는 변수 입니다. 때문에, 프로그램이 종료되어야만 메모리에서 없어집니다.
이처럼 프로그램 내부, 어디에서 선언되느냐에 따라 특정 함수 안에서만 사용할 수 있는 것이 지역 변수이며, 제한 없이 프로그램의 모든 곳에서 사용할 수 있는 것이 전역 변수 입니다.
[네이버 지식백과] 전역변수, 지역변수 [global variable/local variable]다음 코드는
window.addEventListener("DOMContentLoaded", scrollLoop)
window에 이벤트를 선언한다. 문서 객체를 조작할때 사용하는DOMContentLoaded를 쓰고scrollLoop사용한다.function setTranslate(xPos, yPos, el){ el.style.transform=`translate3d(${xPos}px,${yPos}px, 0)`; }
functionsetTranslate함수를 만들고 괄호안에(xPos, yPos, el)파라미터 매개변수를 선언한다.
잠깐! [복습] 매개변수 란?
매개변수(parameter)와 인수(argument)
함수의 매개변수(parameter)란 함수를 호출할 때 인수로 전달된 값을 함수 내부에서 사용할 수 있게 해주는 변수입니다.
매개 변수가 있는 함수의 형식
: 함수에 변수값이 전달되어 처리해야 하는 경우가 있는데, 이렇게 함수에 전달되는 변수 '매개변수'라 한다.function 함수명(매개변수1, 매개변수2,...) { 실행문; } 함수명(매개변수1 값, 매개변수2 값,...);var 변수명 = function(매개변수1, 매개변수2,...) { 실행문; } 변수명(매개변수1 값, 매개변수2 값,...);[출처] http://www.tcpschool.com/php/php_function_parameter
[출처]https://jenny-daru.tistory.com/13
이어서
위는 벡틱으로 감싸서 작성하였고, 따옴표로 감싸서 작성할 경우와 비교를 해본다.
- 벡틱 (
``) 문법el.style.transform=`translate3d(${xPos}px,${yPos}px, 0)`;
- 따옴표 (
"") 문법el.style.transform="translate3d("+ xPos + "," + yPos + "px, 0)"참고로
px은 써도 되고 안써도 된다. 안써도 인식이 된다.function scrollLoop(){ xScrollPosition=window.scrollX; yScrollPosition=window.scrollY; setTranslate(0, yScrollPosition * -0.2, bigYellowCircle) setTranslate(0, yScrollPosition * -1.5, blueSquare) setTranslate(0, yScrollPosition * 0.5, greenPentagon) requestAnimationFrame(scrollLoop); }마지막 남은
scrollLoop함수 설명이다.xScrollPosition,yScrollPosition은 각window의scrollX와 Y의 값을 담았다. 위에서 만든setTranslate함수의xPos, yPos, el을 매개변수로 하여xPos는0을yPos는yScrollPositon* -0.2을el은bigYellowCircle을 넣어 총 3가지를 담았고requestAnimationFrame(scrollLoop);을 실행시켰다.
Scrolling More Loading
결과

스크롤을 끝까지 내리게 되면 다음 글이 로딩되어 나타나게 된다.

#가상데이터 Json Placeholder
이번 예제에서는 가상데이터인 jsonplaceholder라는 기능을 사용한다.
사용순서
jsonplaceholder검색 혹은 URL : http
s://jsonplaceholder.typicode.com/posts 주소로 들어간다.

- 메뉴에서
Guide를 선택한다.

- 하단으로 내리면
The available nested routes are가 나오고 하단에/posts/1/comments가 나온다.
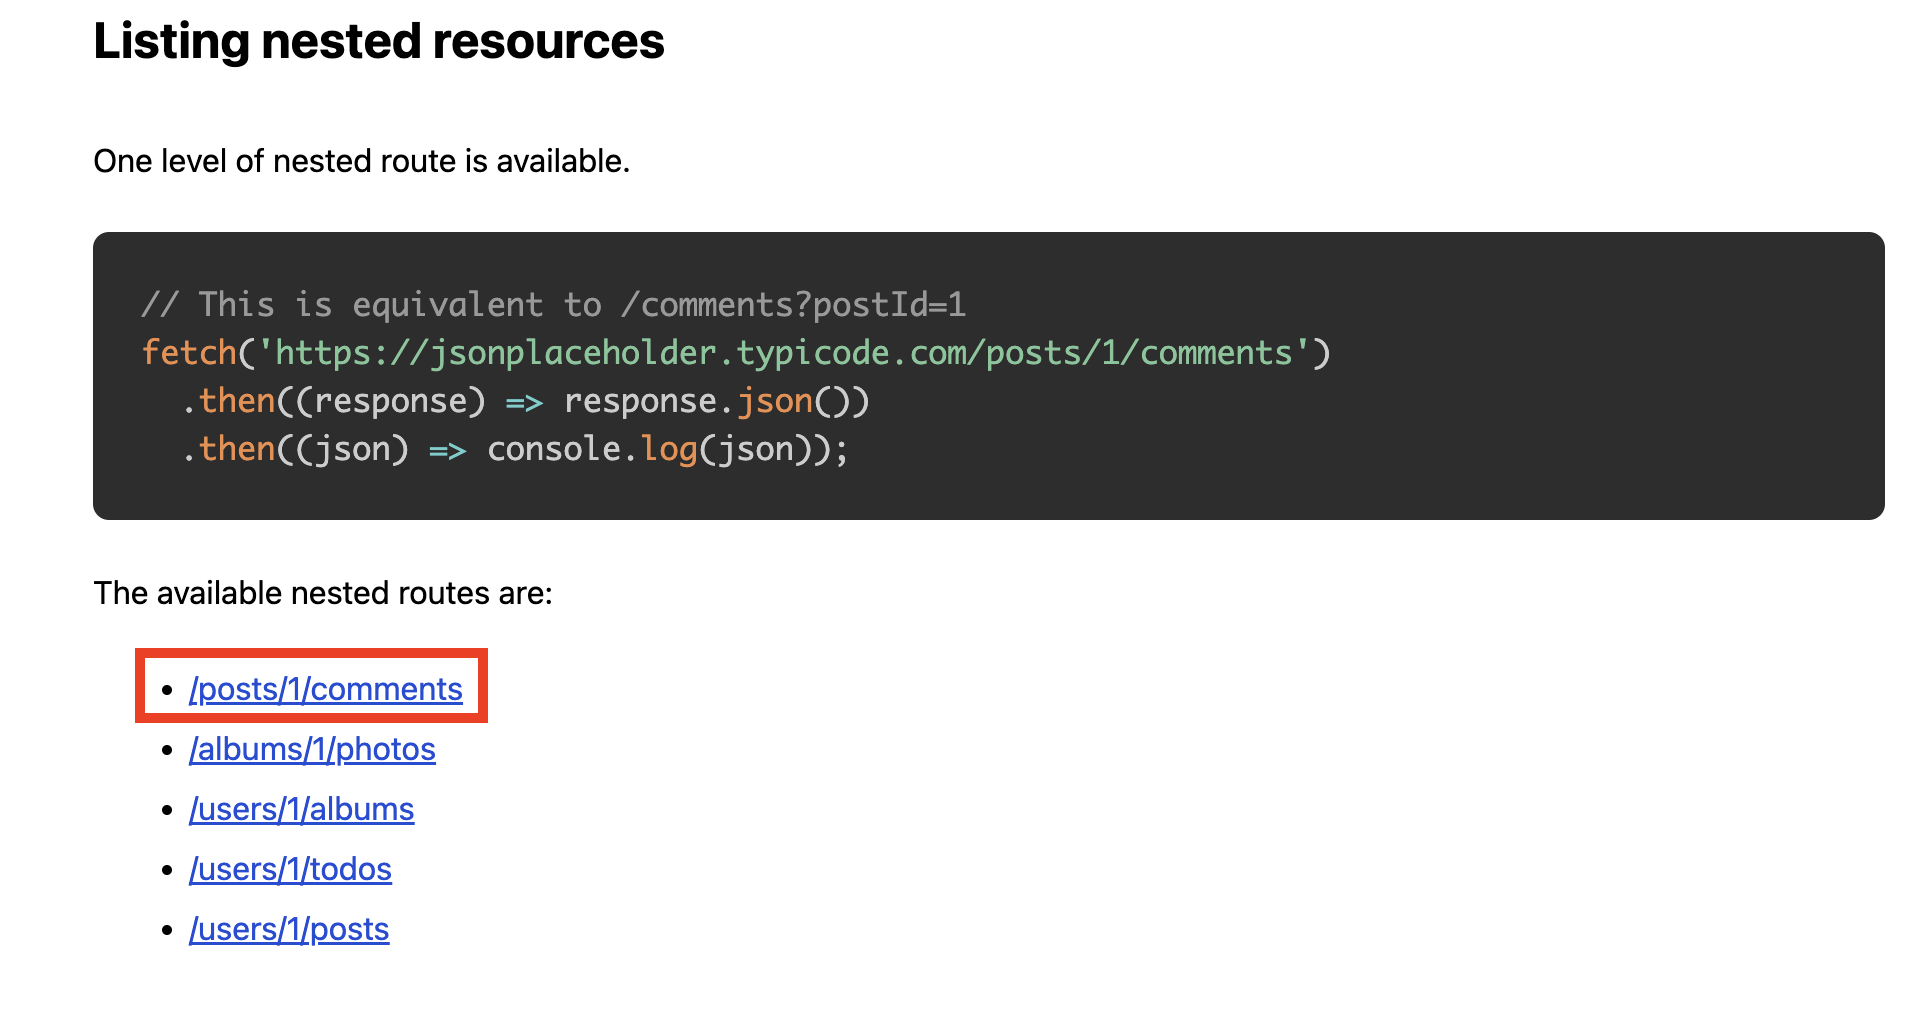
- 저 태그를 누르면
JSON데이터가 나오는데 우리는 더 많은JSON의 데이터가 필요하므로

https://jsonplaceholder.typicode.com/posts/1/comments가 아닌/1/comments를 지운https://jsonplaceholder.typicode.com/posts를 주소로 치고 들어간다.
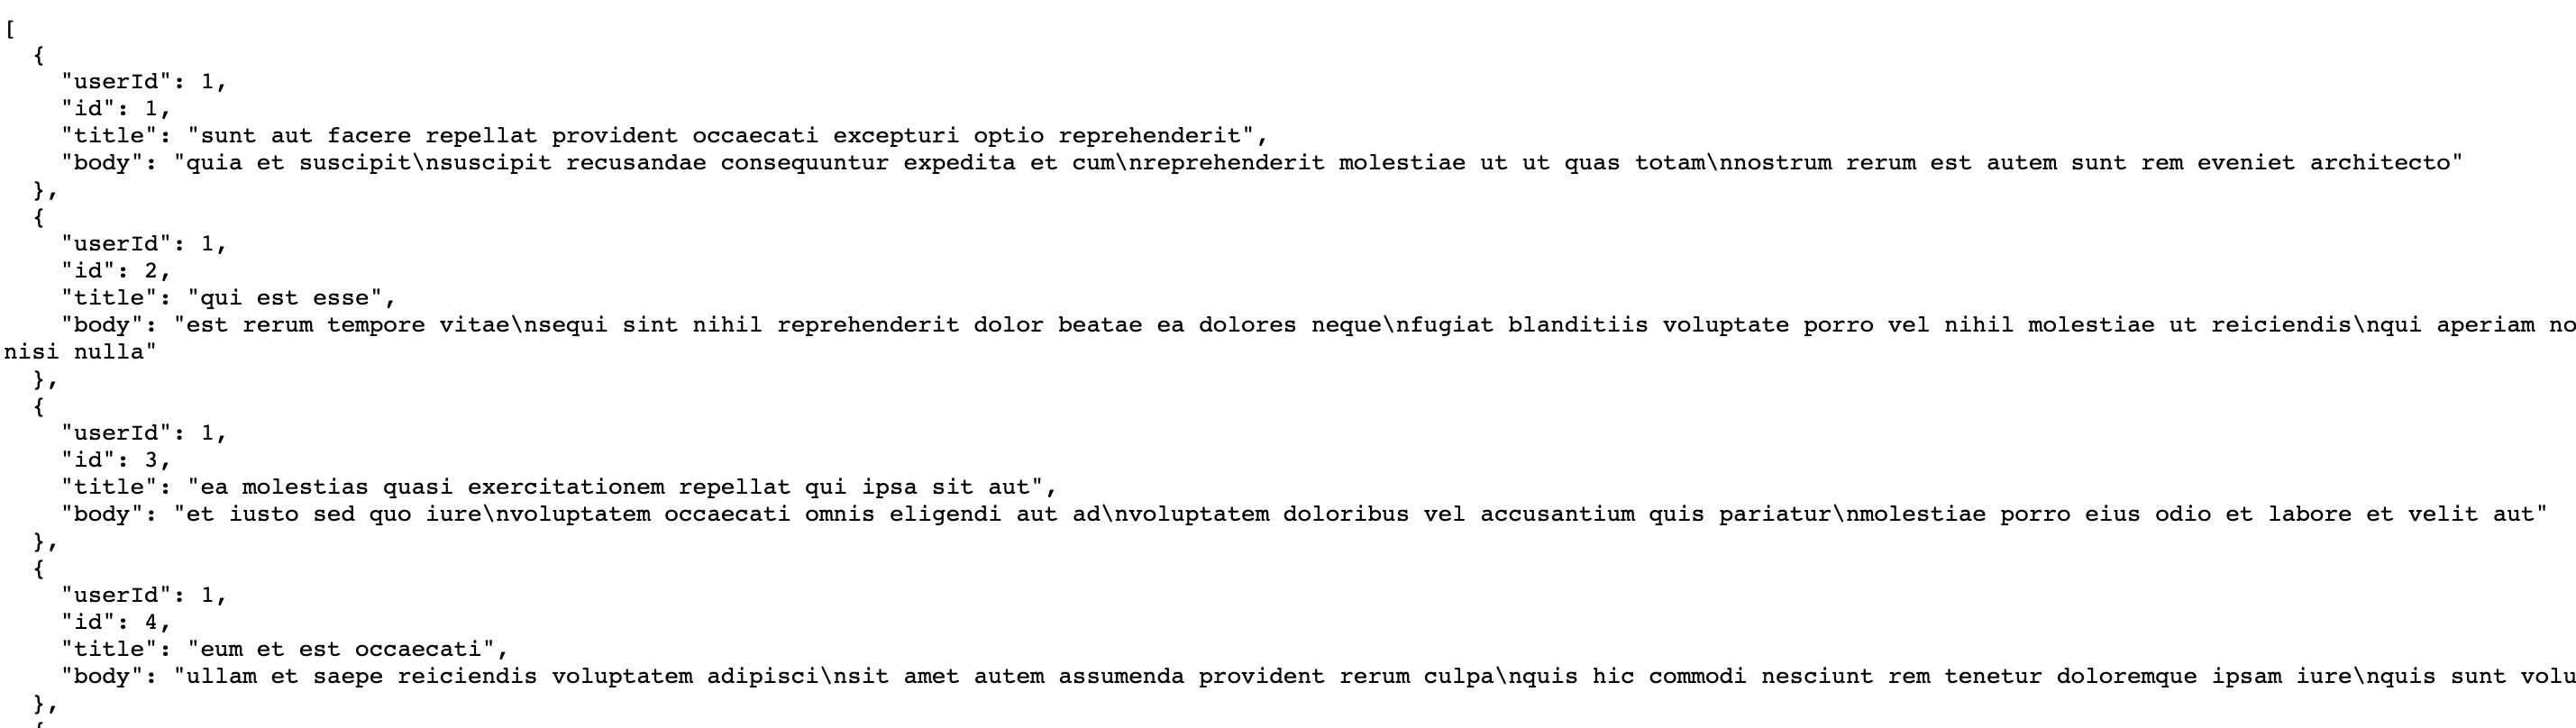
- 우리는 여기서
id,title,body를 가져올 것이다.
HTML
<h1>My The More</h1>
    <div class="filter-container">
        <input type="text" id="filter" class="filter" placeholder="찾기..." value="">
    </div>
    <div id="posts-container"><!-- 여기에 데이터를 받아온다 -->

    </div>
    <div class="loader">
        <div class="circle"></div>
        <div class="circle"></div>
        <div class="circle"></div>
    </div>
CSS
*{margin: 0; padding: 0; box-sizing: border-box;}
body{background: #fff; color: #fff; display: flex; flex-direction: column; align-items: center; justify-content: center; min-height: 100vh; padding-bottom: 100px; text-shadow: 0 2px 4px rgba(0, 0, 0, .3);}
h1{text-align: center; color: #222;}
.filter-container{margin-top: 20px; width: 80vw; max-width: 800px;}
.filter{width: 100%; padding: 12px; outline: none; border: none; border-radius: 5px; transition: .2s ease-in-out; box-shadow: 0 2px 4px rgba(0, 0, 0, .3); color: #222; font-weight: bold; text-shadow: 0 1px 10px rgba(0, 0, 0, .5);}
.filter:active{transform: scale(.99);}
.filter::placeholder{color: #222; text-shadow: 0 2px 4px rgba(0, 0, 0, .5); font-weight: bold; margin-left: 10px;}
.post{position: relative; background: #fff; box-shadow: 0 2px 4px rgba(0, 0, 0, .3); padding: 20px; border-radius: 5px; margin: 40px 0; display: flex; width: 80vw; max-width: 800px;}
.post .number{position: absolute; width: 40px; height: 40px; border-radius: 50%; background: #fff; top: -15px; left: -15px; color: #222; display: flex; align-items: center; justify-content: center; font-weight: bold; box-shadow: 0 2px 4px rgba(0, 0, 0, .3);}
.post .info{margin-left: 20px;}
.post .post-title{font-size: 20px; font-weight: bold; color: #222;}
.post .post-body{margin: 15px 0 0; line-height: 1.3; color: #222;}
.loader{display: flex; position: fixed; bottom: 50px; transition: .3s ease-in; opacity: 0;}
.loader.show{opacity: 1;}
.loader .circle{background: #fff; width: 10px; height: 10px; border-radius: 50%; margin: 5px; animation: bounce 0.5s ease-in infinite; box-shadow: 2px 2px 10px rgba(0, 0, 0, .9);}
.loader .circle:nth-of-type(2){animation-delay: .1s;}
.loader .circle:nth-of-type(3){animation-delay: .2s;}
@keyframes bounce{
    0%{transform: translateY(0);}
    50%{transform: translateY(-10px);}
    100%{transform: translateY(0);}
}
script
const filter=document.getElementById('filter');
const postsContainer=document.getElementById('posts-container');
const loading=document.querySelector('.loader');
let limit=5;
let page=1;
async function getPost(){
    const res=await fetch(
        `https://jsonplaceholder.typicode.com/posts/?_limit=${limit}&_page=${page}`
    );
    const data=await res.json();
    return data;
}
//showPosts();
async function showPosts(){
    const posts=await getPost();
    posts.forEach(post=>{
        const postEl=document.createElement('div');
        postEl.classList.add('post')
        postEl.innerHTML=`
            <div class="number">${post.id}</div>
            <div class="post-info">
                <h2 class="post-title">${post.title}</h2>
                <div class="post-body">${post.body}</div>
            </div>
        `;
        postsContainer.appendChild(postEl);
    })

}

//loading
function showLoading(){
    loading.classList.add('show');
    setTimeout(()=>{
        loading.classList.remove('show')
        setTimeout(()=>{
            page++;
            showPosts();
        },300)
    },1000);
}

showPosts();
window.addEventListener('scroll',()=>{
    const {scrollTop, scrollHeight, clientHeight} = document.documentElement;
    if(scrollTop + clientHeight >= scrollHeight /* - 5 */){
        showLoading();
    }
});

//filter
function filterPosts(e){
    const val=e.target.value.toUpperCase();
    const posts=document.querySelectorAll('.post');
    posts.forEach(post => {
        const title=post.querySelector('.post-title').innerText.toUpperCase();
        const body=post.querySelector('.post-body').innerText.toUpperCase();
        if(title.indexOf(val) > -1 || body.indexOf(val) > -1){
            post.style.display='flex'
        }else{
            post.style.display='none'
        }
    });
}
filter.addEventListener('input', filterPosts);
#Script 01
const filter=document.getElementById('filter');
const postsContainer=document.getElementById('posts-container');
const loading=document.querySelector('.loader');
let limit=5;
let page=1;
async function getPost(){
    const res=await fetch(
        `https://jsonplaceholder.typicode.com/posts/?_limit=${limit}&_page=${page}`
    );
    const data=await res.json();
    return data;
}
- 변수로
filter를 만든다.document안에 아이디filter를 선택한다.- 변수로
postsContainer를 만들고document안에 아이디posts-container를 선택한다. (여기에 데이터를 받아올 것이다.)- 변수로
loading을 만들고document안에 기본 선택자인querySelector로 클래스.loader를 선택한다.- 변수로
limit= 5로 만들어둔다.- 변수로
page= 1로 만들어둔다.
여기서 잠깐! 지금의 예제를 하기 앞서 [복습] 해야할 것이 있다.
#자바스크립트 비동기 처리
Promise,Fetch,Async,Await을 알아보자.
1.Promise: Promise는 JavaScript의 비동기 처리에 사용되는 객체로써 비동기로 처리되는 결과를 동기처럼 반환한다. 실제로 동기처럼 처리되는 것이 아니라 미래의 데이터 처리가 완료된 시점에 결과를 제공하겠다는 ‘약속(프로미스)’를 반환한다.
Promise를 사용하는 이유:
JavaScript에는 동기 작업과 비동기 작업이 있는데, 비동기로 처리되는 작업의 결과를 사용하기 위해 Promise 객체를 사용한다. 비동기 작업이 끝난 후의 결과를 이용해서 작업을 수행하려면 Promise 객체의 콜백함수로 작업을 지정해줘야 한다. 그래야 ‘순서를 보장’ 받을수 있다. 이러한 콜백함수가 너무 많아지면, 수정이 복잡해지고 코드의 가독성도 떨어지게 되는데 이를 ‘콜백지옥’이라고 한다.
콜백지옥을 방지하기 위해 then()을 이어붙여 콜백함수 작업을 처리할 수 있도록 만들 수 있다.
Promise예제function getData() { return new Promise((resolve, reject) => { // 비동기작업 fetch('데이터url', (response) => { resolve(response) }) }) } getData() .then(data => { console.log(data) }) .catch(err => { console.log(err) })Promise 작업의 결과는 resolve와 reject로 받을 수 있는데, Promise 작업이 성공했을 때는 resolve로 어떤 이유로 실패했을 때는 reject로 받는다.
Fetch: Fetch는 JavaScript 내장 API로 비동기 통신 네트워크를 가능하게 하는 기술이다. 비교적 최근에 나온 기술로 XMLHttpRequest 보다 훨씬 간단하고 보기에도 간결하다. jQuery.ajax()와도 비슷하지만 요즘 jQuery를 잘 안 쓰는 추세이므로, Fetch가 훨씬 많이 쓰이는 것 같다.
위의 Promise 예제처럼 new Promise 객체를 만들기보다 아래 예제와 같이 사용되는 사례가 많다. fetch 함수는 url로 요청을 보낸 결과로 Promise 객체를 반환한다.
Fetch의 특징 :
- Fetch로 반환되는 Promise 객체는 error를 reject 하지 않는다. 대신 ok 상태가 false인 resolve가 반환된다. 그러므로 reject를 이용하지 않고, 별도로 에러처리를 해주어야 한다.
- Fetch는 쿠키를 보내거나 받지 않는다. 쿠키를 전송하기 위해서는 자격증명(credentials) 옵션을 설정해주어야 한다.
Fetch예제fetch('데이터url') .then(response => { return response.json() }) .then(data => { console.log(data) }) .catch(err => { console.log(err) })
async&await: async와 await은 비동기 처리 API 중에 가장 최근에 도입된 문법으로 기존의 불편함을 보완하기 위해 나온 편리한 구문(Synthetic Sugar)이다. async와 await을 사용하는 이유를 알기 위해 다음의 코드를 보자.function callAsync() { const data = fetch('데이터url') if(data.id === 1) { console.log(data.name); } }위와 같은 함수가 있다고 할 때 콘솔창에는 과연 무엇이 나올까? fetch는 비동기로 동작하기 때문에 콘솔창의 결과는 장담할 수가 없다. 콜백함수로 처리해야만 결과를 보장받을 수 있다. 이의 단점을 보완하기 위해 등장한 것이 async와 await 이다.
위의 코드를 동작하게 하려면 아래와 같이 async와 await을 붙여주면 된다.
async&await예제async function callAsync() { const data = await fetch('데이터url'); if(data.id === 1) { console.log(data.name); } }async라고 비동기 함수를 선언해주고, 비동기 작업에 await를 붙여주면 그 뒤에 이 결과를 사용하는 작업에서 동기처럼 처리가 된다. 즉, 비동기 작업이 이루어진 후에 그 결과로 작업이 수행된다.
async&await예외처리 예제async function callAsync() { try{ const data = await fetch('데이터url'); if(data.id === 1) { console.log(data.name); } } catch (err) { console.log(err) } }결론
1. Promise 객체는 비동기 작업의 결과로 메소드 체이닝을 통해 then() / catch()를 이어붙여서 콜백함수를 대신할 수 있다.
2. async & await은 아예 비동기 작업을 동기적인 것처럼 만들어서 콜백함수 대신 동기적으로 코드를 작성할 수 있다.
3. 상황에 따라 맞는 방법을 택하자.
4. 그러나 또 이를 보완한 새로운 기술이 등장할 수 있다는 점을 명심하자...
[출처] https://babycoder05.tistory.com/entry/Promise-Fetch-Async-Await-%EC%97%90-%EB%8C%80%ED%95%B4-%EC%95%8C%EC%95%84%EB%B3%B4%EC%9E%90 덕분에 아주 잘 이해됐습니다. 감사합니다.
따라서 우리는
async&await으로 코드를 구성하였다.async function getPost(){ const res=await fetch( `https://jsonplaceholder.typicode.com/posts/?_limit=${limit}&_page=${page}` ); const data=await res.json(); return data; }로 구성했고
fetch안에 변수를 포함시키기 위해 수정했다. https://jsonplaceholder.typicode.com/posts 뒤에?_limit=${limit}&_page=${page}를 넣어 추가하였다.
위의 변수에let limit=5;,let page=1;이기 때문에 1페이지를 로드하면 5개씩 불러온다.
#Script 02
//showPosts();
async function showPosts(){
    const posts=await getPost();
    posts.forEach(post=>{
        const postEl=document.createElement('div');
        postEl.classList.add('post')
        postEl.innerHTML=`
            <div class="number">${post.id}</div>
            <div class="post-info">
                <h2 class="post-title">${post.title}</h2>
                <div class="post-body">${post.body}</div>
            </div>
        `;
        postsContainer.appendChild(postEl);
    })
}
//loading
//showLoading(); //로딩 클래스 추가만 만들어 준 것
function showLoading(){
    loading.classList.add('show');
    setTimeout(()=>{
        loading.classList.remove('show')
        setTimeout(()=>{
            page++;
            showPosts();
        },300)
    },1000);
}
showPosts();
#Script 01 에서는
async,await를 사용하여jsonplaceholder데이터를 불러오는 작업을 했고, 이제 #Script 02에서는 어디에 넣을 건지를 작성한다.
동일하게asyncfunction을 쓰고 그 함수의 이름을 우리는showPosts라고 지어주었다. 변수const posts=await getPost();를 지정하였고, 변수posts를forEach문으로 작성하였다.
[복습] forEach 문이란?
- 배열의 반복문
- 배열에서만 사용하는 메서드
- 배열의 처음부터 마지막 요소까지 반복하여 실행
- 인자로 콜백함수를 받아온다.
- 주어진 콜백함수를 배열 요소에 각각에 대해 실행
- querySelectorAll() 전체 선택자를 이용하여 주로 사용된다.
arr.forEach(callback(item, index, array) // 마지막 인자 array 는 배열로 거의 사용을 하지 않는다.forEach문 예제
const food=['🍓','🍉','🍖','🍙'];
food.forEach(function(el, idx){
	console.log(el, idx);
    });
//결과
🍓 0
🍉 1
🍖 2
🍙 3
const food=['🍓','🍉','🍖','🍙'];
food.forEach(function(el){
console.log(el);
});
//결과
🍓
🍉
🍖
🍙
forEach문으로 작성하였다. 이어서post=> 화살표 함수 안에postEl이라는 변수 생성을 한다. 가지고 올 데이터를 넣기위해createElement를 사용하여div를 생성하는 변수를 만들었고 거기에style을 넣기위해 클래스 추가를post를 넣었다. 다시postEl에innerHTML을 하여 안에 들어갈 태그를 써준다.<div class="number">${post.id}</div> <div class="post-info"> <h2 class="post-title">${post.title}</h2> <div class="post-body">${post.body}</div> </div>이렇게 작성을 해주고 사이에
``벡틱으로 감싼다. 따라서 데이터를 불러오면$ {post.title},$ {post.body}는 JsonPlaceholder 에서 가져온 가상 데이터https://jsonplaceholder.typicode.com/posts/?_limit=${limit}&_page=${page}여기에서 가져오는 배열이며 안에는 이렇게 구성이 되어있는걸 위에서 확인했다.
{
    "userId": 1,
    "id": 1,
    "title": "sunt aut facere repellat provident occaecati excepturi optio reprehenderit",
    "body": "quia et suscipit\nsuscipit recusandae consequuntur expedita et cum\nreprehenderit molestiae ut ut quas totam\nnostrum rerum est autem sunt rem eveniet architecto"
  },
  {
    "userId": 1,
    "id": 2,
    "title": "qui est esse",
    "body": "est rerum tempore vitae\nsequi sint nihil reprehenderit dolor beatae ea dolores neque\nfugiat blanditiis voluptate porro vel nihil molestiae ut reiciendis\nqui aperiam non debitis possimus qui neque nisi nulla"
  },
저기에서
$ {post.title},$ {post.body}는 post 안에 > title 과 body 배열을 가져온다는 의미이다.
그런다음 자바스크립트에서 위의 변수를 지정해준postsContainer의appendChild에postEl를 넣어준다.postsContainer.appendChild(postEl);다음은 데이터가 나타나기전 로딩이 되는부분이다.
코드는 아래//loading //showLoading(); //로딩 클래스 추가만 만들어 준 것 function showLoading(){ loading.classList.add('show'); setTimeout(()=>{ loading.classList.remove('show') setTimeout(()=>{ page++; showPosts(); },300) },1000); } showPosts();
functionshowLoading을 만들어 주었고loading이 되면show클래스를 추가한다. Loading의 효과를 주기위함과 데이터를 안전하게 로드하기위해 시간지연 처리를setTimeout을 사용하고 1초의 효과를 주며 1초간loading이 되는동안 안에서 또다른setTimeout을 사용하여 0.3 초간 변수page를 1씩 증가시키고showPosts함수를 실행시킨다.즉 함수
showLoading과 함수showPosts은 아래와 같이 동작하게 될거지만 아직scroll이벤트가 없기때문에 저렇게 동작이 되려면 하나가 더 필요하다.!


#Script 03
window.addEventListener('scroll',()=>{
    const {scrollTop, scrollHeight, clientHeight} = document.documentElement;
    if(scrollTop + clientHeight >= scrollHeight /* - 5 */){
        showLoading();
    }
});
//filter
function filterPosts(e){
    const val=e.target.value.toUpperCase();
    const posts=document.querySelectorAll('.post');
	posts.forEach(post => {
        const title=post.querySelector('.post-title').innerText.toUpperCase();
        const body=post.querySelector('.post-body').innerText.toUpperCase();
        if(title.indexOf(val) > -1 || body.indexOf(val) > -1){
            post.style.display='flex'
        }else{
            post.style.display='none'
        }
    });
}
filter.addEventListener('input', filterPosts);
window의addEventListenerscroll이벤트 함수를 만든다.
변수는 구조분해할당을 하여 지정하는데...
[복습] 구조분해할당이란?
구조 분해 할당 구문은 배열이나 객체의 속성을 해체하여 그 값을 개별 변수에 담을 수 있게 하는 JavaScript 표현식이고 배열 구조 분해 할당은 배열이나 객체의 속성을 해체하고 그 값을 개별 변수에 담을 수 있게 하는 표현식이다. 배열 혹은 객체에서 값이나 프로퍼티를 분해하여 쉽게 별도의 변수에 담을 수 있기 때문에 javascript에서 매우 유용하게, 많이 사용되는 문법중 하나이다. 특별한 문법적 형태가 있는 것이 아닌 할당받을 변수를 왼쪽에, 분해할 대상을 오른쪽에 대입하는 형식으로 작성할 수 있다.
1. 배열에 구조 분해 할당하기
- 배열에서 구조 분해를 할당하게 되면 배열의 값(value, element)을 각 변수에 할당해준다.
- 만약 구조 분해를 할당 할 변수가 element의 개수보다 부족하면 가장 앞의 값부터 변수에 할당해 준다.
//예제1
let [x, y, z] = [10, 20, 30];
console.log("x: ", x, "y: ", y, "z: ", z)

//결과
x:10 , y:20, z:30
//예제2
let [x, y] = [10, 20, 30];
console.log("x: ", x, "y: ", y, "z: ", z);
console.log("z: ", z);
//결과
x:10, y:20
z is not defined 오류
z라는 변수로 할당된 값이 없기 때문에 error가 발생한다.2. 객체에 구조 분해 할당하기
- 이미 선언된 객체(또는 배열)에 구조 분해를 할당할 수 있다.
- 객체의 구조 분해는 객체 내부의 프로퍼티명과 동일한 이름의 변수에 자동으로 할당된다.
- 객체를 구조 분해 할 경우 프로퍼티를 기준으로 하기 때문에 배열의 구조 분해와 달리 순서가 바뀌어도 문제없이
해당 프로퍼티의 값을 가져올 수 있다. - 객체의 프로퍼티명이 아닌 새로운 변수에 할당하고싶으면 { 기존 프로퍼티명:새 프로퍼티명}의 방식으로 할당할 수 있다.
 let data = {
    name: "Jane",
    age: 22,
  };
  let { age, name } = data;
  console.log("객체 구조 분해1 : ", name, age);

  let { name: userName, age: userAge } = data;
  console.log("객체 구조 분해2 : ", userName, userAge);

  let { name: userName2 } = data;
  console.log("객체 구조 분해3 : ", userName2);

//결과
객체 구조 분해1: jane, 22
객체 구조 분해2: jane, 22
객체 구조 분해3: jane
[출처] https://blog.naver.com/microfun/222707915362
변수는 구조 분해 할당을 하여 지정하는데... 를 이어 우리는 구조 분해 할당을 하여
scrollTop,scrollHeight,cliientHeight를 넣을 것이다.
[복습] scrollHeight, clientHeight, offsetHeight 의 차이
웹페이지 또는 요소의 높이값 정보를 얻는 속성은 대표적으로 clientHeight , offsetHeight , scrollHeight가 있다. 세 속성은 어떤 경우에는 같은 값을 보여주지만, 어떤경우에는 다른 값을 보여준다. 각 속성의 값의 의미는 다음과 같다.
1. clientHeight : 요소의 내부 높이이다. Padding 값 포함 ScrollBar , border(테두리) , Margin 은 제외
2. offsetHeight : 요소의 높이이다. Padding , ScrollBar , border(테두리) 값 포함 Margin 은 제외
3. scrollHeight : 요소에 들어있는 컨텐츠의 전체 높이 Padding , border(테두리) 값 포함 Margin 은 제외
#그림으로 표현하면 아래와 같다.
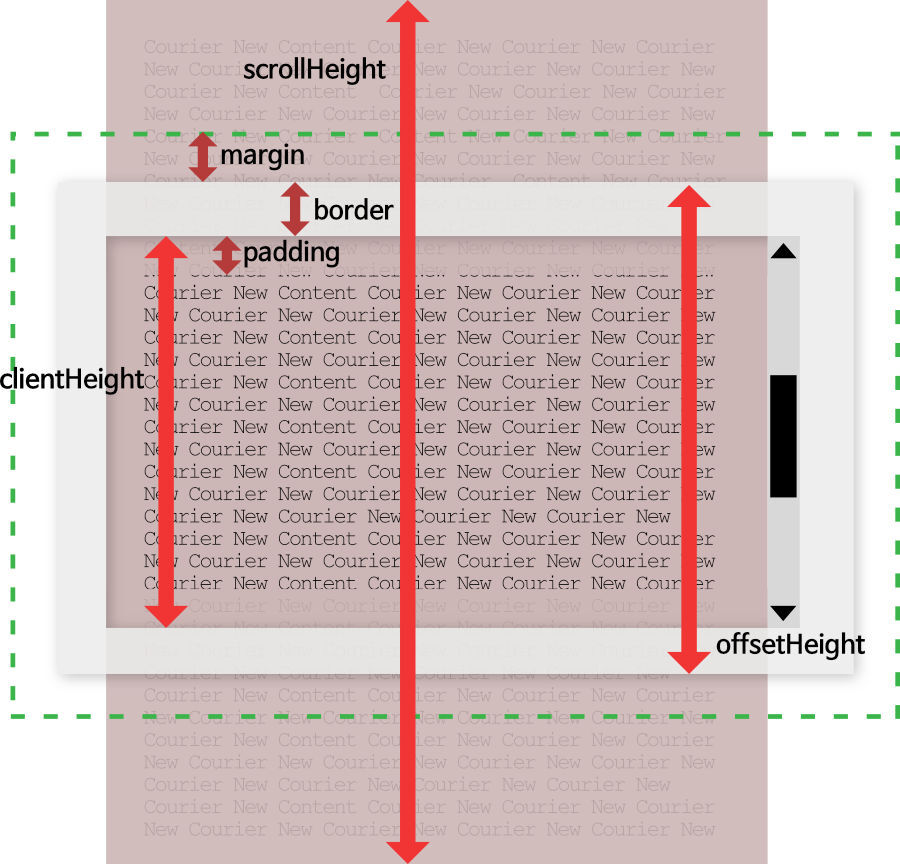
세 속성 모두 정수값으로 표현되고, 마진값은 공통적으로 제외됨 offsetHeight 는 CSS 요소의 높이를 지정할 때 정해지는 높이이다. Padding과 border(테두리)가 포함되며 box-sizing 속성 값에 따라 패딩 테두리 값이 제외될 수 있으므로 주의해야 함. 요소가 감춤 상태인 경우 offsetHeight는 0을 반환한다.
[출처] https://blogpack.tistory.com/706
구조 분해 할당을 하여
scrollTop,scrollHeight,cliientHeight를 넣을 것이다. 를 이어서.. 3개의 높이 값을 한번에document.documentElement에 담는다. 담은 변수를 가지고if 조건문을 만드는데
조건문은 아래와 같다.if(scrollTop + clientHeight >= scrollHeight){ showLoading(); }설명을 하자면 이렇다.
scrollTop은 0 부터 시작해서 스크롤을 내리면 실시간 Y축 좌표를 알려준다.
scrollHeight는 스크롤전체 높이값,cliientHeight는 현 화면에 보이는 높이값 (vh개념과 비슷? 해보인다 )
스크롤을 내릴수록scrollTop값은 늘어나고cliientHeight화면에 보이는 높이값에 도달하면 그 두개의 합은 전체 스크롤 포함 높이값인scrollHeight와 같거나 크게되고 그렇게 되면 함수showLoading이 실행되는 조건문이다.
#아래영상을 다시 참고해보자.
이렇게 까지가 배열데이터를 담아 스크롤이 끝까지 도달하게 되면 새로운 배열이 로딩되는 구성이다. 다음은filter부분이다.
아래와 같이 해당되는 텍스트를 검색하는 기능이다.
function filterPosts(e){
    const val=e.target.value.toUpperCase();
    const posts=document.querySelectorAll('.post');
	posts.forEach(post => {
        const title=post.querySelector('.post-title').innerText.toUpperCase();
        const body=post.querySelector('.post-body').innerText.toUpperCase();
        if(title.indexOf(val) > -1 || body.indexOf(val) > -1){
            post.style.display='flex'
        }else{
            post.style.display='none'
        }
    });
}
filter.addEventListener('input', filterPosts);
함수
filterPosts를 만든다. 변수는valevent인e의target.value는toUpperCase문자열을 대문자로 변환해 반환한다.
*value는value( );로 쓰는데 뒤에 메서드가 붙으면( );를 생략하고value.toUpperCase( );를 써도 된다.
다음 변수posts는.post가상 생성태그인 div 클래스이다. (함수showPosts에createElement('div')의 클래스이다.)
posts의 배열forEach문을 쓰고const title=post.querySelector('.post-title').innerText.toUpperCase(); const body=post.querySelector('.post-body').innerText.toUpperCase();각
title,body의 변수를 만들고if 조건문을 만든다.if(title.indexOf(val) > -1 || body.indexOf(val) > -1){ post.style.display='flex' }else{ post.style.display='none' }다음 이 조건문의 풀이는 이렇다. title의
indexOf에 -1보다 크거나 body의indexOf에 -1보다 크거나 이다.-1이란 배열에서예제) [0,1,2,3] 에서 4를 찾는다면 없으므로 -1의 값이 나오기 때문이다.고로
-1보다 크다는 의미는 배열에 입력된 값이 있다는 말이 그게 아니라면 배열에 없다는 의미이다.
true라면display='flex'false라면display='none'이 되는 조건문이다.이렇게 만들어진 조건문은 함수
filterPosts에 담아두고filter.addEventListener('input', filterPosts);
filter의input이벤트는 함수filterPosts를 실행하는 문구를 작성해주면 필터가 완성된다.