안녕하세요 Niro 🚗 입니다!
DO SOPT 33기 에서 앱잼 기간동안 TOASTER 라는 iOS 앱을 제작했습니다!
약 2주동안 합숙을 진행하면서 많은 추억도 쌓고 개발 능력도 향상시킬 수 있었던 좋은 경험이였고 이번 글은 프로젝트 회고 겸 여러웠고 고심했던 부분들을 정리하고자 적게 되었습니다!
내용이 굉장히 많아서 3개로 나눠서 작성을 하게 될거 같으니... 많은 관심 부탁드리고 링크도 걸어두었으니 다운받아서 직접 사용도 해보시고 피드백 남겨주세요!!
⬇️ 들어가기 앞서서
최근 앱 서비스의 로그인 및 회원가입은 외부 서비스 (Kakao, Naver, Apple, Google) 를 이용해 빠르게 서비스를 이용할 수 있는 것이 특징입니다.
이처럼 자사의 서비스를 이용할 수 있도록 소셜 로그인 종류는 늘어나는 추세입니다. 개발자 입장에서 생각해보면 소셜 로그인을 자사 앱에 적용하는 작업은 귀찮은 일이 될 수도 있습니다.
만약 플랫폼에 종속되는 로그인을 구현하게 되면 어떻게 될까요?
자주 사용하는 Kakao 나 Apple 의 소셜 로그인 API 경우 과정이 다를 뿐더러 로그인 시 반환받는 결과도 다릅니다.
움... 이번 프로젝트가 로그인 로직 구현을 담당한 두번째 프로젝트였습니다.
다른 소셜 로그인을 추가해 달라는 팀원의 요청에 기존 로그인 로직을 완전히 바꿨던 경험을 통해 이번 프로젝트는 더욱 효율적으로 구현해보고자 다음과 같이 진행하였습니다!
🔌 Adapter Pattern 을 적용해보자!
위에서 설명했던 문제점을 통해 “어떤 Pattern 이 효율적일까?” 를 많이 고민했습니다. 팀원의 어떤 요청에도 유연하게 대처할 수 있도록 다양한 패턴 중 Adapter 패턴을 적용시키는 것으로 확정하였습니다.
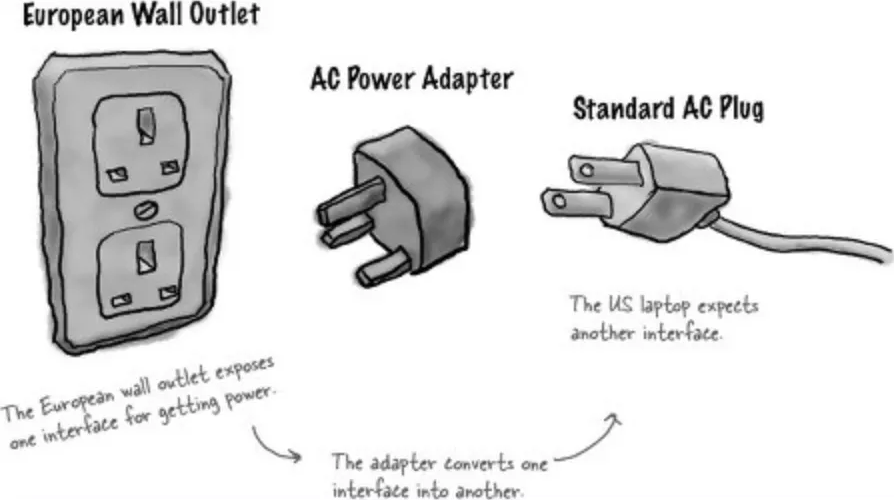
Adapter 라는 이름은 친숙할거라 생각합니다.
우리는 해외 여행을 갈때 콘센트가 호환이 되지 않아 전자제품을 사용하지 못합니다. 그렇다고 해당 규격에 맞는 제품을 사지는 않죠!
다른 나라에서도 사용할 수 있도록 변환 어댑터를 사용하는 것처럼 Adapter 패턴은 이름 그대로 흔히 볼 수 있는 어댑터를 의미합니다.
즉, 서로 호환이 안되는 여러 유형들끼리 함께 연결시킬 수 있도록 도와주는 패턴입니다.
위에서 설명한 것처럼 로그인(콘센트) 을 하기 위해 다양한 플랫폼(전자제품) 을 사용하지만 전혀 다른 방식으로 구현이 되어 있기 때문에 호환이 되지 않은 단점이 있었습니다.
이러한 단점을 해결하고자 Adapter 패턴을 적용하였고 다음과 같은 상황에서 가장 효율적으로 사용할 수 있을 거 같다고 생각합니다.
수정이 불가능한 외부 라이브러리, 즉 Third Party 를 사용할 때, 서로 호환이 불가능한 상황일 때 가장 빛을 낸다 생각합니다.
⌨️ 어떻게 적용했는데?
첫번째로 AuthenticationAdapterProtocol 을 구현했습니다.
protocol AuthenticationAdapterProtocol {
    var adapterType: String { get }

    func login() async throws -> SocialLoginTokenModel

    func logout() async throws -> Bool
}
앱의 요구사항 중 어떤 소셜로그인을 했는지 알고 있어야 했고 로그인과 로그아웃은 공통적인 기능이고 어떤 Adapter 를 사용하던 Protocol 의 login 메서드를 사용하기 때문에 재사용성과 일관된 인터페이스를 제공할 수 있습니다.
해당 기능을 Adapter 내에서 구현할텐데 굳이 Protocol 로 빼서 구현을 해야하나?
라는 의문을 갖기도 했지만 아래의 장점을 읽어본다면 의문은 사라지게 될거라 생각합니다.
😱 Protocol 을 사용하면 좋은 점!
- 다형성 반영
각 Adapter 가 해당 Protocol 을 채택하면 우리는 일관적인 방식으로 Adapter 를 다룰 수 있게 됩니다. 즉, Adapter 내부의 세부 사항에 대해 신경 쓰지 않고도 Protocol 에 정의된 메서드를 호출하게 되는 것이죠!- 유연성과 확장성
새로운 Social Login 을 추가하거나 기존의 서비스가 변경되더라도 클라이언트 코드를 변경하지 않고 새로운 Adapter 를 추가하거나 기존 Adapter 를 수정가능하기 때문에 코드의 유연성과 확장성을 증가시키고 새로운 요구사항에 빠르게 대응을 할 수 있는 장점이 있습니다!- 의존성 역전 원칙
클라이언트 코드는 Adapter Protocol 만 의존하기 때문에 구체적인 Adapter 에 대한 의존성이 낮아지기 때문에 유지보수 및 수정이 더욱 쉬워집니다.
🔌 소셜 로그인 Adapter 만들기
앱 요구사항은 Kakao 와 Apple 로그인 두가지로 AuthenticationAdapterProtocol 을 채택한 AppleAuthenticateAdapter 와 KakaoAuthenticateAdapter 를 구현하였습니다.
🥥 KakaoAuthenticateAdapter
import KakaoSDKAuth
import KakaoSDKUser

final class KakaoAuthenticateAdapter: NSObject, AuthenticationAdapterProtocol {

    var adapterType: String {
        return "Kakao Adapter"
    }

    func login() async throws -> SocialLoginTokenModel {
        /// 카카오톡 어플리케이션이 설치가 되어 있는지 확인
        if UserApi.isKakaoTalkLoginAvailable() {
            do {
                let result = try await getLoginToken()
                return result
            } catch {
                print("Error during KakaoTalk login: \(error)")
                throw error
            }
        } else {
            do {
                let result = try await getTokenKakaoAccount()
                return result
            } catch {
                print("Error during Kakao account: \(error)")
                throw error
            }
        }
    }

    func logout() async throws -> Bool {
        return try await withCheckedThrowingContinuation { continuation in
            UserApi.shared.logout {(error) in
                if let error = error {
                    print(error)
                    continuation.resume(throwing: error)
                } else {
                    print("KakaoTalk Logout success.")
                    continuation.resume(returning: true)
                }
            }
        }
    }

    /// 카카오톡 간편로그인을 통해 토큰을 받아오는 메서드
    @MainActor
    func getLoginToken() async throws -> SocialLoginTokenModel {
        return try await withCheckedThrowingContinuation { continuation in
            UserApi.shared.loginWithKakaoTalk {(oauthToken, error) in
                if let error = error {
                    print(error)
                    continuation.resume(throwing: error)
                } else {
                    print("KakaoTalk Login success.")

                    let accessToken = oauthToken?.accessToken
                    let refreshToken = oauthToken?.refreshToken

                    continuation.resume(returning: SocialLoginTokenModel(accessToken: accessToken, refreshToken: refreshToken, identityToken: nil))
                }
            }
        }
    }

    /// 카카오톡 간편로그인을 할 수 없는 경우 웹에서 이메일로 로그인 해서 토큰을 받아오는 메서드
    @MainActor
    func getTokenKakaoAccount() async throws -> SocialLoginTokenModel {
        return try await withCheckedThrowingContinuation { continuation in
            UserApi.shared.loginWithKakaoAccount {(oauthToken, error) in
                if let error = error {
                    print(error)
                    continuation.resume(throwing: error)
                } else {
                    print("KakaoAccount Login success.")

                    let accessToken = oauthToken?.accessToken
                    let refreshToken = oauthToken?.refreshToken

                    continuation.resume(returning: SocialLoginTokenModel(accessToken: accessToken, refreshToken: refreshToken, identityToken: nil))
                }
            }
        }
    }
}
Kakao 로그인을 구현하기 위해 다음과 같이 Adapter 를 구현하였습니다.
첫번째 중요한 점은 다른 비동기 패턴 사용 이였습니다.
프로젝트 내에서 Async / await 를 사용하고 있었고 KakaoSDK 는 콜백 기반의 비동기 패턴을 사용하고 있었기 때문에 서로 호환이 되지 않았습니다.
KakaoSDK 내부의 코드를 변경할 수는 없기 때문에 Async / await 에서는 콜백 기반의 비동기 패턴을 사용하는 곳에 withCheckedThrowingContinuation 메서드를 래핑하고 continuation 객체를 사용해서 해당 작업의 성공과 에러를 전달할 수 있게 구현하였습니다.
즉, 기존 콜백 기반 비동기 코드를 async / await 와 호환이 가능하게 만들어 줍니다.
두번째는 MainActor 의 사용입니다.
getLoginToken 와 getTokenKakaoAccount 메서드는 토큰을 받아오는 메서드라 설명을 하였지만 로그인 과정 중 카카오톡을 띄우는 알림 창이나 로그인을 하는 웹을 띄우기 때문에 Main Thread 에서 동작을 해야합니다.
우리는 UI 관련 작업을 Main Thread 에서 동작해야한다는 것을 알고 있습니다.
비동기 처리를 하는 곳에서 MainThread 로 옮기는 코드인 DispatchQueue.main.async 을 사용했었죠!
하지만 Swift 5.5 부터 적용된 Concurrency 에서 새로나온 MainActor 는 함수 또는 프로퍼티가 Main Thread 에서 관리되어야 한다는 것을 알려주는 역할을 하게 됩니다.
개발자가 직접 코드를 작성해서 Thread 를 변경하도록 신경써야 했지만 간단한 어트리뷰트를 통해 Main Thread 에서 동작하도록 할 수 있기 때문에 오류를 사전에 방지할 수 있게 됩니다!
결과적으로, MainActor 는 UI 와 관련한 작업을 담당하게 되고 Main Thread 에 실행되도록 보장을 합니다.
🍎 AppleAuthenticateAdapter
import AuthenticationServices

final class AppleAuthenticateAdapter: NSObject, AuthenticationAdapterProtocol {
    var adapterType: String {
        return "Apple Adapter"
    }

    private var authorizationContinuation: CheckedContinuation<SocialLoginTokenModel, Error>?

    func login() async throws -> SocialLoginTokenModel {
        return try await withCheckedThrowingContinuation { continuation in
            self.authorizationContinuation = continuation

            let request = ASAuthorizationAppleIDProvider().createRequest()
            request.requestedScopes = [.fullName]

            let controller = ASAuthorizationController(authorizationRequests: [request])
            controller.delegate = self
            controller.presentationContextProvider = self
            controller.performRequests()
        }
    }

    func logout() async throws -> Bool {
        print("로그아웃")
        return true
    }
}

extension AppleAuthenticateAdapter: ASAuthorizationControllerDelegate {
    /// Apple ID 연동 성공 시
    func authorizationController(controller: ASAuthorizationController, didCompleteWithAuthorization authorization: ASAuthorization) {
        switch authorization.credential {
        case let appleIDCredential as ASAuthorizationAppleIDCredential:
            let userIdentifier = appleIDCredential.user
            let fullName = appleIDCredential.fullName
            let idToken = appleIDCredential.identityToken ?? Data()
            if let tokenString = String(data: idToken, encoding: .utf8) {
                print("User ID : \(userIdentifier)")
                print("User Name : \((fullName?.givenName ?? "") + (fullName?.familyName ?? ""))")
                print("token : \(tokenString)")

                UserDefaults.standard.set(userIdentifier, forKey: Config.appleUserID)

                authorizationContinuation?.resume(returning: SocialLoginTokenModel(accessToken: nil, refreshToken: nil, identityToken: tokenString))
            } else {
                authorizationContinuation?.resume(throwing: LoginError.failedReceiveToken)
            }
            authorizationContinuation = nil

        default:
            break
        }
    }

    /// Apple ID 연동 실패 시
    func authorizationController(controller: ASAuthorizationController, didCompleteWithError error: Error) {
        authorizationContinuation?.resume(throwing: error)
        authorizationContinuation = nil
    }
}

extension AppleAuthenticateAdapter: ASAuthorizationControllerPresentationContextProviding {
    func presentationAnchor(for controller: ASAuthorizationController) -> ASPresentationAnchor {
        // 필요한 window 반환, 대부분의 경우 현재 앱의 메인 window를 반환
        if let windowScene = UIApplication.shared.connectedScenes.first as? UIWindowScene {
            return windowScene.windows.first ?? UIWindow()
        }
        return UIWindow()
    }
}
다음은 Apple 로그인을 구현하기 위해 다음과 같이 Adapter 를 구현하였습니다.
첫번째 어려움은 구현해보니 ASAuthorizationControllerDelegate 으로 사용자 정보와 인증 토큰을 받게 되는데 login 메서드의 반환값으로 사용하고 싶었지만 불가능했습니다...
정석적인 방법은 아니지만
Continuation을 통해 해결을 해보았습니다.
위에서 설명드린 것 처럼 기존을 콜백 기반의 비동기 작업을 Async / await 로 변환하여 사용할 수 있도록 withCheckedThrowingContinuation 를 제공합니다.
final class AppleAuthenticateAdapter: NSObject, AuthenticationAdapterProtocol {
    private var authorizationContinuation: CheckedContinuation<SocialLoginTokenModel, Error>?

    func login() async throws -> SocialLoginTokenModel {
        return try await withCheckedThrowingContinuation { continuation in
            self.authorizationContinuation = continuation
			//...
        }
    }
}

extension AppleAuthenticateAdapter: ASAuthorizationControllerDelegate {
    func authorizationController(controller: ASAuthorizationController, didCompleteWithAuthorization authorization: ASAuthorization) {
    	//...
        authorizationContinuation?.resume(returning: SocialLoginTokenModel(accessToken: nil, refreshToken: nil, identityToken: tokenString))
        //...
    }
}AppleAuthenticateAdapter내에서 접근할 수 있는authorizationContinuation을 선언해줍니다.authorizationContinuation?.resume을 통해 전달되는 값이withCheckedThrowingContinuation메서드가 해당 결과를 기다립니다.- Continuation 을 통해 전달된 결과가 비동기 작업의 완료와 함께
login메서드로 전달됩니다.
위의 과정을 통해 Delegate 로 실행이 되어 발생하는 결과값을 Continuation 을 통해 흐름을 제어하고 에러를 처리할 수 있도록 변경하였습니다.
📌 정리하자면
프로젝트에서 소셜 로그인을 효율적으로 구현하기 위해 Adapter 패턴을 적용했던 회고를 적어보았습니다.
소셜 로그인을 구현하면서 얻을 수 있었던 것은
첫번째, Protocol 의 중요성입니다.
- Protocol 을 구현하여 각 Adapter 에 채택하여 클라이언트 코드와 비즈니스 로직 간의 결합도를 감소 시킬 수 있었습니다.
- Protocol 의 메서드를 통해 다른 Adapter 라도 동일한 인터페이스를 제공할 수 있었습니다.
- 각 소셜 로그인의 동작이 변경되더라도 해당 Adapter 만 변경하면 되기 때문에 유지보수 용이성을 증가시킬 수 있었고 추가하거나 삭제하는 작업에 있어 유연성과 확장성을 확보할 수 있었습니다.
- 각 Adapter 에 의존적이지 않고 Protocol 에 의존하기 때문에 의존성 역전이 되어 유지보수와 수정이 더욱 쉬워졌습니다.
두번째, 각 Adapter 만들면서 고민했던 부분입니다.
- 라이브러리 내의 기존 콜백 기반의 비동기 로직을 수정할 수 없기 때문에 Async / await 와 호환될 수 있도록 Continuation 를 사용하여 해결했습니다.
- Delegate 패턴을 통해 얻은 결과를 Protocol 의 메서드에서 전달받을 수 있도록 Continuation 을 커스텀 하였습니다.
- Async / await 을 사용하고 있어 통일성 있게 코드를 작성하기 위해 UI 관련에 대한 작업을 DispatchQueue.main 이 아닌 MainActor 를 사용하여 개발자가 실수로 놓친 부분도 예방할 수 있도록 구현했습니다.
이렇게.. Adapter 패턴을 적용했던 회고록을 마무리하고 각 Adapter 를 어떻게 실행을 시켰는지와 UseCase 를 통해 더욱 높은 추상화를 어떻게 구현하였는지에 관해 다음 글로 찾아오겠습니다.
긴글 읽어주셔서 감사하고 많은 피드백과 질문 대환영입니다!
🖥️ Github PR