
✨Flask 시작하기 - 서버만들기
-
new project → prac 폴더를 선택하고 create 를 클릭합니다.

-
Flask 패키지 설치하고 시작!
- File → setting → Python interpreter
python interpreter 화면에서 + 버튼
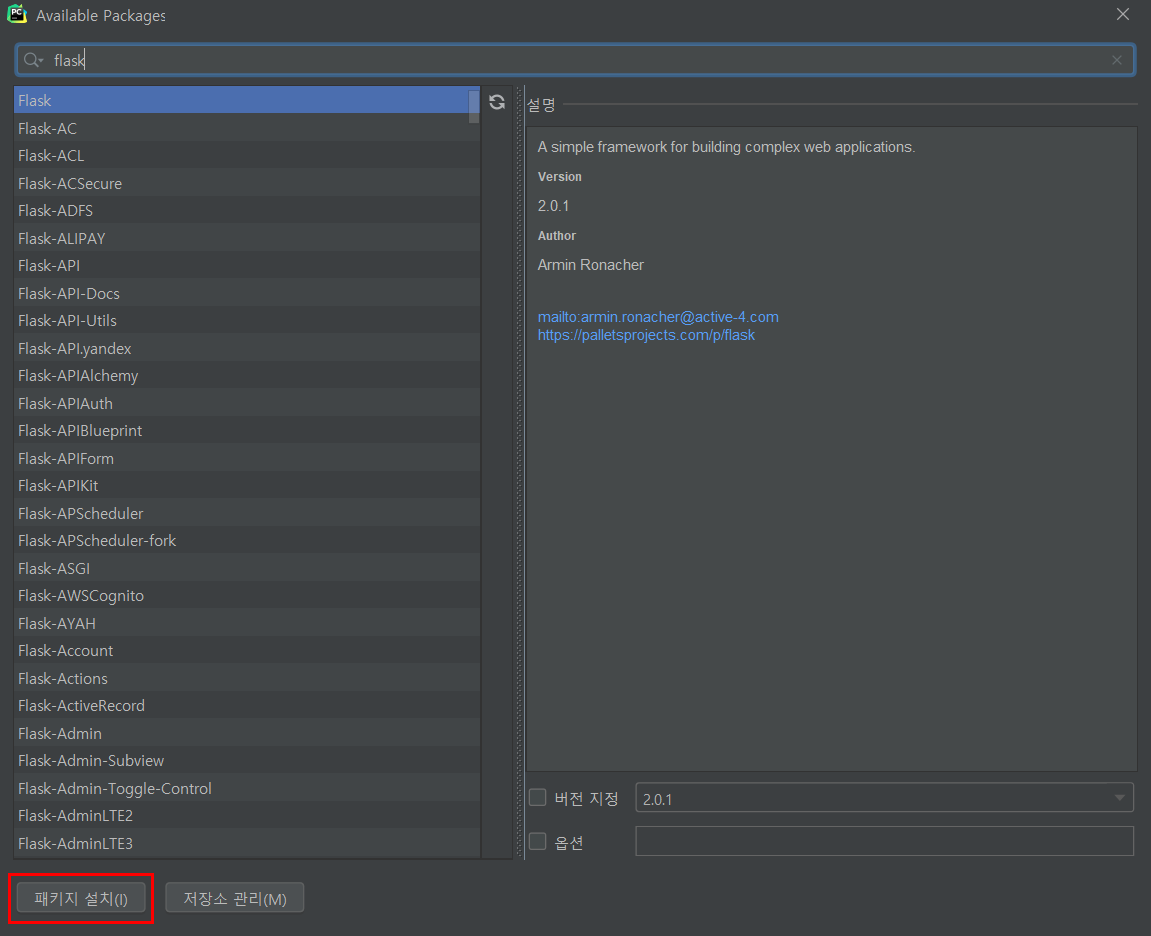
- File → setting → Python interpreter
-
Flask 기초: 기본 실행
-
Flask 프레임워크: 서버를 구동시켜주는 편한 코드 모음. 서버를 구동하려면 필요한 복잡한 일들을 쉽게 가져다 쓸 수 있습니다.
-
💡 프레임워크를 쓰지 않으면 태양초를 빻아서 고추장을 만드는 격!
프레임워크는 3분 요리/소스 세트라고 생각하면 되겠습니다! -
app.py 파일을 만들어 아래 코드를 붙여넣어봅니다.
-
💡파일 이름은 아무렇게나 해도 상관없지만, 통상적으로 flask 서버를 돌리는 파일은 app.py라고 이름 짓습니다!
from flask import Flask app = Flask(__name__) @app.route('/') def home(): return 'This is Home!' if __name__ == '__main__': app.run('0.0.0.0',port=5000,debug=True) -
오른쪽 클릭 → 'Run app'을 클릭하고, 터미널에 아래와 같은 메시지가 뜨면 실행 성공!
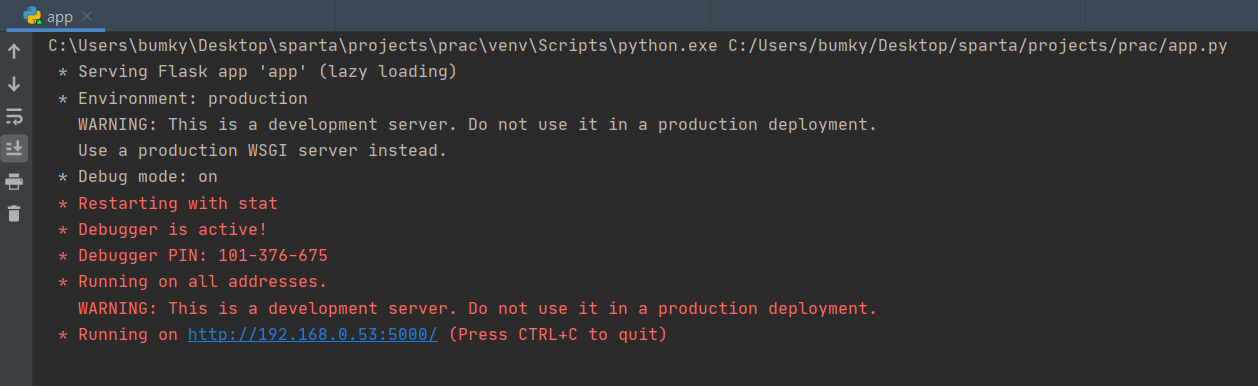
-
이제 크롬에서 http://localhost:5000/ 으로 접속해보세요.
-
종료하는 방법
터미널 창을 클릭하시고, ctrl + c 을 누르시면 서버를 종료
-
-
Flask 기초: URL 나눠보기
-
@app.route('/) 부분을 수정해서 URL을 나눌 수 있습니다!
💡 url 별로 함수명이 같거나, route('/')내의 주소가 같으면 안됩니다.from flask import Flask app = Flask(__name__) @app.route('/') def home(): return 'This is Home!' @app.route('/mypage') def mypage(): return 'This is My Page!' if __name__ == '__main__': app.run('0.0.0.0',port=5000,debug=True)
-
✨Flask 시작하기 - HTML파일 주기
-
Flask 기초: 기본 폴더구조 - 항상 이렇게 세팅하고 시작!
- Flask 서버를 만들 때, 항상,
프로젝트 폴더 안에,
ㄴstatic 폴더 (이미지, css파일을 넣어둡니다)
ㄴtemplates 폴더 (html파일을 넣어둡니다)
ㄴapp.py 파일이렇게 세 개를 만들어두고 시작하세요. 이제 각 폴더의 역할을 알아봅시다!
-
Flask 기초: HTML 파일 불러오기
-
간단한 index.html 파일을 templates 안에 만들기
<!DOCTYPE html> <html lang="en"> <head> <meta charset="UTF-8"> <meta name="viewport" content="width=device-width, initial-scale=1.0"> <script src="https://ajax.googleapis.com/ajax/libs/jquery/3.5.1/jquery.min.js"></script> <title>Document</title> <script> function hey(){ alert('안녕!') } </script> </head> <body> <button onclick="hey()">나는 버튼!</button> </body> </html> -
html 파일 불러오기
flask 내장함수 render_template를 이용합니다.from flask import Flask, render_template app = Flask(__name__) ## URL 별로 함수명이 같거나, ## route('/') 등의 주소가 같으면 안됩니다. @app.route('/') def home(): return render_template('index.html') if __name__ == '__main__': app.run('0.0.0.0', port=5000, debug=True)
-
✨Flask시작하기 - 본격 API 만들기
-
들어가기 전에: GET, POST 요청타입 - 리마인드
-
리마인드!
은행의 창구가 API와 같다는 것을 기억하시나요?
같은 예금 창구에서도 개인 고객이냐 기업 고객이냐에 따라 처리하는 것이 다른 것처럼,클라이언트가 요청 할 때에도, "방식"이 존재합니다.
HTTP 라는 통신 규약을 따른다는 거 잊지 않으셨죠? 클라이언트는 요청할 때 HTTP request method(요청 메소드)를 통해, 어떤 요청 종류인지 응답하는 서버 쪽에 정보를 알려주는 거에요. -
GET, POST 방식
여러 방식(링크)이 존재하지만 우리는 가장 많이 쓰이는 GET, POST 방식에 대해 다루겠습니다.
-
💡 GET → 통상적으로! 데이터 조회(Read)를 요청할 때
예) 영화 목록 조회
→ 데이터 전달 : URL 뒤에 물음표를 붙여 key=value로 전달
→ 예: google.com?q=북극곰 -
💡 POST → 통상적으로! 데이터 생성(Create), 변경(Update), 삭제(Delete) 요청 할 때
예) 회원가입, 회원탈퇴, 비밀번호 수정
→ 데이터 전달 : 바로 보이지 않는 HTML body에 key:value 형태로 전달
-
-
GET 요청에서 클라이언트의 데이터를 받는 방법
-
예를 들어, 클라이언트에서 서버에 title_give란 키 값으로 데이터를 들고왔다고 생각합시다.
(주민등록번호 라는 키 값으로 900120- .. 을 가져온 것과 같은 의미) -
받은 값을 개발자가 볼 수 있게 print 로 찍어볼 수 있게 했습니다. 실전에선 print로 찍어주는 것 외에, 여러가지 작업을 할 수 있겠죠?
-
-
Jquery 임포트
<script src="https://ajax.googleapis.com/ajax/libs/jquery/3.5.1/jquery.min.js"></script>- GET 요청 API코드
@app.route('/test', methods=['GET'])
def test_get():
   title_receive = request.args.get('title_give')
   print(title_receive)
return jsonify({'result':'success', 'msg': '이 요청은 GET!'})- GET 요청 확인 Ajax코드
$.ajax({
    type: "GET",
    url: "/test?title_give=봄날은간다",
    data: {},
    success: function(response){
       console.log(response)
    }
})- POST 요청에서 클라이언트의 데이터를 받는 방법
- POST 요청 API코드
@app.route('/test', methods=['POST']) def test_post(): title_receive = request.form['title_give'] print(title_receive) return jsonify({'result':'success', 'msg': '이 요청은 POST!'}) - POST 요청 확인 Ajax코드
$.ajax({
  type: "POST",
  url: "/test",
  data: { title_give:'봄날은간다' },
  success: function(response){
     console.log(response)
  }
})
- POST 요청 API코드
✨[화성땅 공동구매] - 뼈대 준비하기
-
프로젝트 준비 - app.py 준비하기
from flask import Flask, render_template, request, jsonify app = Flask(__name__) @app.route('/') def home(): return render_template('index.html') @app.route("/mars", methods=["POST"]) def web_mars_post(): sample_receive = request.form['sample_give'] print(sample_receive) return jsonify({'msg': 'POST 연결 완료!'}) @app.route("/mars", methods=["GET"]) def web_mars_get(): return jsonify({'msg': 'GET 연결 완료!'}) if __name__ == '__main__': app.run('0.0.0.0', port=5000, debug=True) -
프로젝트 준비 - index.html 준비하기
<!DOCTYPE html>
<html lang="en">
<head>
   <meta charset="UTF-8">
   <meta http-equiv="X-UA-Compatible" content="IE=edge">
   <meta name="viewport" content="width=device-width, initial-scale=1.0">

   <link href="https://cdn.jsdelivr.net/npm/bootstrap@5.0.2/dist/css/bootstrap.min.css" rel="stylesheet"
       integrity="sha384-EVSTQN3/azprG1Anm3QDgpJLIm9Nao0Yz1ztcQTwFspd3yD65VohhpuuCOmLASjC" crossorigin="anonymous">
   <script src="https://ajax.googleapis.com/ajax/libs/jquery/3.5.1/jquery.min.js"></script>
   <script src="https://cdn.jsdelivr.net/npm/bootstrap@5.0.2/dist/js/bootstrap.bundle.min.js"
       integrity="sha384-MrcW6ZMFYlzcLA8Nl+NtUVF0sA7MsXsP1UyJoMp4YLEuNSfAP+JcXn/tWtIaxVXM"
       crossorigin="anonymous"></script>

   <link href="https://fonts.googleapis.com/css2?family=Gowun+Batang:wght@400;700&display=swap" rel="stylesheet">

   <title>선착순 공동구매</title>

   <style>
       * {
           font-family: 'Gowun Batang', serif;
           color: white;
       }

       body {
           background-image: linear-gradient(0deg, rgba(0, 0, 0, 0.5), rgba(0, 0, 0, 0.5)), url('https://cdn.aitimes.com/news/photo/202010/132592_129694_3139.jpg');
           background-position: center;
           background-size: cover;
       }

       h1 {
           font-weight: bold;
       }

       .order {
           width: 500px;
           margin: 60px auto 0px auto;
           padding-bottom: 60px;
       }

       .mybtn {
           width: 100%;
       }

       .order > table {
           margin : 40px 0;
           font-size: 18px;
       }

       option {
           color: black;
       }
   </style>
   <script>
       $(document).ready(function () {
           show_order();
       });
       function show_order() {
           $.ajax({
               type: 'GET',
               url: '/mars',
               data: {},
               success: function (response) {
                   alert(response['msg'])
               }
           });
       }
       function save_order() {
           $.ajax({
               type: 'POST',
               url: '/mars',
               data: { sample_give:'데이터전송' },
               success: function (response) {
                   alert(response['msg'])
               }
           });
       }
   </script>
</head>
<body>
   <div class="mask"></div>
   <div class="order">
       <h1>화성에 땅 사놓기!</h1>
       <h3>가격: 평 당 500원</h3>
       <p>
           화성에 땅을 사둘 수 있다고?<br/>
           앞으로 백년 간 오지 않을 기회. 화성에서 즐기는 노후!
       </p>
       <div class="order-info">
           <div class="input-group mb-3">
               <span class="input-group-text">이름</span>
               <input id="name" type="text" class="form-control">
           </div>
           <div class="input-group mb-3">
               <span class="input-group-text">주소</span>
               <input id="address" type="text" class="form-control">
           </div>
           <div class="input-group mb-3">
               <label class="input-group-text" for="size">평수</label>
               <select class="form-select" id="size">
                 <option selected>-- 주문 평수 --</option>
                 <option value="10평">10평</option>
                 <option value="20평">20평</option>
                 <option value="30평">30평</option>
                 <option value="40평">40평</option>
                 <option value="50평">50평</option>
               </select>
             </div>
             <button onclick="save_order()" type="button" class="btn btn-warning mybtn">주문하기</button>
       </div>
       <table class="table">
           <thead>
             <tr>
               <th scope="col">이름</th>
               <th scope="col">주소</th>
               <th scope="col">평수</th>
             </tr>
           </thead>
           <tbody>
             <tr>
               <td>홍길동</td>
               <td>서울시 용산구</td>
               <td>20평</td>
             </tr>
             <tr>
               <td>임꺽정</td>
               <td>부산시 동구</td>
               <td>10평</td>
             </tr>
             <tr>
               <td>세종대왕</td>
               <td>세종시 대왕구</td>
               <td>30평</td>
             </tr>
           </tbody>
         </table>
   </div>
</body>
</html>