들어가기에 앞서
실제 프로젝트 진행했던 코드 내용 및 세부 내용은 일부만 업로드하였습니다.
10. 뷰 구축
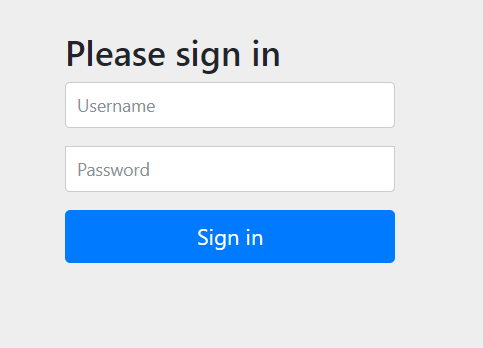
(6) 로그인 페이지 작성
Spring Initializr > Spring Web, Spring Security, Thymeleaf동시 추가implementation 'org.thymeleaf.extras:thymeleaf-extras-springsecurity5'
는 Security와 Thymeleaf가 동시에 있어야 추가되기 때문
implementation 'org.springframework.boot:spring-boot-starter-security'
implementation 'org.springframework.boot:spring-boot-starter-thymeleaf'
implementation 'org.springframework.boot:spring-boot-starter-web'
implementation 'org.thymeleaf.extras:thymeleaf-extras-springsecurity5'- build.gradle에 추가한 후 gradle 새로고침, 실행
- localhost:8080/articles 접근 시
- SecurityConfig 추가 (login 기능 없이 확인하기 위해)
- 인증 기능이 구현되지 않은 단계이므로 모든 요청에 대해 인증이 열리게 오픈하고
폼 로그인을 통해 로그인 뷰를 활성화 시킴 - 스프링 부트 2.7 (스프링 시큐리티 5.7) 부터 시큐리티 설정 방법이 바뀜
WebSecurityConfigureAdapter가deprecated되었고SecurityFilterChain을 사용해야 함
- 인증 기능이 구현되지 않은 단계이므로 모든 요청에 대해 인증이 열리게 오픈하고
import org.springframework.context.annotation.Bean;
import org.springframework.context.annotation.Configuration;
import org.springframework.security.config.annotation.web.builders.HttpSecurity;
import org.springframework.security.web.SecurityFilterChain;

@Configuration
public class SecurityConfig {

    @Bean
    public SecurityFilterChain securityFilterChain(HttpSecurity http) throws Exception {
        return http
                .authorizeHttpRequests(auth -> auth.anyRequest().permitAll())
                .formLogin().and()
                .build();
    }
}- ArticleControllerTest 수정
- SecurityConfig로 인해 일부 테스트가 불가능할 것
(로그인이 되지 않은 영역에 대해 401 에러 발생)이므로
@import(SecurityConfig.class)사용
- SecurityConfig로 인해 일부 테스트가 불가능할 것
- AuthControllerTest 추가
import com.fastcampus.projectboard.config.SecurityConfig;
import org.junit.jupiter.api.DisplayName;
import org.junit.jupiter.api.Test;
import org.springframework.beans.factory.annotation.Autowired;
import org.springframework.boot.test.autoconfigure.web.servlet.WebMvcTest;
import org.springframework.context.annotation.Import;
import org.springframework.http.MediaType;
import org.springframework.test.web.servlet.MockMvc;

import static org.springframework.test.web.servlet.request.MockMvcRequestBuilders.get;
import static org.springframework.test.web.servlet.result.MockMvcResultMatchers.content;
import static org.springframework.test.web.servlet.result.MockMvcResultMatchers.status;

@DisplayName("View 컨트롤러 - 인증")
@Import(SecurityConfig.class)
@WebMvcTest
public class AuthControllerTest {

    private final MockMvc mvc;

    public AuthControllerTest(@Autowired MockMvc mvc) {
        this.mvc = mvc;
    }


    @DisplayName("[VIEW][GET] 로그인 페이지 - 정상 호출")
    @Test
    public void givenNothing_whenTryingToLogin_thenReturnsLogInView() throws Exception {
        // Given

        // When & Then
        mvc.perform(get("/login"))
                .andExpect(status().isOk()) // 정상 호출인지
                .andExpect(content().contentTypeCompatibleWith(MediaType.TEXT_HTML)); // HTML 파일의 컨텐츠인지 (호환되는 컨텐츠 포함)
    }
}
(7) 뷰에 디자인 붙이기
(7-1) bootstrap 사용 기초와 index.html 적용
- bootstrap > docs > quick start 부분 참조
- index.html의 header / body 적용
- header
  <meta charset="UTF-8">
  <meta name="viewport" content="width=device-width, initial-scale=1">
  <meta name="description" content="">
  <meta name="author" content="mrcocoball">
  <title>게시판 페이지</title>

  <link href="https://cdn.jsdelivr.net/npm/bootstrap@5.2.0/dist/css/bootstrap.min.css" rel="stylesheet" integrity="sha384-gH2yIJqKdNHPEq0n4Mqa/HGKIhSkIHeL5AyhkYV8i59U5AR6csBvApHHNl/vI1Bx" crossorigin="anonymous">
- body 맨 마지막
<script src="https://cdn.jsdelivr.net/npm/bootstrap@5.2.0/dist/js/bootstrap.bundle.min.js" integrity="sha384-A3rJD856KowSb7dwlZdYEkO39Gagi7vIsF0jrRAoQmDKKtQBHUuLZ9AsSv4jD4Xa" crossorigin="anonymous"></script>- bootstrap의 적용 방법
- example을 확인해서 소스코드를 보고 컴포넌트를 복붙할 수 있음
(7-2) 테이블 템플릿 적용
- content > table
<table class="table">

- bootstrap 관련 사이트 : bootdey.com
- bootstrap 활용시 메인 태그에 항상 container 사용해야함
<main class="container"> - 템플릿 적용
(7-3) CSS 스타일 적용
- css 스타일은 새로 파일을 분리시켜놓고 링크를 걸어둠
- static에 new directory css > search-bar.css
- css 템플릿 내부에 작성
- index 타이틀 부분 마지막에
<link href="/css/search-bar.css" rel="stylesheet">추가 - 단, Spring 서버가 돌아가고 있는 상태에서만 해당 링크가 확인이 됨...
- 테이블 부분 스타일 수정
        <tr>
          <th class="col-6">제목</th>
          <th class="col-3">해시태그</th>
          <th class="col">작성자</th>
          <th class="col">작성일</th>
        </tr>
(7-4) 내비게이션 템플릿 적용
- bootstrap pagination 참고
    <nav aria-label="Page navigation example">
      <ul class="pagination justify-content-center">
        <li class="page-item"><a class="page-link" href="#">Previous</a></li>
        <li class="page-item"><a class="page-link" href="#">1</a></li>
        <li class="page-item"><a class="page-link" href="#">2</a></li>
        <li class="page-item"><a class="page-link" href="#">3</a></li>
        <li class="page-item"><a class="page-link" href="#">Next</a></li>
      </ul>
    </nav>
(7-5) header, footer 템플릿 적용
- bootstrap example 참고
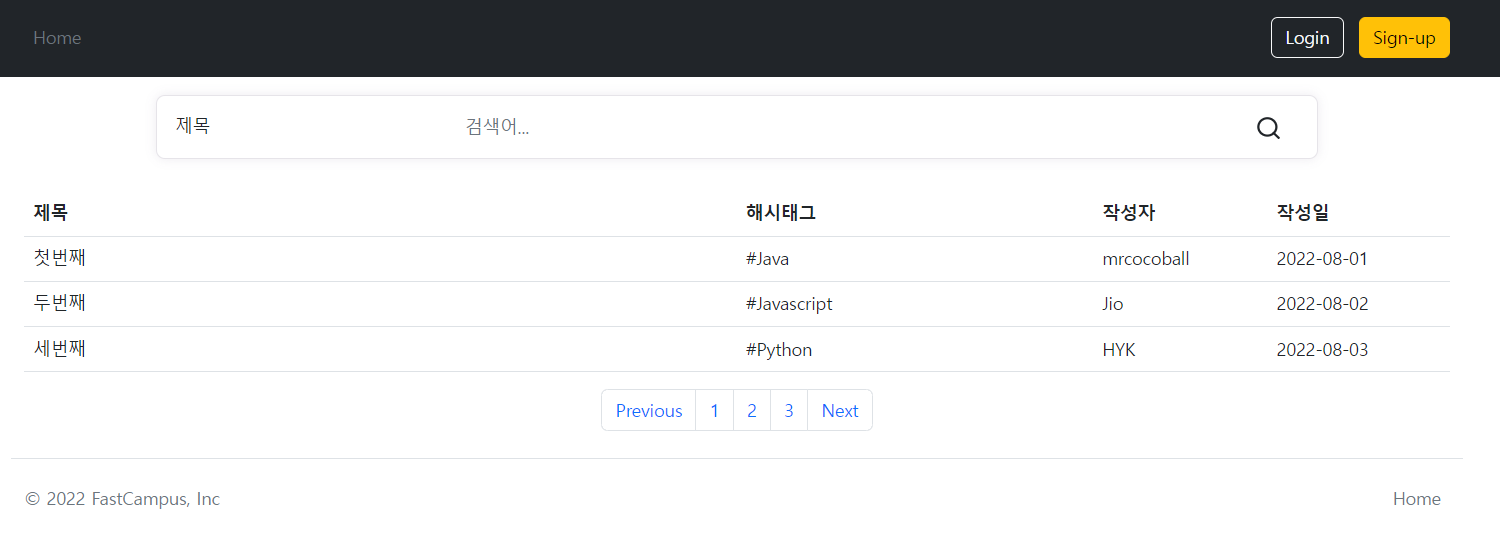
(7-6) detail.html 적용
- header, footer 부분은 컴포넌트로 분리되어 있기 때문에 앞에서 적용한 템플릿 적용됨
- 나머지 부분 템플릿 적용


공부했던 내용들을 모아둔 창고입니다.