
Elements
: 화면에서 보이는 것들을 기술
: 리액트 앱을 구성하는 가장 작은 블록들
✔️React Element vs Dom Element
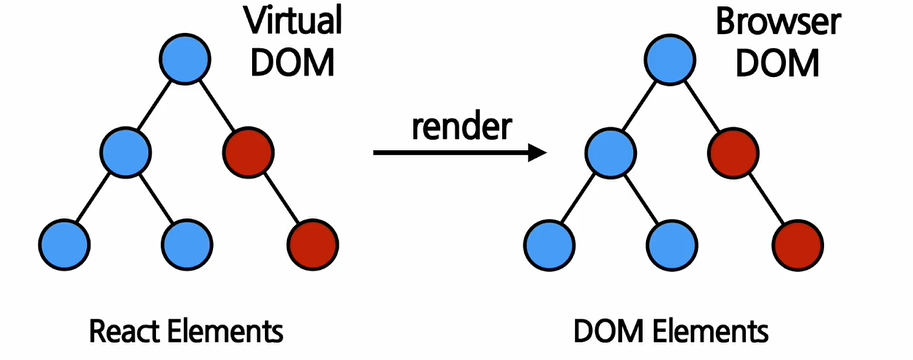
아래의 사진을 봤을 때, 오른쪽에 나와있는 Elements들은 Dom Element를 의미한다. 즉, 우리가 실제 화면에서 보는 것을 Dom Element라고 한다.

React Element는 Dom Element의 가상표현이라고 할 수 있으며, Dom Element는 React Element보다 많은 정보를 담고있어, 상대적으로 크고 무겁다.
예를 들어,
const element = <h1>Hello, World!</h1>;라는 element가 정의되어있다.
React는 이 elements들을 통해 우리가 실제 화면에서 보게될 Dom Element를 생성한다.
✔️React Elements의 형태
React Element는 자바스크립트 객체 형태로 존재하며, 한번 생성하면 변경할 수 없는 불변성을 가지고 있다.
아래는 버튼을 나타내는 element이다.
// 버튼을 나타내는 element
{
  type: 'button',
  props: {
    className: 'bg-green',
   	children: {
      type: 'b',
      props: {
        children: 'Hello, element!'
      }
    }
  }
}
이 element가 렌더링 될 경우, 아래와 같은 DOM element가 된다.
<button class="bg-green">
  <b>
    Hello, Element!
 </b>
</button>element타입의HTML태그가 문자열로 들어가는 것이 아닌 경우
- 위의 코드와의 차이:type에 문자열로 된HTML태그가 아닌,React Component의 이름이 들어갔다는 점
//리액트의 컴포넌트 element를 나타내는 코드
{
  type: Button,
  props: {
    color: 'green',
    children: 'Hello, Element!'
  }
}
React Element는 이와 같은 자바스크립트 객체로 이루어져 있다. 그리고 이와 같은 객체를 만드는 역할이 바로 createElement 함수이다.
예제 코드
function Button(props){
  return (
    <button className={`bg-${props.color}`}>
      <b>
        {props.children}
      </b>
   </button>
  )
}

function ConfirmDialog(props){
  return(
    <div>
      <p>내용을 확인하셨으면 확인 버튼을 눌러주세요.</p>
      <Button color='green'>확인</Button>
    </div>
  )
}
는 아래와 같이 변환된다.
{
	type: 'div',
    props: {
    	children: [
        	{
              //HTML태그
            	type: 'p',
                props: {
                	children: '내용을 확인하셨으면 확인 버튼을 눌러주세요.'
                }
            },
            {
              //리액트 컴포넌트의 이름
                type: Button,
                props: {
                    color: 'green',
                    children: '확인'
               }
            }
        }
    }
}
✔️Elements의 특징
- 불변성(immutable)
→ elements 생성후children이나attributes를 바꿀 수 없다.
→ 화면에 변경된element를 보여줄 경우, 변경이 아닌 새로운element를 생성하여, 기존element와 바꾸기
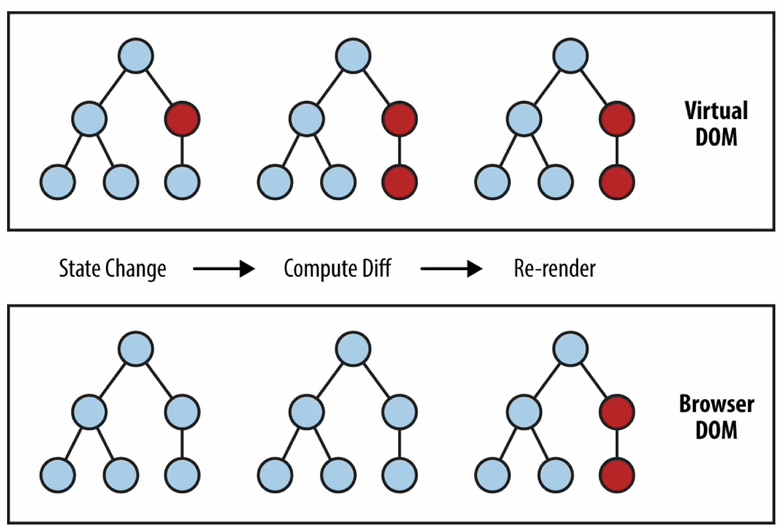
그림에 따르면, Virtual DOM은 변경된 부분을 계산하고 Compute diff를 하여 해당 부분만을 다시 렌더링한다.
- 원: 각각의 element
- 빨간색 원: 변경된 element
✔️Elements 렌더링하기
- Root DOM Node
<div id="root"></div>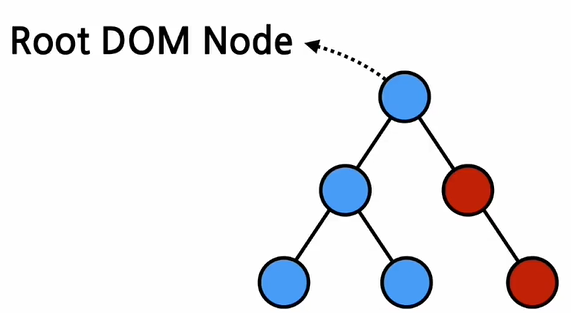
div태그 안에 리액트 엘리먼트들이 렌더링 되며, 이것을Root dom node라고 한다.
→div태그 안의 모든 것이React dom에 의해 관리되기 때문이다.
→ 리액트만으로 만들어진 모든 웹사이트들은 단 하나의Root DOM Node를 가짐
→ 반면, 기존의 웹사이트에 추가적으로 react를 연동하게되면, 여러개의 분리된Root DOM Node를 가지게 될 수 있다.
- root div에 실제로 React element를 렌더링 하기 위한 코드
- render() 함수 사용
: react element를 html element로 렌더링하는 역할
→ 첫번째 파라미터: react element
→ 두번째 파라미터: html element (dom element)
const element = <h1>안녕, 리액트!</h1>;
ReactDOM.render(element, document.getElementById('root'));
✔️렌더링된 Elements를 업데이트하기
예제 코드
function tick(){
  const element = (
    <div>
      <h1>안녕, 리액트!</h1>
      <h2>현재 시간: {new Date().toLocaleTimeString()}</h2>
    </div>
  );

  ReactDOM.render(element, document.getElementById('root'));
}

setInterval(tick, 1000);- 내부적으로,
tick함수가 호출될 때마다 기존 element를 변경하는 것이 아닌, 새로운 element로 교체
👩💻간단 실습 코드 - Clock
- Clock.jsx
import React from "react";

function Clock(props) {
  return (
    <div>
      <h1>안녕, 리액트!</h1>
      <h2>현재 시간: {new Date().toLocaleTimeString()}</h2>
    </div>
  );
}

export default Clock;- index.js
import React from 'react';
import ReactDOM from 'react-dom';
import './index.css';
import reportWebVitals from './reportWebVitals';

import Clock from './ch04/Clock';

setInterval(() => {
  ReactDOM.render(
    <React.StrictMode>
      <Clock />
    </React.StrictMode>,
    document.getElementById('root')
  );
}, 1000);

// If you want to start measuring performance in your app, pass a function
// to log results (for example: reportWebVitals(console.log))
// or send to an analytics endpoint. Learn more: https://bit.ly/CRA-vitals
reportWebVitals();- 실행결과