
윈도우는 git bash에서 실행
# 현재 디렉토리에 레포지토리 생성
git init

# git 저장소 상태 확인 (현재 디렉토리안에 있는 파일들의 상태 표시)
git status

# 커밋 목록에 넣기 unstaged상태 -> staged상태(commit할 목록)
git add ~.py

# 커밋하기
git commit -m "message"

If git이 처음이라면 user.name과 user.email을 설정해줘야 함

# 레포지토리 기록보기
git log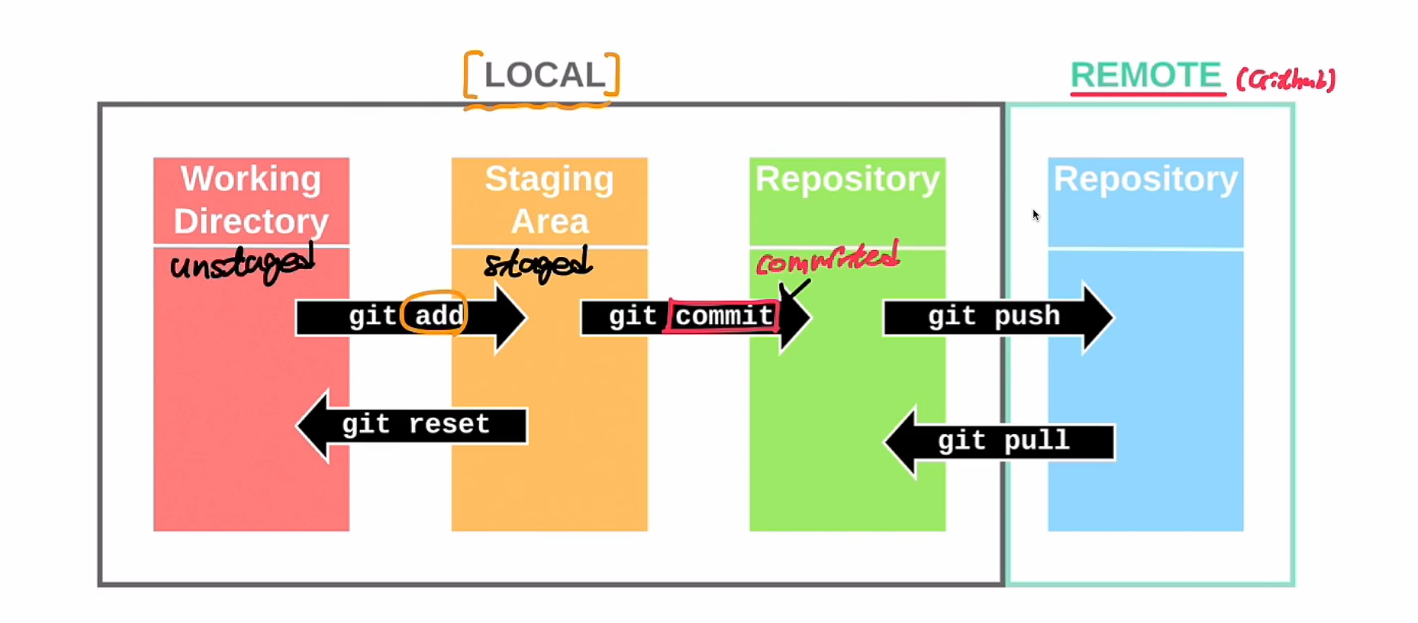
# HEAD는 현재 내가 작업중인 브랜치를 가리킨다.

# 브랜치 생성
## master는 기본 브랜치
git branch <branch_name>

# 브랜치 확인
git branch -v

# 브랜치 변경
git checkout <branch_name>
ㄴ> 바뀜 git switch <branch_name>

# 브랜치 합치기 (현재 브랜치 master에서 <branch_name>을 병합)
# git checkout master (master 브랜치로 변경)
git merge <branch_name>

# 브랜치 삭제하기
git branch -d <branch_name>

# 브랜치 이름 변경
git branch -M <바꿀 이름>
깃허브
# 원격 저장소 - github
# 로컬 저장소 - 내컴퓨터
# git의 기본이름은 master github는 main

# 별칭은 보통 origin을 많이 씀
git remote add <원격저장소이름> <원격저장소주소(github주소)>

# 원격 저장소에 업로드
git push <원격저장소이름> <branch_name>
ex) git push origin main

IF personal access token 같은 오류가 나오면 github -> setting -> develop setting에서 pat를 발급받으면 된다.(pw대신)

# github clone
git clone <repo-url> <디렉토리 주소 default=현재 위치>

# private clone
git clone <user_name@repo-url> <디렉토리 주소 default=현재 위치>
과제 제출하기
# 해당 브랜치로 변경
ex)제출을 month1로 해야한다면
git checkout month1

# 정책에 맞게 새로운 브랜치 생성
git branch week3-1/ㅇㅇㅇ
git checkout week3-1/ㅇㅇㅇ

# 작업 수행 후
git add <내가 수행한 파일>
git commit -m <message>
git push origin wee3-1/ㅇㅇㅇ

# 깃허브 사이트에서 풀리퀘스트 PR
1. 브랜치 선택 , Pull requests탭 선택
2. 초록색 New pull request선택
3. base:브랜치를 뻗은 브랜치 <- compare:요청날릴 브랜치
ex) base:month1 <- compare:week3-1/ㅇㅇㅇ
4. file changed내역 확인 후 초록색 Create pull request 버튼
5. 제목과 내용 작성 후 Create pull request
PS
Merge와 pull request는 본질적으론 같음
다만 github에서 몇몇 기능을 사용한다면 Pull request
git 명령어로 진행한다면 Merge라 생각하면 됨!

Trendy AI Developer