MCP란?
MCP는 작년 11월 Anthropic이 발표한 대규모 언어 모델이 외부 데이터와 시스템을 더 효과적으로 활용할 수 있도록 설계된 일종의 연결 프로토콜이다.
Anthropic은 MCP를 아래와 같이 비유한다.

이미지 출처: What is Model Context Protocol (MCP)?
"MCP는 AI 애플리케이션을 위한 USB-C 포트와 같습니다. USB-C가 다양한 주변기기와 액세서리에 기기를 연결하는 표준화된 방법을 제공하는 것처럼, MCP는 AI 모델을 다양한 데이터 소스와 도구에 연결하는 표준화된 방법을 제공합니다."
동작 방식

MCP는 아래의 세 가지 역할의 협력으로 이루어진다.
MCP 서버
LLM이 사용할 수 있는 도구와 데이터 액세스 기능을 제공하는 프로그램.
- 전통적인 원격 API 서버와는 달리, MCP 서버는 사용자의 장치에서 로컬 애플리케이션으로 실행되거나 원격 서버에 배포 가능
- 각 MCP 서버는 로컬 데이터나 원격 서비스에서 정보를 검색하는 특정 도구 세트를 제공.
- LLM이 작업을 처리하는 데에 특정 도구를 사용해야 한다고 하면, MCP 서버가 제공하는 도구를 사용하여 필요한 데이터를 얻고 이를 LLM에 반환.
MCP 클라이언트
LLM과 MCP 서버를 연결하는 브리지.
LLM에 포함되어 다음과 같은 역할을 담당한다.
- LLM으로부터 요청 수신
- 적절한 MCP 서버로 요청 전달
- MCP 서버로부터 결과를 LLM에 반환
MCP 호스트
Claude Desktop, IDE(Cursor 등), 또는 MCP를 통해 데이터를 액세스하고자 하는 AI 도구와 같은 프로그램.
이러한 애플리케이션은 사용자가 LLM과 상호작용할 수 있는 인터페이스를 제공하면서, MCP 클라이언트를 통합하여 MCP 서버가 제공하는 도구를 사용하여 LLM 기능을 확장한다.
ADK란?
Agent 개발에 대한 많은 관심이 쏠린 가운데 Google도 Agent 개발을 위한 Python 기반의 오픈소스 프레임워크를 내놓았다.
ADK를 사용하면 MCP tool을 가져다 손쉽게 Agent 개발이 가능하다.
Google ADK를 사용하여 MCP tool을 활용해볼 건데, 두 가지를 해볼 것이다.
- ADK 에이전트와 함께 MCP 서버 사용
-> ADK WEB에서 확인 - 파일 시스템 MCP 서버 사용
ADK기반 Agent는 ADK WEB을 통해서 UI에서 테스트해볼 수 있다.
ADK 에이전트와 함께 MCP 서버 사용
파일 구조
├── multi_tool_agent
│   ├── __init__.py
│   ├── __pycache__
│   └── agent.py
※ADK WEB을 사용하려면 init 파일을 필수로 만들어야 하고 agent 이름은 반드시 root_agent로 지정해야 한다.※
agent.py
특정 도시의 날씨와 현재 시간을 조회하는 간단한 Agent.
import datetime
from zoneinfo import ZoneInfo
from google.adk.agents import Agent

def get_weather(city: str) -> dict:
    """Get the current weather in a city."""
    if city:
        return {
            "status": "success",
            "report": f"The weather in '{city}' is sunny with 25°C."
        }
    return {
        "status": "error",
        "error_message": f"Weather for '{city}' unavailable."
    }

def get_current_time(city: str) -> dict:
    """Get the current time in a city."""
    city_timezones = {
        "new york": "America/New_York",
        "london": "Europe/London",
        "seoul": "Asia/Seoul",
        "tokyo": "Asia/Tokyo",
        "paris": "Europe/Paris"
    }

    if city.lower() in city_timezones:
        try:
            tz = ZoneInfo(city_timezones[city.lower()])
            now = datetime.datetime.now(tz)
            return {
                "status": "success",
                "report": f"The current time in {city} is {now.strftime('%Y-%m-%d %H:%M:%S %Z')}"
            }
        except Exception:
            pass

    return {
        "status": "error",
        "error_message": f"Time information for '{city}' unavailable."
    }

root_agent = Agent(
    name="weather_time_agent",
    model="gemini-2.0-flash",
    description="Agent that provides weather and time information for cities.",
    instruction="You help users with time and weather information for various cities.",
    tools=[get_weather, get_current_time],
)
init.py
from .agent import root_agent

__all__ = ["root_agent"]
'adk web' 명령어 실행
서울의 현재 날씨와 시간을 알려달라고 했고, 이에 맞는 툴들을 호출하여 답변하는 것을 UI로 확인할 수 있다.
파일 시스템 MCP 서버 사용
내 로컬의 파일시스템과 상호작용할 수 있는 도구를 제공하는 MCP 서버를 구축해볼 것이다.
ADK 공식 문서에 있는 코드를 그대로 실행하였다.
1. Node.js 설치
현재 대부분의 MCP 서버의 경우 node.js에서 구축되고 npx를 사용하여 실행되기 때문에 패키지를 설치해준다.
난 리눅스 VM에서 실행하므로 Node.js install 에서 아래와 같이 .xz 파일을 다운받아서 직접 설치해줬다.
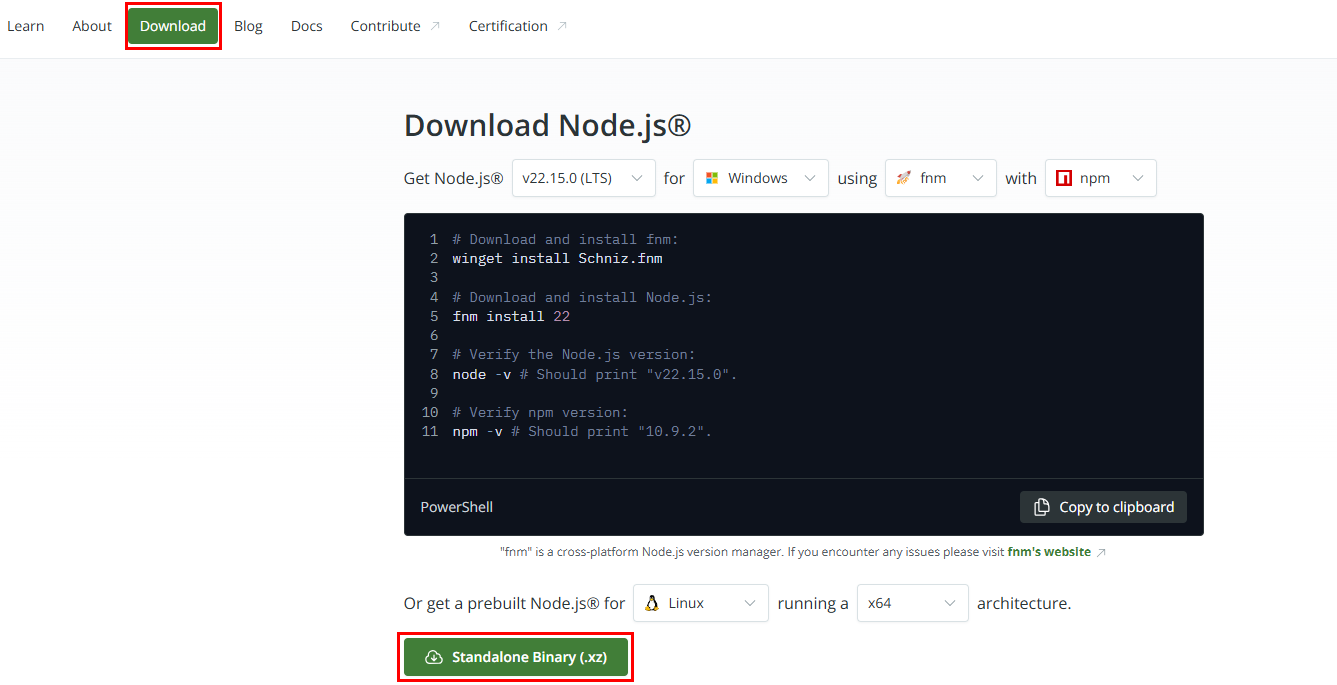
각 운영체제에 맞는 파일로 골라서 설치해주자!
# 압축 해제
tar -xf <파일 다운 경로>/node-v22.15.0-linux-x64.tar.xz

# Node.js 바이너리를 /usr/local에 복사
sudo cp -R <파일 다운 경로>/node-v22.15.0-linux-x64 /usr/local/node-v22.15.0

# node/npm/npx에 대한 심볼릭 링크 설정
sudo ln -sf /usr/local/node-v22.15.0/bin/node   /usr/bin/node
sudo ln -sf /usr/local/node-v22.15.0/bin/npm    /usr/bin/npm
sudo ln -sf /usr/local/node-v22.15.0/bin/npx    /usr/bin/npx

# 확인
node -v
npm -v
npx -v
2. 도구 가져오기
로컬 MCP 서버(여기선 파일 시스템 도구에 대한 액세스를 제공하는 서버)에 연결하여 도구를 가져온다. (예: 파일 나열, 읽기, 쓰기)
파일 경로 입력시 시스템의 절대 경로로 적어야 한다.
async def get_tools_async():
  """Gets tools from the File System MCP Server."""
  print("Attempting to connect to MCP Filesystem server...")
  tools, exit_stack = await MCPToolset.from_server(
      # Use StdioServerParameters for local process communication
      connection_params=StdioServerParameters(
          command='npx', # Command to run the server
          args=["-y",    # Arguments for the command
                "@modelcontextprotocol/server-filesystem",
                # TODO: IMPORTANT! Change the path below to an ABSOLUTE path on your system.
                "<허용해줄 폴더 경로>"],
      )
      # For remote servers, you would use SseServerParams instead:
      # connection_params=SseServerParams(url="http://remote-server:port/path", headers={...})
  )
  print("MCP Toolset created successfully.")
  # MCP requires maintaining a connection to the local MCP Server.
  # exit_stack manages the cleanup of this connection.
  return tools, exit_stack
여기서 알고 넘어가야할 것이 있다. MCP 구현 방법 중에는 Stdio, SSE의 표준 통신 방식을 지원한다.
Stdio
Standard Input / Standard Output의 약자.
우리가 컴퓨터 터미널(CMD, 쉘 등)에서 프로그램을 실행할 때 기본적으로 사용되는 입력과 출력 통로를 의미.
- Standard Input (stdin): 프로그램이 데이터를 입력받는 표준 통로 (보통 키보드 입력)
- Standard Output (stdout): 프로그램이 일반적인 결과를 출력하는 표준 통로 (보통 화면 출력)
- Standard Error (stderr): 프로그램이 오류 메시지를 출력하는 표준 통로 (보통 화면 출력, stdout과 분리됨)
MCP에서 Stdio 통신 방식을 사용한다는 것은, LLM 에이전트(클라이언트)와 MCP Tool 서버가 네트워크(HTTP, SSE 등)를 통하지 않고, 마치 터미널에서 프로그램을 실행하고 그 프로그램과 직접 데이터를 주고받는 것처럼 통신한다는 의미.
SSE
Server Sent Events의 약자.
서버의 데이터를 실시간으로, 지속적으로 Streaming하는 통신 방식이다.
서버에서 변경된 데이터에 대해 그때그때 별도 요청을 보내지 않아도 Streaming으로 전달받을 수 있게 된다.(Read Only)
때문에 원격으로 별도 MCP 서버를 사용할 경우 SSE를 통해 구현해야할 것이고, 로컬의 경우 Stdio를 사용해야 한다. 여기선 내 로컬에(로컬VM) MCP 서버를 구축할 것이므로 Stdio를 사용하여 구현할 것이다.
3. LLM 에이전트 생성
2에서 가져온 도구를 LLM에 탑재.
async def get_agent_async():
  """Creates an ADK Agent equipped with tools from the MCP Server."""
  tools, exit_stack = await get_tools_async()
  print(f"Fetched {len(tools)} tools from MCP server.")
  root_agent = LlmAgent(
      model='gemini-2.0-flash', # Adjust model name if needed based on availability
      name='filesystem_assistant',
      instruction='Help user interact with the local filesystem using available tools.',
      tools=tools, # Provide the MCP tools to the ADK agent
  )
  return root_agent, exit_stack
4. Workflow 실행
async def async_main():
  session_service = InMemorySessionService()
  # Artifact service might not be needed for this example
  artifacts_service = InMemoryArtifactService()

  session = session_service.create_session(
      state={}, app_name='mcp_filesystem_app', user_id='user_mhk'
  )

  # TODO: Change the query to be relevant to YOUR specified folder.
  # e.g., "list files in the 'documents' subfolder" or "read the file 'notes.txt'"
  query = "<사용자 질문>"
  print(f"User Query: '{query}'")
  content = types.Content(role='user', parts=[types.Part(text=query)])

  root_agent, exit_stack = await get_agent_async()

  runner = Runner(
      app_name='mcp_filesystem_app',
      agent=root_agent,
      artifact_service=artifacts_service, # Optional
      session_service=session_service,
  )

  print("Running agent...")
  events_async = runner.run_async(
      session_id=session.id, user_id=session.user_id, new_message=content
  )

  async for event in events_async:
    print(f"Event received: {event}")

  # Crucial Cleanup: Ensure the MCP server process connection is closed.
  print("Closing MCP server connection...")
  await exit_stack.aclose()
  print("Cleanup complete.")

if __name__ == '__main__':
  try:
    asyncio.run(async_main())
  except Exception as e:
    print(f"An error occurred: {e}")
Issue
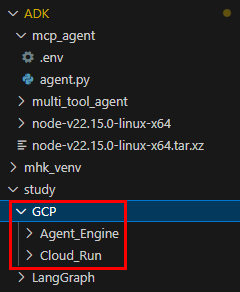
기존의 실행 파일은 mcp_agent/agent.py였고 GCP 관련 코드들에 대해서 물어보기 위해 study 폴더에 대해서 접근을 허용해줬었다.
하지만 아래와 같은 응답을 받았다.
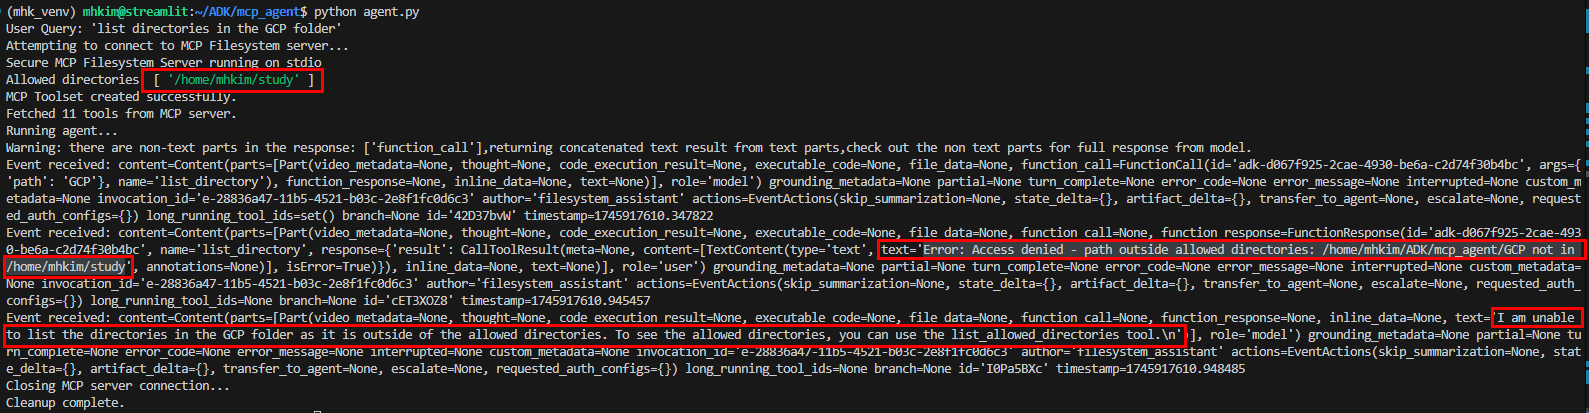
# ..생략
Error: Access denied - path outside allowed directories: /home/mhkim/ADK/mcp_agent/GCP not in /home/mhkim/study

# ..생략
I am unable to list the directories in the GCP folder as it is outside of the allowed directories. To see the allowed directories, you can use the list_allowed_directories tool
그래서 Agent가 실행되고 있는 폴더 안으로 디렉토리들을 복사해주고 허용 디렉토리를 ~/ADK로 해줬다.
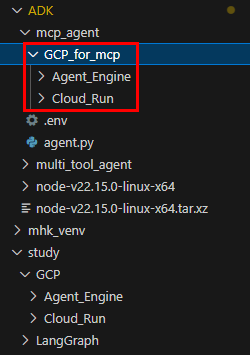
성공
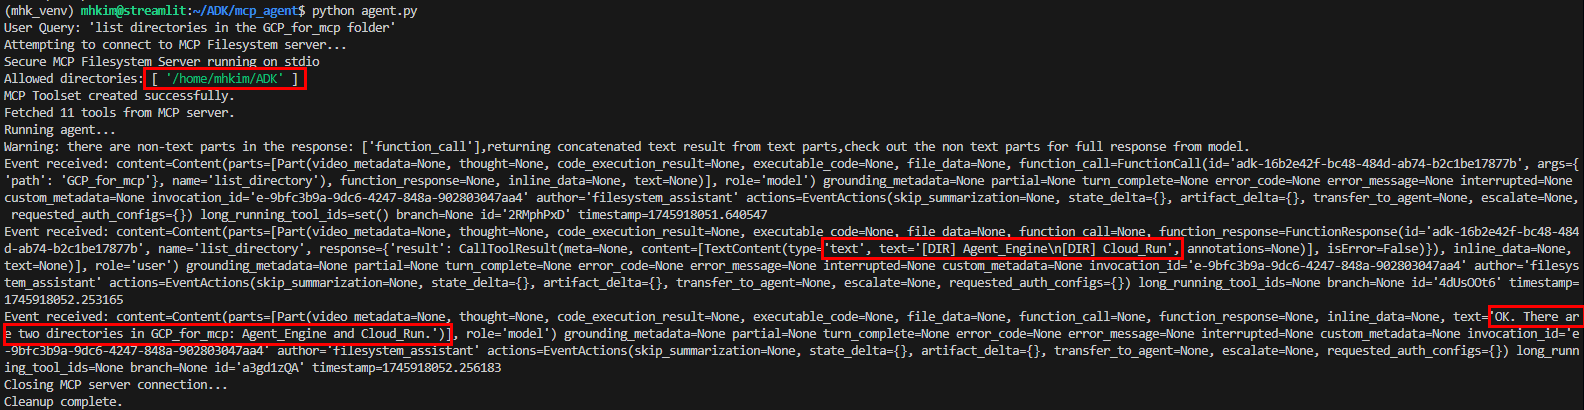
# ..생략
'[DIR] Agent_Engine\n[DIR] Cloud_Run'

# ..생략
OK. There are two directories in GCP_for_mcp: Agent_Engine and CLoud_Run.
참고한 블로그를 보았을 때 코드가 실행되는 곳과 허용 디렉토리를 아예 다른 경로로 지정해도 상관없어 보였는데..🤔
위와 같은 문제가 발생할 수 있으니 파일 구조를 잘 구성하여 테스트 해보길 권한다.
[MCP 참고]
- https://channel.io/ko/blog/articles/what-is-mcp-52c77e72
- https://blog.logto.io/ko/what-is-mcp
- https://dytis.tistory.com/112
[Google ADK와 MCP를 사용한 Agent 개발 참고]