지난 ADK와 MCP를 사용한 Agent 개발 포스팅에서 ADK와 MCP에 대해서 알아보고 Agent를 개발해보았다.
MCP Toolbox for Databases란?
Google에서는 여러 데이터에 쉽고 안전하게 연결할 수 있도록 하는 MCP 서버인 MCP Toolbox for Databases(Toolbox)를 내놓았다.
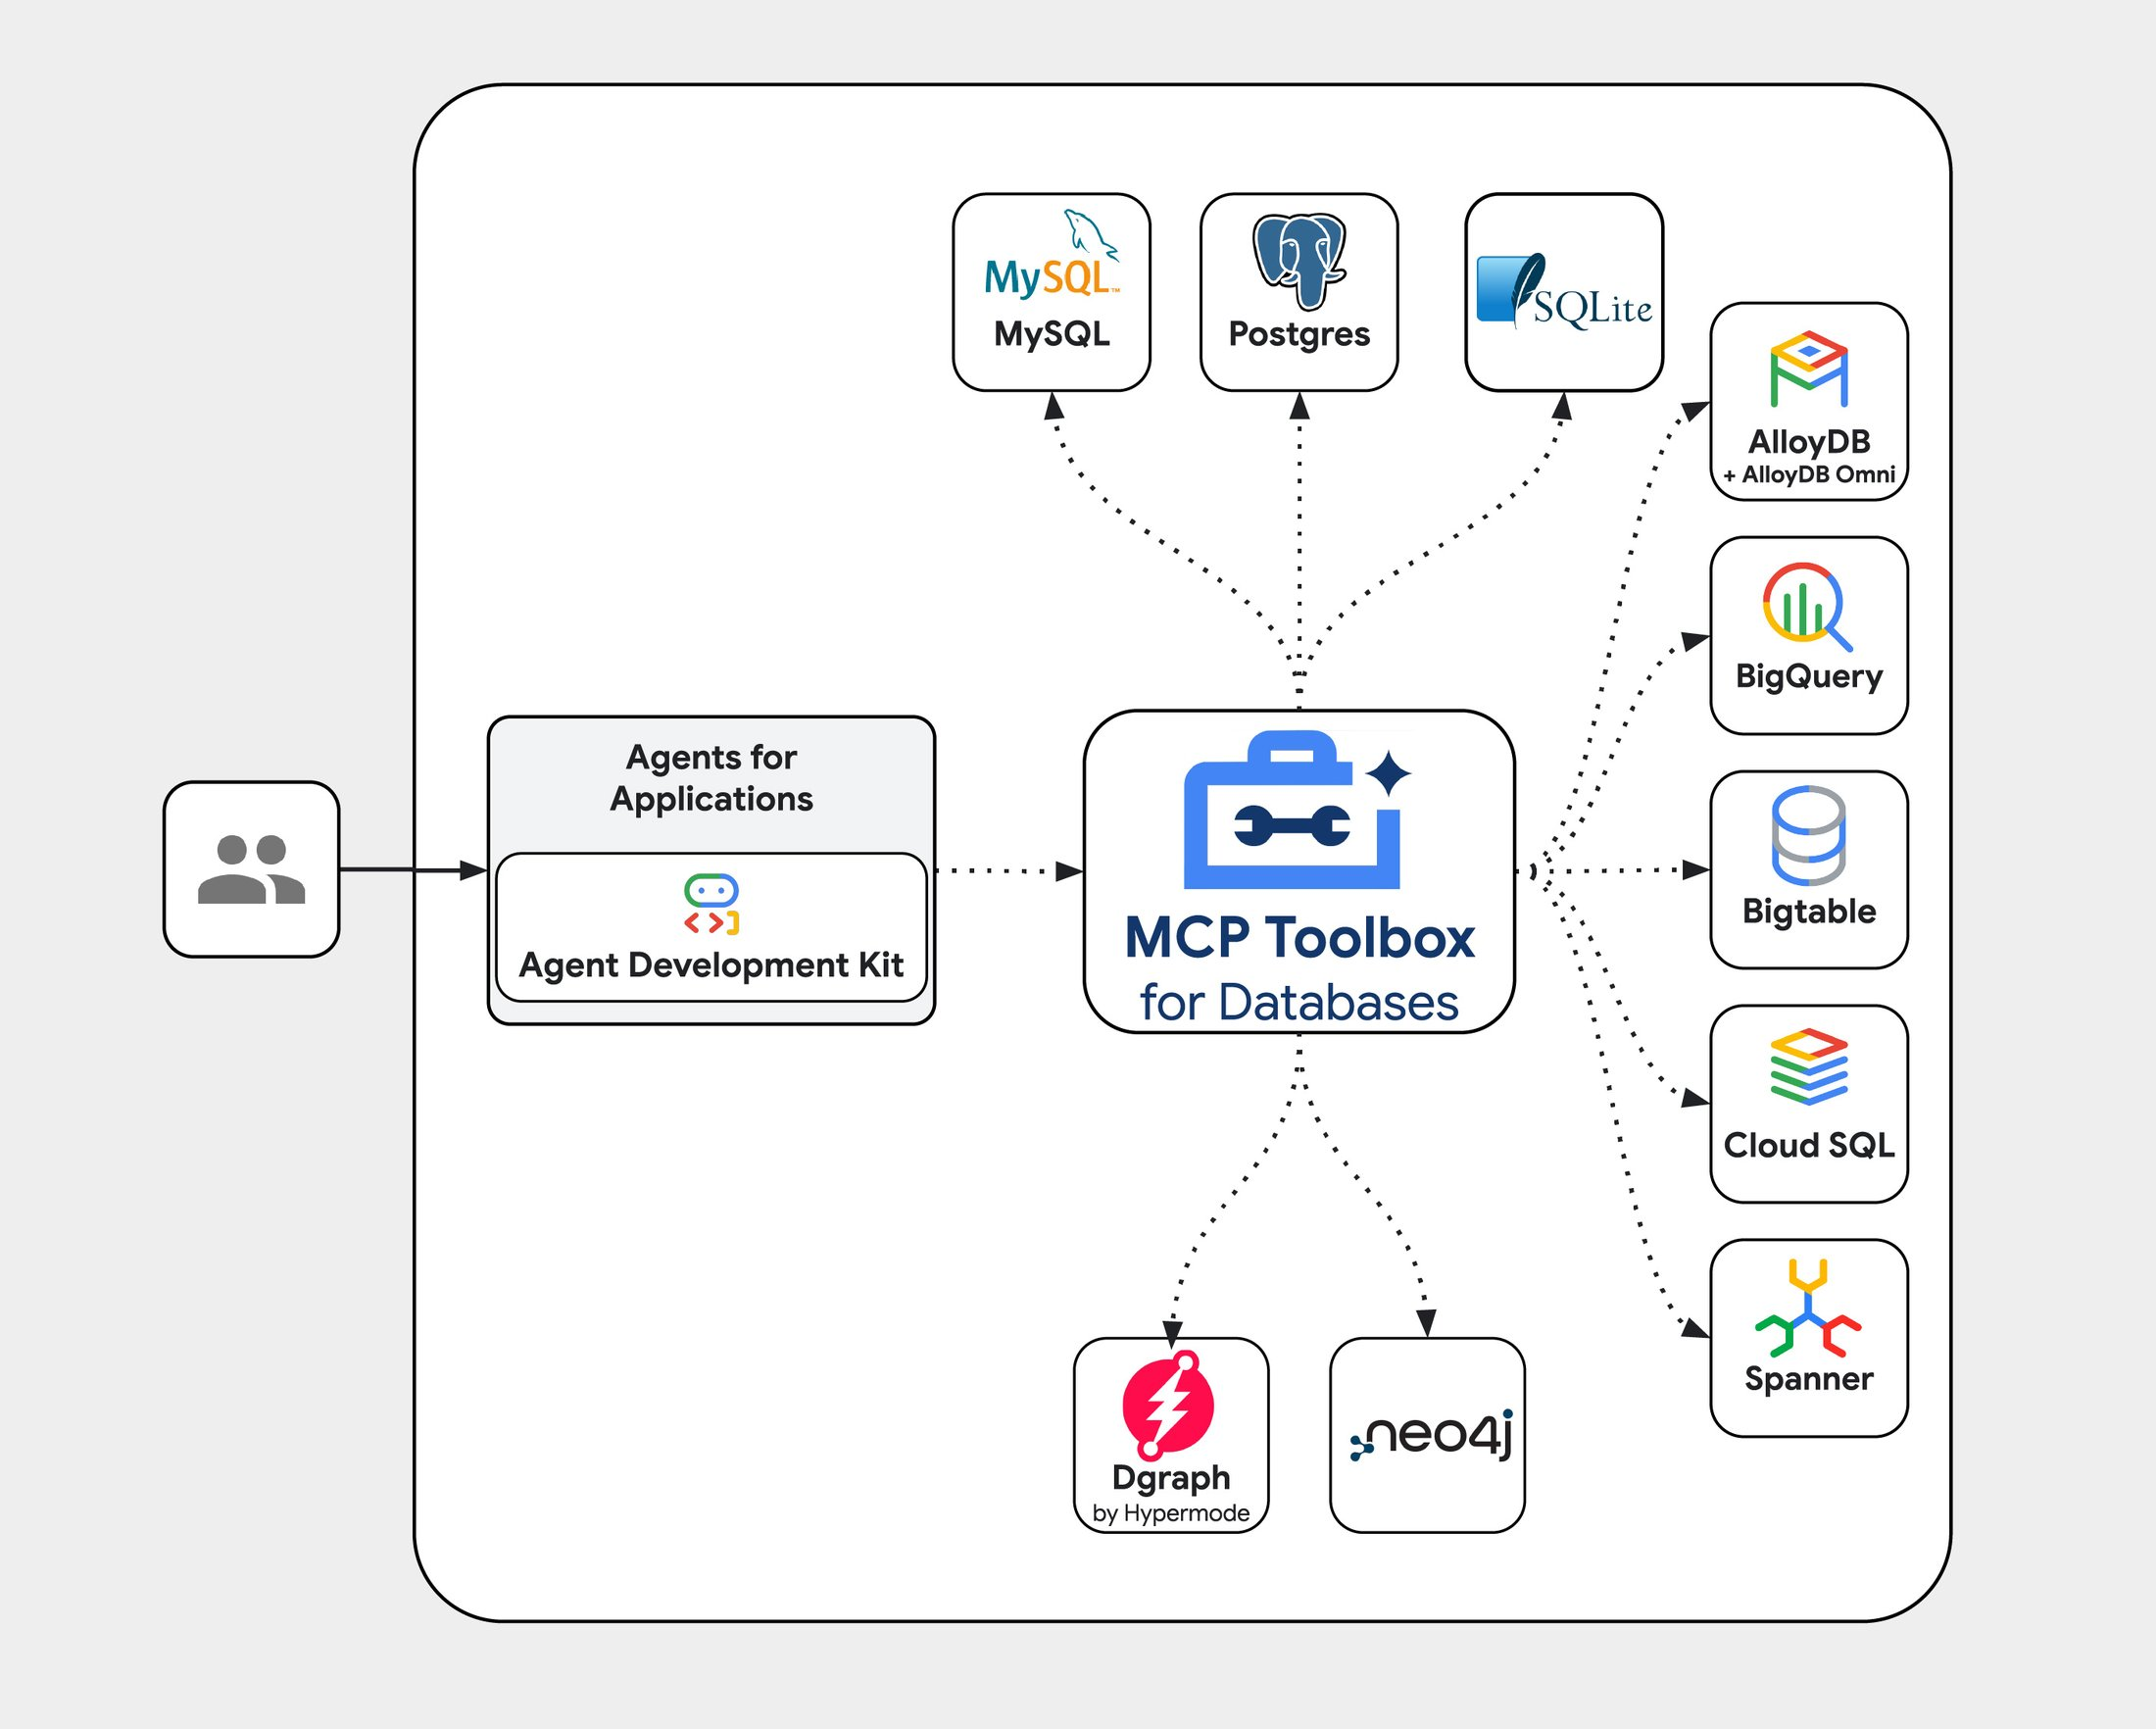
이미지 출처: MCP Toolbox for Databases (formerly Gen AI Toolbox for Databases)
Toolbox는 MySQL, PostgreSQL뿐 아니라 GCP의 AlloyDB, BigQuery, BigTable, Cloud SQL, Spanner등을 손쉽게 LLM이 도구로 사용할 수 있게 해준다.
또한 ADK에서도 지원이 되므로 Toolbox와 ADK를 사용하여 멀티 에이전트 구축 및 Vertex AI Agent Engine, Cloud Run, GKE 등에 배포가 가능하다.
ADK와 Toolbox를 사용한 에이전트 개발을 해볼 것이고, DB는 BigQuery로...!!!!!
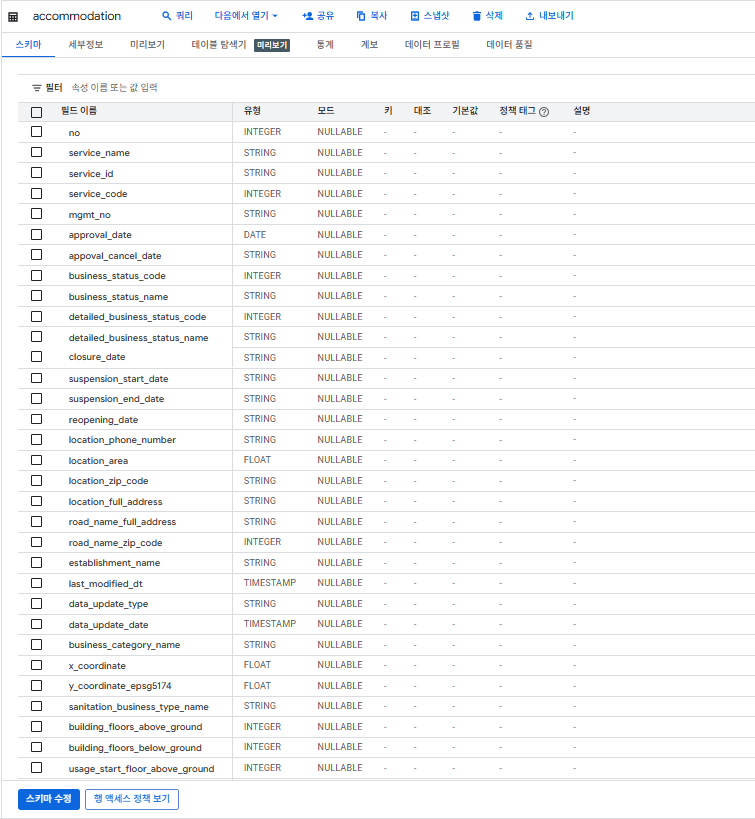
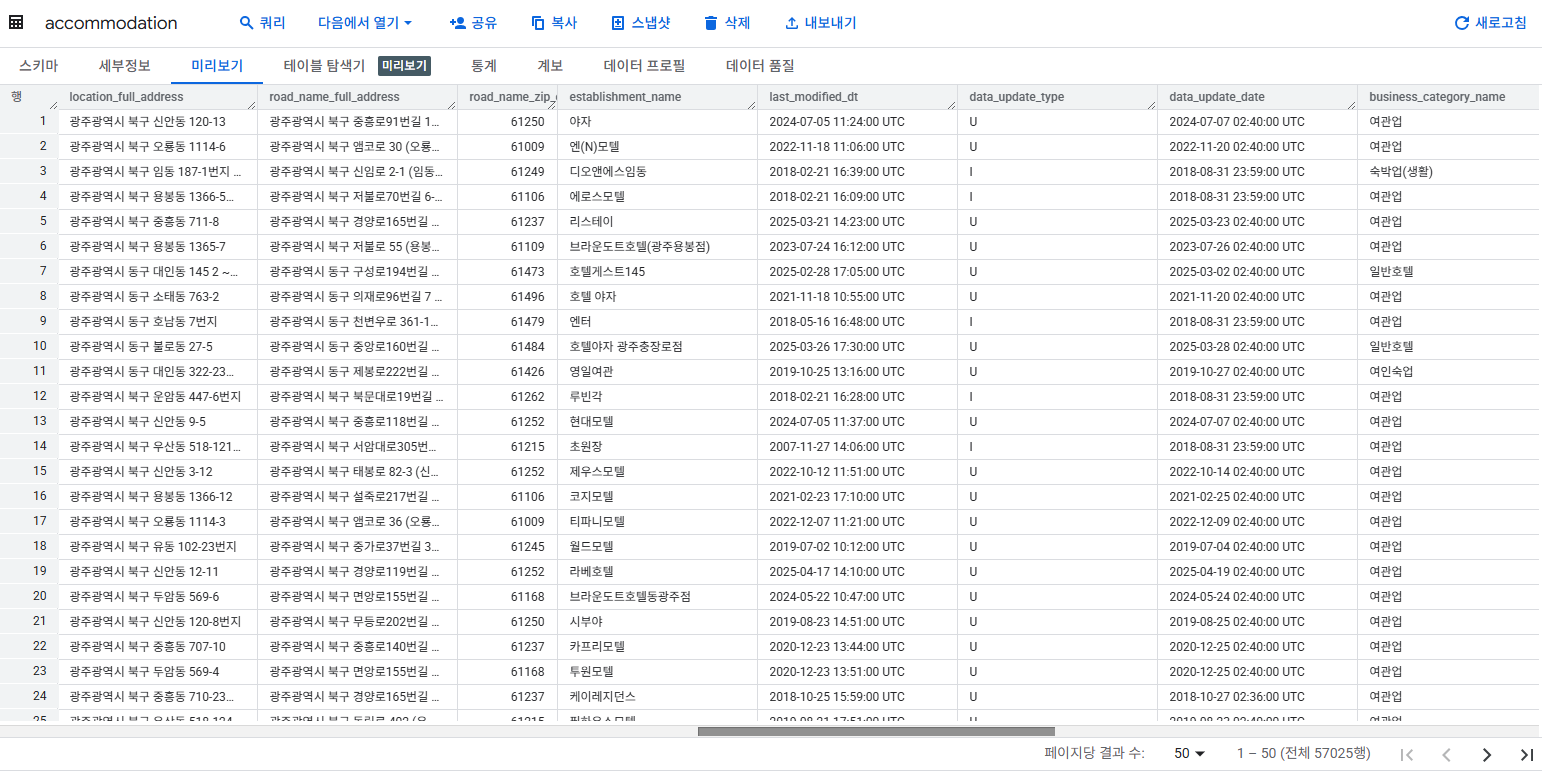
데이터셋
공공데이터포털의 행정안전부_숙박업 데이터를 사용해볼 것이다.
컬럼명을 영어로 모두 변경해주고 BigQuery에 업로드했다.
Schema
데이터
Toolbox 설치 및 구성
Toolbox는 tools.yaml 파일만을 사용하여 여러 툴들을 정의할 수 있고, LLM이 활용하게 할 수 있다.
우선 toolbox를 설치해주자.
curl -O https://storage.googleapis.com/genai-toolbox/v0.4.0/linux/amd64/toolbox
chmod +x toolbox
correct binary를 참고하여 맞는 OS의 바이너리 파일을 선택하여 설치하시길...
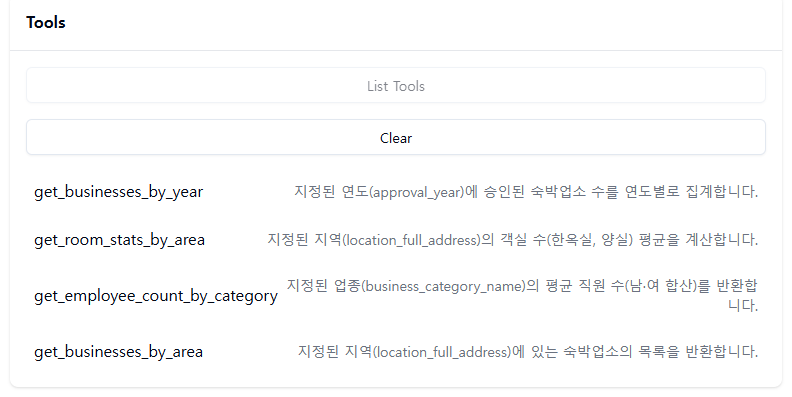
tool은 쿼리를 통해 분석을 할 수 있는 네 가지 툴을 정의할 것이다.
- 지정된 지역에 있는 숙박업소의 목록을 반환하는 tool
- 지정된 연도에 승인된 숙박업소 수를 연도별로 집계하는 tool
- 지정된 지역에 객실 수의 평균을 계산하는 tool
- 지정된 업종의 평균 직원 수를 반환하는 tool
tools.yaml
sources:
  mhkim-da-source:
    kind: bigquery
    project: <프로젝트ID>
    location: <리전>
tools:
  get_businesses_by_area:
    kind: bigquery-sql
    source: mhkim-da-source
    description: 지정된 지역(location)에 있는 숙박업소의 목록을 반환합니다.
    parameters:
      - name: location
        type: string
        description: 조회할 지역 이름
    statement: |
      SELECT
        service_name,
        location_full_address,
        approval_date
      FROM `test.accommodation`
      WHERE location_full_address LIKE CONCAT('%',@location,'%')
      ORDER BY approval_date DESC
      LIMIT 100;
  get_businesses_by_year:
    kind: bigquery-sql
    source: mhkim-da-source
    description: 지정된 연도(year)에 승인된 숙박업소 수를 연도별로 집계합니다.
    parameters:
      - name: year
        type: integer
        description: 승인 연도
    statement: |
      SELECT
        COUNT(*) AS num_businesses
      FROM `test.accommodation`
      WHERE EXTRACT(YEAR FROM approval_date) = @year
      LIMIT 100;
  get_room_stats_by_area:
    kind: bigquery-sql
    source: mhkim-da-source
    description: 지정된 지역(location)의 객실 수(한옥실, 양실) 평균을 계산합니다.
    parameters:
      - name: location
        type: string
        description: 객실 통계를 조회할 지역 이름
    statement: |
      SELECT
        AVG(num_korean_style_rooms) AS avg_korean_rooms,
        AVG(num_western_style_rooms) AS avg_western_rooms
      FROM `test.accommodation`
      WHERE location_full_address LIKE CONCAT('%',@location,'%')
      LIMIT 100;
  get_employee_count_by_category:
    kind: bigquery-sql
    source: mhkim-da-source
    description: 지정된 업종(category)의 평균 직원 수(남·여 합산)를 반환합니다.
    parameters:
      - name: category
        type: string
        description: 조회할 업종명
    statement: |
      SELECT
        AVG(COALESCE(num_female_employees,0) + COALESCE(num_male_employees,0)) AS avg_employees
      FROM `test.accommodation`
      WHERE business_category_name = @category
      LIMIT 100;
toolsets:
   mhkim_bq_toolset:
     - get_businesses_by_area
     - get_businesses_by_year
     - get_room_stats_by_area
     - get_employee_count_by_category
사용자 질문을 파악하여 알맞은 tool을 호출하게 될텐데, 질문에서 필요한 parameter를 추출하여 쿼리문에 사용한다.
데이터가 많으므로 LIMIT 100으로 조건을 걸어줬다.
./toolbox --tools-file="tools.yaml" --address 0.0.0.0 --port 7000이러면 자동으로 MCP 서버가 프로비저닝 된다. 아주 쉽다!!!
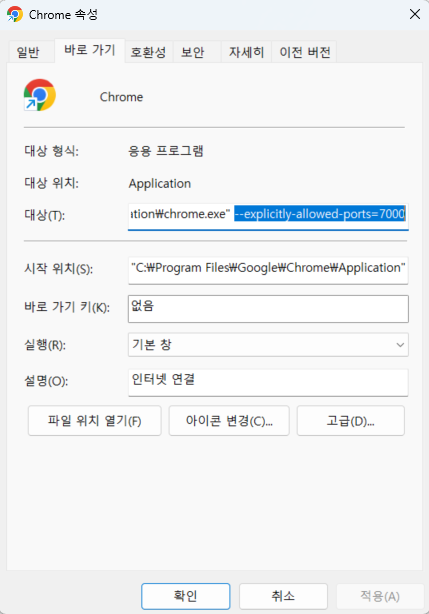
Default 포트는 5000번이나 따로 지정할 수 있다. 하지만 6000번은 Chrome에서 기본적으로 막혀있는 포트이므로 다른 포트를 사용하길 권장한다.
추가로 본래 local환경에서 띄우는 가이드가 대부분이나, 나는 내 작업용 VM이 있어 해당 VM에서 작업을 했기에.. 브라우저로 접속하려면 --address 0.0.0.0 옵션을 지정해줘야 한다.
성공적으로 서버가 띄워지면 아래와 같은 로그가 나올 것이다.

127.0.0.1:7000으로 접속
(여기선 VM Public IP:7000으로 접속)

127.0.0.1:7000/api/toolset으로 접속
(여기선 VM Public IP:7000/api/toolset으로 접속)

Trouble Shooting
6000번 포트를 피해서 지정해줬음에도 혹시 크롬에서 ERR_UNSAFE_PORT가 뜨고 접속이 되지 않는다면 아래처럼 크롬 속성에서 허용하려는 포트를 --explicitly-allowed-ports 옵션과 함께 추가해주자.
MCP Inspector로 확인
MCP Inspector를 활용하면 브라우저에서 에이전트를 확인할 수 있다.
아래 명령어 실행
npx @modelcontextprotocol/inspector성공하면 아래와 같은 로그가 뜰 것이다. 이제 뒤에 포트를 6274로 지정하여 접속해보자.

나와같이 별도 VM에서 작업할 경우 방화벽에서 6274, 6277, toolbox의 포트 모두 허용해줘야 접속이 될 것이다.
접속
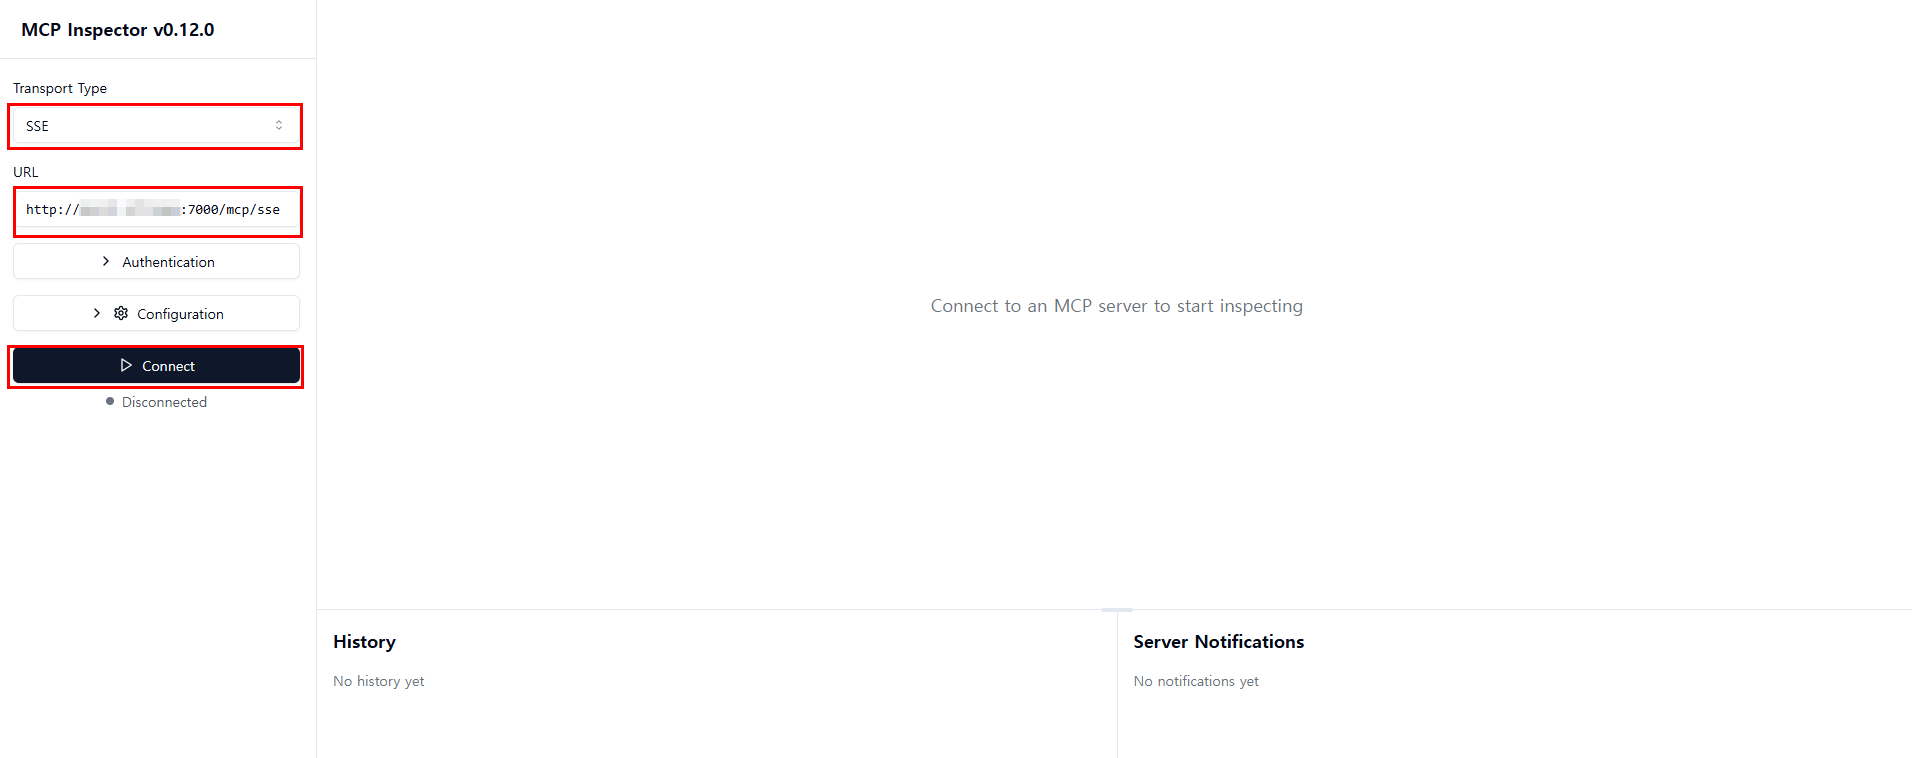
- Transport Type: SSE
- URL: http://127.0.0.1:7000/mcp/see
Connect 클릭
MCP 서버와 잘 연결이 되면 아래와 같은 화면이 뜰 것이다.
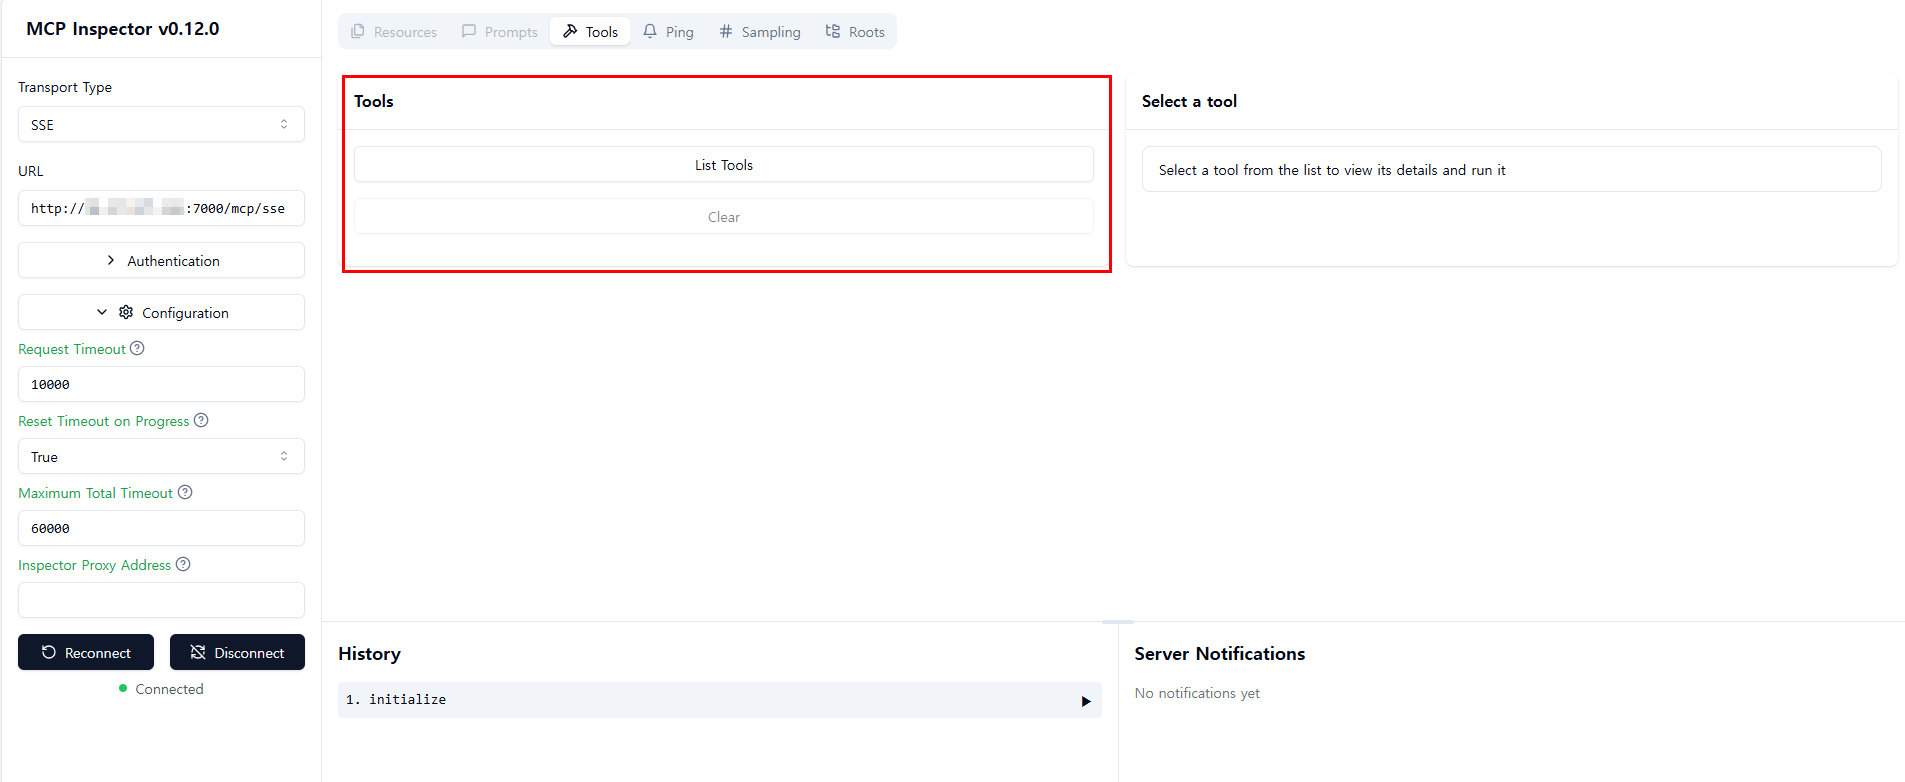
정의한 tool들 확인.
Agent 개발
이제 ADK를 사용하여 이 toolset을 사용하는 LLM Agent를 개발해볼 것이다.
ADK WEB에서 확인
지난 ADK와 MCP를 사용한 Agent 개발 포스팅에서와 똑같이 init.py 파일을 만들어주고 agent.py이름으로 파일을 생성해줘야 한다.
agent.py
from google.adk.agents import Agent
from toolbox_core import ToolboxSyncClient

import os
os.environ['GOOGLE_GENAI_USE_VERTEXAI'] = 'True'
# TODO(developer): Replace 'YOUR_PROJECT_ID' with your Google Cloud Project ID.
os.environ['GOOGLE_CLOUD_PROJECT'] = '<프로젝트 ID>'
# TODO(developer): Replace 'us-central1' with your Google Cloud Location (region).
os.environ['GOOGLE_CLOUD_LOCATION'] = '<리전>'

# --- Load Tools from Toolbox ---
# TODO(developer): Ensure the Toolbox server is running at http://127.0.0.1:5000
toolbox_client = ToolboxSyncClient("http://127.0.0.1:7000")
# TODO(developer): Replace "my-toolset" with the actual ID of your toolset as configured in your MCP Toolbox server.
agent_toolset = toolbox_client.load_toolset("mhkim_bq_toolset")

# --- Define the Agent's Prompt ---
prompt = """
  You are a helpful Data Analytics Assistant and need to extract meaningful data from user questions about accommodations and call the appropriate tool.
  Answer must be generated in Korean.
"""

# --- Configure the Agent ---

root_agent = Agent(
    model='gemini-2.0-flash',
    name='bq_agent',
    description='Answers user questions about the accommodation information.',
    instruction=prompt,
    tools=agent_toolset, # Pass the loaded toolset
)
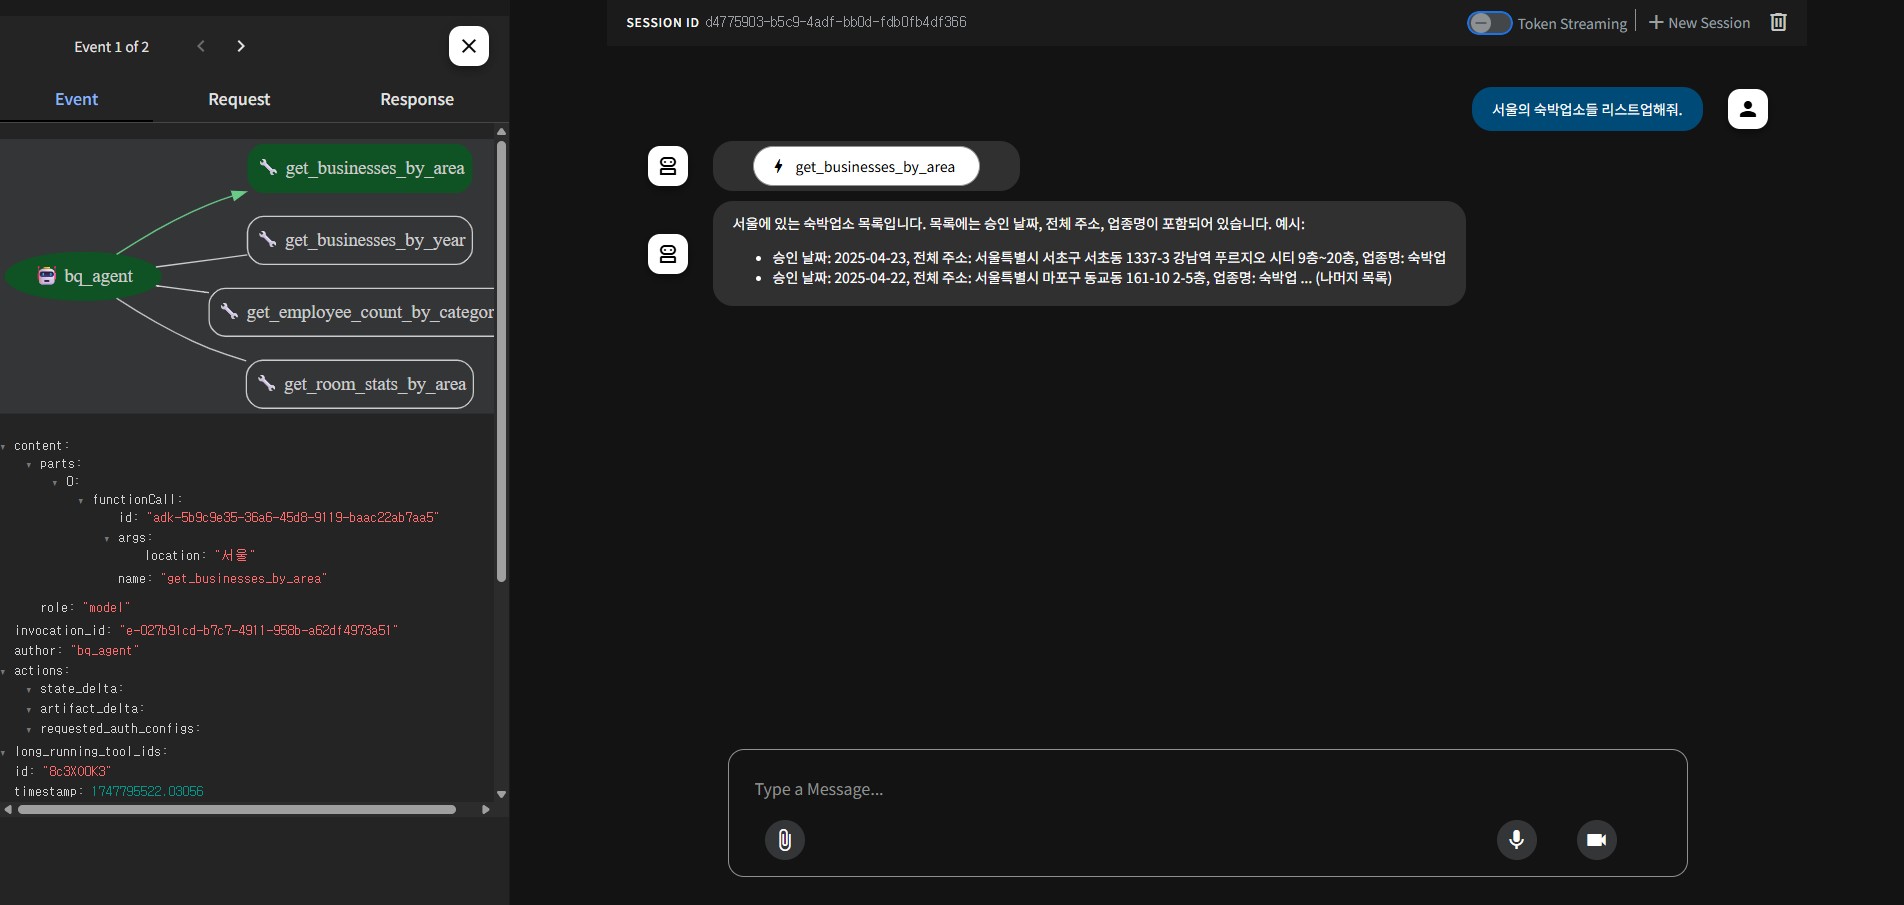
해당 파일이 있는 위치에서 한 단계 상위 폴더로 이동하여 'adk web' 명령어 실행
Agent의 동작 구조와 호출된 function, 추출된 parameter 모두 확인이 가능하다.
Local에서 확인
위의 코드에 이어서 밑에 아래 코드를 추가해주자.
agent.py
# 위의 코드 아래에 추가
from google.adk.runners import Runner
from google.adk.sessions import InMemorySessionService
from google.adk.artifacts.in_memory_artifact_service import InMemoryArtifactService
from google.genai import types # For constructing message content

# --- Initialize Services for Running the Agent ---
session_service = InMemorySessionService()
artifacts_service = InMemoryArtifactService()
# Create a new session for the interaction.
session = session_service.create_session(
    state={}, app_name='bq_agent', user_id='123'
)

runner = Runner(
    app_name='bq_agent',
    agent=root_agent,
    artifact_service=artifacts_service,
    session_service=session_service,
)

# --- Define Queries and Run the Agent ---
queries = [
    "서울의 숙박업소들 리스트업해줘.",
    "2024년도에 승인된 숙박업소들 알려줘.",
    "광주에 있는 숙박업소의 객실 수 통계내줘.",
    "전체 숙박업소 업체 중 일반호텔에 종사하고 있는 직원 수 알려줘.",
]

for query in queries:
    content = types.Content(role='user', parts=[types.Part(text=query)])
    events = runner.run(session_id=session.id,
                        user_id='123', new_message=content)

    responses = (
      part.text
      for event in events
      for part in event.content.parts
      if part.text is not None
    )

    for text in responses:
      print(text)
실행
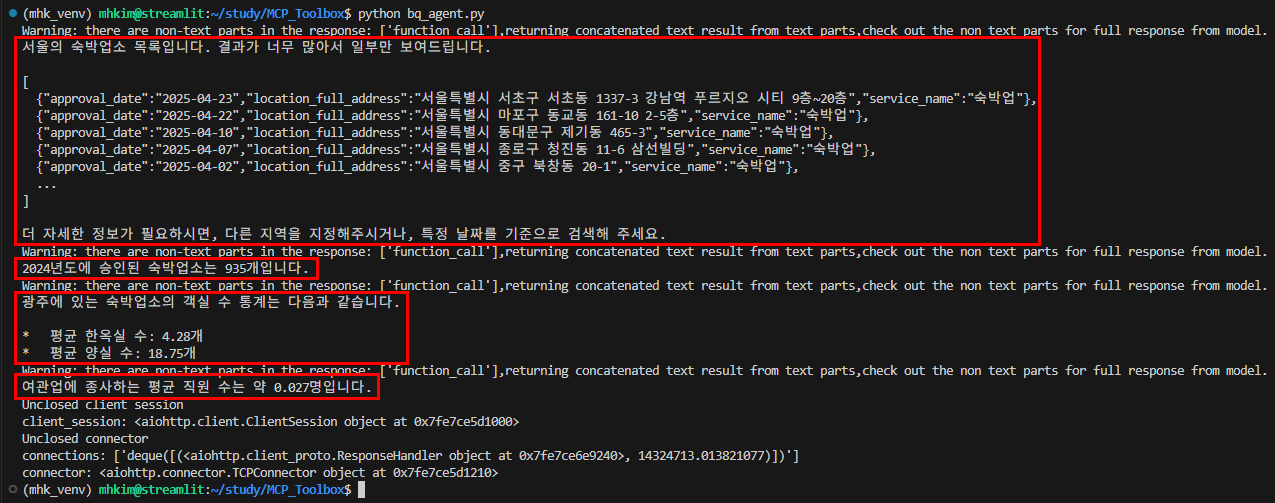
코드에 보면 알 수 있다시피 각각의 툴을 사용하는 4가지 질문들을 넣어줬고 BigQuery에서 실행된 쿼리문을 통해 LLM이 잘 답변한 것을 확인할 수 있다.
[ADK와 MCP Toolbox for Databases를 사용한 DB Agent 개발 참고]
- https://googleapis.github.io/genai-toolbox/samples/bigquery/local_quickstart/
- https://medium.com/google-cloud/building-a-conversational-agent-on-bigquery-data-using-googles-agent-development-kit-and-mcp-0fd78b38a53e
- https://medium.com/google-cloud/tutorial-mcp-toolbox-for-databases-exposing-big-query-datasets-9321f0064f4e