
✔ 데이터 전처리
범주형 데이터:Category, Factor -enum: 나열형, 열거형 상수
개요
- 특정한 값만을 갖는 데이터
문자를 숫자로 표현해보자.
A, B, C, D를 어떻게 숫자로 표현하지?
- A : 0, B : 1, C : 2, D : 3
- 이는 대신 순서의 개념이 도입된 것으로 보인다.
Ex)
SHIFT, ALT, CONTROL, L Button, R Button 을
내가 0,1,2,3,4 로 순서를 지정해도 되는 걸까?
그럼 이렇게 해보자.
SHIFT : 1 0 0 0 0
ALT : 0 1 0 0 0
CONTROL : 0 0 1 0 0
L BUT : 0 0 0 1 0
R BUT : 0 0 0 0 1
순서가 없는 친구들은 이렇게 해주면 좋을 것 같아!
- 이게 One Hot Encoding이야.
One Hot Encoding ❗
- 머신러닝은 오로지 숫자 데이터로만 작업을 한다.
- 위에 표시한 그대로 작업을 한다면 메모리를 너무 사용하는 문제가 있다.
- Dense Matrix(밀집 행렬)로 사용하던 것을 좀 바꿔보자.
- Sparse Matrix(희소 행렬)로 바꿔보자.
- 1인 곳의 좌표만 설정해주자. (코테 길찾기 문제 입력 같은 느낌인데)
- 저장은 희소행렬, 출력은 밀집행렬로 하는 편입니다.
- 범주형 데이터를 수치 데이터로 변환하는 방법
- 0 과 1은 크고 작음을 나타내는 것이 아니고, 특성의 존재 여부만을 나타냄
pandas get_dummies()메서드를 이용한다면 범주형 데이터를 원 핫 인코딩을 할 수 있습니다.- 다중 회귀에서 사용할 때는 너무 많은 특성(열, column, feature)을 만들어내기 때문에, 다중공선성문제를 유발할 수 있기 때문에, 적절하게 특성의 개수를 조절해야 합니다.
- 다중공선성 (기억하자)
- 하나의 특성이 다른 특성에 종속되어서 과도하게 영향을 미치는 것
실습
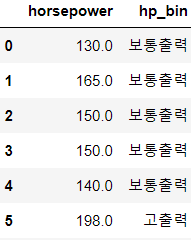
# auto-mpg 데이터 읽어오기
auto_mpg=pd.read_csv('./data/auto-mpg.csv', header=None)
# 컬럼 이름 설정하기
auto_mpg.columns=['mpg', 'cylinders', 'displacement', 'horsepower',
'weight','acceleration', 'model year', 'origin', 'name']
auto_mpg['horsepower'].replace('?',np.nan,inplace=True)
auto_mpg.dropna(subset=['horsepower'],axis=0, inplace=True)
auto_mpg['horsepower']=auto_mpg['horsepower'].astype('float')
auto_mpg.head()
# One Hot Encoding # Horsepower 특성을 범주형으로 추가 - 3개의 영역으로 구분 # 3개의 구간으로 구분해서 개수와 경계값을 리턴받아서 저장 count,bin_dividers=np.histogram(auto_mpg['horsepower'],bins=3) # 범주형 형태로 생성 auto_mpg['hp_bin']=pd.cut(x=auto_mpg['horsepower'], bins=bin_dividers, labels=['저출력', '보통출력', '고출력'], include_lowest=True) auto_mpg[['horsepower','hp_bin']].head(10)
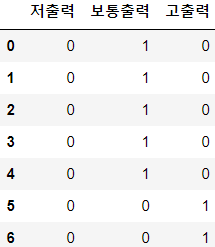
# 원 핫 인코딩 수행 - 값이 3종류이므로,
# 3개의 특성이 만들어지고 값은 하나만 1이다.
horsepower_dummies=pd.get_dummies(auto_mpg['hp_bin'])
horsepower_dummies.head(7)
sklearn.preprocessing의 One Hot Encoding
- LabelBinarizer
- 하나의 특성을 One Hot Encoding- MultiLabelBinarizer
- 여러 개의 특성을 One Hot Encoding- LabelEncoder
- 0부터 시작하는 정수로 인코딩, 순서가 의미있는 경우에 사용- OneHotEncoder
- Sparse 옵션에 따라 희소행렬이나 밀집행렬의 형태로 리턴해주는 클래스
실습
from sklearn.preprocessing import LabelBinarizer
one_hot=LabelBinarizer()
one_hot.fit_transform(auto_mpg['hp_bin'])
#이름확인
one_hot.classes_
# 2개 이상의 특성을 가지고 원 핫 인코딩이 가능합니다. # 2ㅐ 이상의 1이 등장할 수 있습니다. from sklearn.preprocessing import MultiLabelBinarizer multi_feature=[('java','c++'),('c++', 'python'), ('java', 'c#'), ('java', 'kotlin'), ('python', 'go'), ('python', 'r')] one_hot_multiclass=MultiLabelBinarizer() print(one_hot_multiclass.fit_transform(multi_feature)) print(one_hot_multiclass.classes_)
데이터의 순서가 의미를 갖는 경우
- pandas의
replace함수를 이용해서 직접 치환 가능 - sklearn에서는
OrdinalEncoder를 이용해서 치환 가능한데, 이 경우는 여러 개의 컬럼도 동시에 가능함
# 순서가 의미를 갖는 경우 - replace 함수 이용
df=pd.DataFrame({"Score":['저조','보통','보통','저조',
'우수','매우우수']})
scale_mapper={'저조':1,'보통':2,'우수':3,'매우우수':4}
df['encoder']=df['Score'].replace(scale_mapper)
print(df)
from sklearn.preprocessing import OrdinalEncoder features=np.array([['Low',10],['Normal',20],['High',15]]) ordinal_encoder=OrdinalEncoder() print(ordinal_encoder.fit_transform(features)) print(ordinal_encoder.categories_)
결측치 대체
- 결측치를 대체하는 방법으로, 최선의 방법은 일반적으로 다른 데이터의 다른 특성의 값을 이용해서 머신러닝을 수행해서 값을 예측해서 대입하는 것이고, 그 이외의 경우는 최빈값을 사용하거나 이전이나 이후의 값을 이용하는 방법도 존재합니다.
- 회귀와 분류는 거의 수행 방식이 동일한데, 결과가 수치 데이터이면 회귀이고, 결과가 범주형이면 분류입니다.
# 분류 모델을 이용한 결측값 대체
from sklearn.neighbors import KNeighborsClassifier
# 훈련 데이터 생성
X=np.array([[0,2.10,1.45],[1,1.18,1.33],[0,1.22,1.27],
[1,-0.21,-1.19]])
X_with_nan=np.array([[np.nan,0.87,0.31],[np.nan,-0.67,-0.22]])
# KNN 학습기 생성
clf=KNeighborsClassifier(3,weights='distance')
# 첫 번째 데이터가 레이블이고 나머지 데이터를 feature로 설정해서 훈련하기
# data, target 순으로 적어두었구나?
trained_model=clf.fit(X[:,1:],X[:,0])
# 예측
imputed_values=trained_model.predict(X_with_nan[:,1:])
print(imputed_values)
# 예측한 데이터와 원본 데이터를 합치기
# 옆으로 합치면 hstack
X_with_imputed=np.hstack((imputed_values.reshape(-1,1),
X_with_nan[:,1:]))
print(X_with_imputed)
# 결측치를 대체한 데이터와 훈련에 사용한 데이터를 합쳐보자.
# 위 아애로 합치면 vstack을 사용합니다.
result=np.vstack((X_with_imputed,X))
print(result)
# 가장 많이 나오는 데이터로 대체 from sklearn.impute import SimpleImputer X_complete=np.vstack((X_with_nan,X)) print(X_complete) imputer=SimpleImputer(strategy='most_frequent') imputer.fit_transform(X_complete)
범주형 데이터의 불균형 문제
- 적은 양의 데이터를 갖는 부분을 모으는 것이 근본적인 해결방법
- 모델이 평가 지표를 변경
- 정확도 오차행렬, 정밀도, 재현율, F1 Score, ROC Curve를 활용
- 정확도는 분석의 지표로 사용하지 않습니다.
- 데이터가 균형을 이룰 때만 사용이 가능합니다. - 데이터에 가중치를 적용
- 대다수의 AI 모델들은 데이터의 가중치를 부여할 수 있는 옵션을 제공합니다. - 다운 샘플링 & 업 샘플링
- 샘플의 비율을 줄이거나 늘려버리는 것
- 최근에는 업샘플링 대신 생성모델을 이용 (결과 왜곡 문제)
텍스트 데이터
텍스트 마이닝
- 비정형 데이터인 텍스트를 가지고 사용자가 분석 도구를 이용해서 새롭고 유용한 정보를 찾아가는 과정
텍스트 정제
- 파이썬의 문자열 메서드를 이용해서 정제하는 경우가 많음
- str 클래스에 속한 메서드를 잘 활용하는 것이 중요합니다.
- strip, replace, split, upper, lower, substr 등...
정규 표현식
- 문자열 데이터를 어떠한 패턴으로 파악하여 식별하는데 사용하는 표현식
- 이거 제발 공부 열심히 해두자.
- python에서는 re모듈 제공합니다.
- 패턴의 반복을 의미하는 메타 문자
- * : 0번 이상
- + : 1번 이상
- ? : 0 번이나 1번
- (숫자) : 숫자 만큼
- (숫자1,숫자2) : 숫자 1에서 숫자 2만큼
- (숫자,) : 숫자 이상 - 매칭 관련 메타 문자
- . : 줄바꿈 문자를 제외한 글자 1개
- ^ : 시작하는 이지만, [] 안에서 사용이 되면 제외
- $ : 끝나는 인데 []안에서는 그냥 $
- [] : 집합을 의미하는데, , 나 - 사용이 가능(, : 또는, - 범위)
- | : 또는
- () : 정규식을 하나의 그룹으로 묶을 때 사용합니다. - 특수 문자
- \ : 역 슬래시
- \d : 숫자
- \D : 숫자를 제외한
- \s : 공백문자
- \S : 공백문자를 제외한
- \w : 숫자나 문자
- \W : 숫자나 문자를 제외한
- \b : 단어의 경계
- \B : 단어의 경계가 아닌 - 플래그
- re.I : 대소문자 구분하지 않고 적용
- re.M : 여러 줄에 걸쳐서 매칭 - re 모듈의 함수
- compile : 정규식 인스턴스 생성
- search
- match
- split
- findall
- sub : 치환, 문자열을 수집한 후 이 함수를 이용해서 불필요한 데이터 삭제
실습
import re
# 매칭 여부를 확인하자
match=re.match('[0-9]', '1234')
# 패턴에 일치하는 데이터가 있으면 match 객체 리턴
# 없으면 None 리턴
print(match)
match2=re.match('[0-9]', 'abc')
print(match2)
string='@안녕하세요 반갑습니다^^ 486 의미없는 숫자는...!!!' # 숫자 데이터 제거하기 p=re.compile('[0-9]+') result=p.sub('',string) print(result) # 특수문자 제거하기 p=re.compile('\W+') result=p.sub(' ',result) print(result)
- 구두점 제거는 unicodedata 패키지를 이용할 수 있습니다.
import unicodedata
import sys
text_data=['안녕하세요 반갑습니다.', 'My job is Programmer.',
'C&C++ ,python']
# 구두점 딕셔너리를 생성
punctuation=dict.fromkeys(i for i in range(sys.maxunicode)
if unicodedata.category(chr(i)).startswith('P'))
result=[string.translate(punctuation) for string in text_data]
print(result)
텍스트 토큰화
- 문장으로 입력받은 데이터를 '단어'단위로 쪼개는 것
- 일반적으로 공백과 마침표를 이용해서 단어와 문장 단위로 분할합
nltk패키지의word_tokenize나sent_tokenize를 이용해서 수행nltk패키지의punkt와stopwords라이브러리 설치
- pip install nltk- 설치 코드
- import nltk
- nltk.download('punkt')
- nltk.download('stopword')
from nltk.tokenize import word_tokenize
from nltk.tokenize import sent_tokenize
string='The science of today is the technology of tomorrow'
print(word_tokenize(string))
string="품질은 양보다 중요합니다 한 번의 홈런이 두번의 2루타보다 낫습니다. 혁신은 현존하는 수천 가지 것들 중에 아니라고 말하는 것이다."
print(sent_tokenize(string))
불용어(Stopwords) 처리
- 불용어
- 자주 사용되지만 특별한 의미를 부여하기 힘든 단어들 - 파이썬의 nltk 패키지에서는 영어, 프랑스어, 독일어, 이탈리아어, 헝가리어, 핀란드어, 덴마크어, 네덜란드어에 대한 불용어 사전을 제공함
- sklearn에서도 영어에 대해서는 제공
- 한글의 불용어는 사이트에서 참고
- 대부분의 경우는 제공되는 불용어 사전에 도메인에 따른 불용어를 추가
- corpus
- 자연어 처리에서 의미를 갖는 데이터
# 불용어 제거 - 한글은 불용어 사전이 없기에 직접 만들어야 한다.
word_korean=['1월','2월','3월','4월']
stopwords=['2월','3월']
print([i for i in word_korean if i not in stopwords])
# i for i in word_korean if i not in stopwords 는 작업을 수행해서
# generator를 생성. 이는 이터레이터로 접근할 수 있는 객체임
# 영문도 해보자. from nltk.corpus import stopwords word_english=['chief','the','an','and','president','kenedy', 'move'] result=[w for w in word_english if not w in stopwords.words('english')] print(result) from sklearn.feature_extraction.text import ENGLISH_STOP_WORDS result=[w for w in word_english if not w in ENGLISH_STOP_WORDS] print(result)
어간 추출
- 한글은 어미나 조사에 따라 단어의 형태가 변경되고 영어는 단수형과 복수형이 존재하고, 시제에 따라 동사의 모양이 변함
- 어미나 조사가 바뀐다고해서 단어의 의미자체가 변경되지는 않음
- 한글의 경우에는 어미나 조사에 상관없이 단어를 추출할 수 있어야 하고, 영문은 단수나 복수 또는 시제에 상관없이 추출이 가능해야 합니다.
- 영문의 경우에는 NLTK 패키지의
PorterStemmer나LancasterStemmer를 제공 - 한글의 경우에는 별도의 형태소 분석기를 활용합니다.
# 영문 어간 추출
from nltk.stem import PorterStemmer
from nltk.stem.lancaster import LancasterStemmer
from nltk.tokenize import word_tokenize
string="All pythoners have pythoned poorly at least once"
# 단어 토큰화
words=word_tokenize(string)
print(words)
# 어간 추출
ps_stemmer=PorterStemmer()
for w in words:
    print(ps_stemmer.stem(w), end='\t')
print()
# 어간 추출
ls_stemmer=LancasterStemmer()
for w in words:
    print(ls_stemmer.stem(w), end='\t')
- 어간 추출에서 주의할 점은 언어는 계속해서 진화한다는 것이다.
n-gram
- 연속해서 등장하는 단어이다.
- 즉, 2개 이상의 단어로 구성되어 있지만, 하나의 단어로 간주해야 하는 것이다.
- 2개의 단어로 구성되면 바이그램, 3개의 단어로 구성되면 트라이그램
- 자연어 처리를 할 때, n-gram에 대한 말뭉치를 만드는 것도 고려
- 연속해서 몇 번 이상 등장하면 하나의 말뭉치로 간주.
형태소 분석 - 품사 태깅
- 단어의 list를 이용해서 단어와 품사 태그로 이루어진 튜플의 리스트를 만드는 작업
- 자연어 처리를 하다보면, 특정 품사의 단어를 제외하거나 가중치를 부여해야 하는 경우가 발생하기 때문에 단어의 품사를 알아내는 일은 중요합니다.
- 영어는 nltk가 pos_tag라는 라이브러리를 제공하고, google의 BERT같은 라이브러리를 이용하면 됩니다.
- 한글은 konlpy를 주로 이용합니다.
한글 형태소 분석
- 한글 형태소 분석은 konlpy 패키지를 이용합니다.
- konlpy는 java로 만들어져 있어서 java 설치가 필요합니다.
- 이후 java를 python에서 인식하도록 해주는 JPype를 설치해야 합니다.
- JPype가 C언어로 만들어져 있어서 widows에서는 직접 설치가 안되며, visual C++ 재배포 패키지나, build tool을 설치해야만 설치되는 경우가 있습니다.
- 설치
- 자바 설치
- jdk 다운로드 받아서 설치
- windows의 경우는 jdk경로 또는 jvm.dll 파일의 경로를 JAVA_HOME 환경변수에 대입해야 합니다.
- 차후에 java 명령을 편리하게 사용하기 위해서 jdk 경로 내의 bin 디렉경로를 path 설정해줘야 합니다.- widows의 경우에는 VC++재배포 패키지나 Build Tool을 설치해야 합니다.
- JPype 설치
-conda install -c conda-forge jpype1- konlpy 설치
-pip install konlpy
# 한글 형태소 분석
from konlpy.tag import Kkma
text='태양계는 지금으로부터 약 46억년 전 거대한 분자 구름의 일부분이
중력 붕괴를 일으키면서 형성되었다.'
kkma=Kkma()
#문장 분석
print(kkma.sentences(text))
# 단어 분석
print(kkma.nouns(text))
# 형태소 분석
print(kkma.pos(text))
# 다른 형태소 분석기 from konlpy.tag import Hannanum hannanum=Hannanum() # 단어 분석 print(hannanum.nouns(text)) # 형태소 분석 print(hannanum.morphs(text)) print(hannanum.pos(text))
BoW - Bag of Word (중요)
- 텍스트 데이터에서 특정 단어의 등장 횟수를 나타내는 특성을 만드는 작업
- sklearn의
CounterVectorizer객체를 가지고 생성이 가능합니다. - 옵션
- ngram_range
- stop_words
- vocabulary
- 단어의 list를 제공해서 list에 해당하는 것만 카운트- max_df
- 최대 개수- min_df
- 최소 개수- max_feature
- 추출할 상위 카운트의 개수
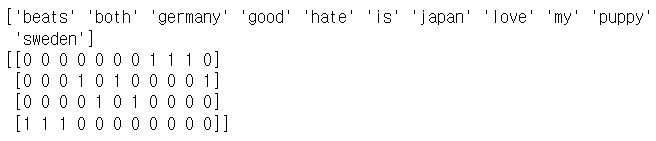
# BoW(Bag of Word) - 단어의 개수
from sklearn.feature_extraction.text import CountVectorizer
text_Data=np.array([
    'I love my puppy',
    'Sweden is good',
    'I hate japan',
    'Germany beats both'
])
count=CountVectorizer()
bag_of_words=count.fit_transform(text_Data)
print(bag_of_words)
- 희소행렬의 형태로 출력된다.
# 밀집 행렬의 형태로 출력하려면
print(count.get_feature_names_out())
print(bag_of_words.toarray())

tf-idf (중요)
- 단어의 가중치
- tf
- 하나의 단어가 하나의 문장에서 자주 등장한다면 중요한 단어이다.
- 한 문장에서 여러번 등장하기에 중요한 단어로, 가중치를 주자. - idf
- 하나의 단어가 여러 문장에서 자주 등장한다면 중요하지 않은 단어이다.
- ex) '나는' '나는'.... | 'the', 'a' 'an', ... - 문장의 유사도 측정에 사용합니다.
- 논문 유사도 측정에 사용됩니다.
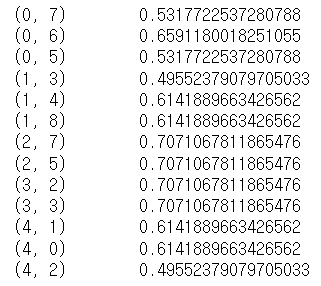
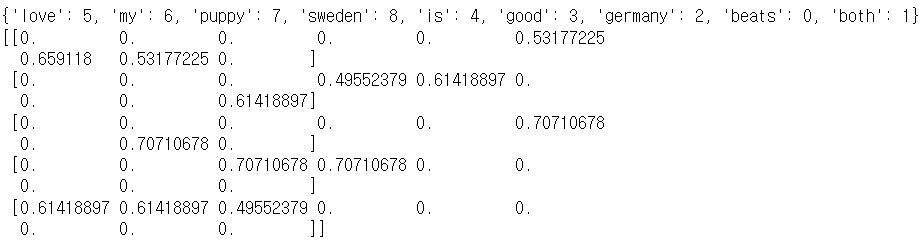
# tf-idf
from sklearn.feature_extraction.text import TfidfVectorizer
text_Data=np.array([
    'I love my puppy',
    'Sweden is good',
    'l puppy love',
    'Germany good',
    'Germany beats both'
])
# tf-idf 객체 생성
tfidf=TfidfVectorizer()
feature_matrix=tfidf.fit_transform(text_Data)
print(feature_matrix)
print(tfidf.vocabulary_)
print(feature_matrix.toarray())
시계열 데이터
개요
- 날짜와 시간을 이용해서 정렬한 데이터
- 일정한 간격을 갖는 데이터
- 센서 데이터 - 물리적 흔적
pandas의 시계열 자료형
- datatime64(Timestamp)
- 실제 시간 - Period
- 두 시점 사이의 일정한 기간을 나타내는 자료형
문자열로 만들어진 데이터를 시계열로 변환
-
pandas.to_datetime함수를 이용
- 날짜 형식의 문자열과 format 매개변수에 날짜의 형식을 문자열로 대입하면 변경을 해주는 format을 설정하지 않으면 유추를 한다.
- errors 매개변수에 ignore를 설정하면 에러를 무시하고, 원본 문자열을 리턴하고 coerece를 대입하면, 에러가 발생하는 경우 NaT로 설정하며, raise를 설정하면 문제 발생 시 예외를 발생시킴 -
포맷 문자
- %Y
- %m
- %d
- %l
- %p
- %M
- %S
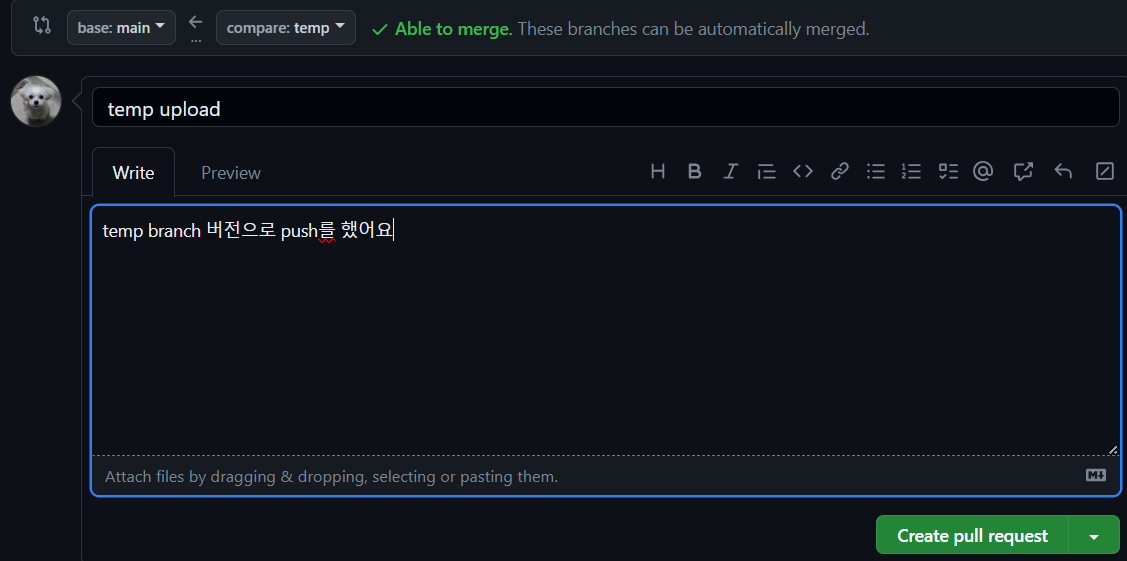
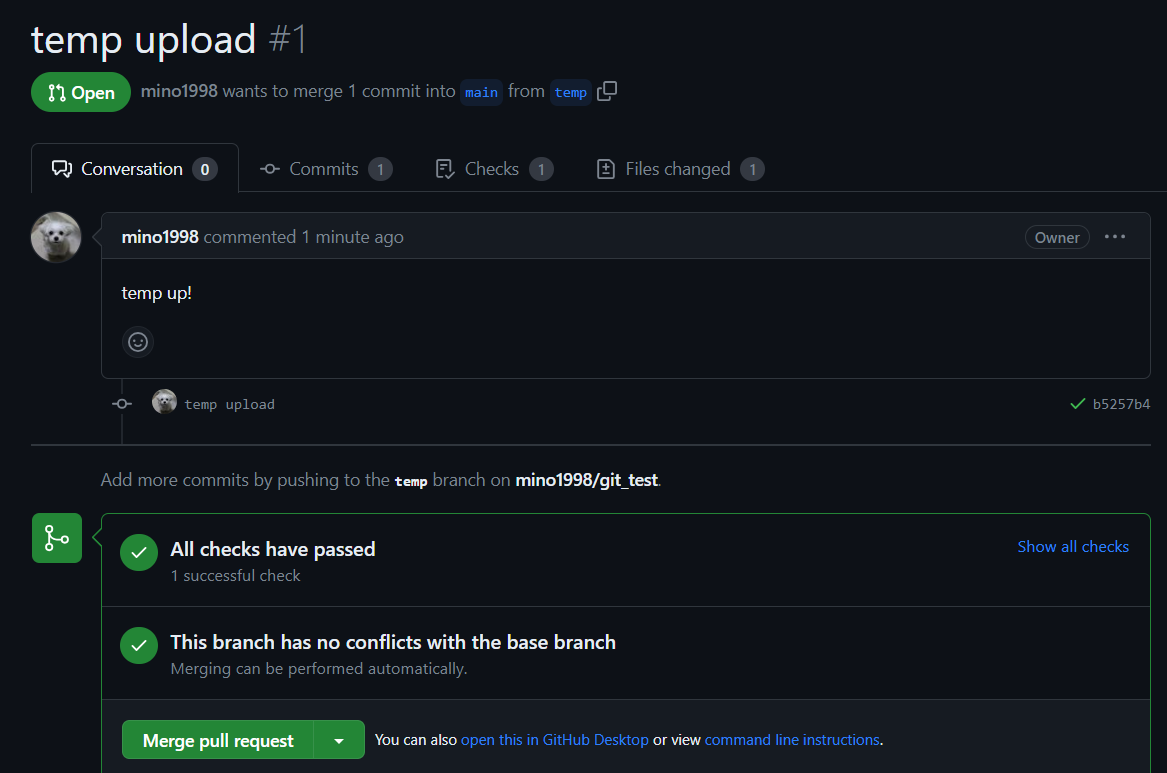
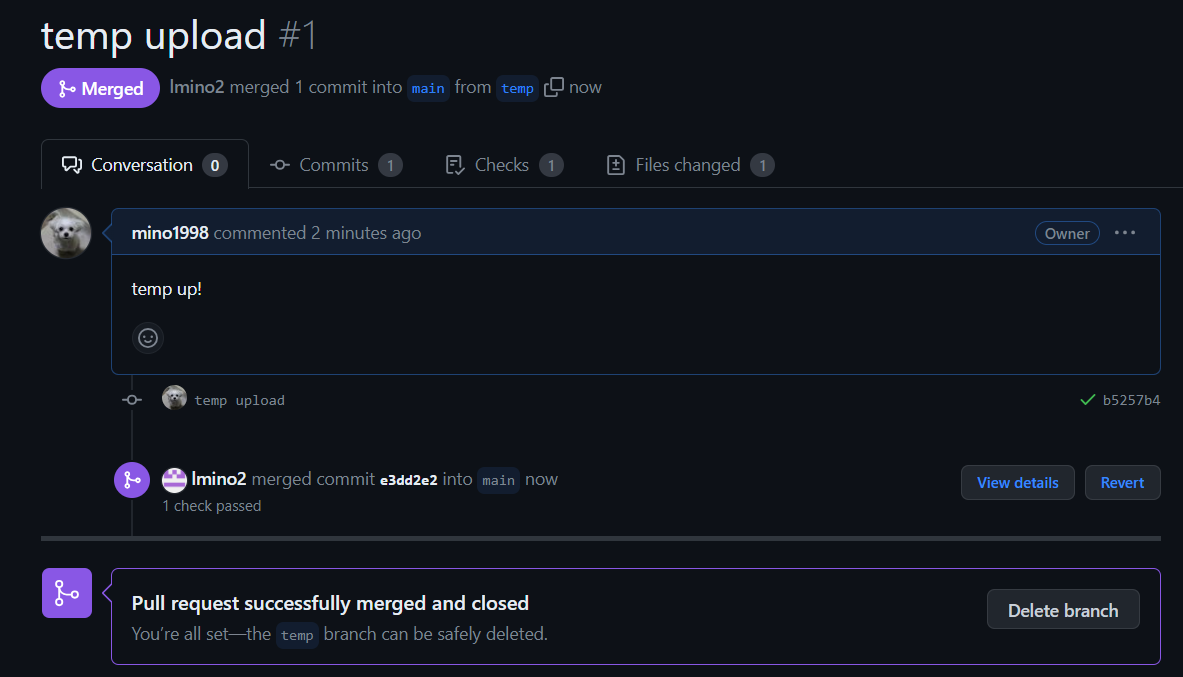
✔ git pull request
- repo 만들고
- collaborators -> 추가하기.
- main, temp branch로 push 한번씩 해주면
- 이렇게 한다면 다른 계정으로 봐보면
- file changed 도 확인 가능합니다.
- 본 계정으로 들어가서 보니 pull request는 사라지고 main branch에 temp branch 내용이 merge 되어있음
- 모두가 commit을 해줘야지 merge가 된다.
- 여기까지가 review하는 부분이었다.


밀가루 귀여워요