1. Redis Cache
데이터의 빠른 처리를 위한 임시저장소
- 데이터를 메모리(RAM)에 저장하므로, 디스크 기반 DB보다 속도가 빠름
- 읽기/쓰기 속도가 밀리초(ms) 단위로 매우 빠르게 동작함
- 특정 key에 대해 만료시간(TTL)을 지정할 수 있어 캐시 데이터가 일정시간이 지나면 자동 삭제됨
- 데이터의 변경이 적고, 읽기 요청이 많은 데이터가 적합함
- 도메인에 따라 여러개의 Redis 인스턴스를 연결하는 수평확장이 가능함
1️⃣ Cache Hit, Miss
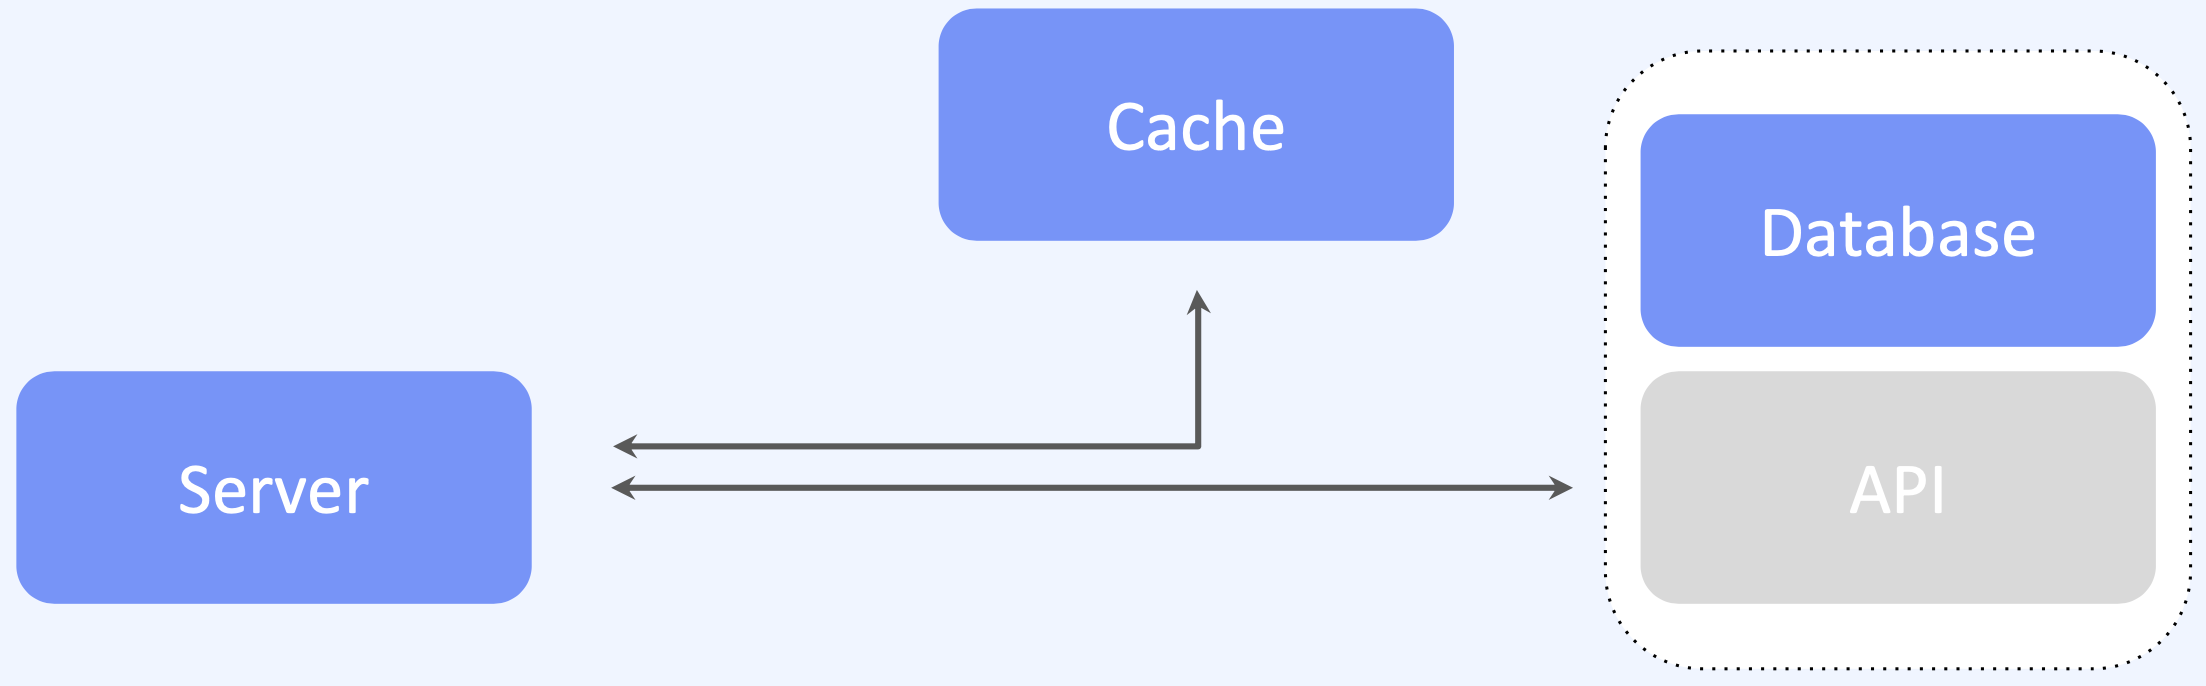
Cache Hit: 데이터 질의 → Cache 서버에 해당 데이터가 적재되어 있어 바로 반환 (DB 조회 X)Cache Miss: 데이터 질의 → Cache 서버에 해당 데이터가 존재하지 않아 DB에서 조회한 후 Cache 서버에 저장 및 반환
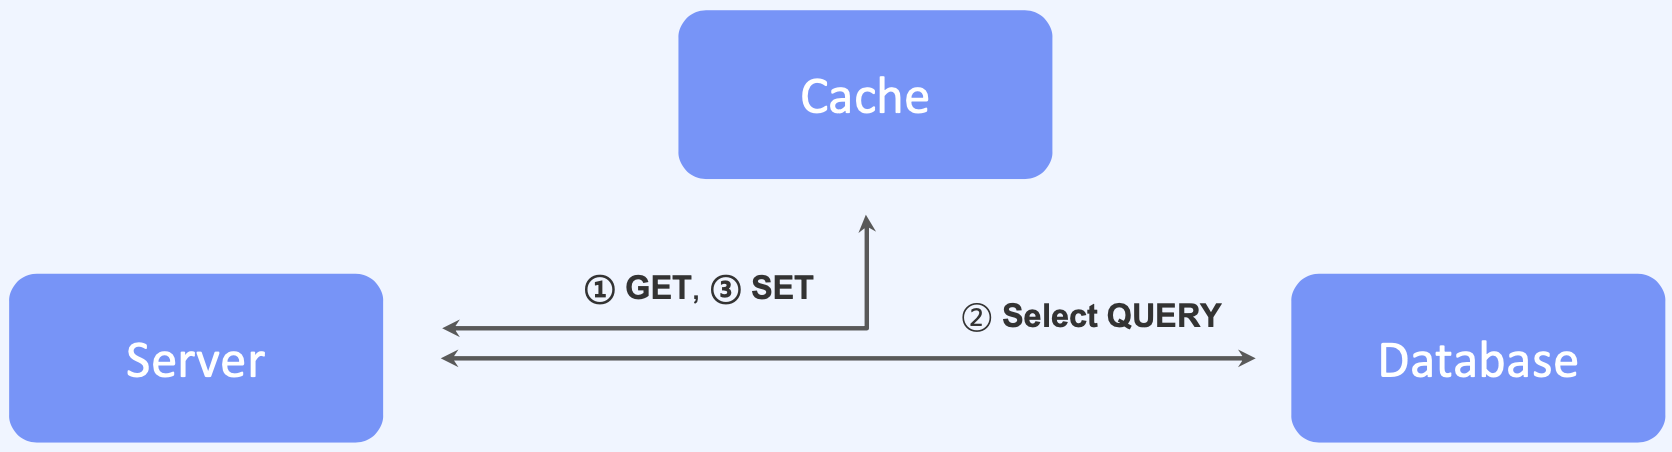
2️⃣ Cache pattern (Read)
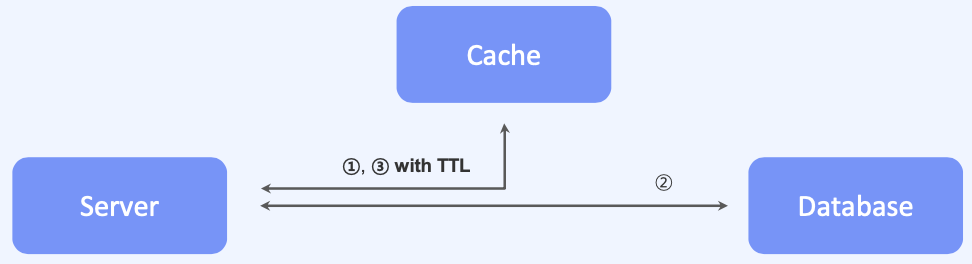
cache aside pattern
- ① Cache 서버에 데이터 질의
- ② Cache 서버에 적재되지 않은 데이터를 DB에서 직접 조회
- ③ DB에서 직접 조회한 데이터를 TTL(만료시간) 설정값과 함께 Cache 서버에 적재
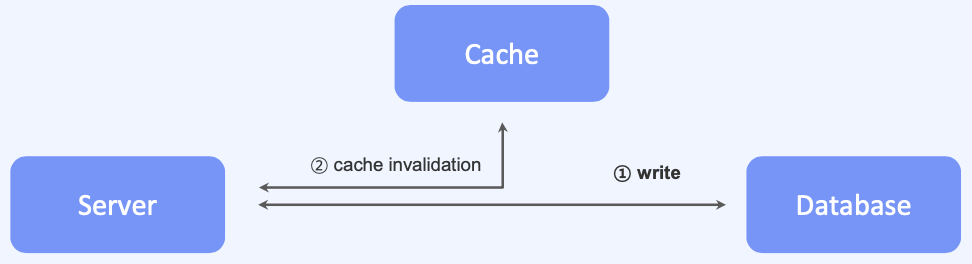
cache invalidation (캐시 무효화)
- 캐시에 저장된 데이터를 삭제하거나 갱신하여 DB와의 데이터 일관성을 유지하는 과정
| 전략 | 내용 | 단점 |
|---|---|---|
| Write-Through | - 데이터가 업데이트 될 때 DB와 Cache를 동시에 갱신 - DB와 캐시가 항상 동일한 데이터를 유지(sync) | - 동시 갱신때문에 쓰기 연산성능이 저하될 수 있음 |
| Write-Behind | - Cache만 먼저 갱신하고, 나중에 비동기적으로 DB 업데이트 - 데이터 변경 요청이 많은 경우 DB 부하를 줄이는데 유용 | - 장애 발생 시, 데이터 유실 위험 존재 |
| Cache Eviction | - 데이터가 변경될 때 Cache 데이터를 삭제하고, 다음 요청 시 DB에서 다시 조회해 저장 - Cache에 오래된 데이터가 남아있을 위험이 없음 | - Cache가 날아가므로 Cache Miss 증가 가능 (= 조회 성능 저하) |
3️⃣ Cache pattern (Write)

write-back pattern
- 데이터를 먼저 Cache에 저장한 후, 일정시간이 지나거나 특정조건이 충족되었을 때 비동기적으로 DB에 반영하는 방식
- Write-Through와 비슷하지만 DB 업데이트를 즉시 수행하지 않는다는 점이 가장 큰 차이점
- 클라이언트에게 즉시 응답을 반환할 수 있고, DB의 부하를 줄일 수 있는 장점이 있음
4️⃣ Local Cache
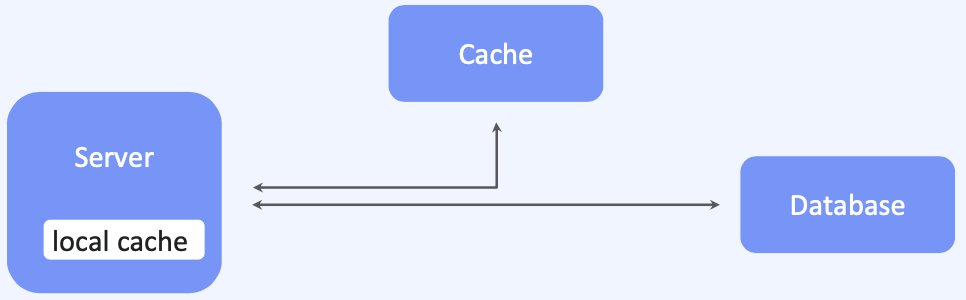
- local cache + 분산 캐시를 함께 사용
- 서버의 메모리를 캐시로서 사용
- ① local cache 조회
- 데이터 존재 → 즉시반환 (cache hit)
- 데이터 존재 X → 분산캐시(Redis)로 이동
- ② Redis(분산캐시) 조회
- 데이터 존재 → local cache에 저장 후, 반환 (cache hit)
- 데이터 존재 X → DB로 이동
- ③ DB에서 직접 조회 후, Redis(분산캐시)와 local cache에 동시 저장
2. Cache 실습
- Redis cache에 String type의 데이터를 저장하기 때문에 GET/SET 사용
1️⃣ docker mysql 초기설정
# Mysql Docker image 내려받기
> docker pull mysql:8

# -e 옵션으로 패스워드 및 포트 설정
> docker run -e MYSQL_ROOT_PASSWORD=mallang -d -p 3306:3306 mysql:8

# mysql cli 접속
> docker exec -it <컨테이너ID> mysql -p

# 데이터베이스 생성
mysql> create database sns;
mysql> use sns;
2️⃣ SpringBoot 프로젝트 생성
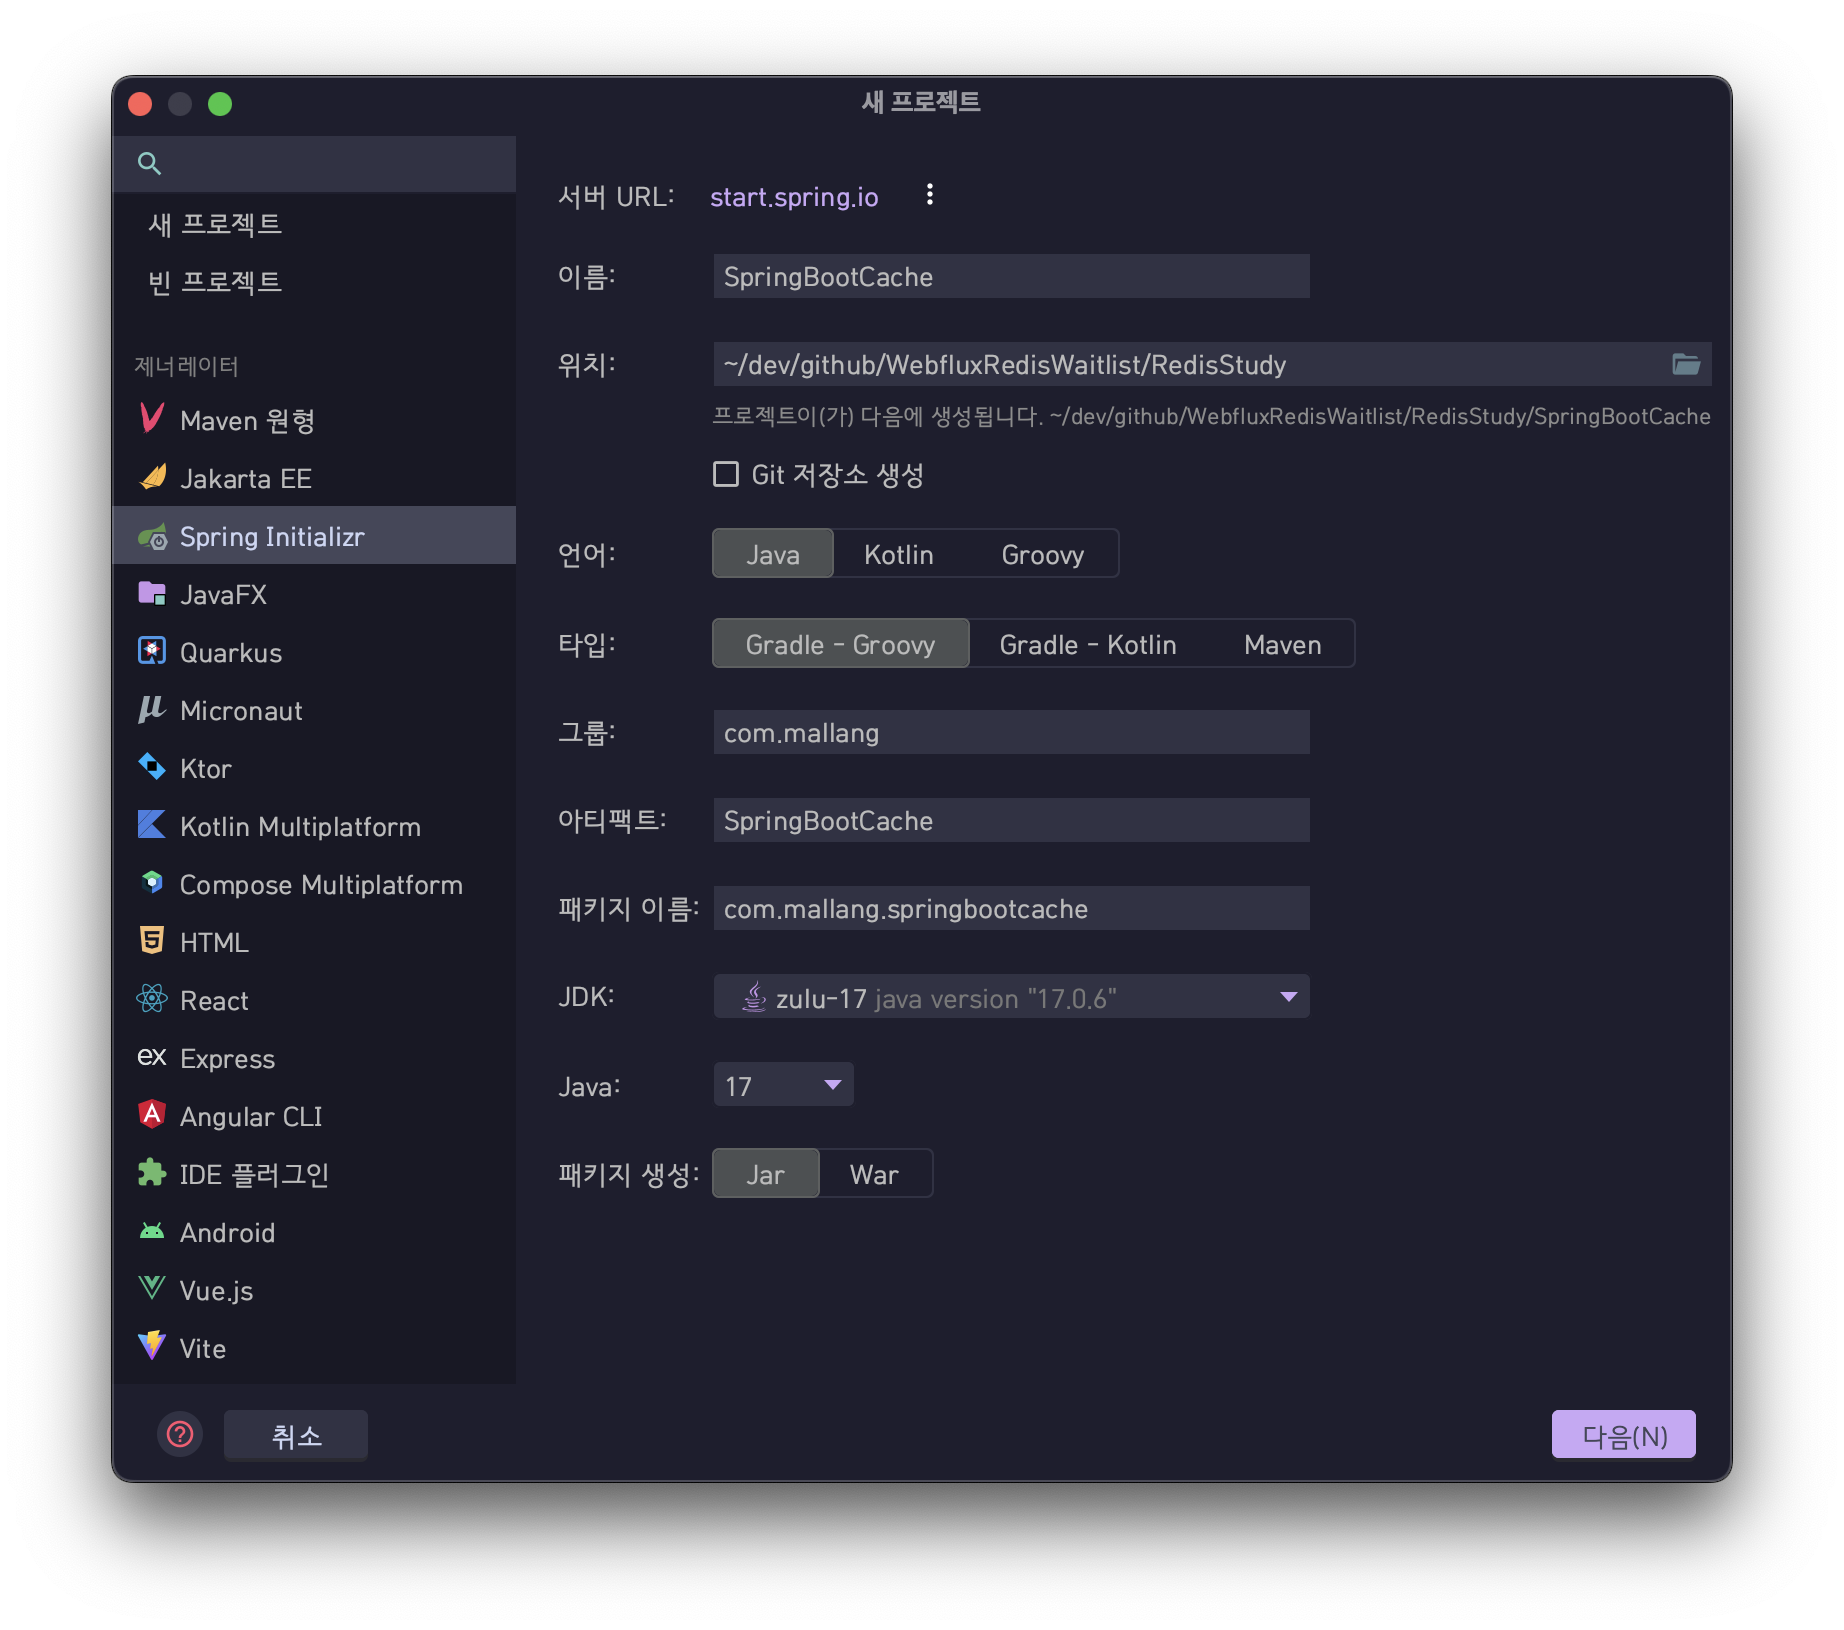
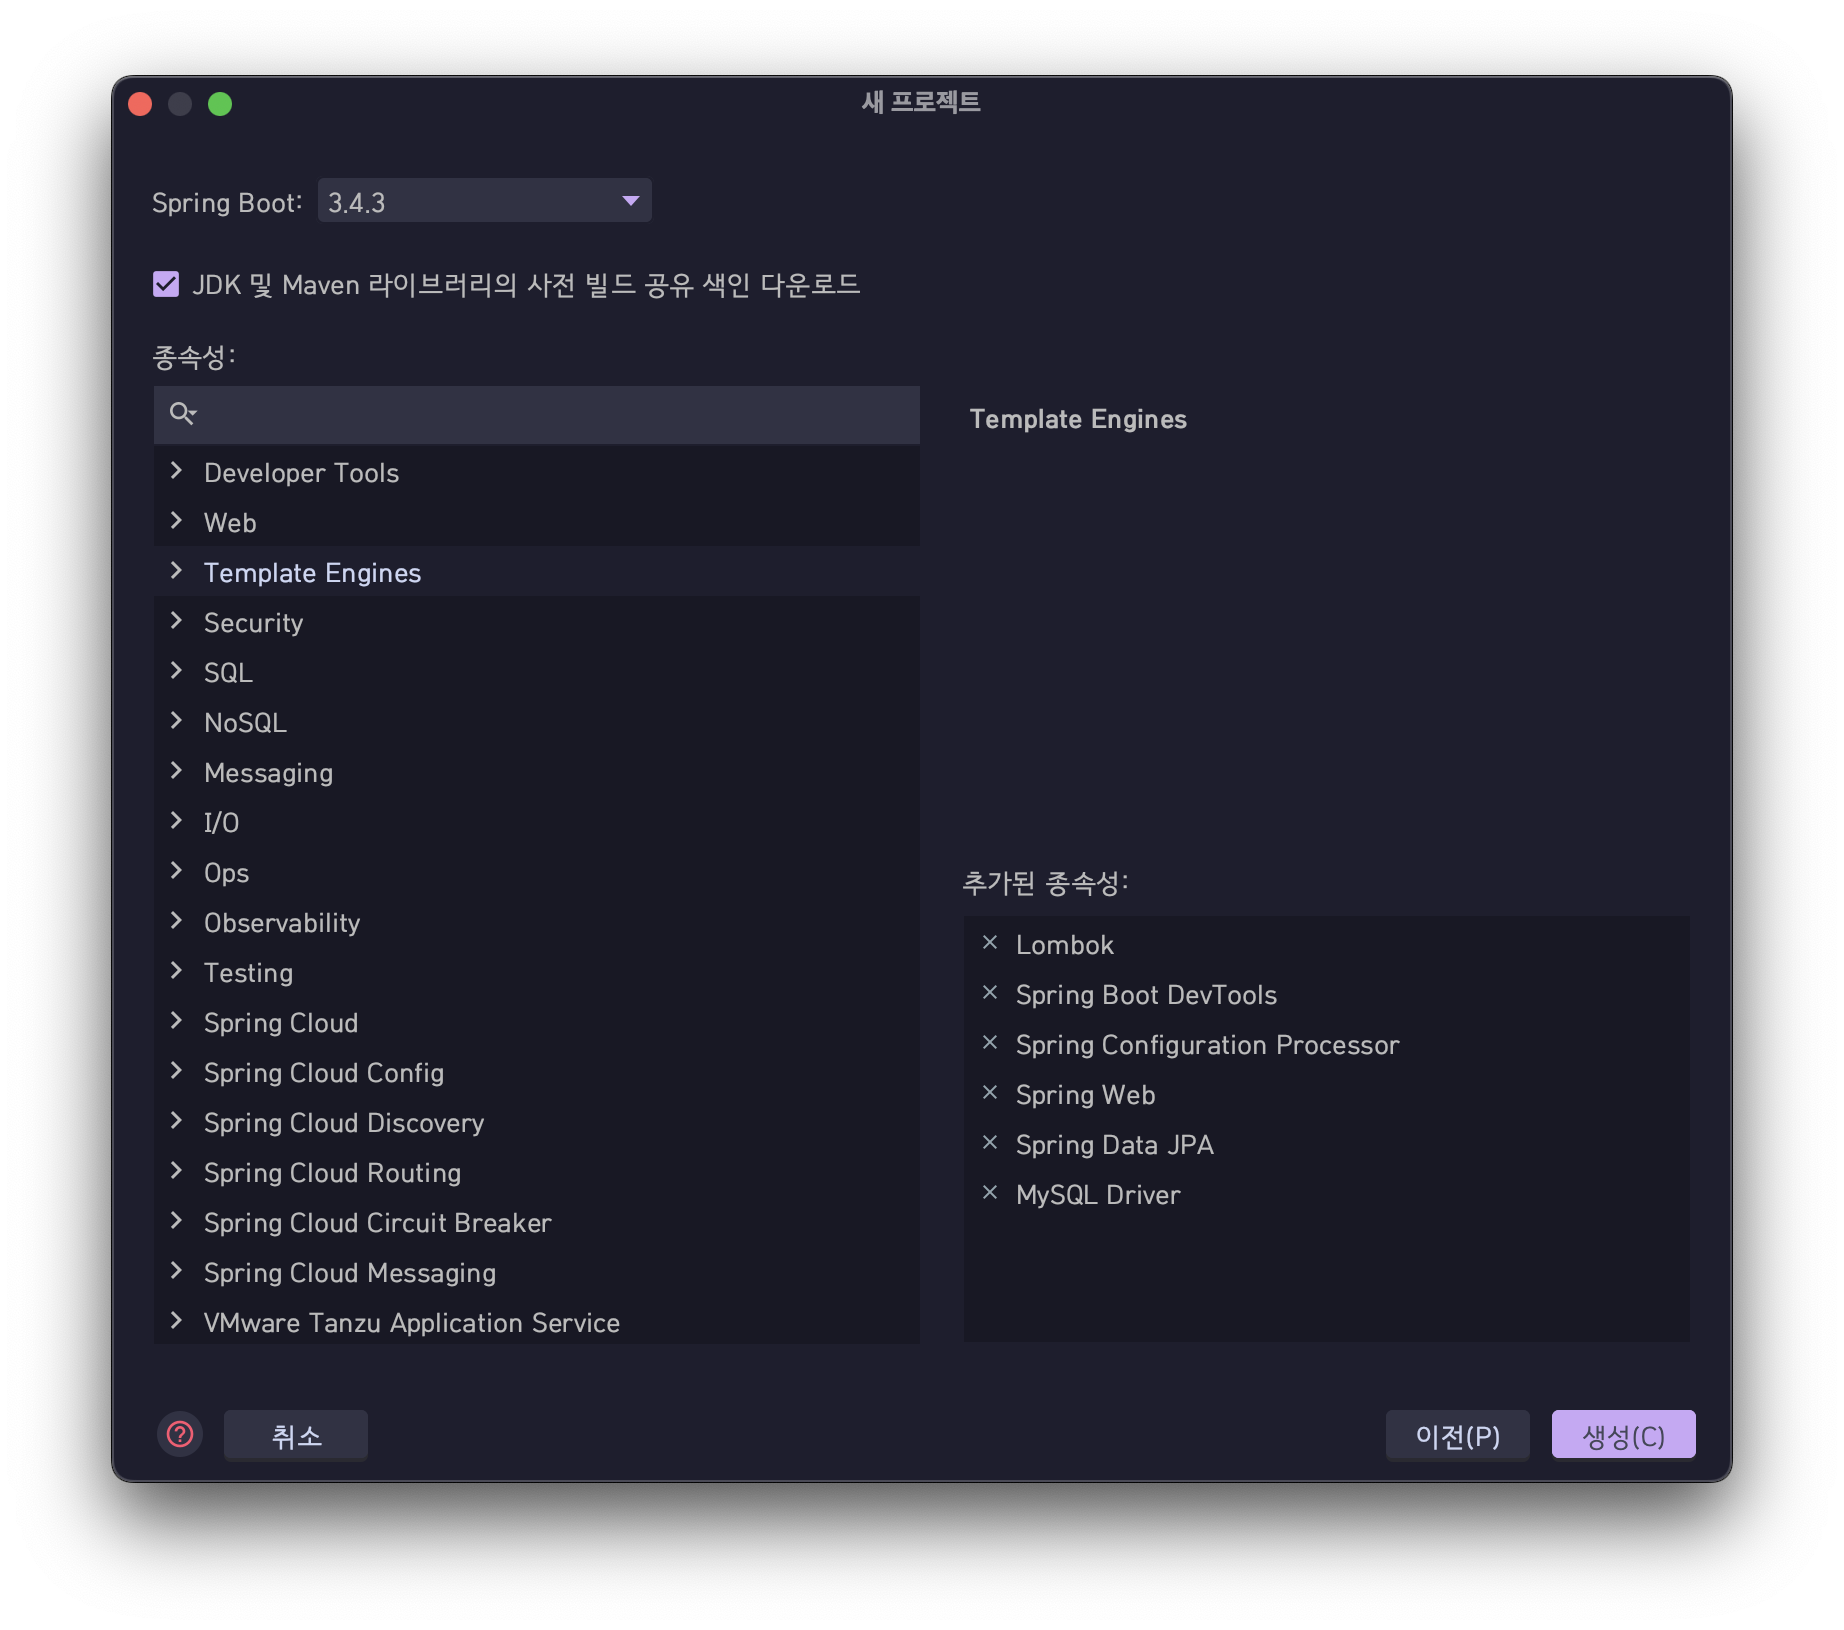
속성값 설정
application.properties→ yaml로 변경
spring:
  datasource:
    url: "jdbc:mysql://localhost:3306/sns"
    username: root
    password: mallang
  jpa:
    hibernate.ddl-auto: create # create option : table trop -> new create
    show-sql: true
  jmx:
    enabled: false
User Entity 생성
package com.mallang.springbootcache;

import jakarta.persistence.*;
import lombok.AllArgsConstructor;
import lombok.Builder;
import lombok.Getter;
import lombok.NoArgsConstructor;
import org.springframework.data.annotation.CreatedDate;
import org.springframework.data.annotation.LastModifiedDate;
import org.springframework.data.jpa.domain.support.AuditingEntityListener;

import java.time.LocalDateTime;

@Entity
@Builder // 데이터 save하기 위한 lombok 양식
@Getter
@NoArgsConstructor // 파라미터가 없는 기본 생성자 추가 (값 초기화X. 객체생성 후 필드 세팅을 도와줌)
@AllArgsConstructor // 모든 필드 값을 파라미터로 받는 생성자 추가 (Builder와 함께 특정 필드를 선택적으로 초기화)
@EntityListeners(AuditingEntityListener.class) // created, modified랑 연결 (자동 값 갱신)
public class User {

    @Id
    @GeneratedValue(strategy = GenerationType.IDENTITY)
    private Long id;

    @Column(length = 100)
    private String email;

    @Column(length = 30)

    private String name;

    @CreatedDate
    @Column(name = "created_at")
    private LocalDateTime createdAt;

    @LastModifiedDate
    @Column(name = "updated_at")
    private LocalDateTime updatedAt;

}
User Repository 생성
package com.mallang.springbootcache;

import org.springframework.data.jpa.repository.JpaRepository;

public interface UserRepository extends JpaRepository<User, Long> {

}
application.java → 데이터 삽입 추가
package com.mallang.springbootcache;

import lombok.RequiredArgsConstructor;
import org.springframework.boot.ApplicationArguments;
import org.springframework.boot.ApplicationRunner;
import org.springframework.boot.SpringApplication;
import org.springframework.boot.autoconfigure.SpringBootApplication;

// ApplicationRunner -> application 시작 시, 데이터 삽입
@SpringBootApplication
@RequiredArgsConstructor // final, @Notnull 필드 값만 파라미터로 받는 생성자 자동생성
public class SpringBootCacheApplication implements ApplicationRunner {

    private final UserRepository userRepository;

    public static void main(String[] args) {
        SpringApplication.run(SpringBootCacheApplication.class, args);
    }

    @Override
    public void run(ApplicationArguments args) throws Exception {
        userRepository.save(User.builder().name("mallang").email("mallang@mallang.com").build());
        userRepository.save(User.builder().name("chunsik").email("chunsik@chunsik.com").build());
        userRepository.save(User.builder().name("ryan").email("ryan@ryan.com").build());
        userRepository.save(User.builder().name("grommit").email("grommit@grommit.com").build());
    }

}
실행 후 docker mysql 확인
# mysql cli 접속
> docker exec -it <컨테이너ID> mysql -p
> use sns;
> show tables;
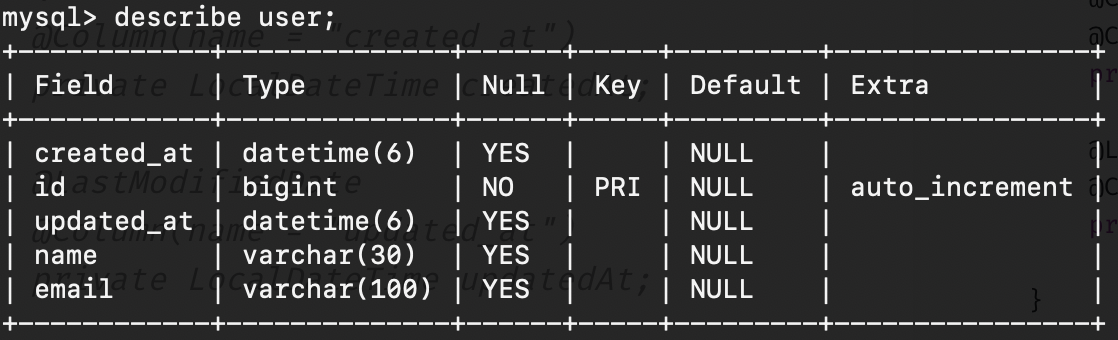
> describe user;
> select * from user;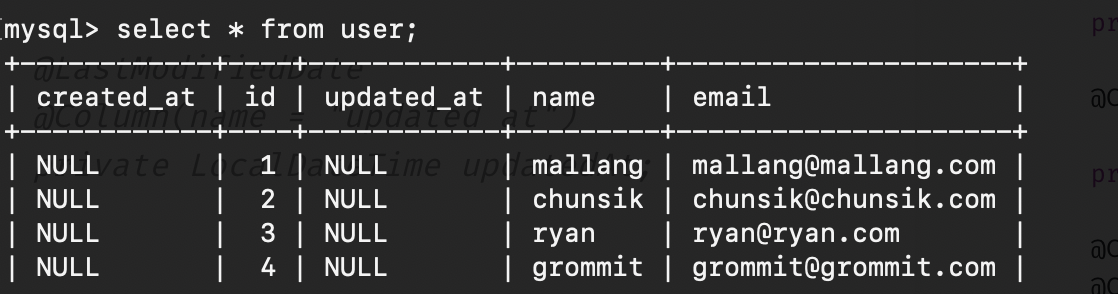
Jedis 의존성 추가
implementation 'redis.clients:jedis:4.3.1'Redis Config
package com.mallang.springbootcache;

import org.springframework.context.annotation.Bean;
import org.springframework.stereotype.Component;
import redis.clients.jedis.JedisPool;
import redis.clients.jedis.JedisPoolConfig;

// 재사용이 가능한 독립된 모듈
@Component // Spring Bean으로 등록 (의존성 주입 DI)
public class RedisConfig {

    @Bean
    public JedisPool createJedisPool() {
        JedisPoolConfig poolConfig = new JedisPoolConfig();
        poolConfig.setJmxEnabled(false); // JMX 기능 비활성화
        return new JedisPool(poolConfig, "127.0.0.1", 6379);
    }

}
User Controller
package com.mallang.springbootcache;
import lombok.RequiredArgsConstructor;
import org.springframework.web.bind.annotation.GetMapping;
import org.springframework.web.bind.annotation.PathVariable;
import org.springframework.web.bind.annotation.RestController;
import redis.clients.jedis.Jedis;
import redis.clients.jedis.JedisPool;
@RequiredArgsConstructor // final, @notnull 필드 값만 파라미터로 받는 생성자 자동생성
@RestController
public class UserController {
private final UserRepository userRepository;
private final JedisPool jedisPool;
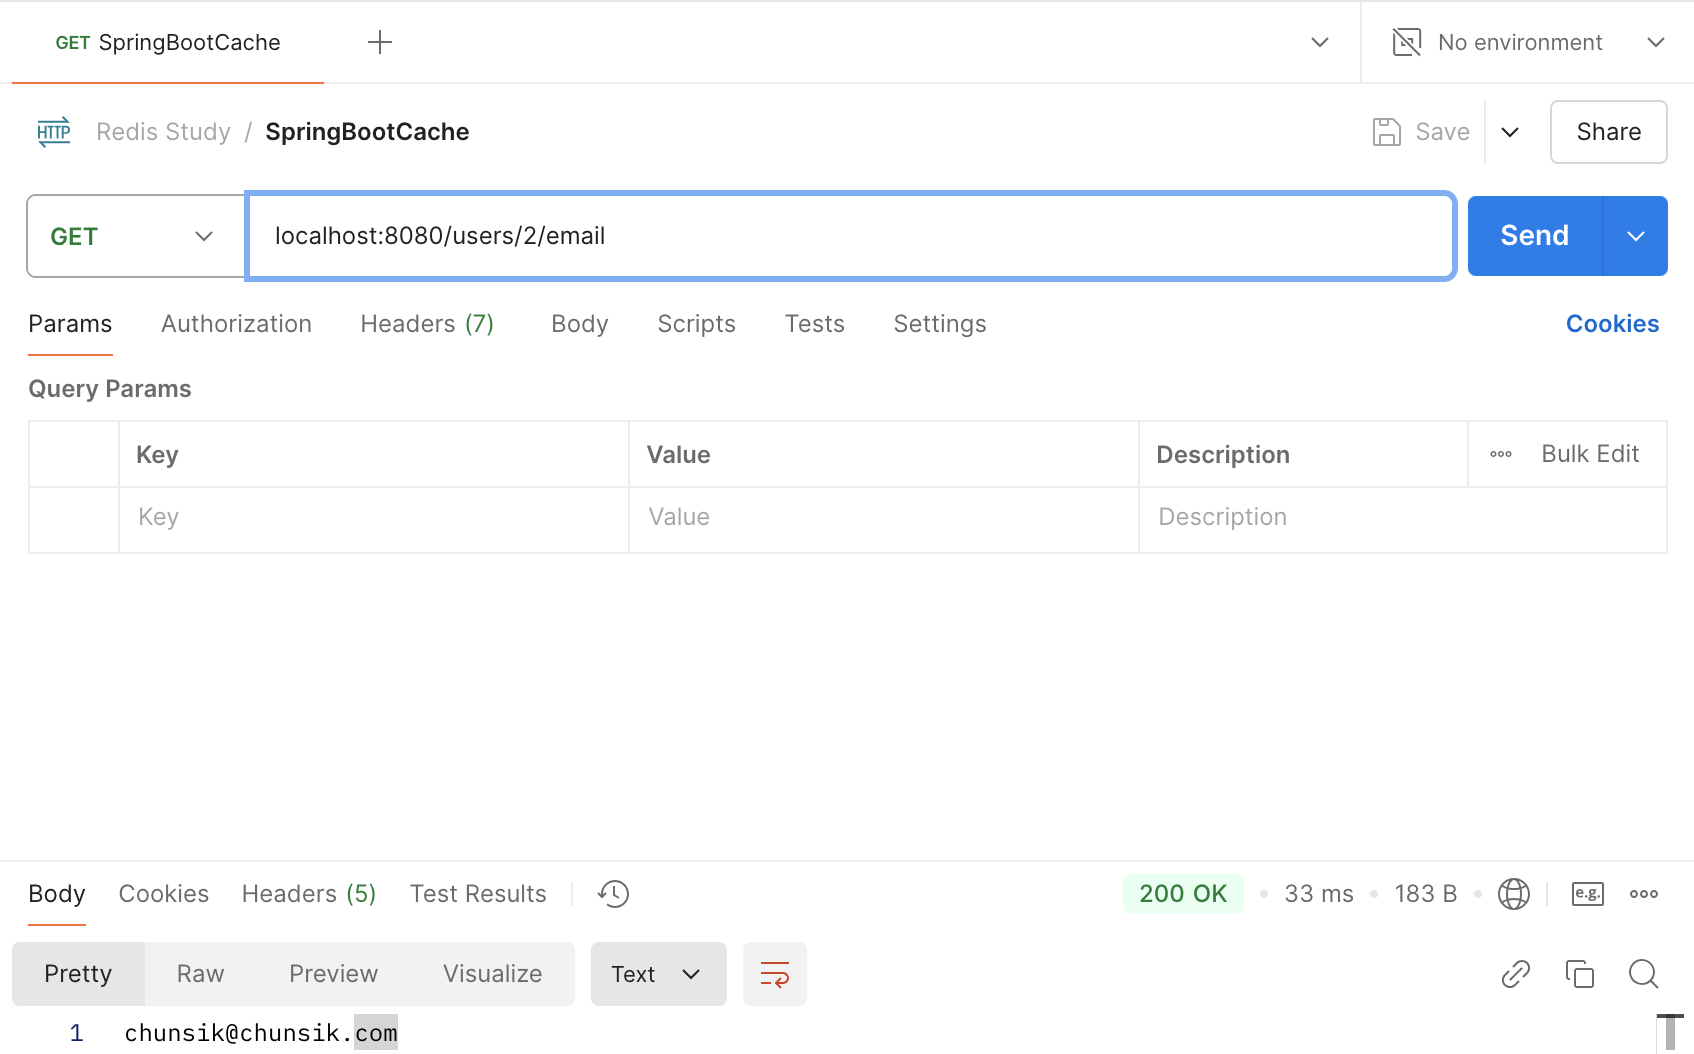
@GetMapping("/users/{id}/email")
public String getUserEmail(@PathVariable Long id) {
try (Jedis jedis = jedisPool.getResource()) {
// request id 값 -> redis key 값 설정
var userEmailRedisKey = "users:%d:email".formatted(id);
// 분산서버(Redis)에서 1차조회
String userEmail = jedis.get(userEmailRedisKey);
// 분산서버(Redis) 조회값 반환
if (userEmail != null) {
return userEmail;
}
// DB에서 2차조회
userEmail = userRepository.findById(id).orElse(User.builder().build()).getEmail();
// Redis TTL 설정
jedis.setex(userEmailRedisKey, 30, userEmail);
return userEmail;
}
}
}Postman 확인

🐰 I'm Sunyeon-Jeong, mallang