Computed
아래처럼 중복되는 표현식이 존재한다고 치자.
 <div id="app">
    <h1>{{ count }}</h1>
    <h2>{{ count * 2 }}</h2>
    <h2>{{ count * 2 }}</h2>
    <h2>{{ count * 2 }}</h2>
    <h2>{{ count * 2 }}</h2>
  </div>
반복되는 표현식은 함수로 바꿔줄수 있다.
  <div id="app">
    <h1>{{ count }}</h1>
    <h2>{{ double() }}</h2>
    <h2>{{ double() }}</h2>
    <h2>{{ double() }}</h2>
    <h2>{{ double() }}</h2>
  </div>
  <script>
    const { createApp } = Vue;
    const App = {
      data() {
        return {
          count: 3
        }
      },
      methods: {
        double() {
          return this.count * 2
        }
      }
    };
    const vm = createApp(App).mount("#app");
  </script>
하지만 똑같이 4번의 표현식을 실행하는건 똑같다.
4개면 다행이지, 단위가 커진다면 리소스가 꽤 낭비된다.
이를 보완하는 기능이 Computed다.
 <div id="app">
    <h1>{{ count }}</h1>
    <h2>{{ double }}</h2>
    <h2>{{ double }}</h2>
    <h2>{{ double }}</h2>
    <h2>{{ double }}</h2>
  </div>
  <script>
    const { createApp } = Vue;
    const App = {
      data() {
        return {
          count: 3
        }
      },
      computed: {
        double() {
          return this.count * 2
        }
      }
    };
    const vm = createApp(App).mount("#app");
  </script>
언뜻보면 표현식을 4번 실행하듯 보이지만, 결과는 이미 computed에 저장되어있다.
=> 그냥 표현식의 결과를 변수에 할당하는 것 아닌가?
조금 더 복잡한 예를 보자.
참고로 api fetching까지 사용할건데, 주소는
https://jsonplaceholder.typicode.com/를 사용한다.
=> 무료 가상 api서버를 제공해주는 곳이다!
나중에 투두리스트 만들때 연습용으로 사용해도 되겠다!
  <div id="app">
    <ul>
      <li v-for="todo in todos">{{ todo.title }}	</li>
    </ul>
  </div>
  <script>
    const { createApp } = Vue;
    const App = {
      data() {
        return {
          todos: []
        }
      },
      created() {
        fetch("https://jsonplaceholder.typicode.com/todos")
          .then(res => res.json())
          .then(res => {
            console.log(res);
            this.todos = res;
          })
      },
    };
    const vm = createApp(App).mount("#app");
    </script>
이렇게 가져온 투두리스트들의 제목을 모두 대문자로 만들고싶다.
<div id="app">
    <ul>
      <li v-for="todo in upperTodos">{{ todo.title }}</li>
    </ul>
  </div>
  <script>
    const { createApp } = Vue;
    const App = {
      data() {
        return {
          todos: []
        }
      },
      created() {
        fetch("https://jsonplaceholder.typicode.com/todos")
          .then(res => res.json())
          .then(res => {
            console.log(res);
            this.todos = res;
          })
      },
      computed: {
        upperTodos() {
          return this.todos.map(todo => ({
            ...todo,
            title: todo.title.toUpperCase()
          })
          )
        }
      }
    };
    const vm = createApp(App).mount("#app");
  </script>
정확히 upperTodos메서드가 계속 실행되는게 아니라
한번만 실행되고 upperTodos라는 변수에 할당된다.
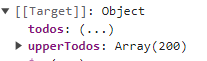
또한 캐싱이 되어서 종속대상이 변경되지 않는 한 데이터를 유지한다고 한다.
=> this.todos를 기반으로 데이터를 조작하니 this.todos가 종속 대상이다!
computed의 종속성과 setter
정확히 종속성이 무엇일까?
리액트의 useEffect2번째 매개변수로 받아오는 배열 내부 인자와 같다고 볼수있다.
  <div id="app">
    <h1>{{ fullName }}</h1>
    <h1>{{ firstName }}</h1>
    <h1>{{ lastName }}</h1>
  </div>
  <script>
    const { createApp } = Vue;
    const App = {
      data() {
        return {
          firstName: 'Leon',
          lastName: 'Miller'
        }
      },
      computed: {
        fullName() {
          return `${this.firstName} ${this.lastName}`
        }
      }
    };
    const vm = createApp(App).mount("#app");
  </script>
fullName은 종속성으로 firstName, lastName을 갖고있다.
따라서 fullName을 변경하여도 아무일도 일어나지 않는다.
(readOnly라서 사실 의미가 없다)
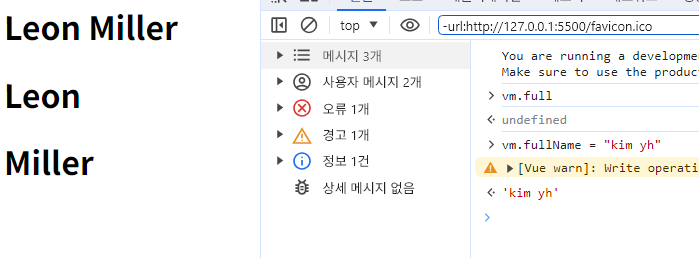
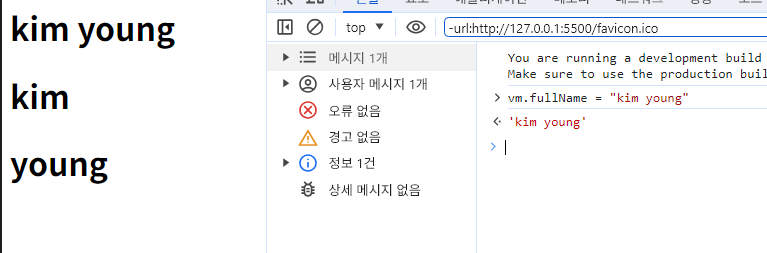
또한 computed내 메서드는 기본적으로 getter만 지니고 있어 할당이 필요하다면 setter를 직접 설정해주어야함.
 computed: {
        fullName: {
          get() {
            return `${this.firstName} ${this.lastName}`
          },
          set(newName) {
            const spliitedName = newName.split(" ");
            [this.firstName, this.lastName] = spliitedName;
          }
        }
      }
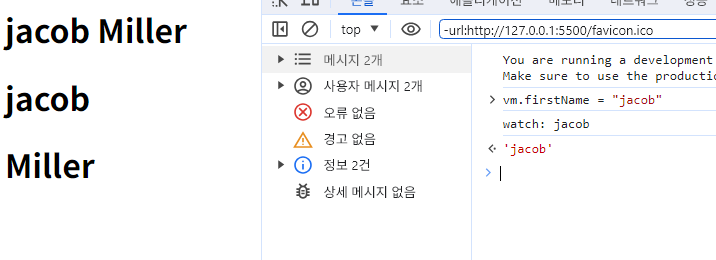
watch
computed와 비슷하다.
참고로 메서드의 이름을 감시할 데이터와 일치시켜야함.
=> 메서드의 이름을 감시한다!
<div id="app">
    <h1>{{ fullName }}</h1>
    <h1>{{ firstName }}</h1>
    <h1>{{ lastName }}</h1>
  </div>
  <script>
    const { createApp } = Vue;
    const App = {
      data() {
        return {
          firstName: 'Leon',
          lastName: 'Miller'
        }
      },
      computed: {
        fullName: {
          get() {
            return `${this.firstName} ${this.lastName}`
          },
          set(newName) {
            const spliitedName = newName.split(" ");
            [this.firstName, this.lastName] = spliitedName;
          }
        }
      },
      watch: {
        firstName() {
          console.log('watch:', this.firstName)
        }
      }
    };
    const vm = createApp(App).mount("#app");
  </script>
감시할 데이터가 바뀐다면, 메서드가 실행된다.
computed와 뭐가 다른걸까? 공식문서에 따르면 이렇다.
- watch: 이 데이터를 감지해서 메서드를 실행하여라 하는 명령형 방식
- computed : 이렇게 가공된 데이털를 사용하겠다는 선언형 방식
가급적 computed를 사용하라.
다만 데이터 변경에 대한 응답으로 비동기식 또는 시간이 많이 소요되는 조작을 수행하려는 경우에 가장 유용하다.
=> 예를들면 비동기, 디바운스 작업 등!
참조형 데이터 내부도 감시
<div id="app">
<h1>{{user.age}}</h1>
</div>
<script>
const { createApp } = Vue;
const App = {
data() {
return {
user: {
name: "kim",
age: 22
}
}
},
watch: {
user(newValue, oldValue) {
console.log(newValue, oldValue)
}
}
};
const vm = createApp(App).mount("#app");
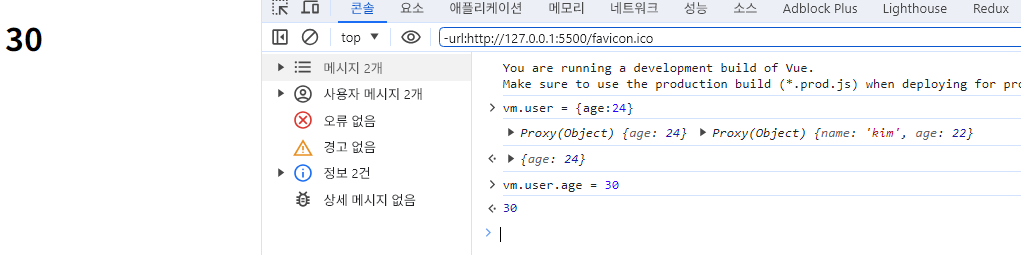
</script>위의 코드는 user데이터를 감시한다. 그때문에 user자체를 바꾸어야만 감지메서드가 동작한다.
user를 바꿨을땐 동작하지만, 내부 프로퍼티인user.age를 바꿨을땐 동작하지 않는다.
데이터 내부를 감시하려면 어떻게해야할까?
...
      watch: {
        user: {
          handler(newValue, oldValue) {
            console.log(newValue, oldValue)
          },
          deep: true
        }
      }
바로 이렇게 데이터 내부 handler라는 키워드에 메서드를 추가해주고 deep이라는 키워드를 선언해준다.
=> 객체의 프로퍼티까지 감시하겠다는 의미다.
내부 프로퍼티를 바꾸면 감시메서드가 실행된다.

참고로 배열도 결국 객체니 똑같이 사용하면 된다.
새로고침(페이지 로드)됐을때도 핸들러를 바로 실행할 수 있게 만들수 도 있음.
deep키워드처럼 immediate키워드를 추가하면 됨.
Vue의 클래스, 스타일 바인딩
동적 바인딩
<style>
    .title {
      font-size: 60px;
      color: blue;
    }

    .active {
      color: red
    }
  </style>
  <div id="app">
    <button @click="toggle">toggle</button>
    <h1 class="title" :class="isActive ? 'active' : '' ">{{msg}}</h1>
  </div>
  <script>
    const { createApp } = Vue;
    const App = {
      data() {
        return {
          msg: " hello", isActive: false,
        }
      },
      methods: {
        toggle() {
          this.isActive = !this.isActive;
        }
      }
    }; const vm = createApp(App).mount("#app"); </script>
이런식으로 동적바인딩을 이용 할수도 있다.
삼항 연산자
삼항연산자를 조금 더 간단하게 만들 수도 있다.
<h1 class="title" :class="{active: isActive}">{{msg}}</h1>isActive가 false면 바인드되지 않는다.
데이터값으로
아예 클래스 이름을 데이터로 만들면, 객체 키-값 같을 시 생략가능한 기능을 이용할 수 도 있다.
<div id="app">
    <button @click="toggle">toggle</button>
    <h1 class="title" :class="{active}">{{msg}}</h1>
  </div>
  <script>
    const { createApp } = Vue;
    const App = {
      data() {
        return {
          msg: " hello", active: false,
        }
      },
      methods: {
        toggle() {
          this.active = !this.active;
        }
      }
}; const vm = createApp(App).mount("#app"); </script>{active}는 {active:active}와 같다.
classes in computed
<style>
    .title {
      font-size: 60px;
      color: blue;
    }

    .active {
      color: red
    }

    .color--orange {
      color: orange
    }
  </style>
  <div id="app">
    <button @click="toggle">toggle</button>
    <h1 class="title" :class="styleObject">{{msg}}</h1>
  </div>
  <script>
    const { createApp } = Vue;
    const App = {
      data() {
        return {
          msg: " hello",
          active: false,
          small: true
        }
      },
      computed: {
        styleObject() {
          return {
            active: this.active,
            'color--orange': this.small
          }
        }
      },
      methods: {
        toggle() {
          this.active = !this.active;
        }
      }
    }; const vm = createApp(App).mount("#app"); </script>
data에 선언하지 않는 이유는 반응형으로 만들기 위해서이다.
배열데이터 사용
<style>
    .title--large {
      color: gray;
    }

    .active {
      color: red
    }
  </style>
  <div id="app">
    <h1 @click="changeTitle" :class="[actvie, title]">Hi bros</h1>
  </div>
  <script>
    const { createApp } = Vue;
    const App = {
      data() {
        return {
          active: "active",
          title: "title"
        }
      },
      methods: {
        changeTitle() {
          this.title = 'title--large'
        }
      }
    }; const vm = createApp(App).mount("#app"); </script>
참고로 클래스 내부의 배열 요소들에게 작은따옴표를 씌워주면 문자열로 취급된다.
['acitve'] => "active"와 동일
인라인 스타일
클래스와 유사한 방식으로 사용하면된다.
하지만 인라인 스타일은 명시도가 아주 높으니 보통 권장하지않음.알아두기만 하자.
참고로 여러개 메소들를 바인딩할땐 "method1(); method2(); method3()" 이런식으로 바인딩 해주어야한다.
<style>
    h1 {
      border: 4px solid;
    }
  </style>
  <div id="app">
    <h1 @click="toBlue(); increaseWidth();" :style="{color, width:`${width}px`}">hello vue</h1>
  </div>
  <script>
    const { createApp } = Vue;
    const App = {
      data() {
        return {
          color: "red",
          width: 200
        }
      },
      methods: {
        toBlue() {
          this.color = "blue"
        },
        increaseWidth() {
          this.width += 10;
        }
      }
    }; const vm = createApp(App).mount("#app"); </script>
이렇게 작성해도 되고 클래스처럼 데이터 내부에 객체 생성후 할당하여도 된다. 또한 computed키워드를 이용하여도 좋다.
클래스 방식과 다른 게 없으니 생략함.
느낀점
뷰가 리액트보다 더 간단해보인다. 아직 배운 게 없어서 착각인가 싶기도하고?
또한 Computed와 Watch를 보며 상태를 감시하는 기능에 대해 실마리를 얻었다.
나중에 Proxy도 써보면 좋을것 같음ㅎㅎ