선택자(selector)

CSS를 selector로 속성 변경하기
- JavaScript의 selector와 동일하다.
- 여기서도 ‘$’를 사용한다.
- id와 class의 경우 stylesheet에 기입하는거와 같이 #과 .을 활용해야 한다.
<!DOCTYPE html>
<html lang="en">
<head>
    <meta charset="UTF-8">
    <meta name="viewport" content="width=device-width, initial-scale=1.0">
    <script src="https://code.jquery.com/jquery-3.7.0.js"></script>
    <title>Document</title>
    <script>
        $(function(){
            // attr("속성"): 해당 속성값을 반환
            // attr("속성","값") : 해당 속성값으로 변경
            // eq(0): 0번 인덱스, 첫번째를 의미 -> first, last로도 분류 가능

            //alert("처음 로딩시 호출!!!!");... 확인 차원에서..

            //방법1
            //$("#happy").css("color","red");
            //$("#happy").css("background-color","yellow");

            //방법2
            //위의 것을 한 줄로
            $("#happy").css({
                "color":"orange",
                "background-color":"gray",
                "width":"300px",
                "border":"2px solid green"
            });

            //selector가 복잡할 경우에도 간단 처리
            $("div.hello>div").css({
                "font-size":"3em",
                "color":"blue",
                "font-weight":"bold"
            });

            //happy의 배경색을 얻어서 div.hello의 글자색으로 적용
            var bg=$("#happy").css("background-color");
            $("div.hello").css("color",bg);

            //bts 아래 이미지 가로 150px로 변경
            $("div.bts>img").css("width","150px");

            //hello클래스 아래 이미지도 가로 200
            $("div.hello>img").css("width","200px");

            //바디 전체 글꼴 변경
            $("body*").css("font-family","궁서체");

            //bts div 전체 속성을 변경, 위치 이동
            $("div.bts").css({
                "position":"absolute",
                "left":"300px",
                "top":"400px",
                "width":"300px",
                "height":"250px",
                "border":"3px groove gold"
            });

            //모든 b태그 글자색 변경
            $("b").css("color","magenta");

            //b태그 중에서 1번, 2번 인덱스만 변경
            //eq(0)부터 시작 / body에 제일 처음 쓴 것이 0번
            $("b:eq(1)").css("background-color","orange");//방법1
            $("b").eq(2).css("background-color","pink");//방법2

            //전체 b태그 중 첫번째 마지막
            $("b:first").css("border","2px solid red");
            $("b:last").css("border","4px dotted green");

            // gt(1):1번 이후   1t(3):3번 이전
            $("b:gt(1)").css("font-size","30px"); // 2번 인덱스부터 모두 변경
            $("b:lt(1)").css("background-color","black"); // 0번, 1번

        });
    </script>
</head>
<body>
    <div class="hello">
        div class hello
        <div>
            div hello 아래 div
        </div>
    </div>
    <div class="bts">
        <b>div bts 아래 b태그</b>
        <img src="../연예인사진/19.jpg">
    </div>
    <div class="hello">
        div class hello2
        <img src="../연예인사진/15.jpg">
        <div>div hello 아래의 div 태그</div>
    </div>
    <b>단독 b태그#1</b>
    <b>단독 b태그#2</b>
    <b>단독 b태그#3</b>
    <h2 id="happy">h2 is happy</h2>
    <h3 class="happy2">h3 class happy2</h3>
</body>
</html>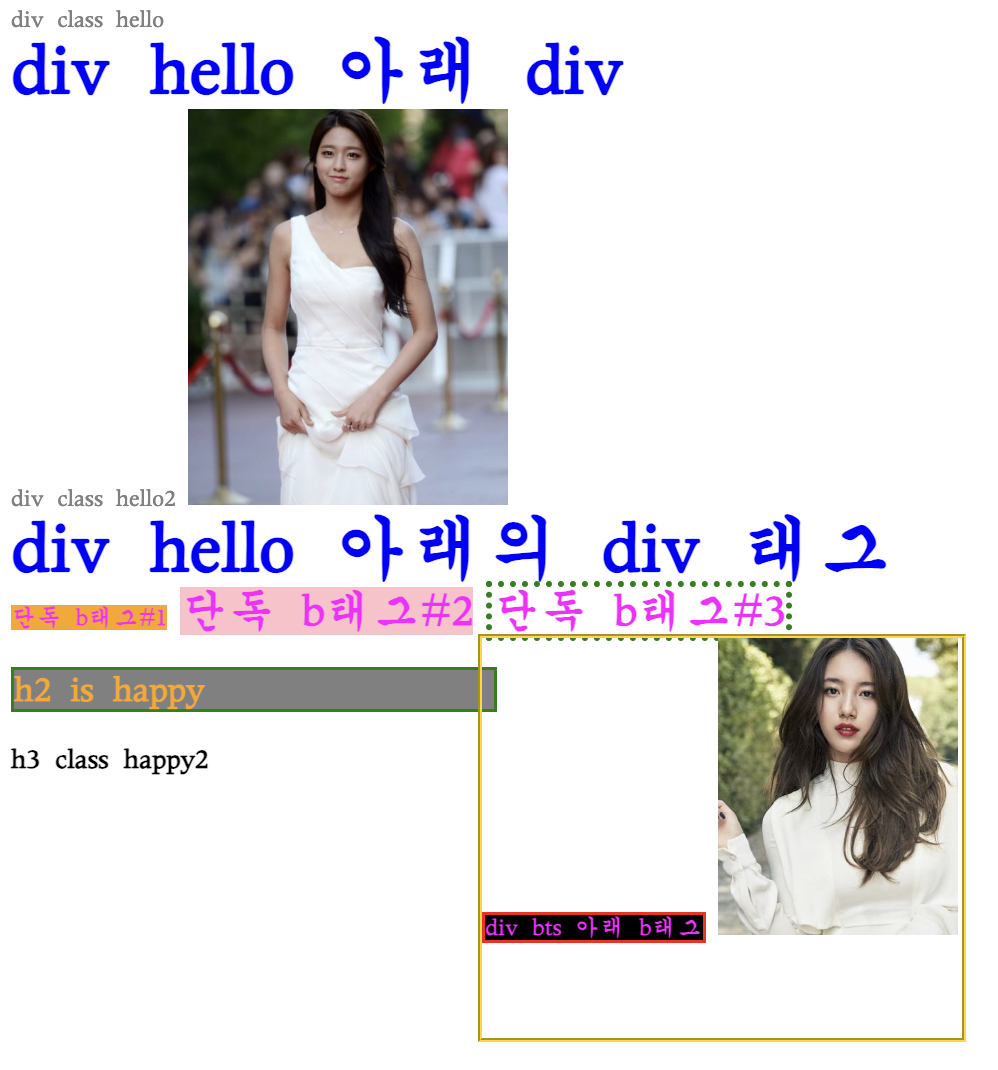
출력(append,eq(0),first,last,text,html)
- .append : 뒤에 내용 추가
- “h2:eq(1)” : h2 태그중에 위에서 2번째꺼 (배열과 동일하게 0부터 시작)
- .first : 첫번째 태그
- .last : 마지막 태그
<!DOCTYPE html>
<html lang="en">
<head>
<meta charset="UTF-8">
<meta name="viewport" content="width=device-width, initial-scale=1.0">
<script src="https://code.jquery.com/jquery-3.7.0.js"></script>
<title>Document</title>
</head>
<body>
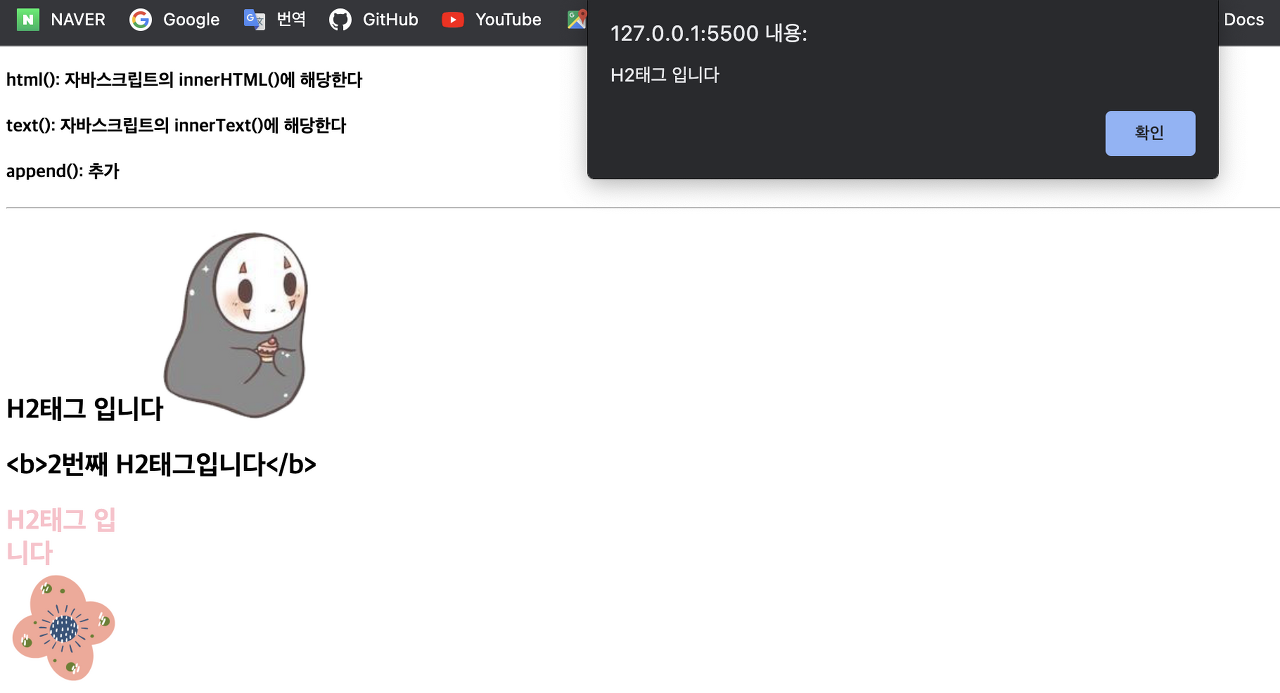
<h4>html(): 자바스크립트의 innerHTML()에 해당한다</h4>
<h4>text(): 자바스크립트의 innerText()에 해당한다</h4>
<h4>append(): 추가</h4>
<hr>
<h2>1</h2>
<h2>2</h2>
<h2>3</h2>
<script>
// h2중에서 1번째에 html태그 넣기
// $("h2").eq(0).html("<b>H2태그입니다</b>");
// $("h2:eq(0)").html("<b>H2태그입니다</b>");
// $("h2:first").html("<b>H2태그 입니다</b>");
$("h2").first().html("<b>H2태그 입니다</b>");
// h2태그중에서 2번째 text로 2번째 h2태그 입니다.
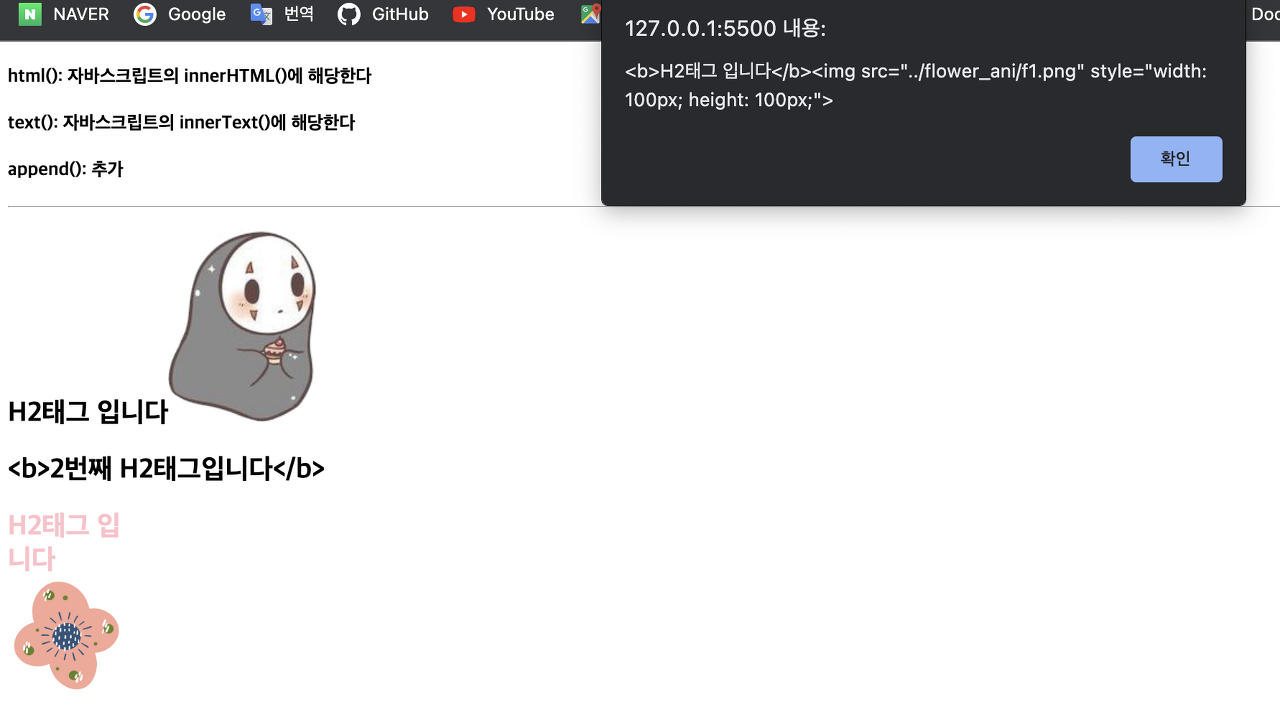
$("h2:eq(1)").text("<b>2번째 H2태그입니다</b>");
// h2마지막 태그에 html로 넣고 css(글꼴색)
$("h2").last().html("<b>H2태그 입니다</b>").css("color","pink"); // eq(2)도 됨
// append는 기존 값 뒤에 추가하기
$("h2:eq(0)").append("<img src=../만화이미지/15.png>");
// 3번째 h2태그 뒤에 이미지넣고 너비, 높이 100으로 해주세요
$("h2:last").append("<img src=../flower_ani/f1.png>").css({"width":"100","height":"100"}); // 크기 반영 안됨
$("h2:eq(2) img").css({"width":"100px","height":"100px"}); // 크기는 다시 selector로 지정해서 값을 줘야 합니다.
// 이벤트
// 첫번째 h2를 클릭시 자기가 가지고 있는 text를 alert에 반환
$("h2:eq(0)").click(function(){
alert($(this).text());
});
// 마지막 h2 클릭시 자신의 html을 경고창에 반환할 것.
$("h2:last").click(function(){
alert($(this).html());
});
</script>
</body>
</html>-
기본 화면

-
H2태그 입니다(가오나시이미지) 클릭 시
-
분홍색 H2태그 입니다(꽃모양 이미지) 클릭 시
next(), prev(), html(), text(), after, append
<!DOCTYPE html>
<html lang="en">
<head>
<meta charset="UTF-8">
<meta name="viewport" content="width=device-width, initial-scale=1.0">
<link rel="preconnect" href="https://fonts.gstatic.com" crossorigin>
<link href="https://fonts.googleapis.com/css2?family=East+Sea+Dokdo&family=Moirai+One&family=Nanum+Pen+Script&family=Orbit&display=swap" rel="stylesheet">
<script src="https://code.jquery.com/jquery-3.7.0.js"></script>
<link href="https://cdn.jsdelivr.net/npm/bootstrap@5.3.0/dist/css/bootstrap.min.css" rel="stylesheet">
<title>Document</title>
<script>
$(function(){
// 모든 img태그에 마우스를 올리면 src변경
/* $("img").mouseover(function(){
imgName=$(this).attr("src");
$(this).attr("src","../Food/10.jpg");
});
*/
// 마우스 벗어나면 원래사진으로 돌아가기
$("img").mouseout(function(){
$(this).attr("src",imgName);
})
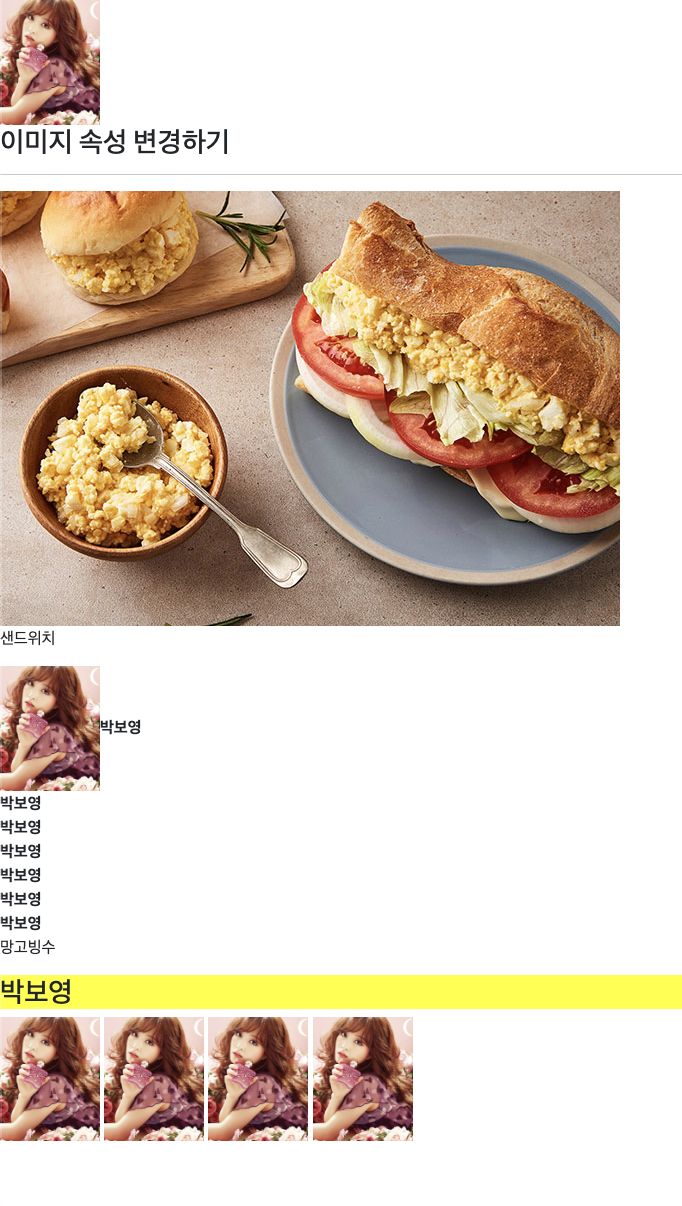
//h3_hover 이용해서 배경색 변경
$("h3").hover(function(){
$(this).css("background-color","yellow");
},function(){
$(this).css("background-color","white");
});
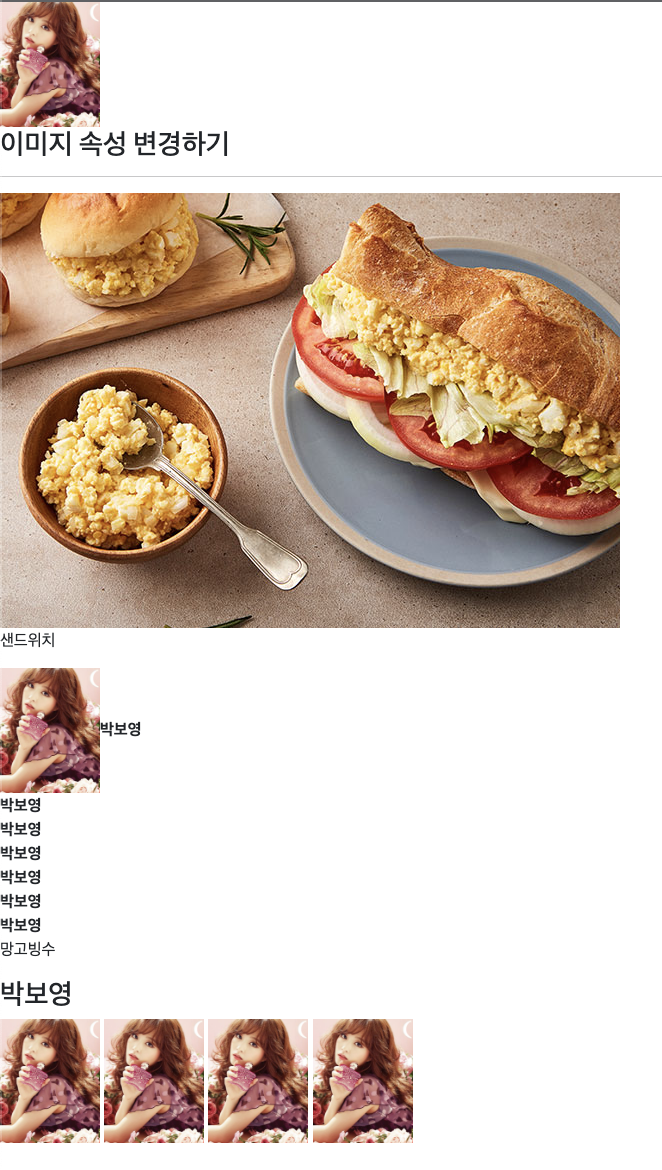
// 0번 이미지를 클릭하면 2번 img의 src에 같은 이미지 넣기
$("img:eq(0)").click(function(){
var curname=$(this).attr("src");
var curw=$(this).attr("width");
$("img:eq(2)").attr("src",curname).css("width",curw);
// irum속성 얻어서 2번 img다음에 b태그로 넣기
// after : 특정태그 이후에 추가하는 것
// append : 특정태그 안에 추가하는 것
var irum=$(this).attr("irum");
$("img:eq(2)").after("<b>"+irum+"</b><br>");
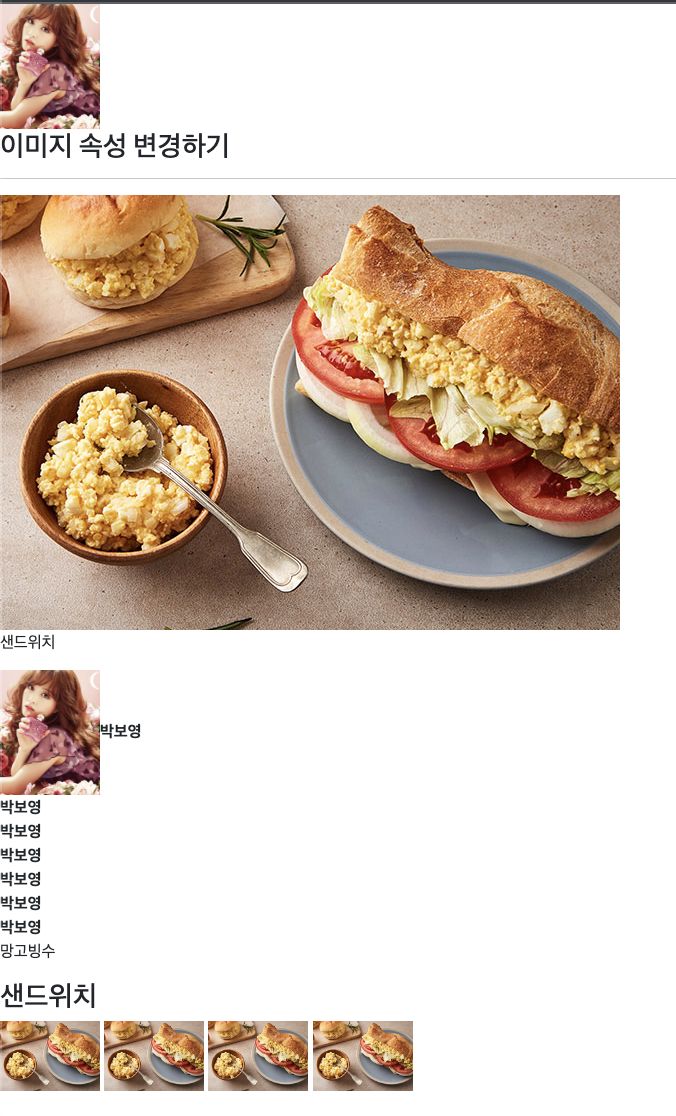
// figure아래 img를 클릭하면 아래사진 4개에 나타나게 하시오.
// gt 이용
$("figure>img").click(function(){
var selectImg=$(this).attr("src");
$("img:gt(2)").attr("src",selectImg);
// 클릭한 이미지 다음 태그 안의 text를 얻어서 2번째 h3에 넣기
// next() : 다음태그
// prev() : 이전태그
// html() : js의 innerHTML
// text() : js의 innerText
var foodName=$(this).next().text();
$("h3:eq(1)").text(foodName);
});
});
});
</script>
</head>
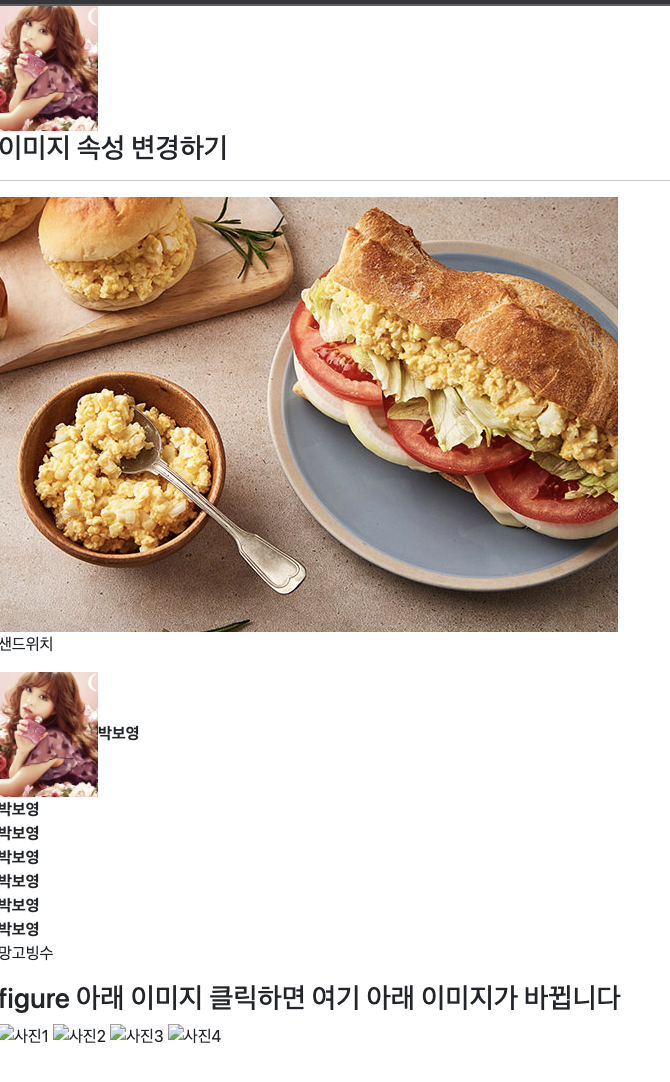
<body>
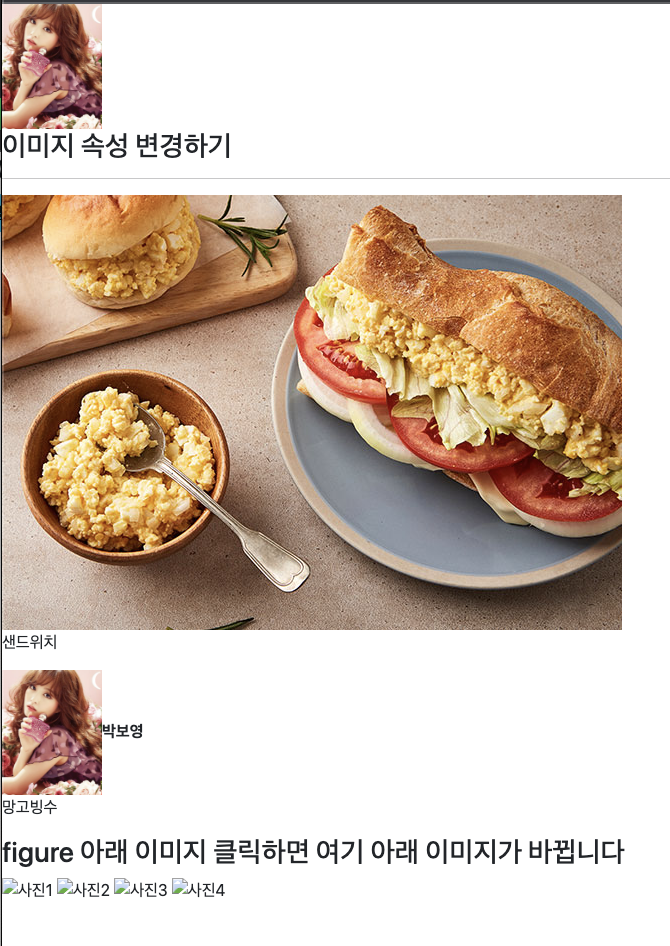
<img src="../연예인사진/12.jpg" width="100" irum="박보영">
<h3>이미지 속성 변경하기</h3>
<hr>
<figure>
<img src="../Food/1.jpg">
<figcaption>샌드위치</figcaption>
</figure>
<figure>
<img src="../Food/11.jpg">
<figcaption>망고빙수</figcaption>
</figure>
<h3>figure 아래 이미지 클릭하면 여기 아래 이미지가 바뀝니다</h3>
<img src="" alt="사진1" width="100">
<img src="" alt="사진2" width="100">
<img src="" alt="사진3" width="100">
<img src="" alt="사진4" width="100">
</body>
</html>- 초기화면
-
'이미지 속성 변경하기'에 마우스를 올렸을 시

-
맨위 이미지 눌렀을 시 (아래 박보영 글씨는 클릭하는 만큼 생성)
-
두번째 샌드위치 그림 클릭 시
-
3번째 박보영 이미지 클릭 시
- 아래 굵은 글씨(박보영)에 마우스를 올렸을 시
Attribute (속성 변경)
- next() : 다음 태그
- next() 를 사용하여 기준점에서 아래아래 줄을 찾는다.(selector)
- next() 의 경우 모든 태그를 포함하므로, br, hr등의 코드도 모두 순서에 포함된다.
<!DOCTYPE html>
<html lang="en">
<head>
    <meta charset="UTF-8">
    <meta name="viewport" content="width=device-width, initial-scale=1.0">
    <link href="https://fonts.googleapis.com/css2?family=East+Sea+Dokdo&family=Moirai+One&family=Nanum+Pen+Script&family=Orbit&display=swap" rel="stylesheet">
    <script src="https://code.jquery.com/jquery-3.7.0.js"></script>
    <link href="https://cdn.jsdelivr.net/npm/bootstrap@5.3.0/dist/css/bootstrap.min.css" rel="stylesheet">
    <title>Document</title>
    <!-- <style>
        h3>b{
            color: pink;
        }
        h3>span{
            font-family: Nanum Pen Script;
        }
    </style> -->
    <script>
        $(function(){

            // h3아래 b태그 글자색 배경 변경
            $("h3>b").css("color","magenta");

            // h3아래 span도 글자체나 글자색 변경

            $("h3>span").css({"color":"pink","font-family":"Nanum Pen Script"});

            // 이벤트 : b태그 클릭시 음식명 누르면 span에 있는 경로가 img에, 음식명은 맨 아래 h3에 나오게 하세요
            $("h3>b").click(function(){
                var s1=$(this).next().next().text();
                $(".photo").attr("src",s1);

                var s2=$(this).text();
                // $("h3:last").html(s2);
                $(".photo").next().next().html(s2);
            });
        })
    </script>
</head>
<body>
    <h3>
        <b>에그샌드위치</b>
        <br>
        <span>../Food/1.jpg</span>
    </h3>
    <h3>
        <b>숯불꼬치</b>
        <br>
        <span>../Food/2.jpg</span>
    </h3>
    <h3>
        <b>순두부라면</b>
        <br>
        <span>../Food/12.jpg</span>
    </h3>
    <hr>
    <img src="" class="photo">
    <br>
    <h3></h3> <!-- 요기에 b태그에 있는 음식명 출력 -->
</body>
</html>- 초기화면
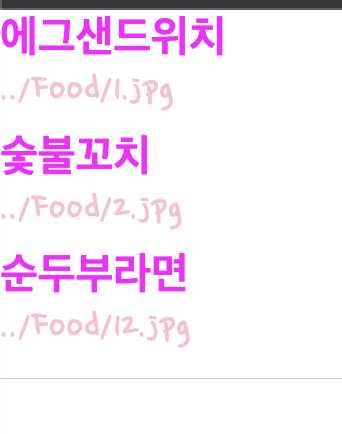
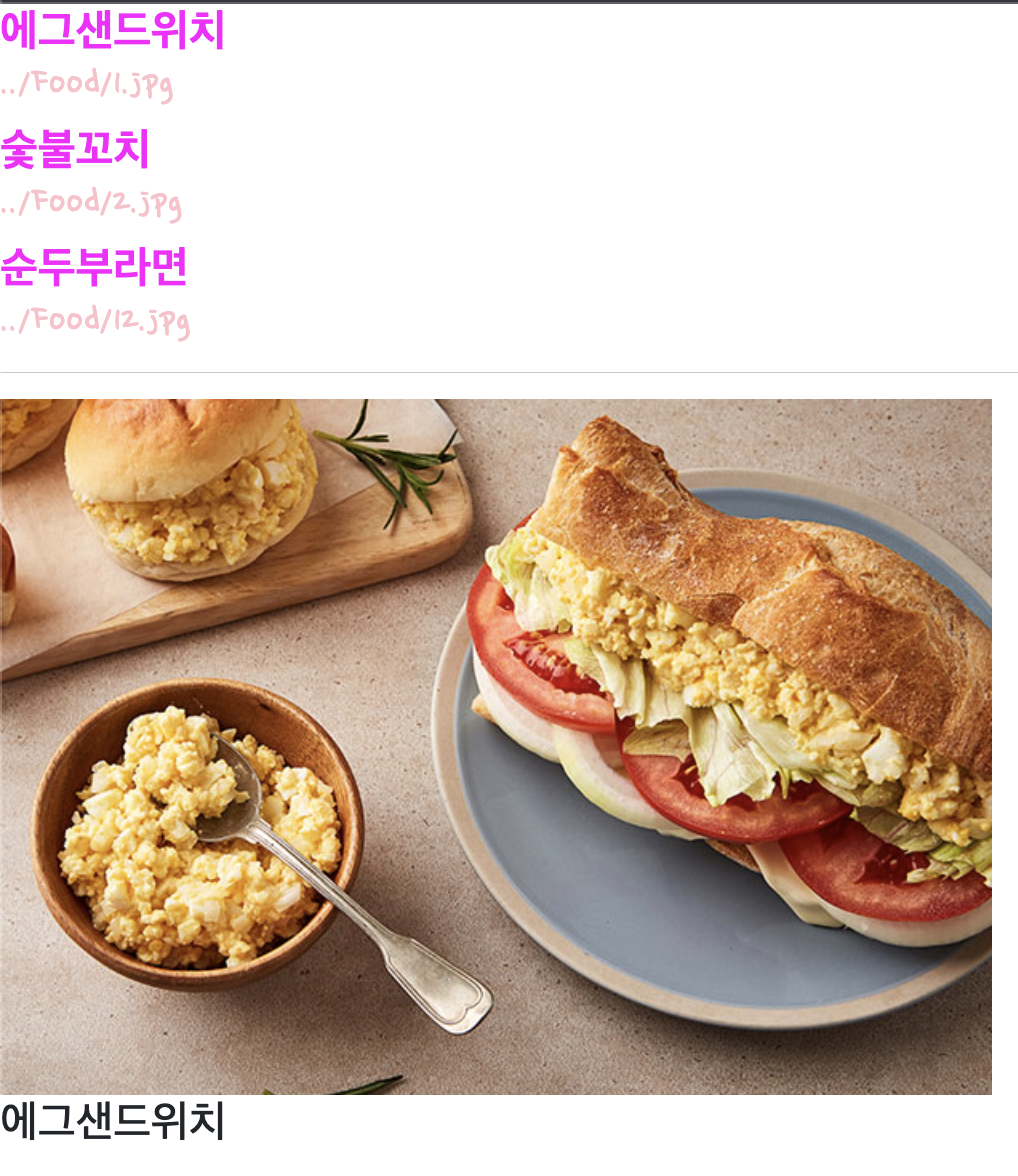
-
에그샌드위치 클릭 시
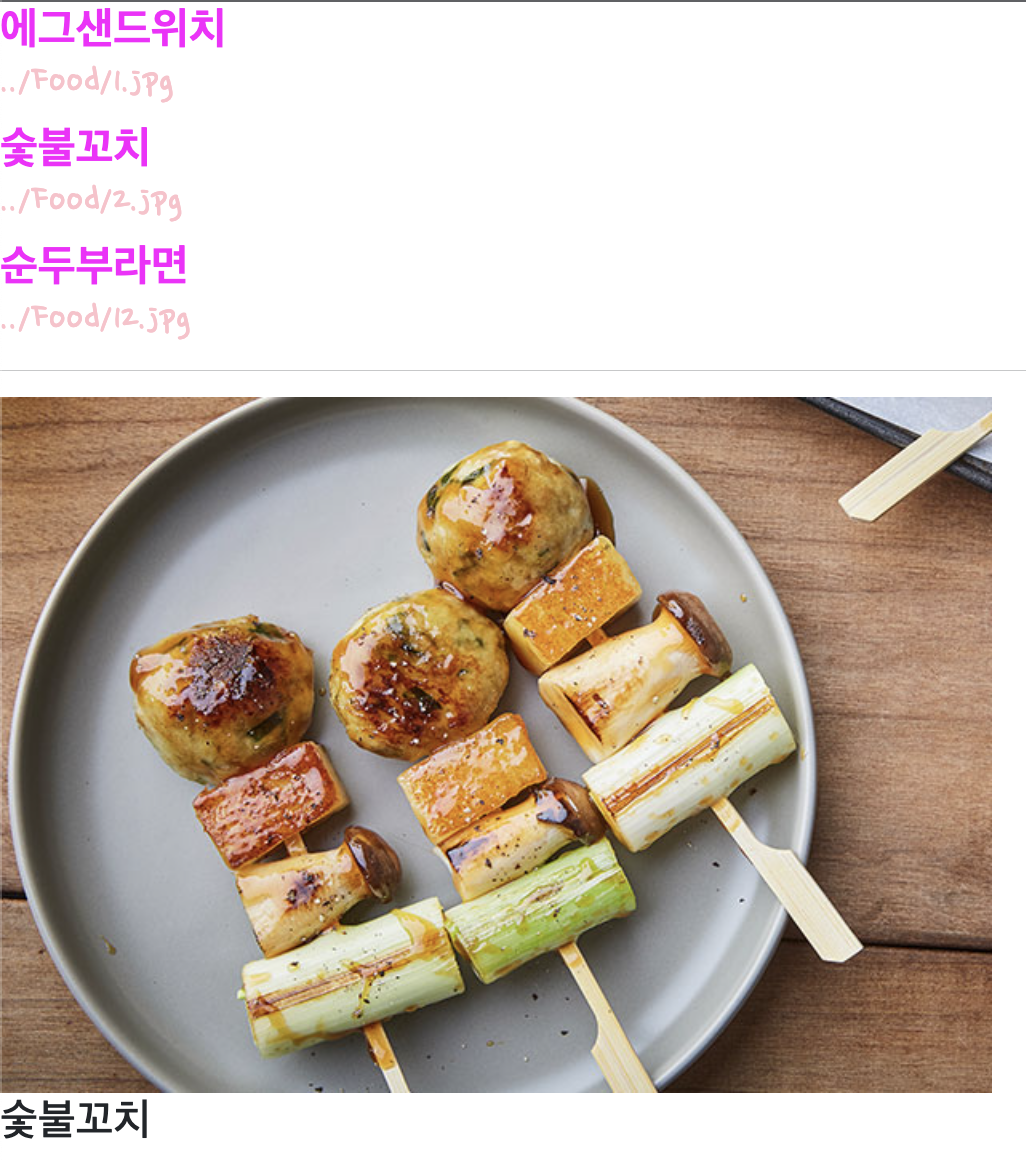
-
숯불꼬치 클릭 시
-
순두부라면 클릭 시

odd, even
- odd : 홀수번지 찾기
- even : 짝수 번지 찾기
- contains(단어) : 특정 단어 찾기
<!DOCTYPE html>
<html lang="en">
<head>
    <meta charset="UTF-8">
    <meta name="viewport" content="width=device-width, initial-scale=1.0">
    <link href="https://fonts.googleapis.com/css2?family=East+Sea+Dokdo&family=Moirai+One&family=Nanum+Pen+Script&family=Orbit&display=swap" rel="stylesheet">
    <link href="https://cdn.jsdelivr.net/npm/bootstrap@5.3.0/dist/css/bootstrap.min.css" rel="stylesheet">
    <script src="https://code.jquery.com/jquery-3.7.0.js"></script>

    <title>Document</title>
</head>
<body>
    <p>오늘공부할 내용</p>
    <ol>
        <li>제이커리_랜덤</li>
        <li>제이커리_셀렉터</li>
        <li>제이커리_복사</li>
        <li>제이커리_속성</li>
    </ol>

    <p>오늘 점심 메뉴</p>
    <ol>
        <li>미향</li>
        <li>역삼갈비</li>
        <li>뢰벤돈까스</li>
        <li>오미라식당</li>
        <li>구내식당</li>
    </ol>

    <script>
        // $("ol li:first").css("background-color","gray"); // 전체 첫번째 li
        $("ol li:first-child").css("background-color","gray"); // 각 ol항목의 첫번째

        // 전체 항목에서 "갈비"을 찾아서 글자크기를 1.5배로
        $("li:contains(갈비)").css("font-size","1.5em");

        // li의 홀수번지를 찾아서 border 지정
        // odd : 홀수번지 찾기
        // even : 짝수번지 찾기
        $("li:odd").css("border","2px solid pink")
        $("li:even").css("color","violet");

    </script>
</body>
</html>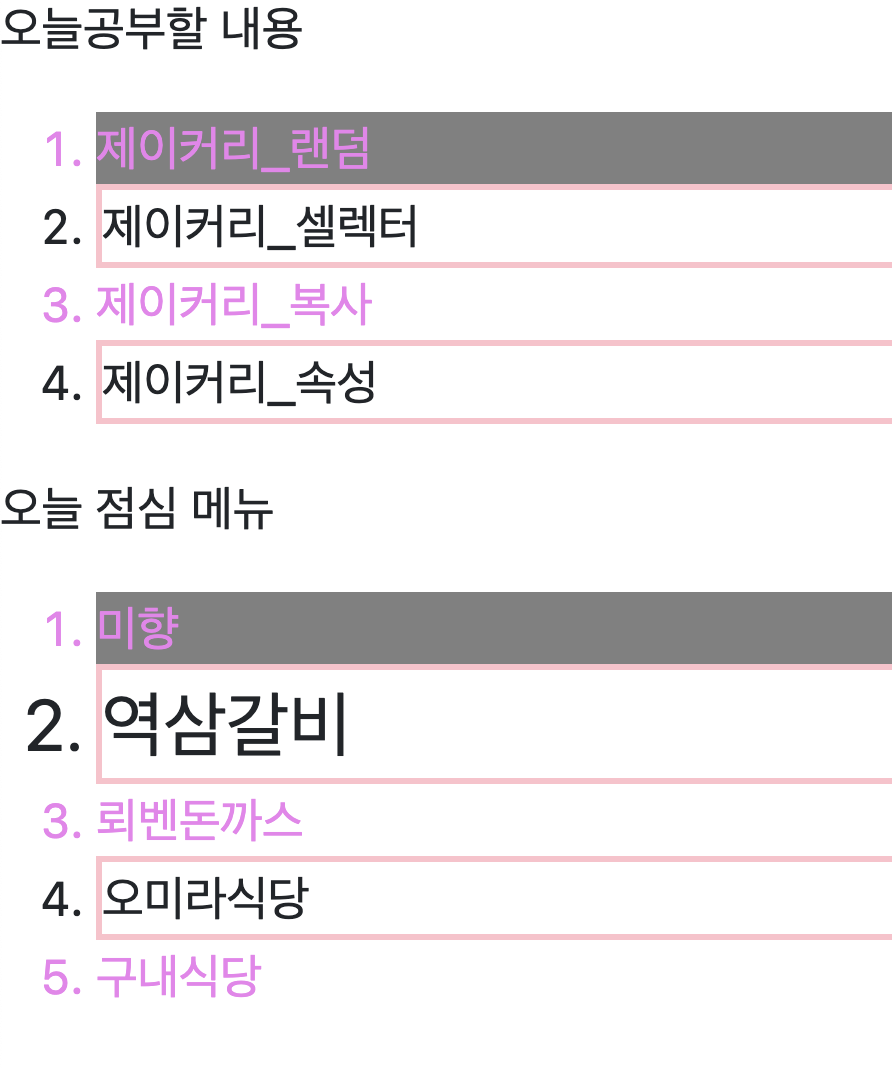

java를 잡아...... 하... 이게 맞나...