- copy라고 생각하면 좀 편하다.
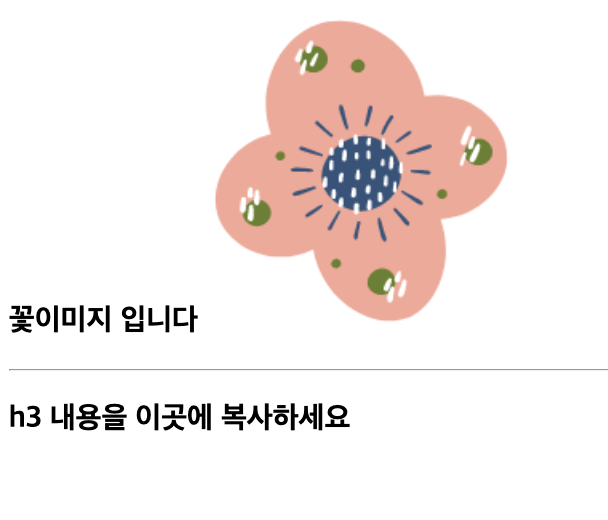
- 아래 그림의 결과에서 ‘꽃이미지 입니다’를 클릭하기 전에는 아래 ‘h3 내용을 이곳에 복사하세요’ 를 눌러도 변하지 않는다.
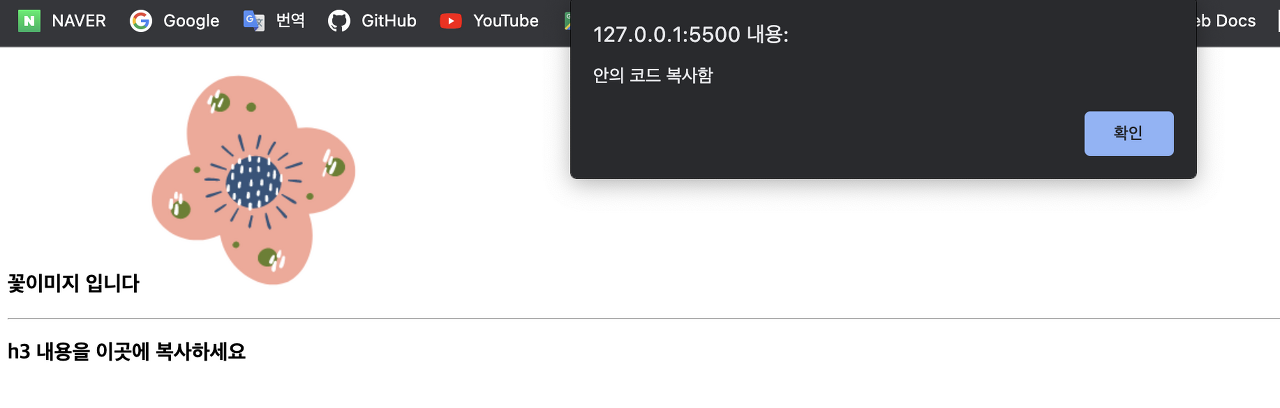
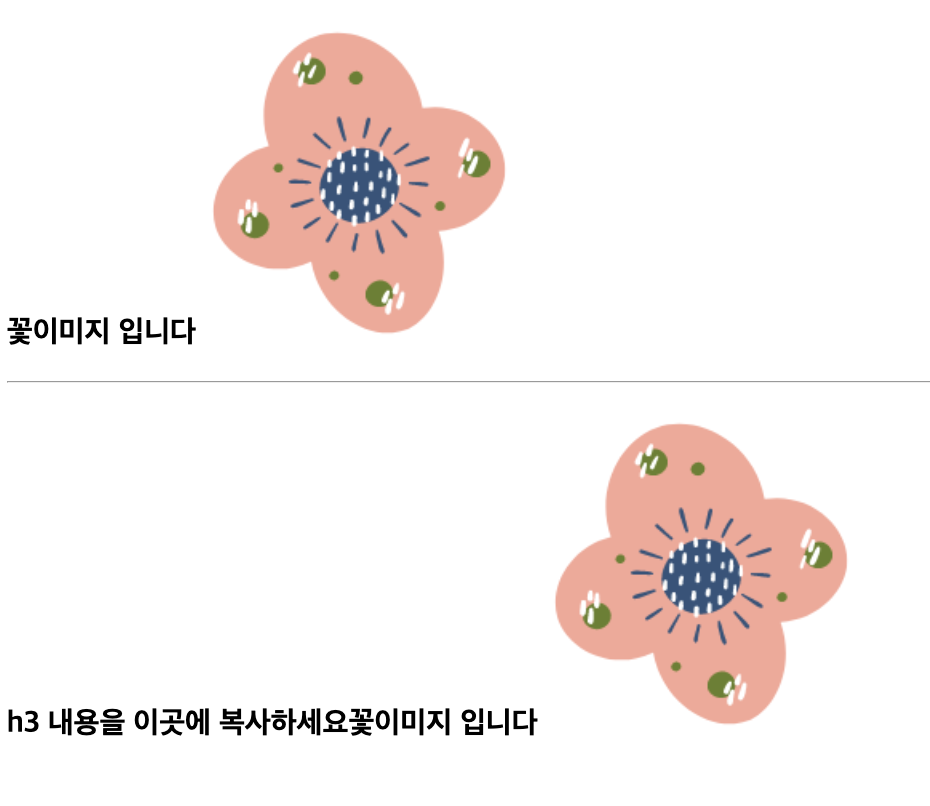
- ‘꽃이미지 입니다’ 를 먼저 클릭해야만 ‘h3 내용을 이곳에 복사하세요’의 내용이 변경된다.
- copy의 의미는 변수로 선언하여 저장하고 그 이후 변수를 사용하는 개념이다.
<!DOCTYPE html>
<html lang="en">
<head>
    <meta charset="UTF-8">
    <meta name="viewport" content="width=device-width, initial-scale=1.0">
    <script src="https://code.jquery.com/jquery-3.7.0.js"></script>
    <title>Document</title>
</head>
<body>
    <h3 class="a"></h3>
    <hr>
    <h3 class="b">h3 내용을 이곳에 복사하세요</h3>

    <script>
        $("h3.a").html("꽃이미지 입니다").append("<img src=../flower_ani/f1.png>");

        // h3.a를 클릭시 "안의 코드 복사함" 라고 나오게 한 후 b에다가 나타나게 하자.
        $("h3.a").click(function(){
            tag=$(this).html();
            alert("안의 코드 복사함");
        });

        // h3.b를 클릭 시 위의 내용이 그대로 복사되도록 해보자.
        $("h3.b").click(function(){
            // $(this).html(tag); // //var tag는 위의 블럭괄호 안에 지역번수로 머물러 있다. 전역으로 사용하기 위해서는 var를 지워야 한다.
            $(this).append(tag); // 위 html은 한번하고 끝. append는 누르면 계속 추가된다.
        });
    </script>
</body>
</html>-
기본 화면
-
꽃이미지 입니다(꽃그림 포함) 클릭 시
- h3 내용을 이곳에 복사하세요 클릭 시
copy 연습
- .click(function(){} 으로 불러온다.
- copy는 클릭하면 계속 나온다.
- ctrl+c 하고 ctrl+v 연타하면 계속 복사되는것과 동일하다.
<!DOCTYPE html>
<html lang="en">
<head>
<meta charset="UTF-8">
<meta name="viewport" content="width=device-width, initial-scale=1.0">
<script src="https://code.jquery.com/jquery-3.7.0.js"></script>
<title>Document</title>
</head>
<body>
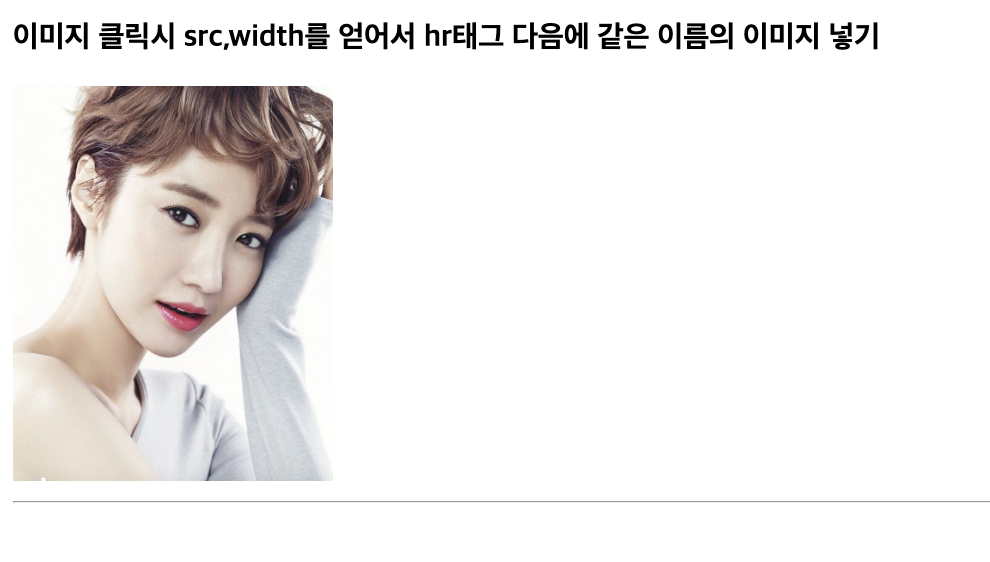
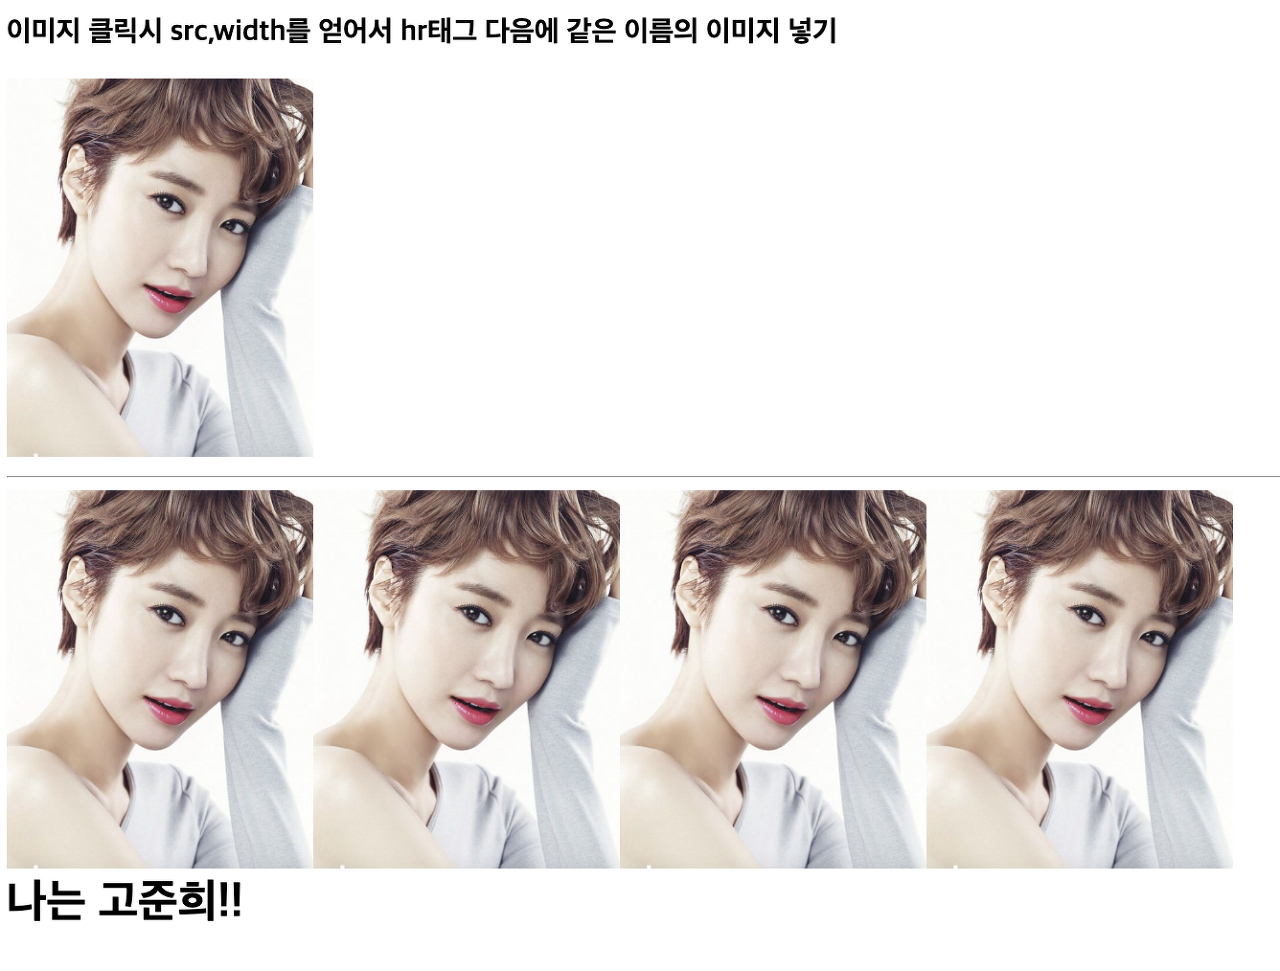
<h3>이미지 클릭시 src,width를 얻어서 hr태그 다음에 같은 이름의 이미지 넣기</h3>
<img src="../연예인사진/11.jpg" width="200px" title="나는 고준희!!">
<hr>
<div></div>
<script>
$("img").click(function(){
// 값들 얻기
var selSrc=$(this).attr("src");
var selW=$(this).attr("width");
var selTitle=$(this).attr("title");
// 사진넣기
var copyImg="<img src='"+selSrc+"' width="+selW+">";
$("hr").after(copyImg);
// 타이틀 카피해서 div에 넣기(글자크기)
$("div").html(selTitle).css({"font-size":"30px","font-weight":"bold"});
});
</script>
</body>
</html>-
기본화면
-
이미지 클릭시 (여러번 클릭하면 사진 계속 나옴)
mouseover,mouseout
- 마우스를 이미지에 올리면 이미지가 바뀐다.
- 마우스가 이미지에서 빠져나오면 다시 원래 그림으로 돌아간다
<!DOCTYPE html>
<html lang="en">
<head>
    <meta charset="UTF-8">
    <meta name="viewport" content="width=device-width, initial-scale=1.0">
    <script src="https://code.jquery.com/jquery-3.7.0.js"></script>
    <title>Document</title>
</head>
<body>
    <h3>Q.a 세개의 이미지에 마우스를 올리면 20.png 으로 바뀌며 <br> 마우스가 벗어나면 원래 이미지로 돌아가게 하세요</h3>
    <img src="../만화이미지/14.png" width="150px">
    <img src="../만화이미지/15.png" width="150px">
    <img src="../만화이미지/16.png" width="150px">

    <script>

        $("img").mouseover(function(){
            imgsrc=$(this).attr("src");
            $(this).attr("src","../만화이미지/17.png");
        });

        $("img").mouseout(function(){
            $(this).attr("src",imgsrc);
        })

    </script>
</body>
</html>-
초기 화면

-
왼쪽 캐릭터에 마우스를 올릴 시

-
가운데 캐릭터에 마우스를 올릴 시

-
오른쪽 캐릭터에 마우스를 올릴 시

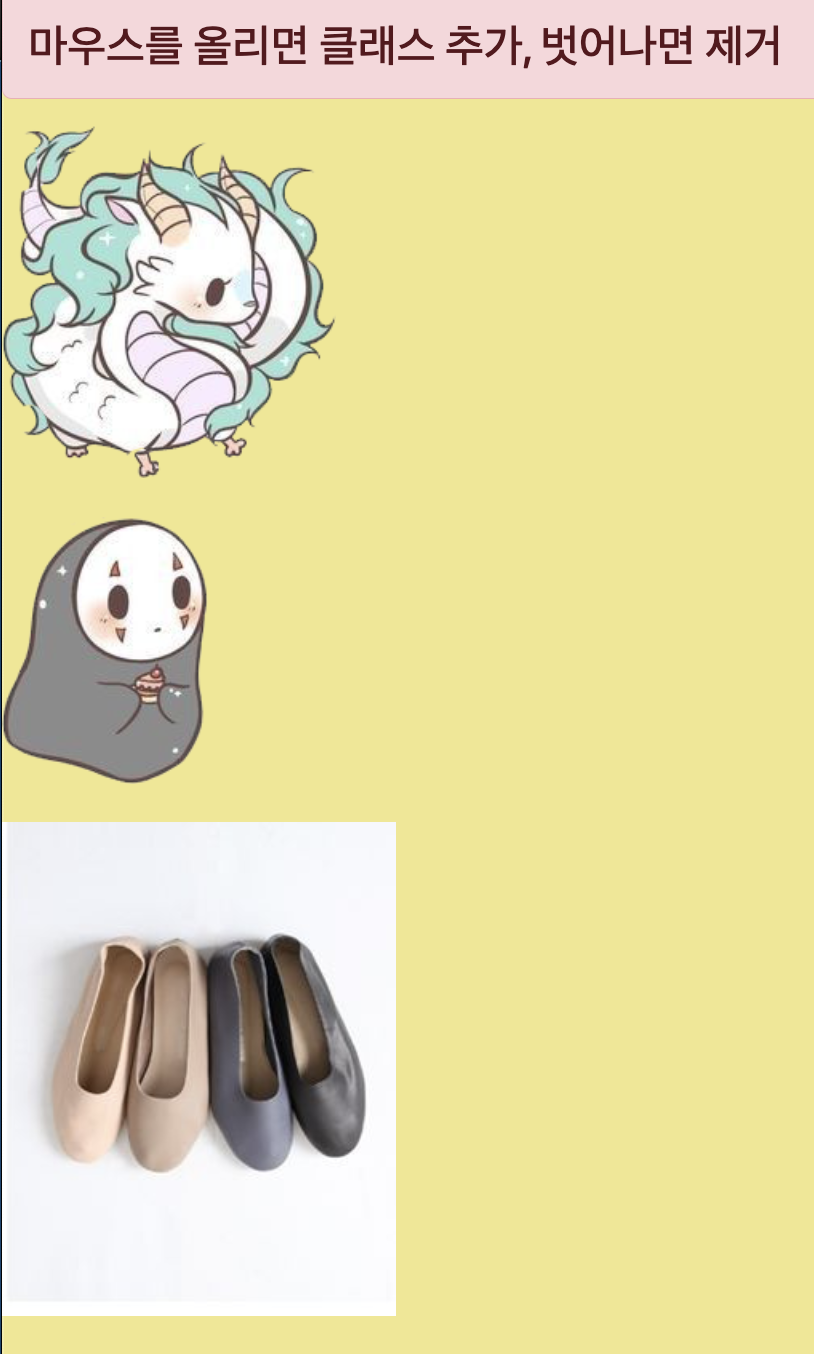
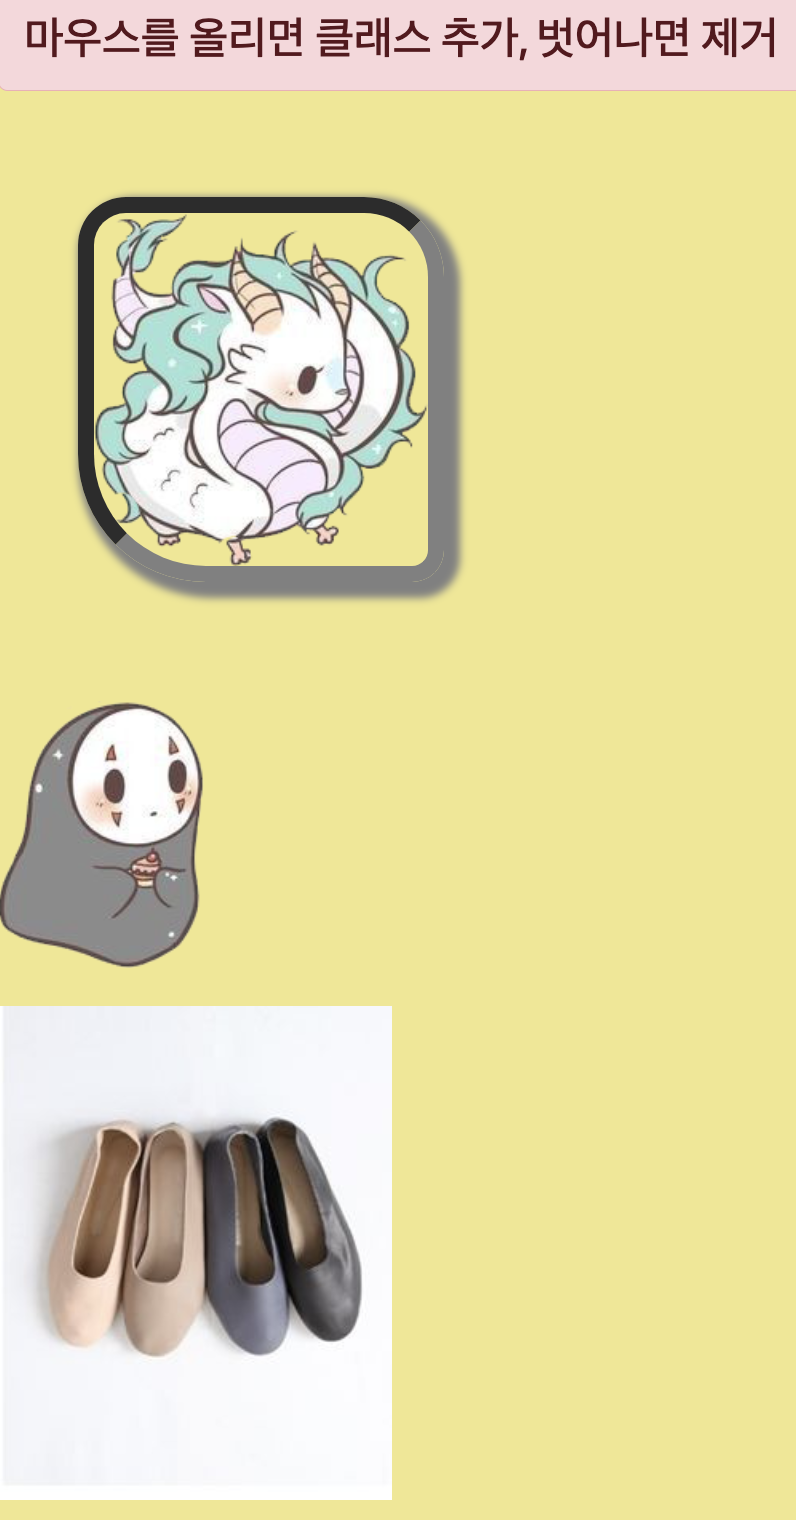
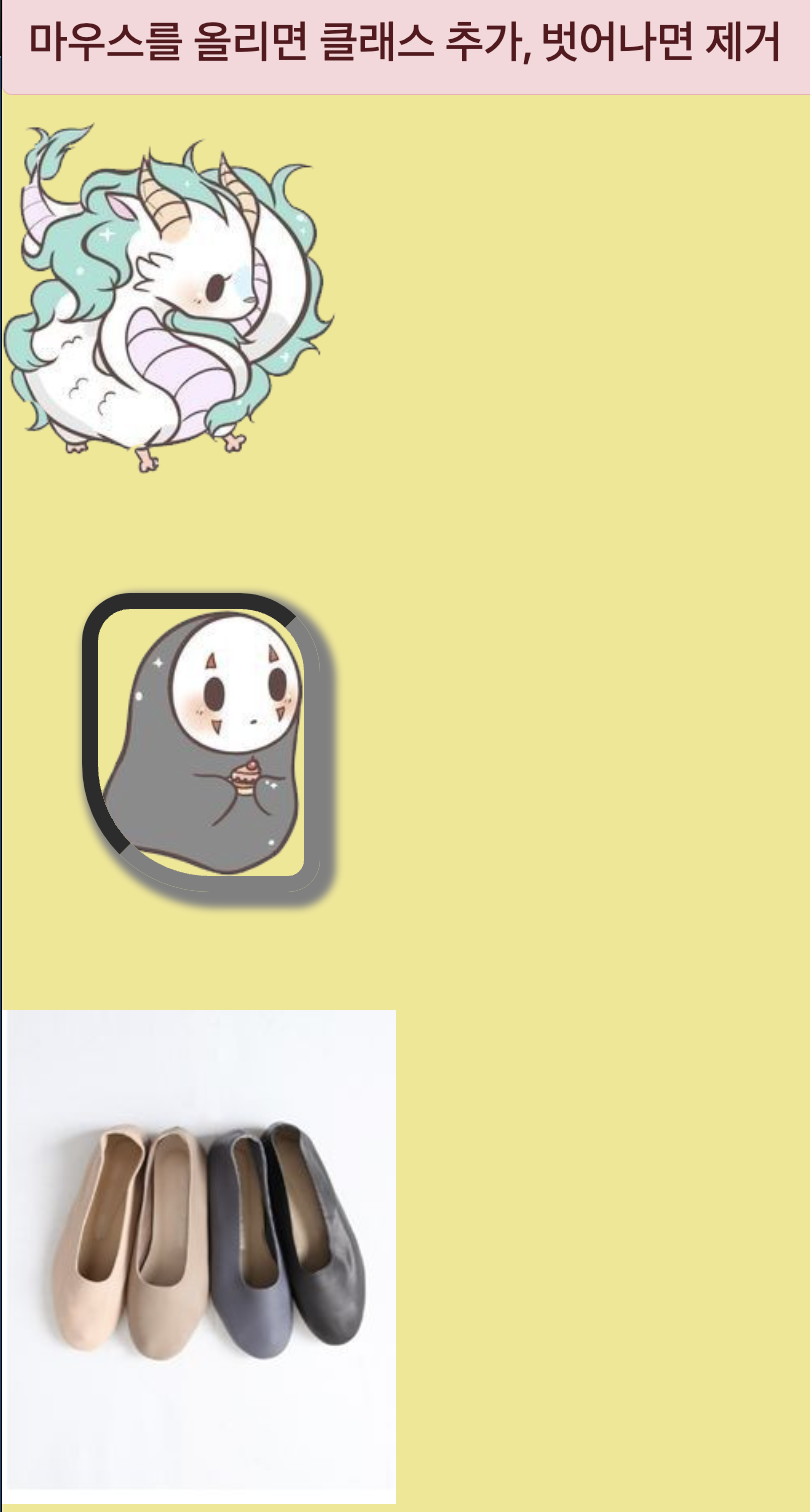
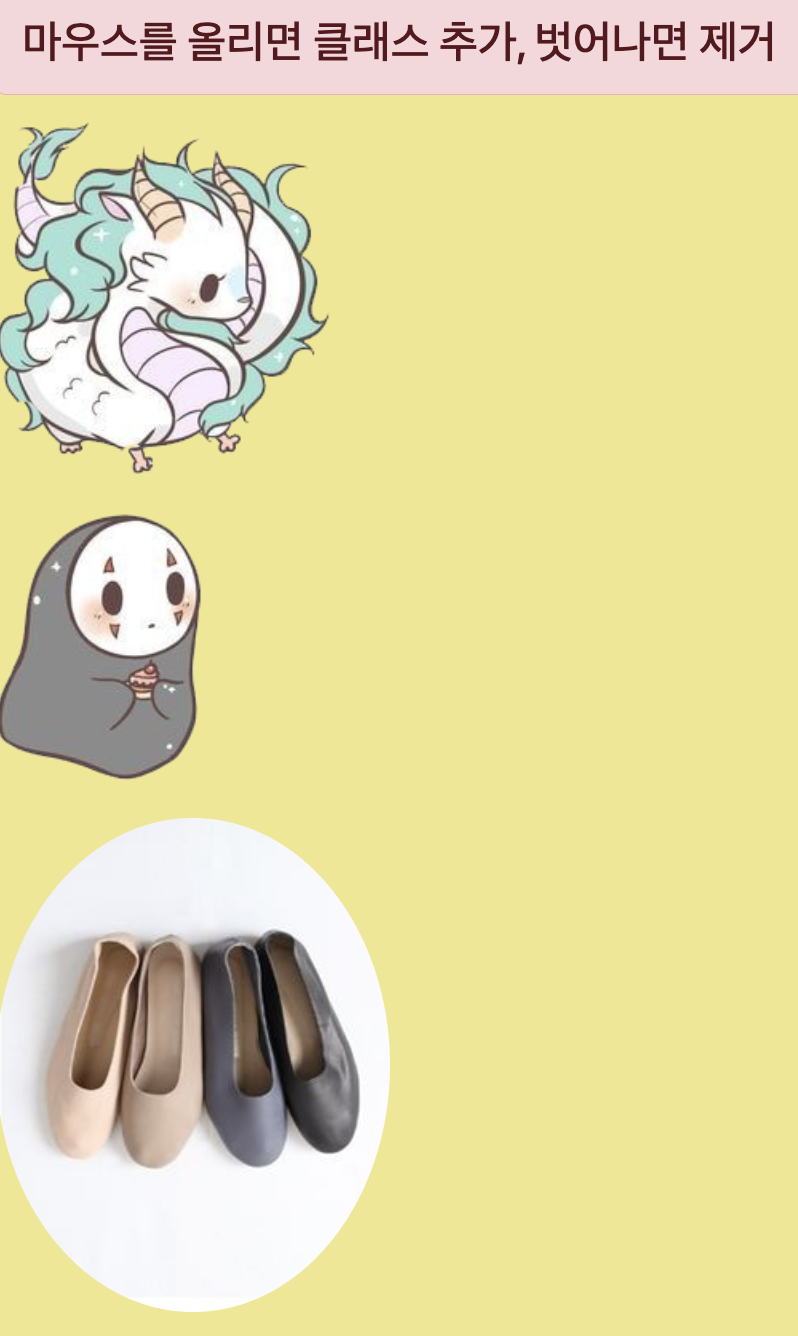
hover, addClass, removeClass,toggleClass (마우스 올릴 시)
- mouseover와 mouseout을 합친 기능이 hover 기능이다.
- class를 통째로 추가할 수 있다. (addClass)
- 물론 추가했던 class를 제거할 수 있다. (removeClass)
- hover와 같이 class를 추가 및 제거를 바로바로 할 수 있다.(toggleClass)
<!DOCTYPE html>
<html lang="en">
<head>
    <meta charset="UTF-8">
    <meta name="viewport" content="width=device-width, initial-scale=1.0">
    <link href="https://fonts.googleapis.com/css2?family=East+Sea+Dokdo&family=Moirai+One&family=Nanum+Pen+Script&family=Orbit&display=swap" rel="stylesheet">
    <script src="https://code.jquery.com/jquery-3.7.0.js"></script>
    <link href="https://cdn.jsdelivr.net/npm/bootstrap@5.3.0/dist/css/bootstrap.min.css" rel="stylesheet">

    <title>Document</title>
    <style>
        .select{
            border: 10px inset gray;
            border-radius: 30px 50px 20px 80px;
            box-shadow: 5px 5px 5px 5px gray;
            cursor: pointer;
            margin: 50px 50px;
        }
    </style>
    <script>
        $(function(){
            // addClass("클래스명") -> 클래스 추가하기
            // removeClass("클래스명") -> 클래스 제거하기
            // removeClass() : 모든 클래스제거
            // toggleClass("클래스명") -> 클래스 추가+제거 번갈아가며 실행

            // 첫 이미지에 마우스 올리고 벗어날때 이벤트
            $("img:eq(0)").hover(function(){
                $(this).addClass("select");
            },function(){
                $(this).removeClass("select");
            });

            // 두번째 이미지는 toggle로 적용
            $("img:eq(1)").hover(function(){
                $(this).toggleClass("select");
            });

            // bootstrap의 class 추가
            $("img:eq(2)").hover(function(){
                $(this).toggleClass("rounded-circle");
            });
        })
    </script>
</head>
<body style="background-color: khaki;">
    <h3 class="alert alert-danger">마우스를 올리면 클래스 추가, 벗어나면 제거 </h3>
    <img src="../만화이미지/14.png"><br><br>
    <img src="../만화이미지/15.png"><br><br>
    <img src="../쇼핑몰사진/17.jpg"><br><br>
</body>
</html>-
기본화면
-
첫번째 용 캐릭터에 마우스를 올릴 시
-
두번째 가오나시 캐릭터에 마우스를 올릴 시
-
플랫슈즈 사진에 마우스를 올릴 시
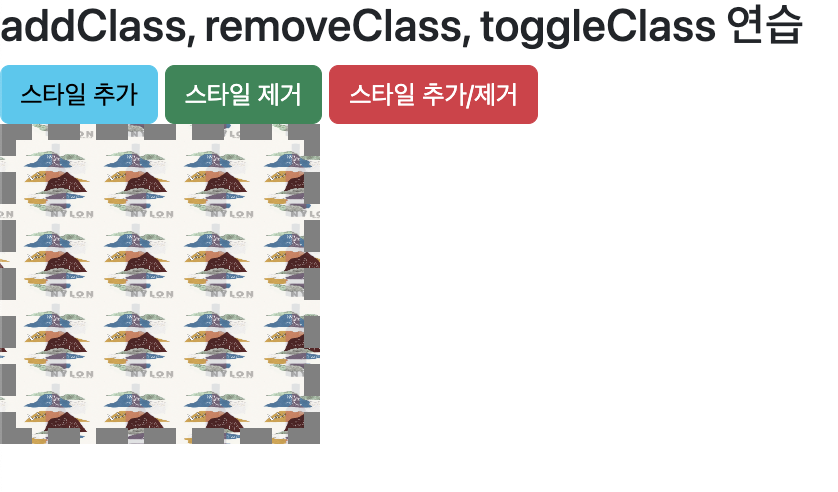
addClass, removeClass,toggleClass (클릭 시)
<!DOCTYPE html>
<html lang="en">
<head>
    <meta charset="UTF-8">
    <meta name="viewport" content="width=device-width, initial-scale=1.0">
    <link href="https://fonts.googleapis.com/css2?family=East+Sea+Dokdo&family=Moirai+One&family=Nanum+Pen+Script&family=Orbit&display=swap" rel="stylesheet">
    <script src="https://code.jquery.com/jquery-3.7.0.js"></script>
    <link href="https://cdn.jsdelivr.net/npm/bootstrap@5.3.0/dist/css/bootstrap.min.css" rel="stylesheet">
    <title>Document</title>
    <style>
        .lunch{
            width: 200px;
            height: 200px;
            border: 10px dashed gray;
            background-image: url("../div_img/bottle03.jpg");
            background-size: 50px 50px;
        }
    </style>
</head>
<body>
    <h3>addClass, removeClass, toggleClass 연습</h3>
    <button type="button" class="btn btn-info" id="btn1">스타일 추가</button>
    <button type="button" class="btn btn-success" id="btn2">스타일 제거</button>
    <button type="button" class="btn btn-danger" id="btn3">스타일 추가/제거</button>
    <div></div>

    <script>
        $("#btn1").click(function(){
            $("div").addClass("lunch");
        });
        $("#btn2").click(function(){
            $("div").removeClass("lunch");
        })
        $("#btn3").click(function(){
            $("div").toggleClass("lunch");
        });
    </script>
</body>
</html>-
초기화면

-
‘스타일 추가’버튼 클릭 시
-
'스타일 제거’버튼 클릭 시

-
‘스타일 추가/제거’버튼 1번 클릭 시

-
‘스타일 추가/제거’버튼 2번 클릭 시

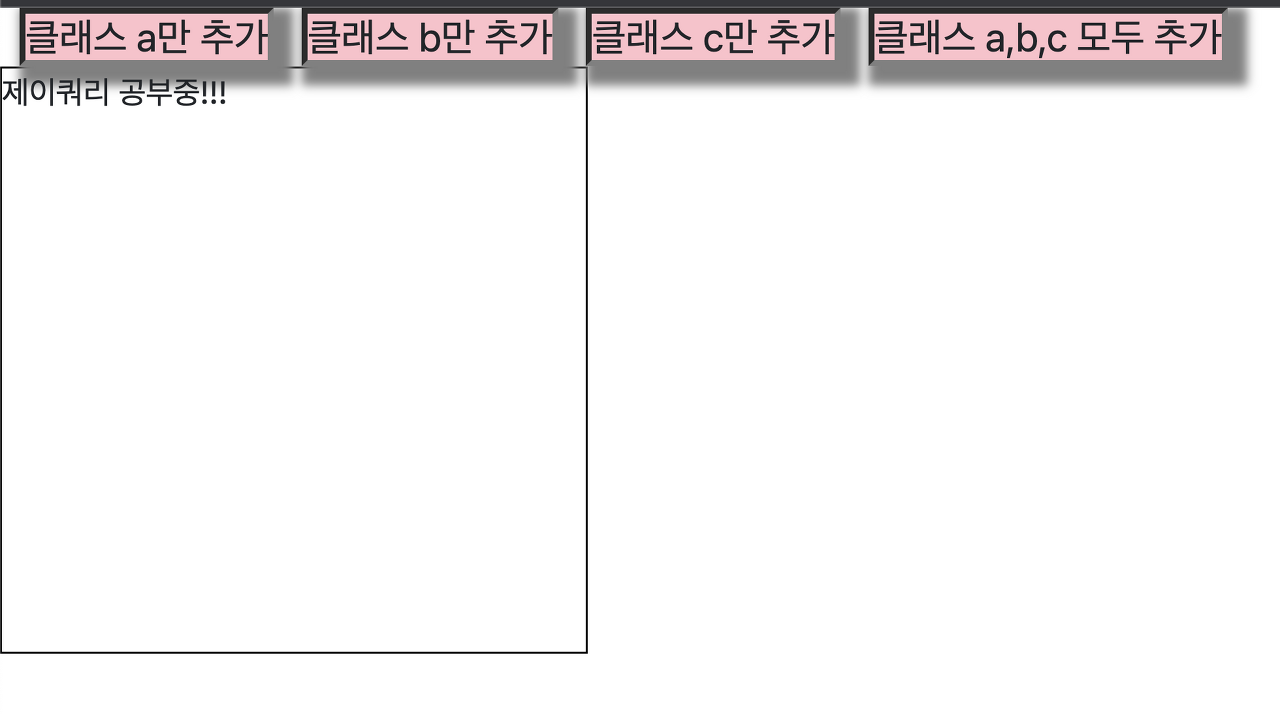
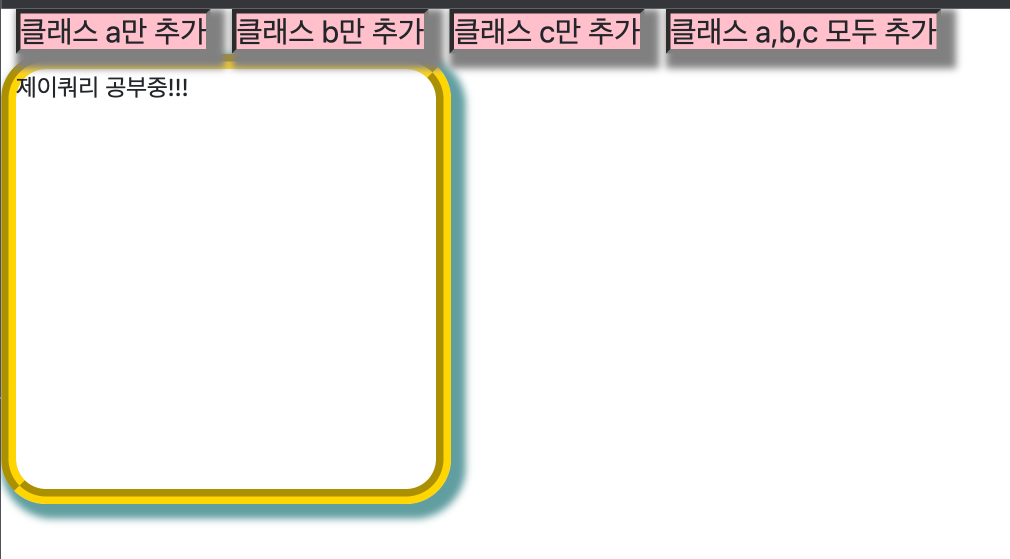
addClass, removeClass
<!DOCTYPE html>
<html lang="en">
<head>
<meta charset="UTF-8">
<meta name="viewport" content="width=device-width, initial-scale=1.0">
<link href="https://fonts.googleapis.com/css2?family=East+Sea+Dokdo&family=Moirai+One&family=Nanum+Pen+Script&family=Orbit&display=swap" rel="stylesheet">
<script src="https://code.jquery.com/jquery-3.7.0.js"></script>
<link href="https://cdn.jsdelivr.net/npm/bootstrap@5.3.0/dist/css/bootstrap.min.css" rel="stylesheet">
<title>Document</title>
<style>
a{
background-color: pink;
cursor: pointer;
border: 3px inset gray;
box-shadow: 5px 5px 5px 5px gray;
margin-left: 10px;
font-size: 15pt;
}
div{
width: 300px;
height: 300px;
border: 1px solid black;
}
div.a{
font-size: 2em; /* 2배 */
font-family: '궁서체';
color: green;
}
div.b{
border: 10px groove gold;
border-radius: 30px;
box-shadow: 5px 5px 5px 5px cadetblue;
}
div.c{
background-image: url("../div_img/bottle04.jpg");
background-repeat: no-repeat;
background-size: 150px 150px;
background-position: center;
}
</style>
</head>
<body>
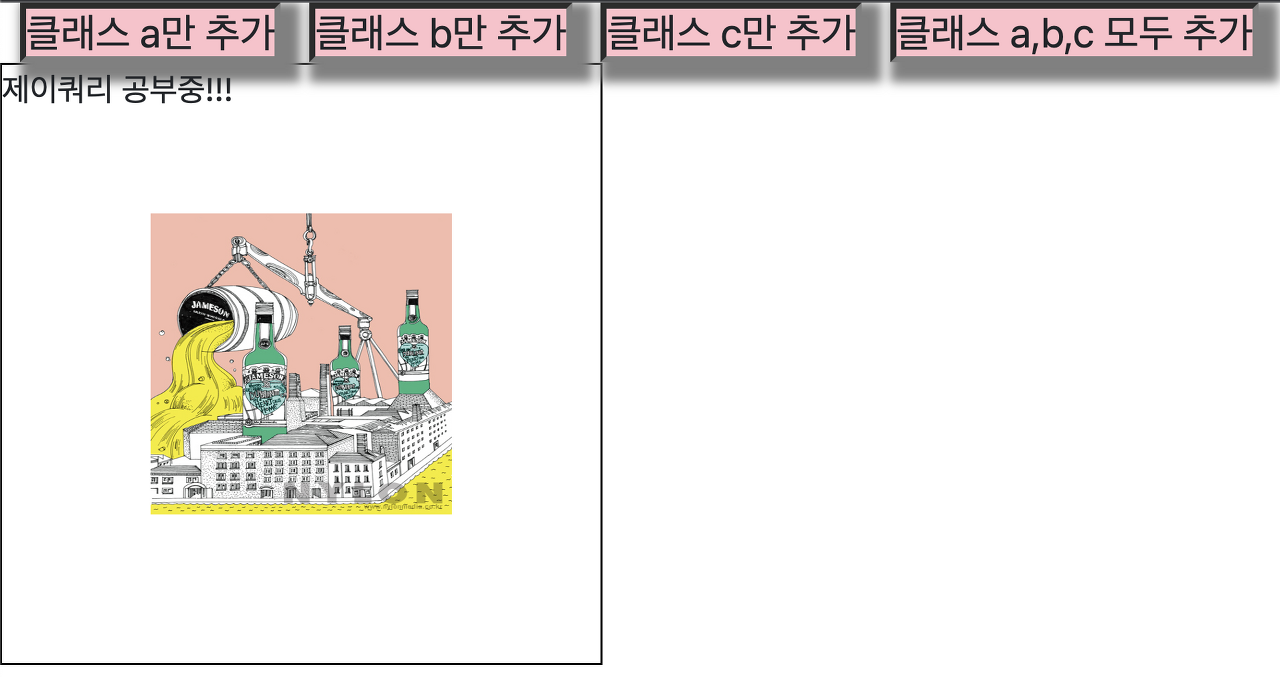
<a>클래스 a만 추가</a>
<a>클래스 b만 추가</a>
<a>클래스 c만 추가</a>
<a>클래스 a,b,c 모두 추가</a>
<div>제이쿼리 공부중!!!</div>
<script>
$("a:eq(0)").click(function(){
$("div").addClass("a").removeClass("b c");
});
$("a:eq(1)").click(function(){
$("div").addClass("b").removeClass("a c");
})
$("a:eq(2)").click(function(){
$("div").addClass("c").removeClass("a b")
})
$("a:eq(3)").click(function(){
$("div").addClass("a b c");
})
</script>
</body>
</html>-
기본화면
-
'클래스 a만 추가' 클릭시

-
‘클래스 b만 추가’ 클릭시
-
‘클래스 a,b,c 모두 추가’ 클릭시
Random 활용
- parseInt(Math.random()*5)+1 :
- random은 기본적으로 소수로 나오기 때문에 parseInt를 이용하여 정수화 시켜줘야 한다.
- 0~4 까지 5자리를 기입하기 때문에 *5를 해줘야 한다.
- 1~5 까지의 숫자를 기입하기 위해서는 뒤에 +1을 해줘야 한다.
<!DOCTYPE html>
<html lang="en">
<head>
    <meta charset="UTF-8">
    <meta name="viewport" content="width=device-width, initial-scale=1.0">
    <link href="https://fonts.googleapis.com/css2?family=East+Sea+Dokdo&family=Moirai+One&family=Nanum+Pen+Script&family=Orbit&display=swap" rel="stylesheet">
    <script src="https://code.jquery.com/jquery-3.7.0.js"></script>
    <link href="https://cdn.jsdelivr.net/npm/bootstrap@5.3.0/dist/css/bootstrap.min.css" rel="stylesheet">
    <title>Document</title>
</head>
<body>
    <img src="">
    <img src="">
    <img src="">
    <img src="">
    <img src="">

    <script>
        // 모든이미지에 같은 이미지 넣고 너비, 높이 보더 등등 주세요
        $("img").attr("src","../만화이미지/15.png").css({"width":"100px","title":"100px","border":"2px dotted gray"});

        // 랜덤이미지 5개 배열
        var imgarr=new Array(5);

        imgarr[0]="../만화이미지/20.png"
        imgarr[1]="../만화이미지/16.png"
        imgarr[2]="../만화이미지/14.png"
        imgarr[3]="../만화이미지/17.png"
        imgarr[4]="../만화이미지/13.png"

        // img태그에 마우스 올리면 5개의 랜덤 이미지 중에서 하나가 선택되고

        // 마우스가 벗어나면 다시 원래의 이미지가 된다.

        $("img").mouseover(function(){
            rnd=parseInt(Math.random()*5);
            $(this).attr("src",imgarr[rnd]);
        });
        $("img").mouseout(function(){
            $(this).attr("src","../만화이미지/15.png");
        });

    </script>
</body>
</html>- 초기화면
- 가운데 사진에 마우스를 올렸을 시

- 가운데 사진에 마우스를 다시 올렸을 시 (random 변수를 사용했으므로 다른 사진이 올라온다.)

random ball
- 아래 : stylesheet
div.lottoball{
    font-size: 40px;
    color: brown;
    text-align: center;
    line-height:100px;
    width: 100px;
    height: 100px;
    background-color: pink;
    float: left;
    border-radius: 100px;
    margin-left: 20px;
    margin-top: 20px;
    box-shadow: 5px 5px 5px 5px gray;
}- 코드
<!DOCTYPE html>
<html lang="en">
<head>
    <meta charset="UTF-8">
    <meta name="viewport" content="width=device-width, initial-scale=1.0">
    <link href="https://fonts.googleapis.com/css2?family=East+Sea+Dokdo&family=Moirai+One&family=Nanum+Pen+Script&family=Orbit&display=swap" rel="stylesheet">
    <link href="https://cdn.jsdelivr.net/npm/bootstrap@5.3.0/dist/css/bootstrap.min.css" rel="stylesheet">
    <link rel="stylesheet" href="../css/style2.css">
    <script src="https://code.jquery.com/jquery-3.7.0.js"></script>
    <script src="../js/randomColor.js"></script>
    <title>Document</title>
</head>
<body>
    <div class="lottoball"></div><div class="lottoball"></div><div class="lottoball"></div><div class="lottoball"></div><div class="lottoball"></div><div class="lottoball"></div>
    <br>
    <h2></h2>
    <script>
        // 공 6개에 1~6까지 숫자 넣기
        // css("속성","값")
        // css("속성")
        // attr("속성","값")
        // attr("속성")
        $("div").each(function(idx){
            $(this).html(idx+1).css("background-color",randomColor());
        })

        $("div").mouseover(function(){
            var col=$(this).css("background-color");
            $("h2").html(col).css("color",col);
        })

        // empty : 마우스 벗어나면 지우기
        $("div").mouseout(function(){
            $("h2").empty();
        })
    </script>
</body>
</html>
function randomColor(){
// rgb 색상얻기
var r=parseInt(Math.random()*256); // 0~ 255 까지
var g=parseInt(Math.random()*256); // 0~ 255 까지
var b=parseInt(Math.random()*256); // 0~ 255 까지
var color="rgb("+r+","+g+","+b+")";
return color;
}-
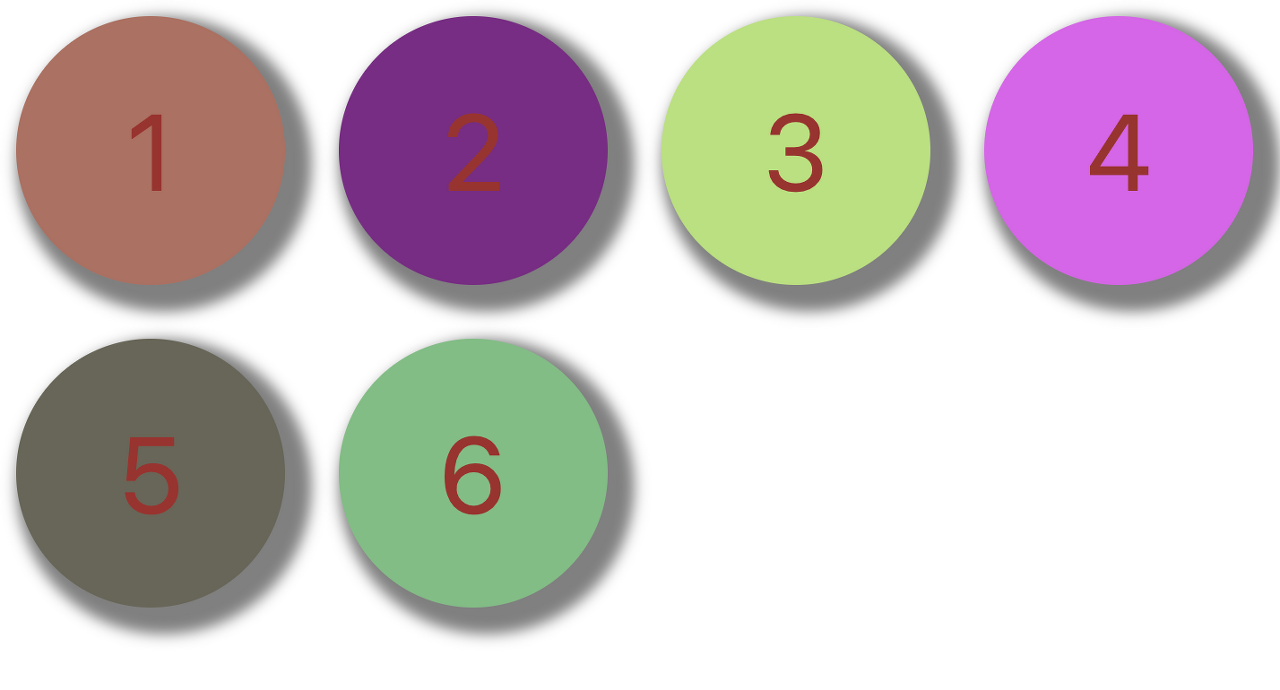
초기화면
-
2번 공에 마우스를 올렸을 시

clone
- clone : 해당 사항 아래에서 모든 항목을 복사한다.
<!DOCTYPE html>
<html lang="en">
<head>
<meta charset="UTF-8">
<meta name="viewport" content="width=device-width, initial-scale=1.0">
<link href="https://fonts.googleapis.com/css2?family=East+Sea+Dokdo&family=Moirai+One&family=Nanum+Pen+Script&family=Orbit&display=swap" rel="stylesheet">
<link href="https://cdn.jsdelivr.net/npm/bootstrap@5.3.0/dist/css/bootstrap.min.css" rel="stylesheet">
<script src="https://code.jquery.com/jquery-3.7.0.js"></script>
<title>Document</title>
</head>
<body>
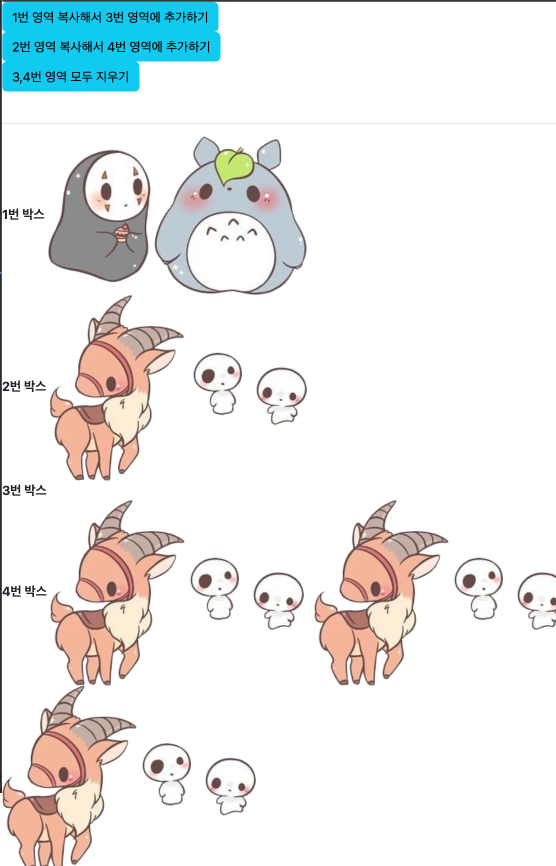
<button type="button" class="btn btn-info" id="btn1">1번 영역 복사해서 3번 영역에 추가하기</button>
<br>
<button type="button" class="btn btn-info" id="btn2">2번 영역 복사해서 4번 영역에 추가하기</button>
<br>
<button type="button" class="btn btn-info" id="btn3">3,4번 영역 모두 지우기</button>
<br>
<br>
<hr>
<div id="box1">
<b>1번 박스</b>
<img src="../만화이미지/15.png">
<img src="../만화이미지/16.png">
</div>
<div id="box2">
<b>2번 박스</b>
<img src="../만화이미지/12.png">
<img src="../만화이미지/17.png">
</div>
<div id="box3">
<b>3번 박스</b>
</div>
<div id="box4">
<b>4번 박스</b>
</div>
<script>
$("#btn1").click(function(){
// box1의 아래 모든 img 태그를 복사하자
var no1=$("#box1").find("img").clone(); // box1 아래에서 모든 img를 복사한다
// box3 영역에 추가한다.
$("#box3").append(no1);
})
$("#btn2").click(function(){
var no2=$("#box2 img").clone();
$("#box4").append(no2);
})
$("#btn3").click(function(){
$("#box3,#box4").find("img").remove();
})
</script>
</body>
</html>-
초기화면

-
1번 영역 복사해서 3번 영역에 추가하기 버튼 클릭 시

-
2번 영역 복사해서 4번 영역에 추가하기 버튼 클릭 시 (append로 출력 했으므로 클릭시 계속 추가된다)
-
3,4번 영역 모두 지우기 버튼 클릭 시

parent, siblings, children
- parent() : 부모
- siblings() : 동급 (본인을 제외한, 본인과 동급들 선택)
- children() : 자식
<!DOCTYPE html>
<html lang="en">
<head>
    <meta charset="UTF-8">
    <meta name="viewport" content="width=device-width, initial-scale=1.0">
    <link href="https://fonts.googleapis.com/css2?family=East+Sea+Dokdo&family=Moirai+One&family=Nanum+Pen+Script&family=Orbit&display=swap" rel="stylesheet">
    <link href="https://cdn.jsdelivr.net/npm/bootstrap@5.3.0/dist/css/bootstrap.min.css" rel="stylesheet">
    <script src="https://code.jquery.com/jquery-3.7.0.js"></script>
    <title>Document</title>
    <style>
        div.bts{
            position: absolute;
            left: 300px;
            width: 250px;
            height: 300px;
            border: 1px solid gray;
            top: 100px;
            border-radius: 30px;
        }
        ul li{
            list-style: none;
        }
        ul.menu>li{
            font-size: 2em;
            font-family: 'Times New Roman',Times, serif;
            cursor: pointer;
        }
        ul.submenu>li{
            font-size: 20px;
            font-family: 'Times New Roman',Times, serif;
        }
        ul.submenu>li:hover{
            background-color: pink;

        }
    </style>
    <script>
        $(function(){
            // 모든 서브메뉴 숨기기
            $("ul.submenu").hide();

            // 이벤트
            // 메인메뉴명을 클릭하면 해당메뉴의 서브메뉴가 나타난다.
            // 내가 클릭한 mainmenu에 대한submenu만 나타나고, 다른 submenu는 숨겨야 한다.

            $("ul.menu>li").click(function(){
                // $(this).find('ul.submenu').show();
                $(this).children().show('slow');
                $(this).siblings().find('ul.submenu').hide('slow');
            })
        })
    </script>
</head>
<body>
    <div class="bts">
        <ul class="menu">
            <li>
                File
                <ul class="submenu">
                    <li>New</li>
                    <li>Open</li>
                    <li>Save</li>
                    <li>Close</li>
                </ul>
            </li>
            <li>
                Edit
                <ul class="submenu">
                    <li>Copy</li>
                    <li>Cut</li>
                    <li>Find</li>
                    <li>Delete</li>
                </ul>
            </li>
            <li>
                Help
                <ul class="submenu">
                    <li>Search</li>
                    <li>Install</li>
                    <li>Market</li>
                </ul>
            </li>
        </ul>
    </div>
</body>
</html>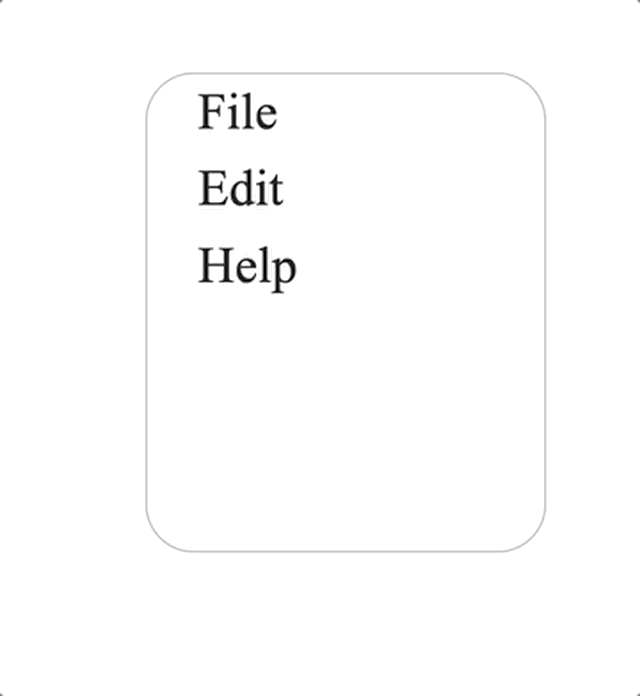
parent, siblings, children 예제
- $(this).parent().siblings().find("div").hide('slow'); ← 이부분 주의!! // div로 묶여있기 때문에 parent() 로 div class="board one"
로 올라가서 동급을 찾고, 다시 자식으로 내려와야 한다.
<!DOCTYPE html>
<html lang="en">
<head>
    <meta charset="UTF-8">
    <meta name="viewport" content="width=device-width, initial-scale=1.0">
    <link href="https://fonts.googleapis.com/css2?family=East+Sea+Dokdo&family=Moirai+One&family=Nanum+Pen+Script&family=Orbit&display=swap" rel="stylesheet">
    <link href="https://cdn.jsdelivr.net/npm/bootstrap@5.3.0/dist/css/bootstrap.min.css" rel="stylesheet">
    <script src="https://code.jquery.com/jquery-3.7.0.js"></script>
    <title>Document</title>
    <style>
        div.ans>h5{
            text-indent: 30px; /* 들여쓰기 */
        }
        .one{
            color: blue;
        }

        .two{
            color: violet;
        }

        .three{
            color: green;
        }

        .board{
            font-family: Moirai One;
            font-size: 20pt;
            cursor: pointer;
        }
        h5{
            font-family: Nanum Pen Script;
        }
    </style>
    <script>
        // one two three 클래스별로 글꼴색 다르게 주기
        // b태그_포인터
        // 글꼴,사이즈 조절
        // 이벤트 : 내용 클릭 시 그 내용 댓글만 보이고 나머지 글에대한 댓글은 안보이기!!
        $(function(){
            $("div.ans").hide();
            $(".board>b").click(function(){
                $(this).siblings().show('slow');
                $(this).parent().siblings().find("div").hide('slow');
// div로 묶여있기 때문에 parent() 로 <div class="board one"> 로 올라가서 동급을 찾고, 다시 자식으로 내려와야 한다.
            });
        })

    </script>
</head>
<body>
    <div class="board one">
        <b>게시판 내용_1</b>
        <div class="ans">
            <h5>개시판 내용_1에 대한 댓글1</h5>
            <h5>개시판 내용_1에 대한 댓글2</h5>
            <h5>개시판 내용_1에 대한 댓글3</h5>
        </div>
    </div>

    <div class="board two">
        <b>게시판 내용_2</b>
        <div class="ans">
            <h5>개시판 내용_2에 대한 댓글1</h5>
            <h5>개시판 내용_2에 대한 댓글2</h5>
            <h5>개시판 내용_2에 대한 댓글3</h5>
        </div>
    </div>

    <div class="board three">
        <b>게시판 내용_3</b>
        <div class="ans">
            <h5>개시판 내용_3에 대한 댓글1</h5>
            <h5>개시판 내용_3에 대한 댓글2</h5>
            <h5>개시판 내용_3에 대한 댓글3</h5>
        </div>
    </div>
</body>
</html>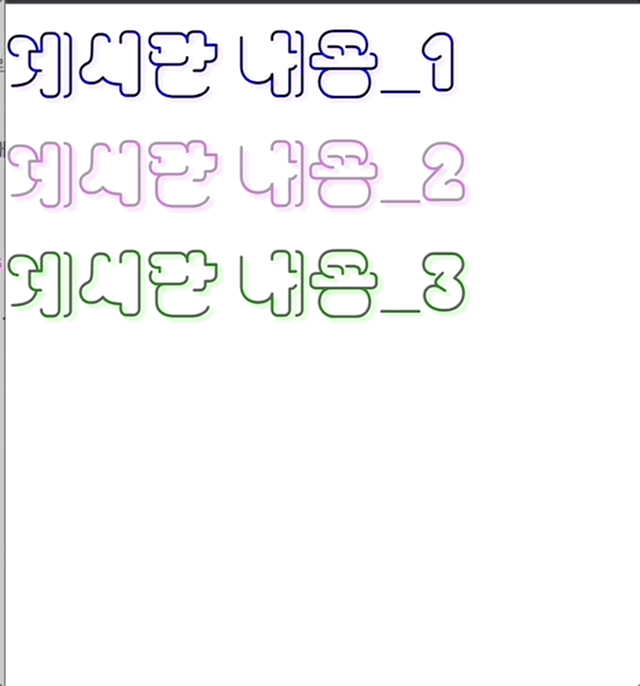
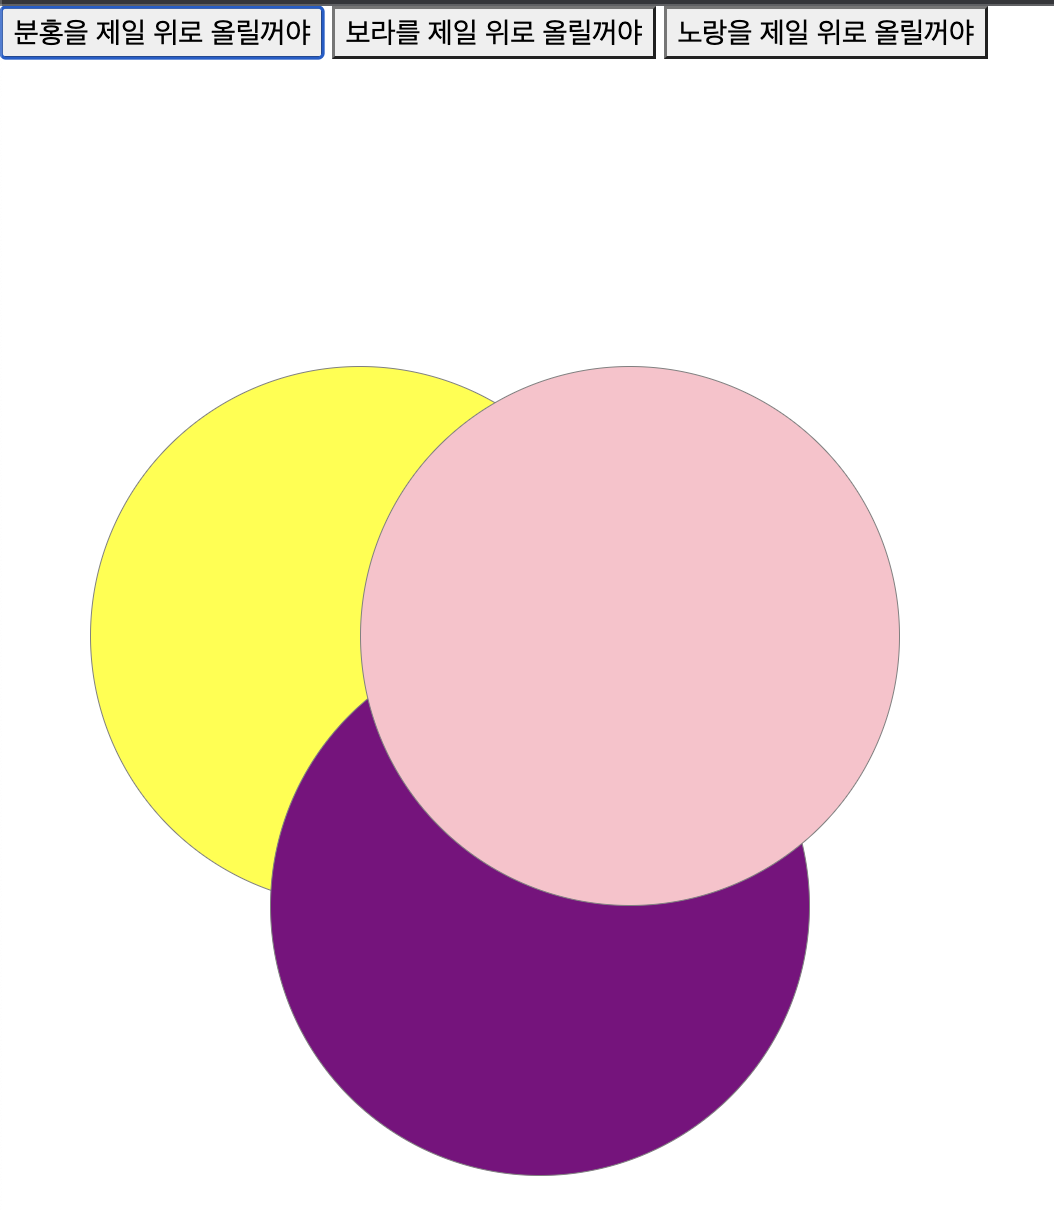
z-index: (style)
- z-index: 숫자; styleshee에 기입하며, 숫자가 가장 큰 항목이 가장 위로 올라온다.
<!DOCTYPE html>
<html lang="en">
<head>
    <meta charset="UTF-8">
    <meta name="viewport" content="width=device-width, initial-scale=1.0">
    <link href="https://fonts.googleapis.com/css2?family=East+Sea+Dokdo&family=Moirai+One&family=Nanum+Pen+Script&family=Orbit&display=swap" rel="stylesheet">
    <link href="https://cdn.jsdelivr.net/npm/bootstrap@5.3.0/dist/css/bootstrap.min.css" rel="stylesheet">
    <script src="https://code.jquery.com/jquery-3.7.0.js"></script>
    <title>Document</title>
    <style>
        div{
            position: absolute;
            border: 1px solid gray;
            width: 300px;
            height: 300px;
            border-radius: 200px;
        }

        div.pink{
            left:200px;
            top: 200px;
            background-color: pink;
            z-index: 5555;    /* 숫자가 몇이건 상관없이 가장 큰 숫자가 위로 올라온다. */
        }
        div.purple{
            left:150px;
            top: 350px;
            background-color: purple;
            z-index: 3424;

        }
        div.yellow{
            left:50px;
            top: 200px;
            background-color: yellow;
            z-index: 14224;
        }
    </style>
    <script>
        $(function(){
            // z-index는 큰값인 요소가 제일 위로 올라온다.
            $("button").click(function(){
                var cls=$(this).attr("class");
                alert(cls);

                if(cls=='pink'){
                    $("div.pink").css("z-index",3);
                    $("div.purple").css("z-index",2);
                    $("div.yellow").css("z-index",1);
                } else if (cls=='purple') {
                    $("div.pink").css("z-index",2);
                    $("div.purple").css("z-index",3);
                    $("div.yellow").css("z-index",1);
                } else {
                    $("div.pink").css("z-index",2);
                    $("div.purple").css("z-index",1);
                    $("div.yellow").css("z-index",3);
                }
            })
        })
    </script>
</head>
<body>
   <button type="button" class="pink">분홍을 제일 위로 올릴꺼야</button>
   <button type="button" class="purple">보라를 제일 위로 올릴꺼야</button>
   <button type="button" class="yellow">노랑을 제일 위로 올릴꺼야</button>

   <div class="pink"></div>
   <div class="purple"></div>
   <div class="yellow"></div>
</body>
</html>-
초기화면
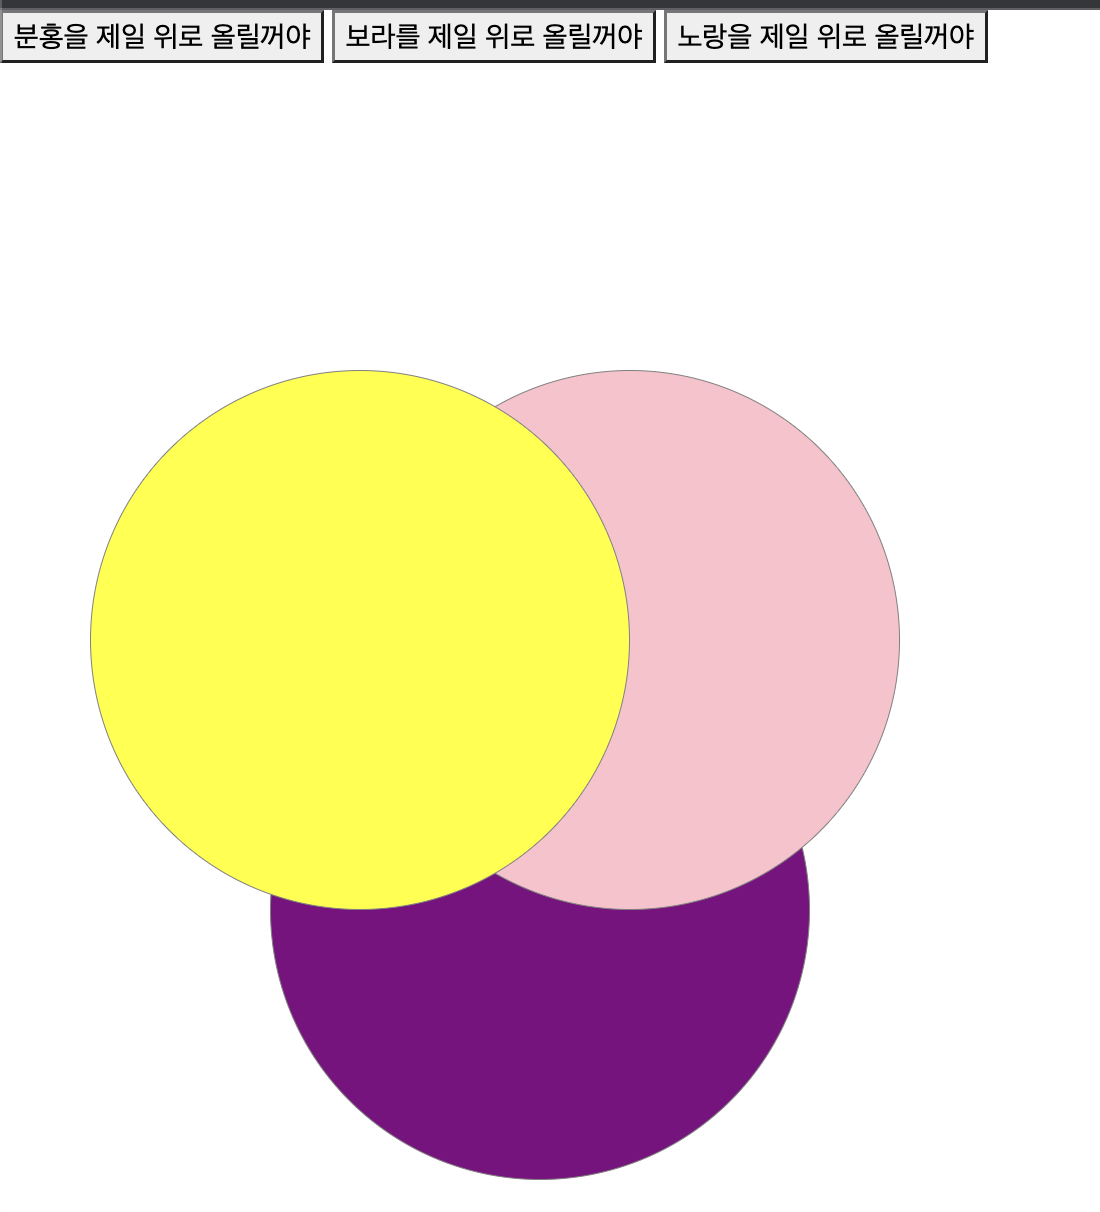
-
분홍을 제일 위로 올릴꺼야 클릭 시

-
확인 클릭 시
-
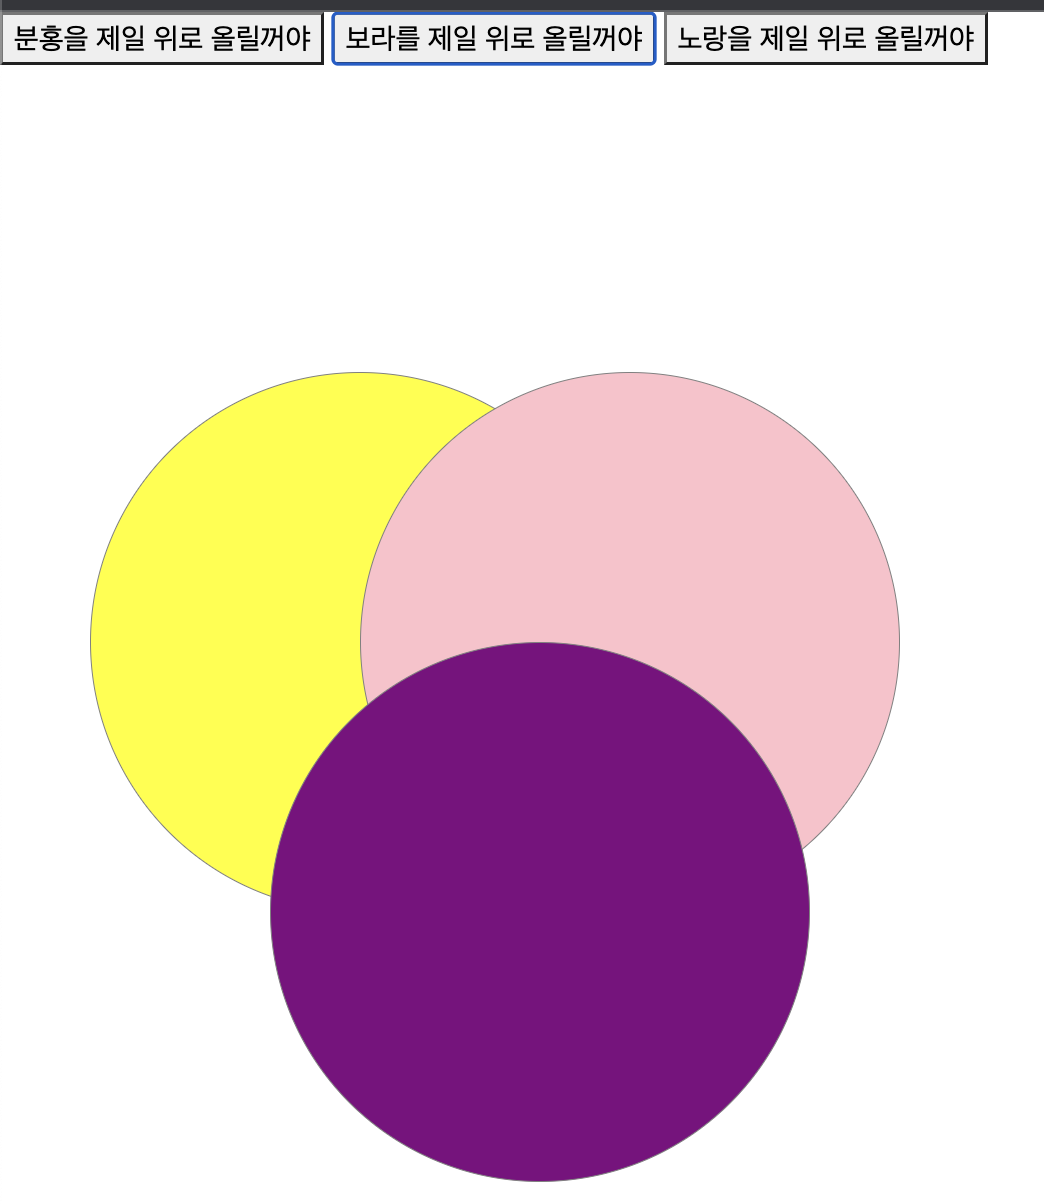
보라를 제일 위로 올릴꺼야 클릭 시
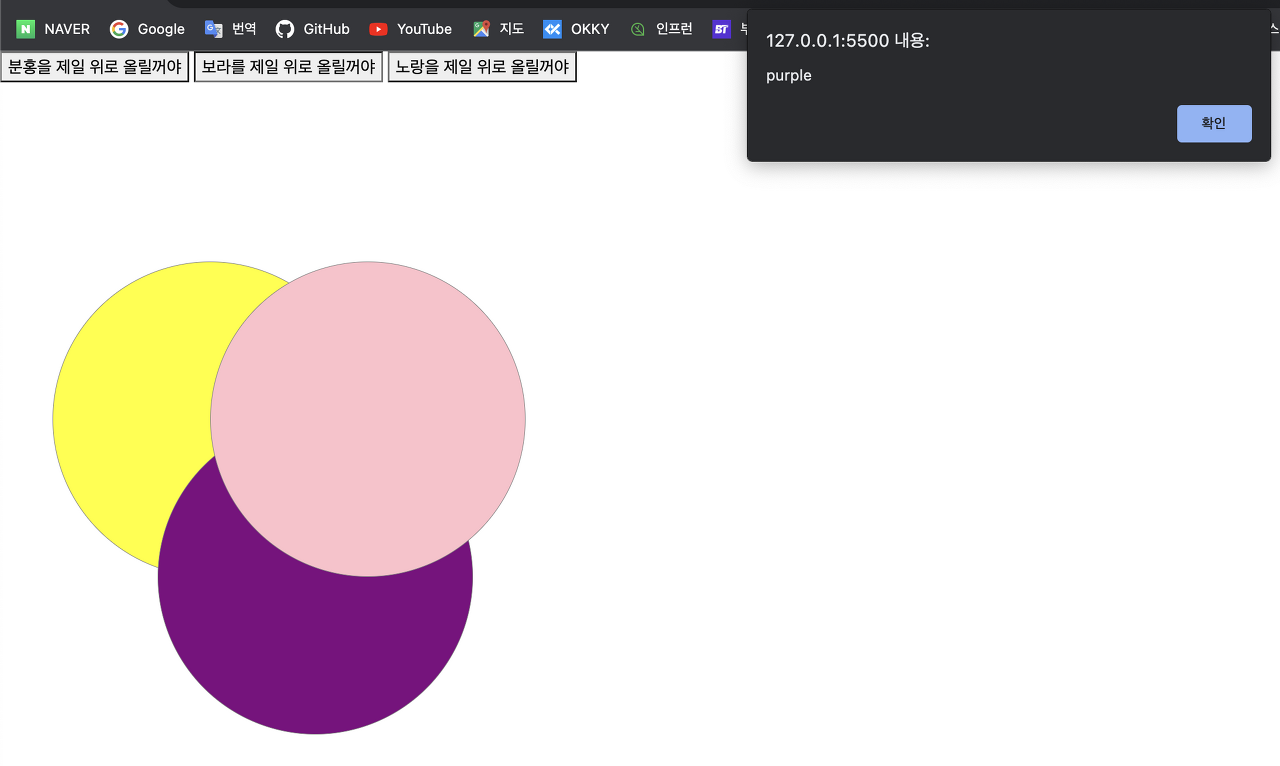
-
확인 클릭 시
-
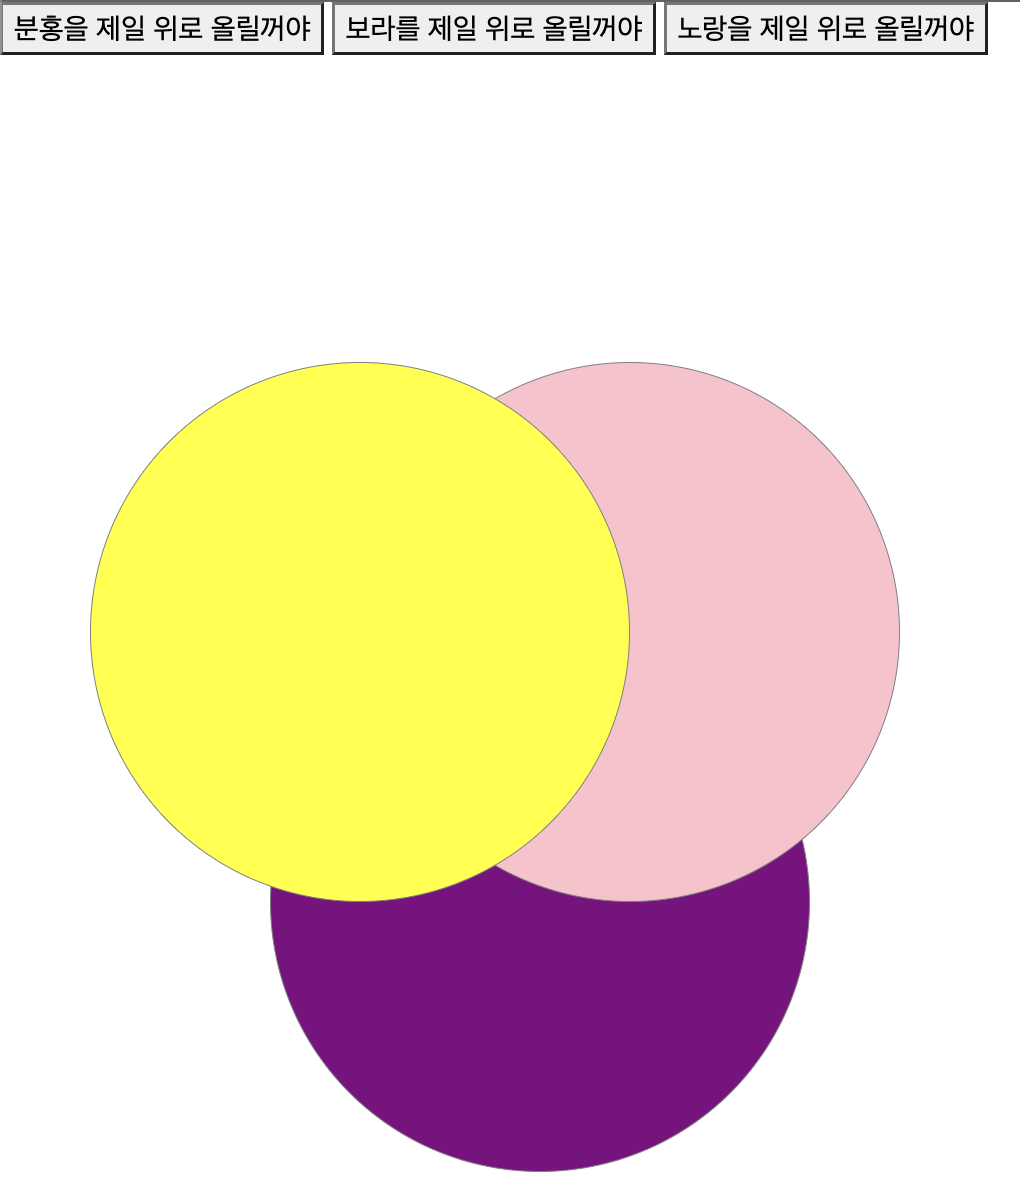
노랑를 제일 위로 올릴꺼야 클릭 시
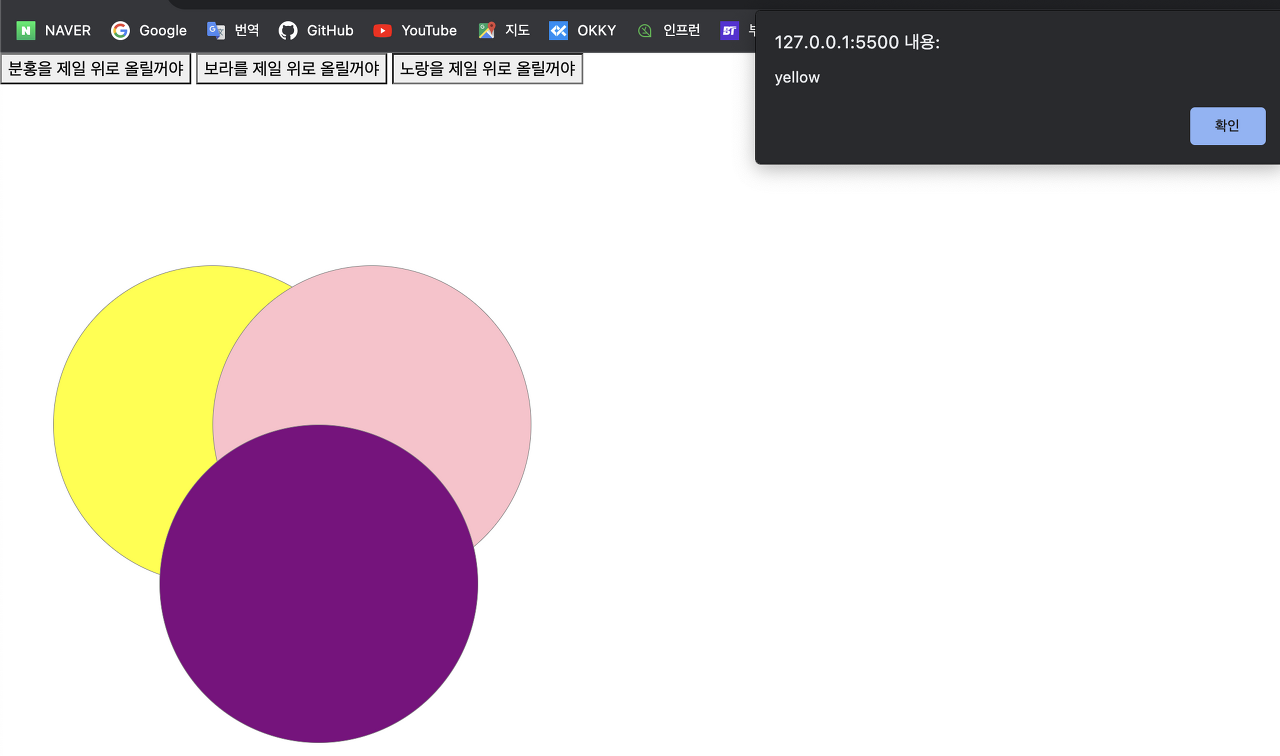
-
확인 클릭 시
:active
- stylesheet 에서 :active 를 이용하면 간단한 mouse 클릭 이벤트를 구현할 수 있다.
- 긴 사진의 절반을 기준으로 위쪽 사진을 보여주다가 클릭 시 아래쪽 사진으로 바꿔주는 역할을 했다.
<!DOCTYPE html>
<html lang="en">
<head>
    <meta charset="UTF-8">
    <meta name="viewport" content="width=device-width, initial-scale=1.0">
    <link href="https://fonts.googleapis.com/css2?family=East+Sea+Dokdo&family=Moirai+One&family=Nanum+Pen+Script&family=Orbit&display=swap" rel="stylesheet">
    <link href="https://cdn.jsdelivr.net/npm/bootstrap@5.3.0/dist/css/bootstrap.min.css" rel="stylesheet">
    <script src="https://code.jquery.com/jquery-3.7.0.js"></script>
    <title>Document</title>
    <style>
        /* gun 사이즈는 300 x 500 */
        #gun{
            width: 300px;
            height: 250px;
            background-image: url('../jquery_img/gun.png');
        }
        #gun:active{
            background-position: bottom;
        }
    </style>
</head>
<body>
    <h2>전체 이미지중에 일부</h2>
    <div id="gun"></div>
</body>
</html>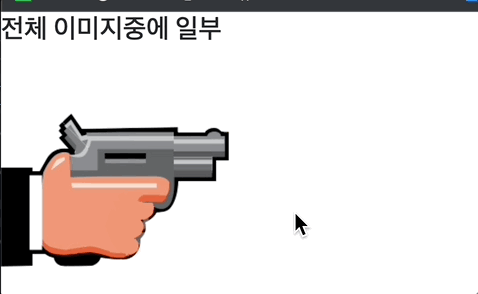
parent, siblings, children 예제
<!DOCTYPE html>
<html lang="en">
<head>
    <meta charset="UTF-8">
    <meta name="viewport" content="width=device-width, initial-scale=1.0">
    <link href="https://fonts.googleapis.com/css2?family=East+Sea+Dokdo&family=Moirai+One&family=Nanum+Pen+Script&family=Orbit&display=swap" rel="stylesheet">
    <link href="https://cdn.jsdelivr.net/npm/bootstrap@5.3.0/dist/css/bootstrap.min.css" rel="stylesheet">
    <script src="https://code.jquery.com/jquery-3.7.0.js"></script>
    <title>Document</title>
    <style>
        li{
            list-style: none;
        }
        div.wall ul.list li img{
            width: 100%;
        }
        div.wall ul.list li{
            width: 100px;
            height: 100px;
            float: left;
            cursor: pointer;
            margin-top: 10px;
            margin-left: 10px;
            border: 5px solid pink;
        }
        div.wall ul.list li.active{
            border:5px solid yellow;
        }
        body{background-color: black;}

        div.wall{
            width: 800px;
            height: 600px;
            background-color: #999;
            margin: 50px auto;
        }
        h1.title{
            font-size: 30px;
            position: absolute;
            left: 655px;
            top: 150px;
            width: 150px;
            font-family: "Nanum Pen Script";
            font-weight: bold;
        }
    </style>
    <script>
        $(function(){
        // 현재 클릭한 이미지의 부모인 li에 class 추가하기
        $("ul.list img").click(function(){
                $(this).parent().addClass("active");
                $(this).parent().siblings().removeClass();

                var title1=$(this).attr("title");
                var src1=$(this).attr("src");
                // console.log(src1);
                // $("h1.title").html(title1);
                $("h1.title").attr("title",title1);
                $("div.wall").css("backgroundImage","url('"+src1+"')");
        })
        // 부모태그의 형제태그에 들어있는 active class는 제거
        // 클릭한 곳의 title 속성 얻어서 h1에 넣기
        // 클릭한 이미지를 배경에 넣기
        })
    </script>
</head>
<body>
    <div class="wall">
        <h1 class="title">Select Page</h1>
        <img src="../jquery_img/cover2.png">
        <ul class="list">
            <li><img src="../jquery_img/b01.png" title="Pear"></li>
            <li><img src="../jquery_img/b02.png" title="Checker"></li>
            <li><img src="../jquery_img/b03.png" title="Bamboo"></li>
            <li><img src="../jquery_img/b04.png" title="Pensil"></li>
            <li><img src="../jquery_img/b05.png" title="Leaf"></li>
            <li><img src="../jquery_img/b06.png" title="Forest"></li>
        </ul>
    </div>
</body>
</html>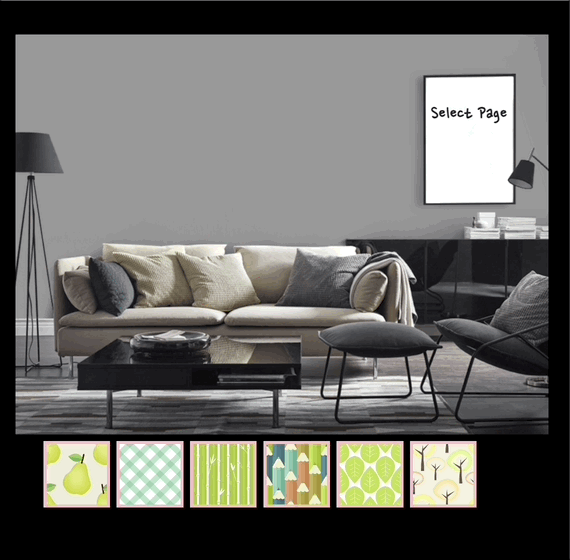

java를 잡아...... 하... 이게 맞나...