
Git Private Repo Clone 에서 이어서 진행된다
1. 리소스 준비
DockerHub & GitHub

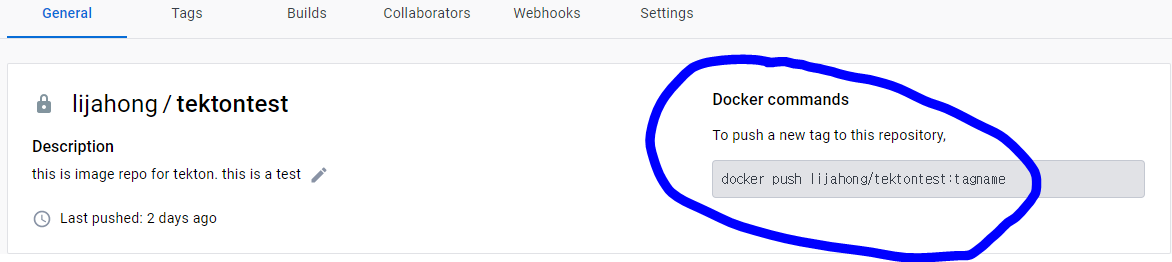
- DockerHub에 들어가서 Private Repo를 생성하자
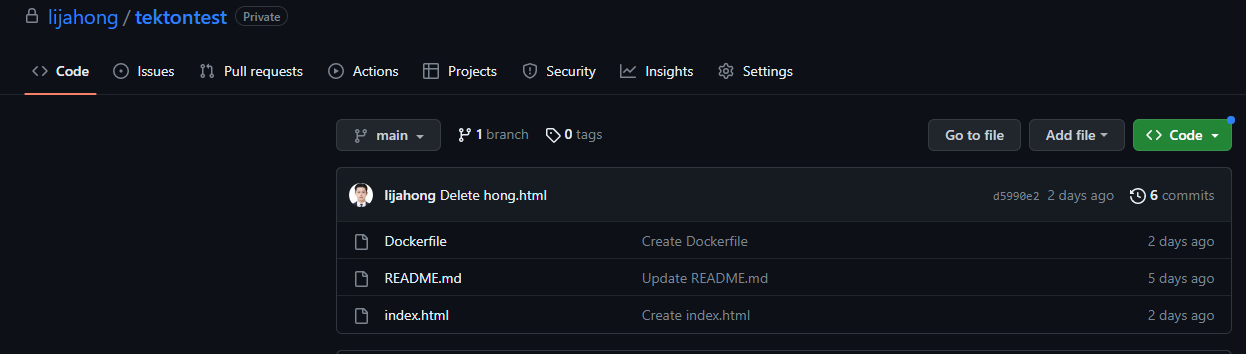
- GitHub Private Repo에 들어가서 Image를 Build 하기 위한 파일 2개를 준비하자
FROM nginx:1.21.1

COPY ./index.html /usr/share/nginx/html/index.html

EXPOSE 80
- Dockerfile은 기본 nginx 이미지에 index.html을 바꿔서 Image를 만들도록 정의한다
<html>
  <head>
    <title>test for tekton</title>
  </head>
  <body>
    <div>
      <h1>this is test for tekton</h1>
    </div>
  </body>
</html>
- index.html은 간단하게 만들어주자
Docker Secret & SA
Build 된 Image를 Docker Hub Private Repo에 Push 할 것이다. 이를 위해서 Docker Hub에 대한 인증 정보가 필요하다
apiVersion: v1
kind: Secret
metadata:
 name: docker-credential
 namespace: hongspace
 annotations:
   tekton.dev/docker-0: https://index.docker.io
type: kubernetes.io/basic-auth
stringData:
 username: 'Docker Hub Account Username'
 password: 'Docker Hub Account Password'
- Docker Hub username과 password를 이용하여 Secret을 생성하는 방법도 있다
- 허나 이렇게 생성한 Secret을 이용하면, Private Repo에 Image Push는 되지만, Kubectl 명령으로 Image를 Pull 할 때 인증이 실패한다
DockerHub Privat Repo에서 Docker Image를 Push & Pull 하기 위해, config.json을 이용하여 DockerHub 인증 정보가 담긴 Secret을 만들자
docker login
- docker login을 해주자
[ec2-user@ip-100-0-1-19 auth]$ cat ~/.docker/config.json
{
        "auths": {
                "https://index.docker.io/v1/": {
                        "auth": "b***********************"
                }
        }
}
- docker login을 하면, 해당 계정의 권한 토큰 정보를 가지고 잇는 config.json이 생성된다
cat ~/.docker/config.json | base64
- config.json의 정보를 이용하여 Secret을 만들기 위해, config.json 내용을 base64로 인코딩해주자
apiVersion: v1
kind: Secret
metadata:
  name: docker-config-secret
  namespace: hongspace
data:
  .dockerconfigjson: "config.json을 base64로 인코딩한 데이터"
type: kubernetes.io/dockerconfigjson
- 위에서 base64로 인코딩한 데이터를 이용하여 Secret을 생성하자
[ec2-user@ip-100-0-1-19 auth]$ k get secret -n hongspace
NAME                   TYPE                             DATA   AGE
docker-config-secret   kubernetes.io/dockerconfigjson   1      51m
- 생성한 Secret을 확인하자
apiVersion: v1
kind: ServiceAccount
metadata:
  name: build-bot
  namespace: hongspace
secrets:
  - name: git-secret
  - name: docker-config-secret
- 생성한 Secrets를 Service Account에 할당해주자
2. Pipeline 구축
다음과 같은 Pipeline을 구축해보자
- GitHub Private Repo에서 Dockerfile과 Image Build를 위한 리소스들을 Clone
- Image를 Build 하고, DockerHub Private Repo에 Push
Task
apiVersion: tekton.dev/v1beta1
kind: Task
metadata:
  name: kaniko
  namespace: hongspace
  labels:
    app.kubernetes.io/version: "0.6"
  annotations:
    tekton.dev/pipelines.minVersion: "0.17.0"
    tekton.dev/categories: Image Build
    tekton.dev/tags: image-build
    tekton.dev/displayName: "Build and upload container image using Kaniko"
    tekton.dev/platforms: "linux/amd64,linux/arm64,linux/ppc64le"
spec:
  params:
    - name: IMAGE
      description: Name (reference) of the image to build.
    - name: DOCKERFILE
      description: Path to the Dockerfile to build.
      default: ./Dockerfile
    - name: CONTEXT
      description: The build context used by Kaniko.
      default: ./
    - name: EXTRA_ARGS
      type: array
      default: []
    - name: BUILDER_IMAGE # kaniko image who build and push image
      description: The image on which builds will run (default is v1.5.1)
      default: gcr.io/kaniko-project/executor:v1.5.1@sha256:c6166717f7fe0b7da44908c986137ecfeab21f31ec3992f6e128fff8a94be8a5
  workspaces:
    - name: source
      description: Holds the context and Dockerfile
    - name: dockerconfig # we will not use this time, we use access token by service account
      description: Includes a docker `config.json`
      optional: true
      mountPath: /kaniko/.docker
  results:
    - name: IMAGE_DIGEST
      description: Digest of the image just built.
    - name: IMAGE_URL
      description: URL of the image just built.
  steps:
    - name: build-and-push
      workingDir: $(workspaces.source.path)
      image: $(params.BUILDER_IMAGE)
      args:
        - $(params.EXTRA_ARGS)
        - --dockerfile=$(params.DOCKERFILE)
        - --context=$(workspaces.source.path)/$(params.CONTEXT)
        - --destination=$(params.IMAGE)
        - --digest-file=$(results.IMAGE_DIGEST.path)
      securityContext:
        runAsUser: 0
    - name: write-url
      image: docker.io/library/bash:5.1.4@sha256:c523c636b722339f41b6a431b44588ab2f762c5de5ec3bd7964420ff982fb1d9
      script: |
        set -e
        image="$(params.IMAGE)"
        echo -n "${image}" | tee "$(results.IMAGE_URL.path)"
- Kaniko 컨테이너를 이용하여 Image를 Build하고, Push하는 Task를 추가하자
- 파라미터 IMAGE는 만들 Image의 이름 & Tag 이다
- 파라미터 DOCKERFILE은 Image를 만들기 위한 Dockerfile 경로이다. 이는 clone한 데이터가 저장된 workspace 의 Dockerfile을 가리킨다
- 파라미터 CONTEXT는 Image를 만들 때, 사용할 리소스들이 담긴 디렉토리 경로이다. 우리는 index.html을 Dockerfile이 위치한 경로와 같은 위치에 놓았으므로 ./ 로 설정하면 된다
steps:
    - name: build-and-push
      workingDir: $(workspaces.source.path)
      image: $(params.BUILDER_IMAGE)
      args:
        - $(params.EXTRA_ARGS)
        - --dockerfile=$(params.DOCKERFILE)
        - --context=$(workspaces.source.path)/$(params.CONTEXT)
        - --destination=$(params.IMAGE)
        - --digest-file=$(results.IMAGE_DIGEST.path)
      securityContext:
        runAsUser: 0
- Kaniko 이미지 실행 시, 인자 값 설정 ( args ) 을 통해 Dockerfile 경로 / Context 경로 / Image 이름 & Tag 와 Push할 레포지토리 정보 등을 옵션으로 설정해준다
Pipeline
Git Private Repo Clone 에서 작업한 Pipeline에서 이어서 진행된다
apiVersion: tekton.dev/v1beta1
kind: Pipeline
metadata:
  name: clone-read
  namespace: hongspace
spec:
  params:
  - name: repo-url
    type: string
  - name: image-reference
    type: string

  workspaces:
  - name: shared-data

  tasks:
  - name: fetch-source
    taskRef:
      name: git-clone
    workspaces:
    - name: output
      workspace: shared-data
    params:
    - name: url
      value: $(params.repo-url)

  - name: build-push
    runAfter: ["fetch-source"]
    taskRef:
      name: kaniko
    workspaces:
      - name: source
        workspace: shared-data
    params:
      - name: IMAGE
        value: $(params.image-reference)
- 전체 코드는 다음과 같다
- Task 부분에 Build를 위한 Task를 추가하면 된다
- 사용하는 workspace는 Git Clone한 데이터가 저정된 workspace 이다
- 넘겨주는 파라미터는 Build 할 Image의 이름 & Tag 이다
PipelineRun
Git Private Repo Clone 에서 작업한 PipelineRun에서 이어서 진행된다
apiVersion: tekton.dev/v1beta1
kind: PipelineRun
metadata:
  namespace: hongspace
  generateName: clone-read-run- # make name automate with random index ( for re use pipelinerun yaml )
spec:
  serviceAccountName: build-bot # sa for git credientials -> pipeline will use for clone private repo
  pipelineRef: # select pipeline
    name: clone-read
  podTemplate: # setting taskpod
    securityContext:  # pod security
      fsGroup: 65532 # set volume owner gid = 65532
  workspaces: # volume for clone code
  - name: shared-data
    volumeClaimTemplate: # automatically create pvc -> create pv
      spec:
        accessModes:
        - ReadWriteOnce
        resources:
          requests:
            storage: 1Gi
  params: # git address
  - name: repo-url
    value: "https://gitlab.mandu.com/userhong/jh_tekton_test.git"
  - name: image-reference
    value: lijahong/tektontest:1.0
- PipelineRun에는 넘겨줄 파라미터만 추가로 정의해주면 된다
- Build 할 Image 이름과 Tag인 image-reference를 정의하자
Image 이름 & Tag 설정은 생성한 Docker Hub Repository를 참조하자
3. 결과 확인
PipelineRun을 배포하여 Pipeline을 실행하자
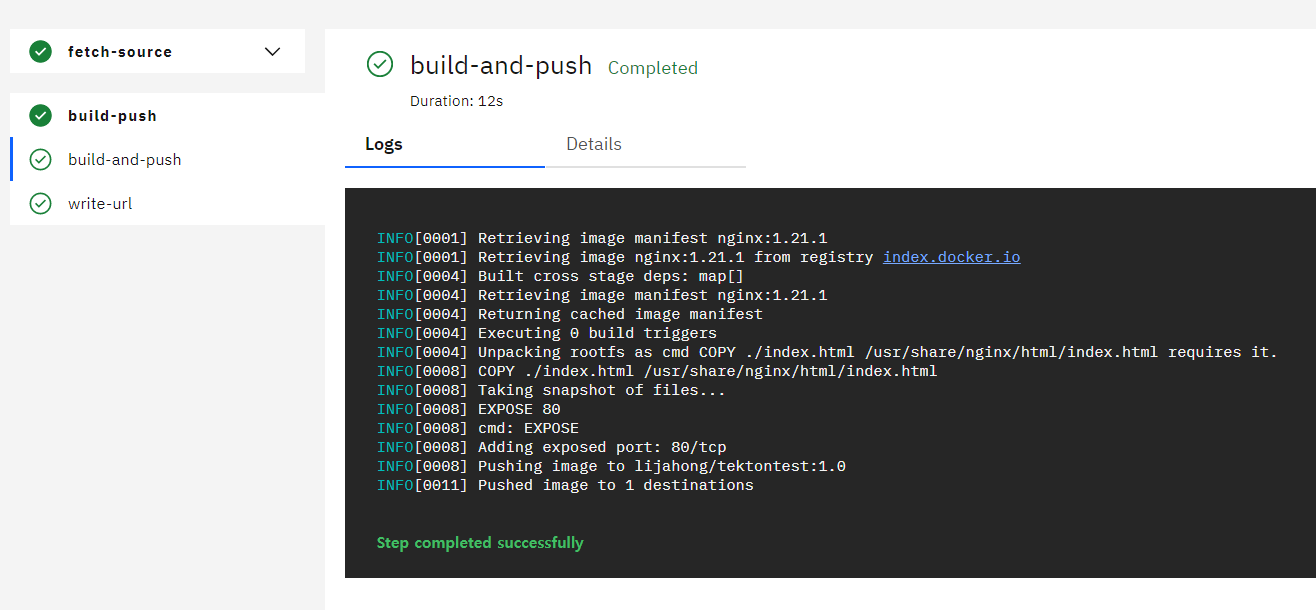
- Tekton Dashboard에서 결과를 확인하면, Image Build 및 Push가 잘 실행된 것을 확인할 수 있다
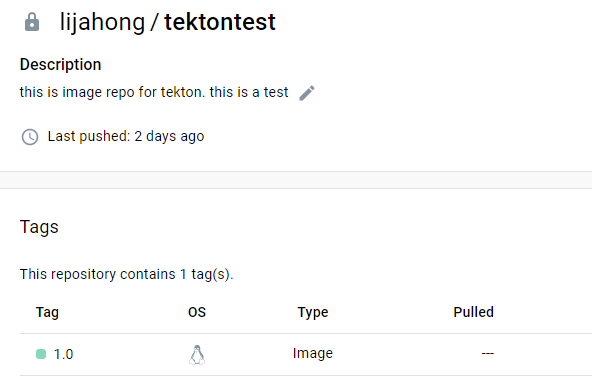
- DockerHub에서 확인하자. 잘 Push 되었다
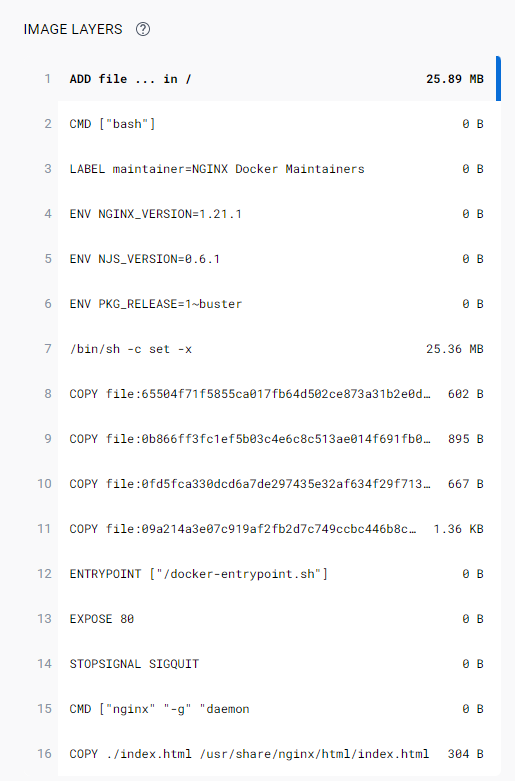
- Image Layers를 확인하자. Dockerfile에 정의한대로 Layer가 잘 추가되었다
멋진 엔지니어가 될 때까지