
서버 컴포넌트 너무 느려~~
Link 태그로 서퍼컴포넌트 페이지로 이동하는 중에 너무 긴 시간이 소요됨을 느꼈습니다. 데이터를 모두 부르고 화면을 다 만들어서 보내주다보니 유저 입장에서는 순간 사이트가 고장난 것 같은 강한 답답함이 느껴져서 해당 문제를 해결하는 방법들을 찾아봤습니다.

1️⃣ 내가 생각해본 방법!
1차 해결방법
loading.tsx파일이나suspense컴포넌트를 이용해도 전혀 속도가 나아지지 않았습니다.
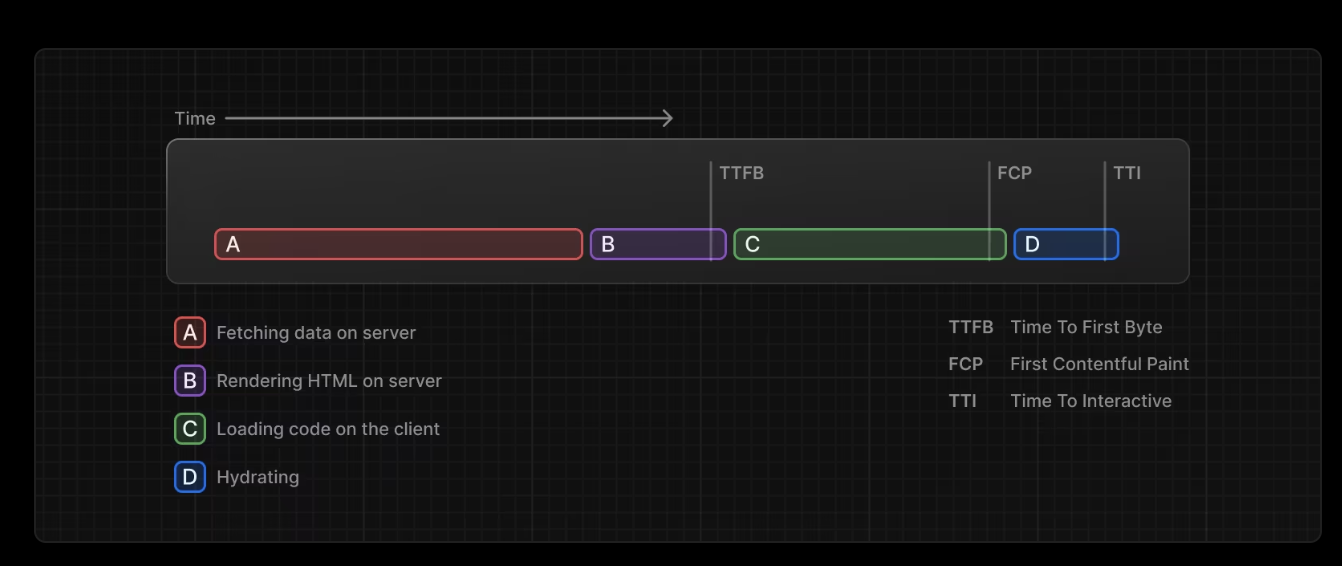
공식 문서 이미지를 그냥 한번 가져와봤는데 저기서 A와 B의 단계가 너무 길어서 위의 두 방법을 사용해봤자로딩이나suspense의fallback이 아주 잠깐 보이고 마는 현상이 자꾸 발생했습니다.
제가 원하는 것은 누르자마자 로딩바가 바로 튀어나오게 하고 싶었습니다.
https://nextjs.org/docs/app/building-your-application/routing/loading-ui-and-streaming#streaming-with-suspense
우선 그래서 버튼을 클릭하자마자 팝업같이 로딩이 나올 수 있도록 context를 이용해서 한번 만들어봤습니다.
// loading.context.tsx
"use client";

import { CircularProgress } from "@mui/material";
import { createContext, PropsWithChildren, useContext, useState } from "react";

type LoadingContextValue = {
  openLoading: () => void;
  closeLoading: () => void;
};

const initialValue: LoadingContextValue = {
  openLoading: () => {},
  closeLoading: () => {},
};

const LoadingContext = createContext<LoadingContextValue>(initialValue);

export const useLoading = () => useContext(LoadingContext);

export function LoadingProvider({ children }: PropsWithChildren) {
  const [isLoading, setIsLoading] = useState<boolean>(false);
  const openLoading = () => setIsLoading(true);
  const closeLoading = () => setIsLoading(false);

  const value: LoadingContextValue = {
    openLoading,
    closeLoading,
  };

  return (
    <LoadingContext.Provider value={value}>
      {children}
      {isLoading && (
        <div className="fixed top-0 left-0 bottom-0 right-0 flex items-center justify-center backdrop-brightness-[0.35]">
          <CircularProgress />
        </div>
      )}
    </LoadingContext.Provider>
  );
}openLoading은 컴포넌트를 클릭했을 때 onClick 함수에 넣어주면 되지만 닫는 시점을 찾기가 어려웠습니다...
그에 대한 저의 해결책은 아래와 같습니다.
1. usePathname
상위 layout.tsx 파일에서 usePathname이 특정 주소가 아닐때 모달을 닫는 함수를 실행시키면 해결할 수 있습니다!
2. useEffect 클린업 함수
Your cleanup code runs one final time after your component is removed from the page (unmounts).
const { openLoading, closeLoading } = useLoading();
  useEffect(() => {
    return () => {
      closeLoading();
    };
  }, []);
위의 코드에서처럼 클린업 함수에 넣어주면 정말 찰떡같이 제가 원하는 방식으로 처리가 되었습니다.
근데 뭔가 이 방법이 맞을까에 대한 찜찜한 마음 때문에 튜터님들께 해당 코드에 대해서 질문했습니다.
2️⃣ 질문해서 알게된 방법!
1. Link prefetching
https://nextjs.org/docs/app/building-your-application/routing/linking-and-navigating#2-prefetching
기본적으로 Link를 사용하면 prefetching 기능을 제공하는데...
- 개발모드에서는 제공을 하지 않습니다.
- 설정을 딱히 하지 않으면 loading 파일까지만 패칭한다고 합니다.
Link 태그에 prefetch={true} 설정을 넣어주면 바로 패칭이 되기는 하지만 그 들어가지도 않을 페이지 전체를 스크롤 할 때마다 다운받는게 너무 낭비스럽게 느껴졌습니다.
만약에 layout 파일을 적극적으로 이용했다면 prefetch 기본설정이 상당히 효과적일 것이라고 생각이 들었습니다.
다음 작업에서는 꼭 layout을 적극적으로 이용해보겠습니다.
<Link> component: Routes are automatically prefetched
  as they become visible in the user's viewport.

Prefetching happens when the page first loads or
  when it comes into view through scrolling.

router.prefetch(): The useRouter hook
  can be used to prefetch routes programmatically.

프리페칭은 개발 중에는 활성화되지 않고, 운영 환경에서만 활성화됩니다.
2. useRouter prefetching
onMouseOver={() => {
        router.prefetch(`/pokemon/${pokemon.id}`);
      }}
onMouseOver 이벤트를 이용해서 마우스가 해당 위치에 올라가면 패칭하는 작업도 있었습니다.
router.prefetch(href: string): Prefetch the provided route for faster client-side transitions.

우선 공식 문서에서는 Link 방식을 권장하고 있네요!
근데 위의 코드 방식대로 해도 prefetch={true}와 같이 페이지 전체를 부르는 것이 아니라 loading만 부르는 것 같습니다.
그냥 문서 말대로 Link를 사용해야할 것 같습니다.