이번 포스팅에서는 EKS Autoscaling에 대해 알아보겠다. k8s에서 주로 사용하는 것은 Pod단위의 스케일링을 처리해주는 HPA와 노드 단위의 Cluster Autoscaler이다.
조심해야 할 것은 Autoscaling이 만능이 아니라는 것이다. 실제로 어플리케이션 아키텍처와 DB 스키마, 커넥션과 같은 설정 등이 기본이 되어야 하고, 그 이후에 트래픽, CPU, Mem에 따라 대응을 하는 Autocaling을 사용하는 것이 맞다고 생각한다.
실습에 사용되는 배포는 가시다님이 제공해주신 EKS 원클릭 배포를 참고하자.
EKS Node Viewer 설치 -노드 할당 가능 용량과 요청 request 리소스 표시, 실제 파드 리소스 사용량 X
# go 설치
yum install -y go

# EKS Node Viewer 설치 : 현재 ec2 spec에서는 설치에 다소 시간이 소요됨 = 2분 이상
go install github.com/awslabs/eks-node-viewer/cmd/eks-node-viewer@latest

# bin 확인 및 사용
tree ~/go/bin
cd ~/go/bin
./eks-node-viewer
3 nodes (875m/5790m) 15.1% cpu ██████░░░░░░░░░░░░░░░░░░░░░░░░░░░░░░░░░░ $0.156/hour | $113.880/month
20 pods (0 pending 20 running 20 bound)

ip-192-168-3-196.ap-northeast-2.compute.internal cpu ████████░░░░░░░░░░░░░░░░░░░░░░░░░░░  22% (7 pods) t3.medium/$0.0520 On-Demand
ip-192-168-1-91.ap-northeast-2.compute.internal  cpu ████░░░░░░░░░░░░░░░░░░░░░░░░░░░░░░░  12% (6 pods) t3.medium/$0.0520 On-Demand
ip-192-168-2-185.ap-northeast-2.compute.internal cpu ████░░░░░░░░░░░░░░░░░░░░░░░░░░░░░░░  12% (7 pods) t3.medium/$0.0520 On-Demand
Press any key to quit
실습의 편의를 위해 Node Viewr를 설치해주자. Grafana에서도 모니터링이 가능하지만 Autoscaling 테스트를 할 때 CLI에서 간단히 볼 수 있어서 좋은 것 같다.
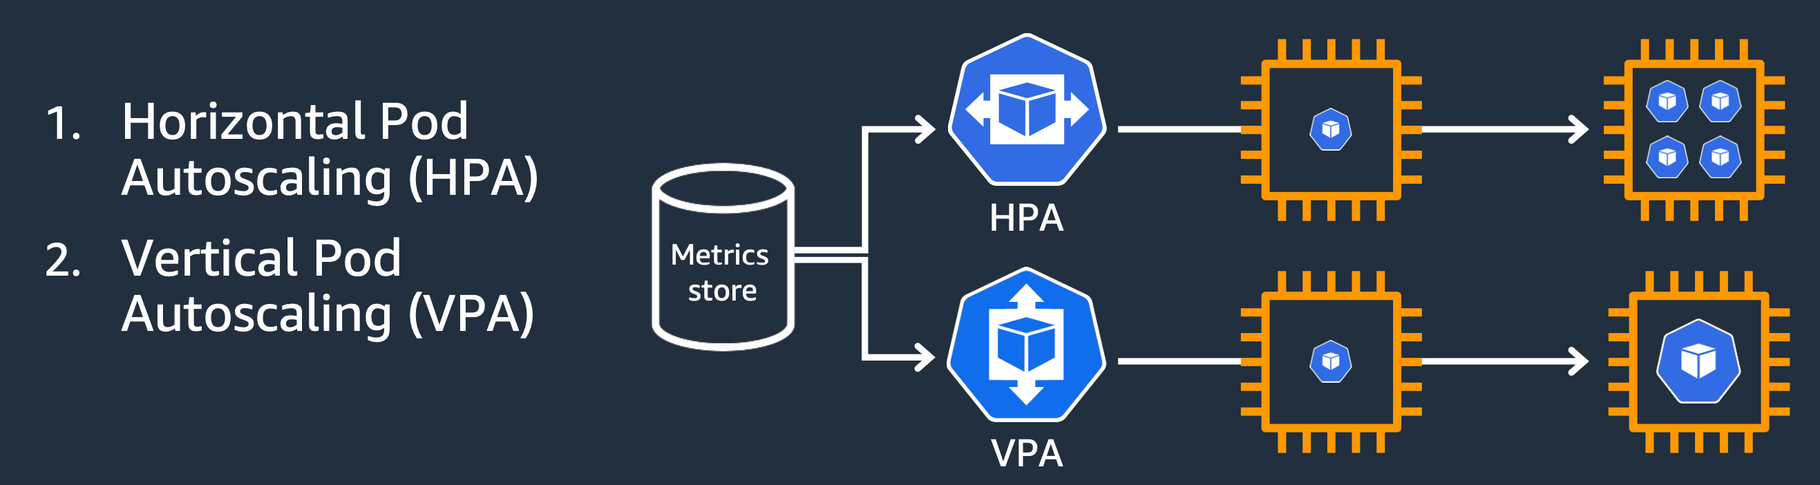
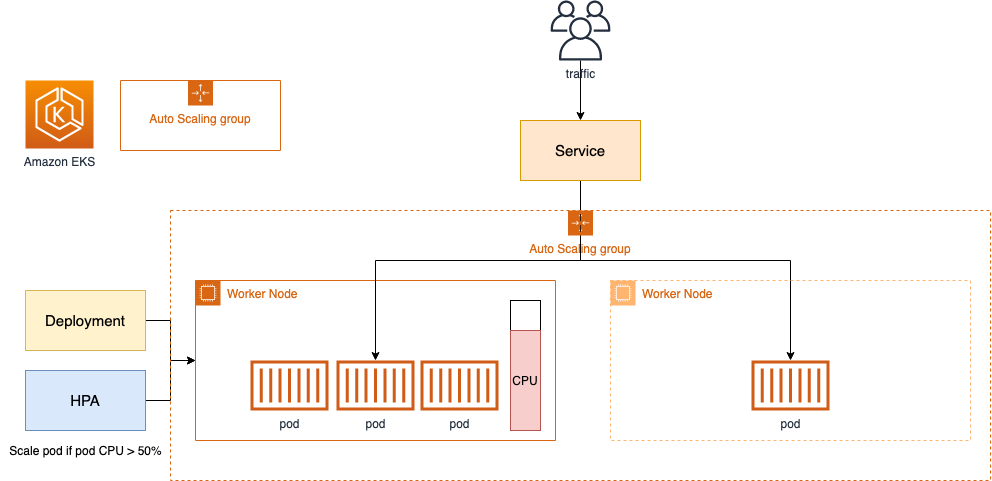
1. HPA
Horizontal Pod Autoscaler(HPA)는 CPU, Memory 기반으로 Pod를 Scale Out/In을한다. Deployment에 세팅을 해주면 hpa라고 하는 리소스가 생성된다.
HPA에서는 기본적으로 15초 마다 메트릭을 측정하고 조건에 맞을 경우 해당 deployment를 Scale Out/In을 하게 된다.
실제로 각 Node에서 cAdvisor가 메트릭정보를 수집하고 -> kubelet으로 보낸다. EKS 원클릭 배포에서 설치한 Addon인 metric server가 k8s apiserver에 메트릭 정보를 등록하고, HPA Controller가 15초마다 값을 수집하는 방식이다.
1-1. HPA 실습
# Run and expose php-apache server
curl -s -O https://raw.githubusercontent.com/kubernetes/website/main/content/en/examples/application/php-apache.yaml
cat php-apache.yaml | yh
kubectl apply -f php-apache.yaml

kubectl autoscale deployment php-apache --cpu-percent=50 --min=1 --max=10

(kimchigood@myeks:default) [root@myeks-bastion-EC2 ~]# kubectl describe hpa
Warning: autoscaling/v2beta2 HorizontalPodAutoscaler is deprecated in v1.23+, unavailable in v1.26+; use autoscaling/v2 HorizontalPodAutoscaler
Name:                                                  php-apache
Namespace:                                             default
Labels:                                                <none>
Annotations:                                           <none>
CreationTimestamp:                                     Fri, 26 May 2023 11:34:35 +0900
Reference:                                             Deployment/php-apache
Metrics:                                               ( current / target )
  resource cpu on pods  (as a percentage of request):  0% (1m) / 50%
Min replicas:                                          1
Max replicas:                                          10
Deployment pods:                                       1 current / 1 desired
Conditions:
  Type            Status  Reason            Message
  ----            ------  ------            -------
  AbleToScale     True    ReadyForNewScale  recommended size matches current size
  ScalingActive   True    ValidMetricFound  the HPA was able to successfully calculate a replica count from cpu resource utilization (percentage of request)
  ScalingLimited  True    TooFewReplicas    the desired replica count is less than the minimum replica count
Events:
  Type    Reason             Age   From                       Message
  ----    ------             ----  ----                       -------
  Normal  SuccessfulRescale  61m   horizontal-pod-autoscaler  New size: 1; reason: All metrics below target
Deployment, Service를 구동시키고 HPA를 등록한다. describe를 통해 HPA를 확인해보면 각 위에서 세팅한 값들이 잘 나와있다. 그림 실제로 부하를 넣어서 HPA작동이 잘되는 지 확인해보자.
# 반복 접속 1 (파드1 IP로 접속) >> 증가 확인 후 중지
while true;do curl -s $PODIP; sleep 0.5; done

# 반복 접속 2 (서비스명 도메인으로 접속) >> 증가 확인(몇개까지 증가되는가? 그 이유는?) 후 중지 >> **중지 5분 후** 파드 갯수 감소 확인
# Run this in a separate terminal
# so that the load generation continues and you can carry on with the rest of the steps
kubectl run -i --tty load-generator --rm --image=**busybox**:1.28 --restart=Never -- /bin/sh -c "while sleep 0.01; do wget -q -O- http://php-apache; done"
부하를 넣어주면 아래와 같이 CPU 50%이상 증가해서 Pod가 Scale Out되는 것을 확인할 수 있다.

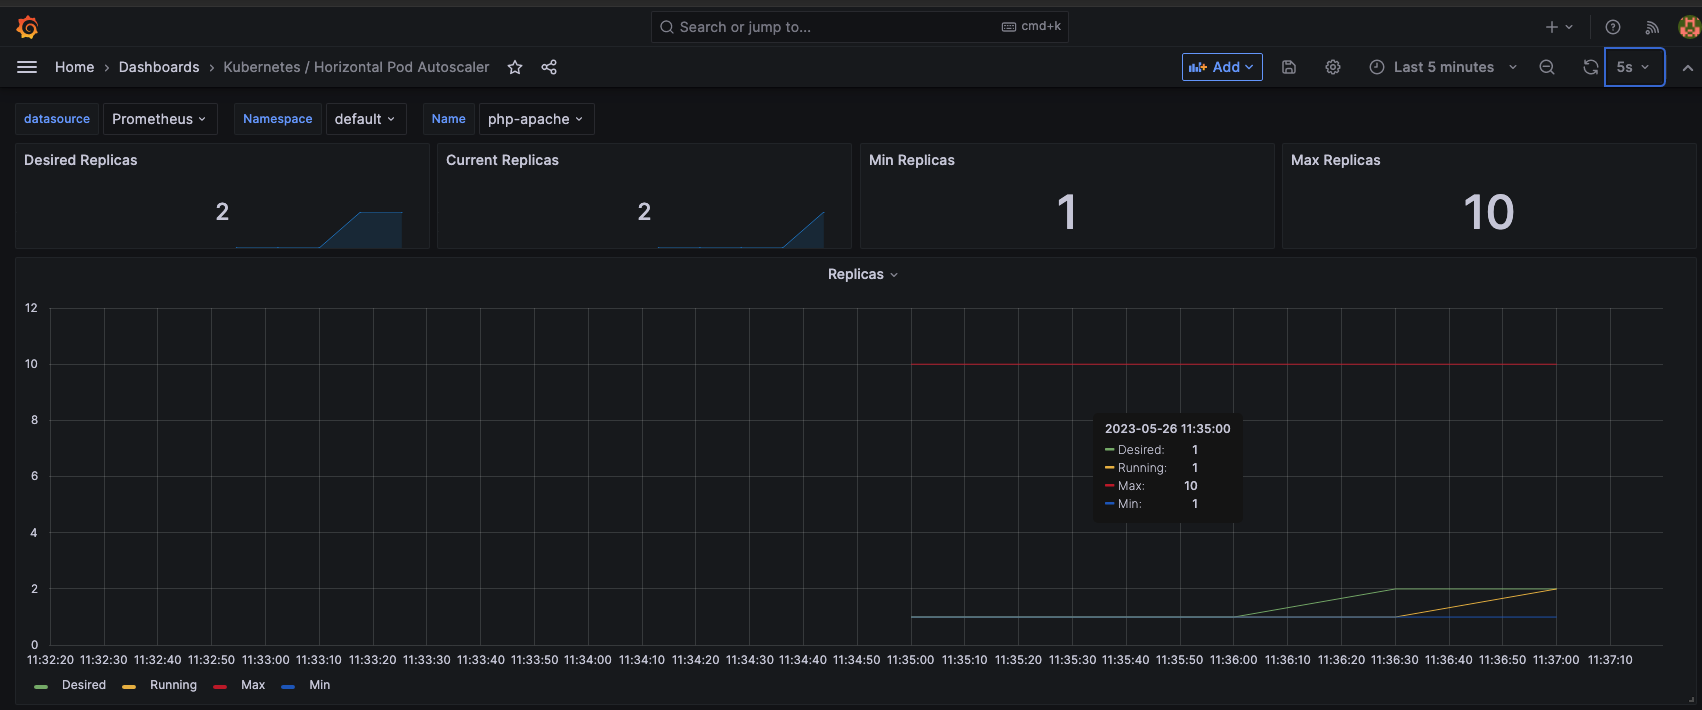
그라파나를 통해서도 확인할 수 있으니 참고하자.
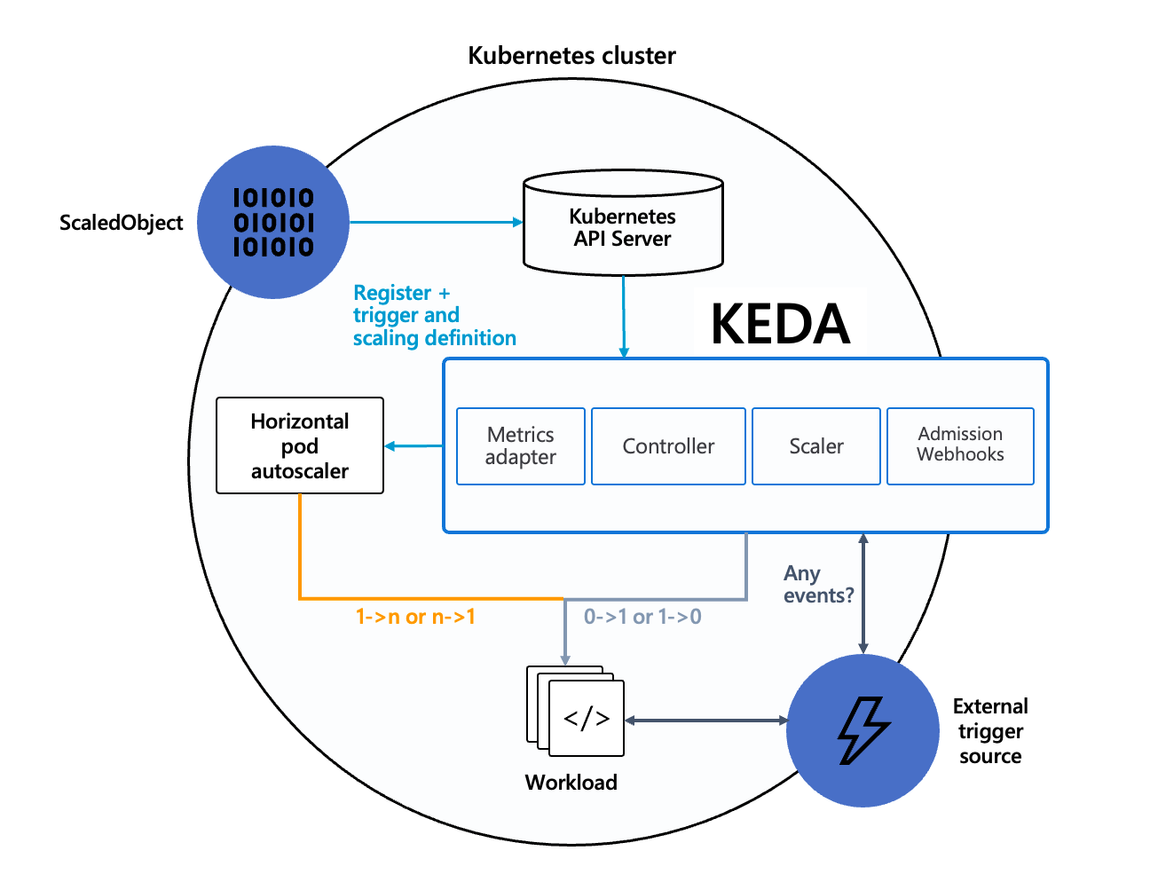
2.KEDA
Kubernetes based Event Driven Autoscaler(KEDA)는 HPA의 단점을 보완한 Autosacler이다. 실제로 Elasticsearch, Azire Blob Storage, AWS SQS, DynamoDB 등 엄청 다양한 종류의 이벤트를 가지고 HPA 기능을 활용할 수 있다.
2-1. KEDA 실습
그럼 바로 실습을 진행해보자.
# KEDA 설치
cat <<EOT > keda-values.yaml
metricsServer:
  useHostNetwork: true

prometheus:
  metricServer:
    enabled: true
    port: 9022
    portName: metrics
    path: /metrics
    serviceMonitor:
      # Enables ServiceMonitor creation for the Prometheus Operator
      enabled: true
    podMonitor:
      # Enables PodMonitor creation for the Prometheus Operator
      enabled: true
  operator:
    enabled: true
    port: 8080
    serviceMonitor:
      # Enables ServiceMonitor creation for the Prometheus Operator
      enabled: true
    podMonitor:
      # Enables PodMonitor creation for the Prometheus Operator
      enabled: true

  webhooks:
    enabled: true
    port: 8080
    serviceMonitor:
      # Enables ServiceMonitor creation for the Prometheus webhooks
      enabled: true
EOT

kubectl create namespace keda
helm repo add kedacore https://kedacore.github.io/charts
helm install keda kedacore/keda --version 2.10.2 --namespace keda -f keda-values.yaml

# KEDA 설치 확인
kubectl get-all -n keda
kubectl get all -n keda
kubectl get crd | grep keda

# keda 네임스페이스에 디플로이먼트 생성
kubectl apply -f php-apache.yaml -n keda
kubectl get pod -n keda

# ScaledObject 정책 생성 : cron
cat <<EOT > keda-cron.yaml
apiVersion: keda.sh/v1alpha1
kind: ScaledObject
metadata:
  name: php-apache-cron-scaled
spec:
  minReplicaCount: 0
  maxReplicaCount: 2
  pollingInterval: 30
  cooldownPeriod: 300
  scaleTargetRef:
    apiVersion: apps/v1
    kind: Deployment
    name: php-apache
  triggers:
  - type: cron
    metadata:
      timezone: Asia/Seoul
      start: 00,15,30,45 * * * *
      end: 05,20,35,50 * * * *
      desiredReplicas: "1"
EOT
kubectl apply -f keda-cron.yaml -n keda

# 그라파나 대시보드 추가
# 모니터링
watch -d 'kubectl get ScaledObject,hpa,pod -n keda'
kubectl get ScaledObject -w

# 확인
kubectl get ScaledObject,hpa,pod -n keda
kubectl get hpa -o jsonpath={.items[0].spec} -n keda | jq
...
"metrics": [
    {
      "external": {
        "metric": {
          "name": "s0-cron-Asia-Seoul-00,15,30,45xxxx-05,20,35,50xxxx",
          "selector": {
            "matchLabels": {
              "scaledobject.keda.sh/name": "php-apache-cron-scaled"
            }
          }
        },
        "target": {
          "averageValue": "1",
          "type": "AverageValue"
        }
      },
      "type": "External"
    }

# KEDA 및 deployment 등 삭제
kubectl delete -f keda-cron.yaml -n keda && kubectl delete deploy php-apache -n keda && helm uninstall keda -n keda
kubectl delete namespace keda
Keda에서는 ScaledObject로 Scale 정책을 정의한다. 위 실습예서는 crontab을 trigger로 등록해서, 5분 간격으로 replica를 1로 만드는 cron을 start/end하게 되는데, cooldownPeriod가 300sec인 것으로 보아 10분 간격으로 pod가 scale 될 것으로 보인다.
자세한 내용은 공식홈페이지를 참조하자: https://keda.sh/docs/2.10/scalers/cron/

위 그래프는 Keda dashboard를 추가한 후 모니터링한 그래프이다. 예상대로 10분 간격으로 Pod가 Scale Out/In 되고 있다.
3. VPA
Vertical Pod Autoscaler(VPA)는 Pod의 replica 증가가 아닌 resource.request의 값을 최적화 하는 기능이다. 기능 작동 시 Pod 재시작이 되고, HPA와 동시에 사용은 불가능하다.
3-1. 실습하기
# 코드 다운로드
git clone https://github.com/kubernetes/autoscaler.git
cd ~/autoscaler/vertical-pod-autoscaler/
tree hack

# 배포 과정에서 에러 발생 : 방안1 openssl 버전 1.1.1 up, 방안2 브랜치08에서 작업
ERROR: Failed to create CA certificate for self-signing. If the error is "unknown option -addext", update your openssl version or deploy VPA from the vpa-release-0.8 branch.

# 프로메테우스 임시 파일 시스템 사용으로 재시작 시 저장 메트릭과 대시보드 정보가 다 삭제되어서 스터디 시간 실습 시나리오는 비추천
helm upgrade kube-prometheus-stack prometheus-community/kube-prometheus-stack --reuse-values --set prometheusOperator.verticalPodAutoscaler.enabled=true -n monitoring

# openssl 버전 확인
openssl version
OpenSSL 1.0.2k-fips  26 Jan 2017

# openssl 1.1.1 이상 버전 확인
yum install openssl11 -y
openssl11 version
OpenSSL 1.1.1g FIPS  21 Apr 2020

# 스크립트파일내에 openssl11 수정
sed -i 's/openssl/openssl11/g' ~/autoscaler/vertical-pod-autoscaler/pkg/admission-controller/gencerts.sh

# Deploy the Vertical Pod Autoscaler to your cluster with the following command.
watch -d kubectl get pod -n kube-system
cat hack/vpa-up.sh
./hack/vpa-up.sh
kubectl get crd | grep autoscaling

# 모니터링
watch -d kubectl top pod

# 공식 예제 배포
cd ~/autoscaler/vertical-pod-autoscaler/
cat examples/hamster.yaml | yh
kubectl apply -f examples/hamster.yaml && kubectl get vpa -w

# 파드 리소스 Requestes 확인
kubectl describe pod | grep Requests: -A2

(kimchigood@myeks:default) [root@myeks-bastion-EC2 ~]# kubectl get events --sort-by=".metadata.creationTimestamp" | grep VPA
86s         Normal   EvictedByVPA        pod/hamster-5bccbb88c6-cdlcl    Pod was evicted by VPA Updater to apply resource recommendation.
26s         Normal   EvictedByVPA        pod/hamster-5bccbb88c6-xb8b5    Pod was evicted by VPA Updater to apply resource recommendation.
실습에서는 OpenSSL 1.1.1 이상의 버전이 필요하므로 세팅을 해주도록한다. 실습을 따라해보면, VPA가 해당되는 Pod의 리소스 스펙을 추천해주고, Pod 재시작까지 해주는 기능이다.

기능은 좋아보이는데, 사실 VPA가 얼마나 최적화된 값으로 추천을 해주는지 명확하지 않고, 운영중인 시스템인데, 재시작은 LB구성이 잘되어있다 하더라도 찝찝한건 사실이다. 이정도 기능이 있다라는 정도만 체크해도 될 것 같다.
4. Cluster Autoscaler
EKS, AKS, GCP 등 퍼블릭 클라우드에서 k8s를 사용하게 되면, 배포된 리소스에 비해 Node의 스펙이 부족할 경우. 퍼블릭 클라우드와 연동해서 Node를 Scale Out/In 할 수 있는 기능이다.
# EKS 노드에 이미 아래 tag가 들어가 있음
# k8s.io/cluster-autoscaler/enabled : true
# k8s.io/cluster-autoscaler/myeks : owned
EKS는 기본적으로 Cluster Autoscaler(CA)의 기능이 할성화 되어있다. (AKS의 경우 따로 활성화를 시켜줘야함)
그런데, 기능만 활성화 되어있을 뿐 실제로 auto scaling group를 describe 해보면, min/max 세팅이 같이 뭐가 되지 않는다.
(kimchigood@myeks:default) [root@myeks-bastion-EC2 vertical-pod-autoscaler]# aws autoscaling describe-auto-scaling-groups \
>     --query "AutoScalingGroups[? Tags[? (Key=='eks:cluster-name') && Value=='myeks']].[AutoScalingGroupName, MinSize, MaxSize,DesiredCapacity]" \
>     --output table
-----------------------------------------------------------------
|                   DescribeAutoScalingGroups                   |
+------------------------------------------------+----+----+----+
|  eks-ng1-b0c42ace-41fa-cc73-048d-f1eb74797db6  |  3 |  3 |  3 |
+------------------------------------------------+----+----+----+

# MaxSize 6개로 수정
export ASG_NAME=$(aws autoscaling describe-auto-scaling-groups --query "AutoScalingGroups[? Tags[? (Key=='eks:cluster-name') && Value=='myeks']].AutoScalingGroupName" --output text)
aws autoscaling update-auto-scaling-group --auto-scaling-group-name ${ASG_NAME} --min-size 3 --desired-capacity 3 --max-size 6
max 값을 늘려줘야 CA가 확장될 수 있다. 그런데 여기서 끝이 아니다. CA 컨트롤러를 추가로 설치해줘야 비로소 CA가 동작하게된다.
# 배포 : Deploy the Cluster Autoscaler (CA)
curl -s -O https://raw.githubusercontent.com/kubernetes/autoscaler/master/cluster-autoscaler/cloudprovider/aws/examples/cluster-autoscaler-autodiscover.yaml
sed -i "s/<YOUR CLUSTER NAME>/$CLUSTER_NAME/g" cluster-autoscaler-autodiscover.yaml
kubectl apply -f cluster-autoscaler-autodiscover.yaml

# 확인
kubectl get pod -n kube-system | grep cluster-autoscaler
kubectl describe deployments.apps -n kube-system cluster-autoscaler

# (옵션) cluster-autoscaler 파드가 동작하는 워커 노드가 퇴출(evict) 되지 않게 설정
kubectl -n kube-system annotate deployment.apps/cluster-autoscaler cluster-autoscaler.kubernetes.io/safe-to-evict="false"
AKS는 간단하게 config세팅으로 nodepool별로 조정이 가능하다. 뭐 장단이 있겠지만 뭔가 AKS가 좀 더 managed된 k8s를 제공하는 느낌이다. 좀 더 고급기능(?)으로 갈수록 AKS에서는 세팅이 어려운 부분도 있을 것 같다.
5. CPA
Cluster Proportional Autoscaler(CPA)는 Node의 수에 따라서 타켓팅된 Pod의 replica수를 늘릴 수 있는 scaler이다. coreDNS와 같이 k8s 성능에 큰 영향을 끼칠 수 있는 Pod를 대상으로 사용한다고 나와있는데, 각자 환경에 맞게 특정 Pod를 Scaling 하는 기능으로 사용하면 좋을 것 같다.
5-1. CPA 실습
#
helm repo add cluster-proportional-autoscaler https://kubernetes-sigs.github.io/cluster-proportional-autoscaler

# CPA규칙을 설정하고 helm차트를 릴리즈 필요
helm upgrade --install cluster-proportional-autoscaler cluster-proportional-autoscaler/cluster-proportional-autoscaler

# nginx 디플로이먼트 배포
cat <<EOT > cpa-nginx.yaml
apiVersion: apps/v1
kind: Deployment
metadata:
  name: nginx-deployment
spec:
  replicas: 1
  selector:
    matchLabels:
      app: nginx
  template:
    metadata:
      labels:
        app: nginx
    spec:
      containers:
      - name: nginx
        image: nginx:latest
        resources:
          limits:
            cpu: "100m"
            memory: "64Mi"
          requests:
            cpu: "100m"
            memory: "64Mi"
        ports:
        - containerPort: 80
EOT
kubectl apply -f cpa-nginx.yaml

# CPA 규칙 설정
cat <<EOF > cpa-values.yaml
config:
  ladder:
    nodesToReplicas:
      - [1, 1]
      - [2, 2]
      - [3, 3]
      - [4, 3]
      - [5, 5]
options:
  namespace: default
  target: "deployment/nginx-deployment"
EOF

# 모니터링
watch -d kubectl get pod

# helm 업그레이드
helm upgrade --install cluster-proportional-autoscaler -f cpa-values.yaml cluster-proportional-autoscaler/cluster-proportional-autoscaler

# 노드 5개로 증가
export ASG_NAME=$(aws autoscaling describe-auto-scaling-groups --query "AutoScalingGroups[? Tags[? (Key=='eks:cluster-name') && Value=='myeks']].AutoScalingGroupName" --output text)
aws autoscaling update-auto-scaling-group --auto-scaling-group-name ${ASG_NAME} --min-size 5 --desired-capacity 5 --max-size 5
aws autoscaling describe-auto-scaling-groups --query "AutoScalingGroups[? Tags[? (Key=='eks:cluster-name') && Value=='myeks']].[AutoScalingGroupName, MinSize, MaxSize,DesiredCapacity]" --output table

# 노드 4개로 축소
aws autoscaling update-auto-scaling-group --auto-scaling-group-name ${ASG_NAME} --min-size 4 --desired-capacity 4 --max-size 4
aws autoscaling describe-auto-scaling-groups --query "AutoScalingGroups[? Tags[? (Key=='eks:cluster-name') && Value=='myeks']].[AutoScalingGroupName, MinSize, MaxSize,DesiredCapacity]" --output table
실습에서는 CPA를 Daemonset과 같이 동작시켰는데, nodeToReplicas 뿐 만 아니라 coreToReplica 도 함께 사용 가능하니 참고하자.
(kimchigood@myeks:default) [root@myeks-bastion-EC2 vertical-pod-autoscaler]# aws autoscaling describe-auto-scaling-groups --query "AutoScalingGroups[? Tags[? (Key=='eks:cluster-name') && Value=='myeks']].[AutoScalingGroupName, MinSize, MaxSize,DesiredCapacity]" --output table

-----------------------------------------------------------------
|                   DescribeAutoScalingGroups                   |
+------------------------------------------------+----+----+----+
|  eks-ng1-b0c42ace-41fa-cc73-048d-f1eb74797db6  |  5 |  5 |  5 |
+------------------------------------------------+----+----+----+

Every 2.0s: kubectl get pod                                                                                                                                                                                                 Fri May 26 15:10:23 2023

NAME                                               READY   STATUS    RESTARTS   AGE
cluster-proportional-autoscaler-75bddf49cb-npbzm   1/1     Running   0          2m24s
hamster-5bccbb88c6-jmql8                           1/1     Running   0          52m
hamster-5bccbb88c6-vwxq6                           1/1     Running   0          53m
nginx-deployment-858477475d-lh2l5                  1/1     Running   0          2m19s
nginx-deployment-858477475d-nzv4d                  1/1     Running   0          2m19s
nginx-deployment-858477475d-q4mkm                  1/1     Running   0          90s
nginx-deployment-858477475d-q748w                  1/1     Running   0          90s
nginx-deployment-858477475d-wmlvj                  1/1     Running   0          2m39s
Wrap up
이번 포스팅에서는 k8s 관련 Autoscaler에 대해 알아보았다. 실제로 HPA, CA는 현업에서 사용중이기도 한데, 다른 Autoscaler에 대해 공부할 수 있었다. Autoscaler 마다 cooldowntime과 같은 세부 설정값들 조작이 가능한데, 뭔가 아다리가 안맞을 경우 Pending에 빠진다거나, 엄청나게 많이 Scale Out 되는 경우가 있을 수 있으니, 신중하게 세팅을 하는게 좋을 것 같다. (맘 편하게 기본세팅으로 가는게 맞는 것 같기도..)