페이지 UI 만들기
bootstrap(pagination /overview)에 있는 코드를 가져와 테이블과 쓰기 버튼 사이에 붙여 넣어줍니다.
<nav aria-label="Page navigation example">
  <ul class="pagination justify-content-center">
    <li class="page-item disabled">
      <a class="page-link">Previous</a>
    </li>
    <li class="page-item"><a class="page-link" href="#">1</a></li>
    <li class="page-item"><a class="page-link" href="#">2</a></li>
    <li class="page-item"><a class="page-link" href="#">3</a></li>
    <li class="page-item">
      <a class="page-link" href="#">Next</a>
    </li>
  </ul>
</nav>
페이지 기능 만들기
Spring.io 에서 project -> Spring Data JPA에 들어가서 아래 코드를 활용 해줍니다.
public interface PagingAndSortingRepository<T, ID>  {

  Iterable<T> findAll(Sort sort);

  Page<T> findAll(Pageable pageable);
}PagingAndSortingRepository<User, Long> repository = // … get access to a bean
Page<User> users = repository.findAll(PageRequest.of(1, 20));BoardController에서 return type을 List에서 Page로 수정해줍니다.
@GetMapping("/list")
    public String list(Model model){
        Page<Board> boards =  boardRepository.findAll(PageRequest.of(0, 20));
        model.addAttribute("boards", boards);
        return "board/list";
    }
PageRequest.of(1, 20)
-> 첫 번째 파라미터는 페이지, 두 번째 파라미터는 사이즈입니다.
JPA는 첫 번째 페이지가 0부터 시작하기 때문에 0으로 수정해줍니다.

lists.size(boards)의 값이 글의 수가 아닌 페이지 수인 1로 변경 되었습니다.
다시 글의 총 건수를 보여주기 위해 boards.getTotalElements()를 사용하여 BoardController를 수정해줍니다.
@GetMapping("/list")
    public String list(Model model){
        Page<Board> boards =  boardRepository.findAll(PageRequest.of(0, 20));
        boards.getTotalElements();
        model.addAttribute("boards", boards);
        return "board/list";
    }
그 다음으로 list.html도 수정해줍니다.
<div>총 건수 : <span th:text="${boards.totalElements}"></span></div>
다시 글의 총 건수가 제대로 나오는 것을 확인할 수 있습니다.
BoardController에 PageRequset.of는 하드 코딩을 했기 때문에 다시 변경을 해줍니다.
 @GetMapping("/list")
    public String list(Model model, Pageable pageable){
        Page<Board> boards =  boardRepository.findAll(pageable);
        int startPage = Math.max(1,boards.getPageable().getPageNumber() - 4);
        int endPage = boards.getTotalPages();
        model.addAttribute("startPage", startPage);
        model.addAttribute("endPage", endPage);
        model.addAttribute("boards", boards);
        return "board/list";
    }
list.html는 #numbers.sequence를 이용해줍니다.
<nav aria-label="Page navigation example">
        <ul class="pagination justify-content-center">
            <li class="page-item disabled">
                <a class="page-link">Previous</a>
            </li>
            <li class="page-item" th:each="i : ${#numbers.sequence(startPage, endPage)}"><a class="page-link" href="#" th:text="${i}"></a></li>
            <li class="page-item">
                <a class="page-link" href="#">Next</a>
            </li>
        </ul>
    </nav>
@PageableDefault을 이용하여 기본적인 페이지나 사이즈를 지정할 수 있습니다.
 @GetMapping("/list")
    public String list(Model model, @PageableDefault(size = 2) Pageable pageable){
        Page<Board> boards =  boardRepository.findAll(pageable);
        int startPage = Math.max(1,boards.getPageable().getPageNumber() - 4);
        int endPage = boards.getTotalPages();
        model.addAttribute("startPage", startPage);
        model.addAttribute("endPage", endPage);
        model.addAttribute("boards", boards);
        return "board/list";
    }
list.html
현재 페이지에 있을 경우 그 페이지로 가는 버튼을 비활성화 하는 기능과 맨 앞 페이지일 경우 Previous 버튼을 비활성화, 맨 마지막 페이지일 경우 Next 버튼을 비활성화 하는 기능을 추가해줍니다.
<nav aria-label="Page navigation example">
        <ul class="pagination justify-content-center">
            <li class="page-item" th:classappend="${1 == boards.pageable.pageNumber + 1} ? 'disabled'">
                <a class="page-link">Previous</a>
            </li>
            <li class="page-item" th:classappend="${i == boards.pageable.pageNumber + 1} ? 'disabled'" th:each="i : ${#numbers.sequence(startPage, endPage)}"><a class="page-link" href="#" th:text="${i}"></a></li>
            <li class="page-item" th:classappend="${boards.totalPages == boards.pageable.pageNumber + 1} ? 'disabled'">
                <a class="page-link" href="#">Next</a>
            </li>
        </ul>
    </nav>
http://localhost:8080/board/list?page=0
첫 번째 페이지로 가게 되면 Previous 버튼과 1페이지 버튼이 비활성화됩니다.
페이지 링크 추가
th:href 파리미터를 전달하기 위해서는 아래와 같은 형식으로 전달합니다.
<a href="details.html" th:href="@{/order/details(orderId=${o.id})}">view</a><nav aria-label="Page navigation example">
<ul class="pagination justify-content-center">
<li class="page-item" th:classappend="${1 == boards.pageable.pageNumber + 1} ? 'disabled'">
<a class="page-link" href="#" th:href="@{/board/list(page=${boards.pageable.pageNumber - 1})}">Previous</a>
</li>
<li class="page-item" th:classappend="${i == boards.pageable.pageNumber + 1} ? 'disabled'"
th:each="i : ${#numbers.sequence(startPage, endPage)}"><a class="page-link" href="#"
th:href="@{/board/list(page=${i -1})}"
th:text="${i}"></a></li>
<li class="page-item" th:classappend="${boards.totalPages == boards.pageable.pageNumber + 1} ? 'disabled'">
<a class="page-link" href="#" th:href="@{/board/list(page=${boards.pageable.pageNumber + 1})}">Next</a>
</li>
</ul>
</nav>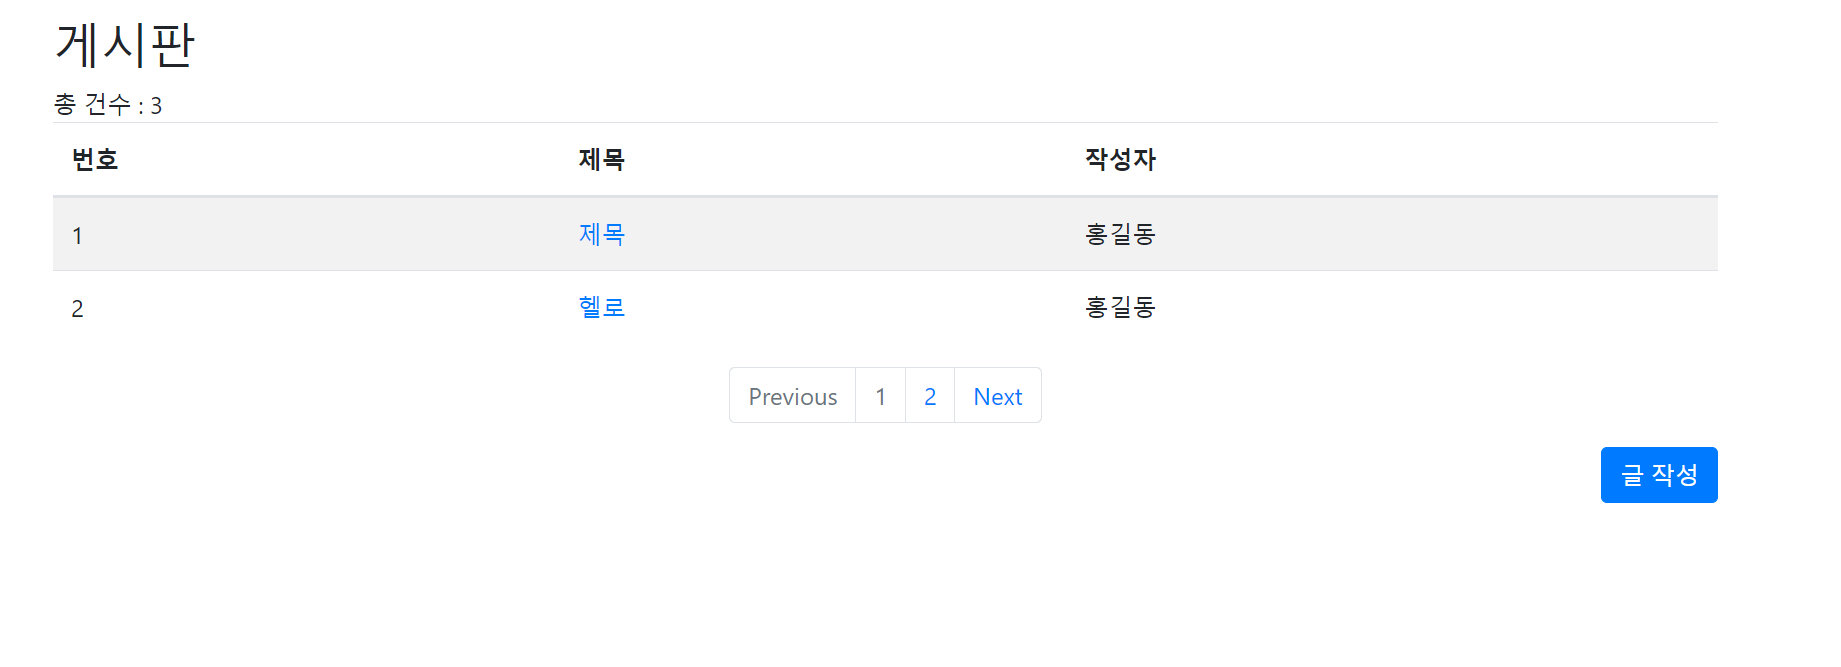

페이지 이동이 잘 되는 것을 확인할 수 있습니다.
제목과 내용으로 검색하는 기능 추가
bootstrap에서 아래 코드를 가져와서 사용해줍니다.
<form class="form-inline">
  <div class="form-group mb-2">
    <label for="staticEmail2" class="sr-only">Email</label>
    <input type="text" readonly class="form-control-plaintext" id="staticEmail2" value="email@example.com">
  </div>
  <div class="form-group mx-sm-3 mb-2">
    <label for="inputPassword2" class="sr-only">Password</label>
    <input type="password" class="form-control" id="inputPassword2" placeholder="Password">
  </div>
  <button type="submit" class="btn btn-primary mb-2">Confirm identity</button>
</form>
d-flex justify-content-end
-> 오른쪽으로 정렬
<form class="form-inline d-flex justify-content-end">
        <div class="form-group mx-sm-3 mb-2">
            <label for="searchText" class="sr-only">검색</label>
            <input type="text" class="form-control" id="searchText" name="searchText">
        </div>
        <button type="submit" class="btn btn-primary mb-2">검색</button>
    </form>
검색 기능을 사용하기 위해 BoardController와 BoardRepositoty를 수정해줍니다.
BroadRepository에는 JPA에서 지원하는 Containing 기능을 이용해줍니다.
Page<Board> findByTitleContainingOrContentContaining(String title, String content, Pageable pageable);위의 코드를 BoardRepository에 넣어줍니다.
BoardController에서는 searchText를 가져와서 검색할 수 있게 코드를 추가해줍니다. 이 때 searchText의 기본값은 빈 문자열로 지정해줍니다.
@GetMapping("/list")
    public String list(Model model, @PageableDefault(size = 2) Pageable pageable, @RequestParam(required = false, defaultValue = "") String searchText){
        //Page<Board> boards =  boardRepository.findAll(pageable);
        Page<Board> boards = boardRepository.findByTitleContainingOrContentContaining(searchText,searchText,pageable);
        int startPage = Math.max(1,boards.getPageable().getPageNumber() - 4);
        int endPage = boards.getTotalPages();
        model.addAttribute("startPage", startPage);
        model.addAttribute("endPage", endPage);
        model.addAttribute("boards", boards);
        return "board/list";
    }
list.html에서 form태그를 수정해줍니다.
<form class="form-inline d-flex justify-content-end" method="GET" th:action="@{/board/list}">
        <div class="form-group mx-sm-3 mb-2">
            <label for="searchText" class="sr-only">검색</label>
            <input type="text" class="form-control" id="searchText" name="searchText" th:value="${param.searchText}">
        </div>
        <button type="submit" class="btn btn-light mb-2">검색</button>
    </form>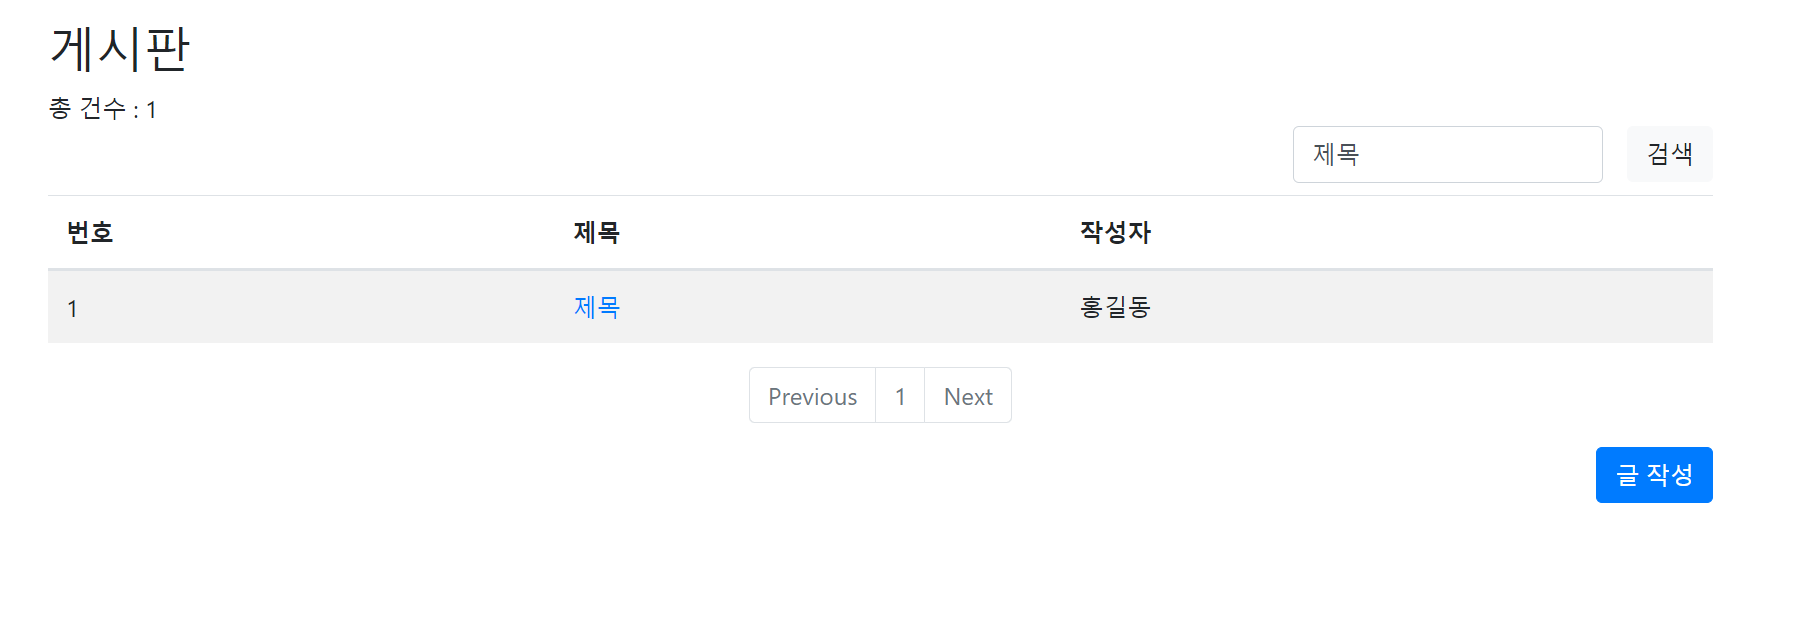
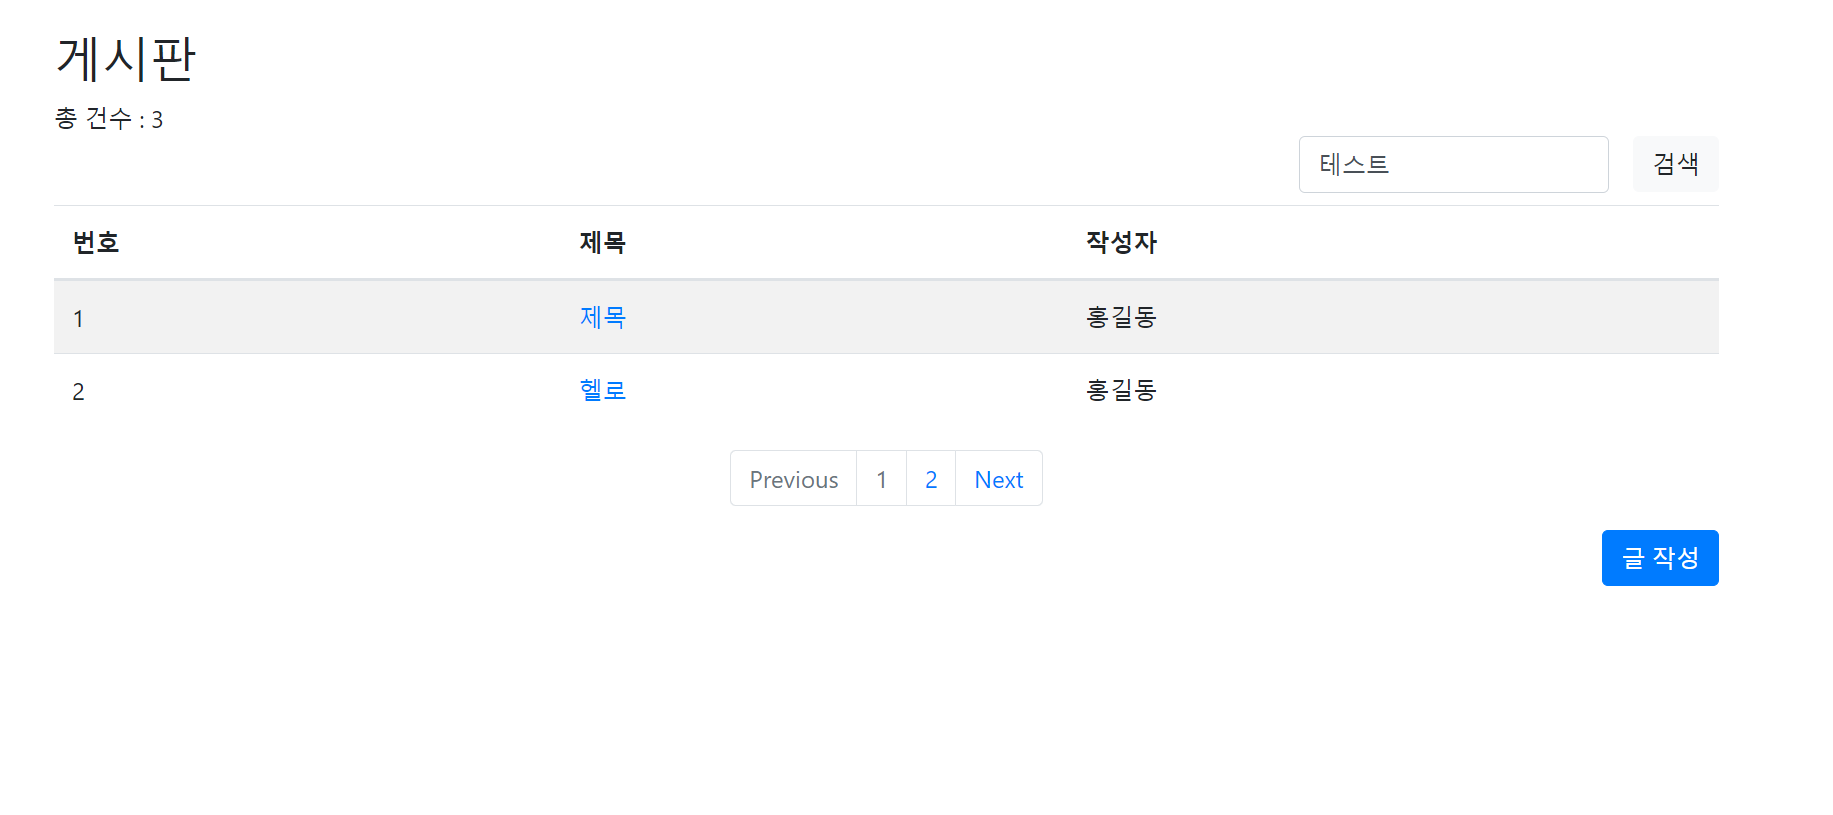
제목이라는 키워드로 검색을 했을 경우 위에 사진처럼 검색 기능이 작동하는 것을 확인할 수 있습니다.
제목이라는 키워드가 포함된 글이 많아서 다음 창으로 넘어가게 되면 input 태그에 있는 text가 사라지는 문제가 발생하게 됩니다. 이것을 해결하기 위해서 페이지를 누를 때도 searchText 값이 전달되게 해주어야 합니다.
list.html을 수정해줍니다.
<nav aria-label="Page navigation example">
        <ul class="pagination justify-content-center">
            <li class="page-item" th:classappend="${1 == boards.pageable.pageNumber + 1} ? 'disabled'">
                <a class="page-link" href="#" th:href="@{/board/list(page=${boards.pageable.pageNumber - 1},searchText=${param.searchText})}">Previous</a>
            </li>
            <li class="page-item" th:classappend="${i == boards.pageable.pageNumber + 1} ? 'disabled'"
                th:each="i : ${#numbers.sequence(startPage, endPage)}"><a class="page-link" href="#"
                                                                          th:href="@{/board/list(page=${i -1},searchText=${param.searchText})}"
                                                                          th:text="${i}"></a></li>
            <li class="page-item" th:classappend="${boards.totalPages == boards.pageable.pageNumber + 1} ? 'disabled'">
                <a class="page-link"  href="#" th:href="@{/board/list(page=${boards.pageable.pageNumber + 1},searchText=${param.searchText})}">Next</a>
            </li>
        </ul>
    </nav>
모든 글 내용에 테스트라는 키워드를 넣은 후 테스트라는 키워드를 검색했을 때 다음 페이지로 넘어가도 input 태그 안에 키워드가 지워지지 않는 것을 확인할 수 있습니다.