프젝을 진행하다보니 CSS가 많이 아리까리 한것 같기도 하고 SASS 혹은 다른 CSS라이브러리를 사용하기 위해 조금 더 깊게 공부해보자
CSS 셀렉터
1.셀렉터[어트리뷰트] -> 지정된 어트리뷰트를 갖는 모든 요소를 선택한다.
 <style>
    /* a 요소 중에 href 어트리뷰트를 갖는 모든 요소 */
    a[href] { color: red; }
 </style>

  <body>
  <a href="http://www.poiemaweb.com">poiemaweb.com</a><br>
  <a href="http://www.google.com" target="_blank">google.com</a><br>
  <a href="http://www.naver.com" target="_top">naver.com</a>
</body>
2.셀렉터[어트리뷰트='값'] -> 지정된 어트리뷰트를 가지며 지정된 값과 어트리뷰트의 값이 일치하는 모든 요소를 선택한다.
<style>
    /* a 요소 중에 target 어트리뷰트의 값이 "_blank"인 모든 요소 */
    a[target="_blank"] { color: red; }
</style>

<body>
  <a href="http://www.poiemaweb.com">poiemaweb.com</a><br>
  <a href="http://www.google.com" target="_blank">google.com</a><br>
  <a href="http://www.naver.com" target="_top">naver.com</a>
</body>
3.셀렉터[어트리뷰트~='값'] -> 지정된 어트리뷰트의 값이 지정된 값을(공백으로 분리된)단어를 포함하는 요소를 선택한다.
 <style>
    /* h1 요소 중에 title 어트리뷰트 값에 "first"를 단어로 포함하는 요소 */
    h1[title~="first"] { color: red; }
 </style>

 <body>
  <h1 title="heading first">Heading first</h1>
  <h1 title="heading-first">Heading-first</h1>
  <h1 title="heading second">Heading second</h1>
  <h1 title="heading third">Heading third</h1>
 </body>
4.셀렉터[어트리뷰트|='값'] -> 지정된 어트리뷰트의 값과 일치하거나 지정 어트리뷰트 값 뒤 연이은 하이픈('값-')으로 시작하는 요소를 선택한다.
<style>
    /* p 요소 중에 lang 어트리뷰트 값이 "en"과 일치하거나 "en-"로 시작하는 요소 */
    p[lang|="en"] { color: red; }
</style>

<body>
  <p lang="en">Hello!</p>
  <p lang="en-us">Hi!</p>
  <p lang="en-gb">Ello!</p>
  <p lang="us">Hi!</p>
  <p lang="no">Hei!</p>
</body>
5.셀렉터[어트리뷰트^='값'] -> 지정된 어트리뷰트 값으로 시작하는 요소를 선택한다.
<style>
    /* a 요소 중에 href 어트리뷰트 값이 "https://"로 시작하는 요소 */
    a[href^="https://"] { color: red; }
</style>

<body>
  <a href="https://www.test.com">https://www.test.com</a><br>
  <a href="http://www.test.com">http://www.test.com</a>
</body>
6.셀렉터[어트리뷰트$='값'] -> 지정된 어트리뷰트 값으로 끝나는 요소를 선택한다.
 <style>
    /* a 요소 중에 href 어트리뷰트 값이 ".html"로 끝나는 요소 */
    a[href$=".html"] { color: red; }
 </style>

 <body>
  <a href="test.html">test.html</a><br>
  <a href="test.jsp">test.jsp</a>
 </body>
7.셀렉터[어트리뷰트*='값'] -> 지정된 어트리뷰트 값을 포함하는 요소를 선택한다.
 <style>
    /* div 요소 중에서 class 어트리뷰트 값에 "test"를 포함하는 요소 */
    div[class*="test"] { color: red; }
    /* div 요소 중에서 class 어트리뷰트 값에 "test"를 단어로 포함하는 요소 */
    div[class~="test"] { background-color: yellow; }
 </style>

 <body>
  <div class="first_test">The first div element.</div>
  <div class="second">The second div element.</div>
  <div class="test">The third div element.</div>
  <p class="test">This is some text in a paragraph.</p>
 </body>
복합 셀렉터
1. 후손 셀렉터
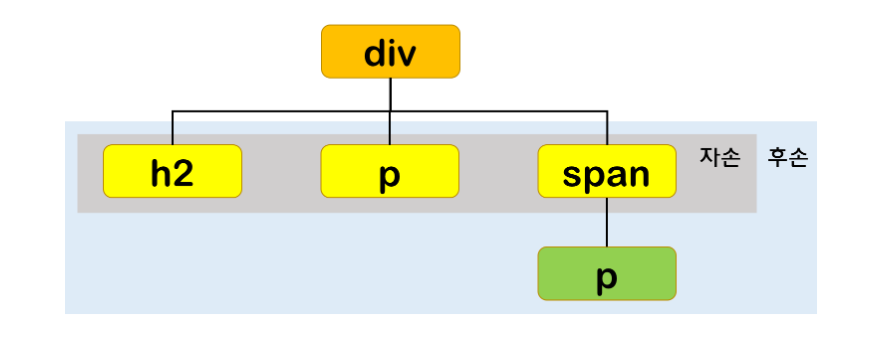
셀렉터A의 모든 후손(하위)요소 중 셀렉터 B와 일치하는 요소를 선택한다.
셀렉터A 셀렉터B
div p {color : red;}
2. 자식 셀렉터
셀렉터A의 모든 자식 요소 중 셀렉터B와 일치하는 요소를 선택한다.
셀렉터A > 셀렉터B
div > p {color : red;}
3. 형제(동위) 셀렉터
형제관계(동위 관계)에서 뒤에 위치하는 요소를 선택할 때 사용한다.

셀렉터A의 형제 요소 중 셀렉터A 바로 뒤에 위치하는 셀렉터B 요소를 선택한다. A,B 사이에 다른 요소가 존재하면 선택되지 않는다.
셀렉터A + 셀렉터B
p 요소의 형제 요소 중에 p 요소 바로 뒤에 위치하는 ul요소를 선택 *
p + ul {color:red;}
4.일반 형제 셀렉터
셀렉터A의 형제 요소 중 셀렉터A 뒤에 위치하는 셀렉터B요소를 모두 선택한다.
셀렉터A ~ 셀렉터B
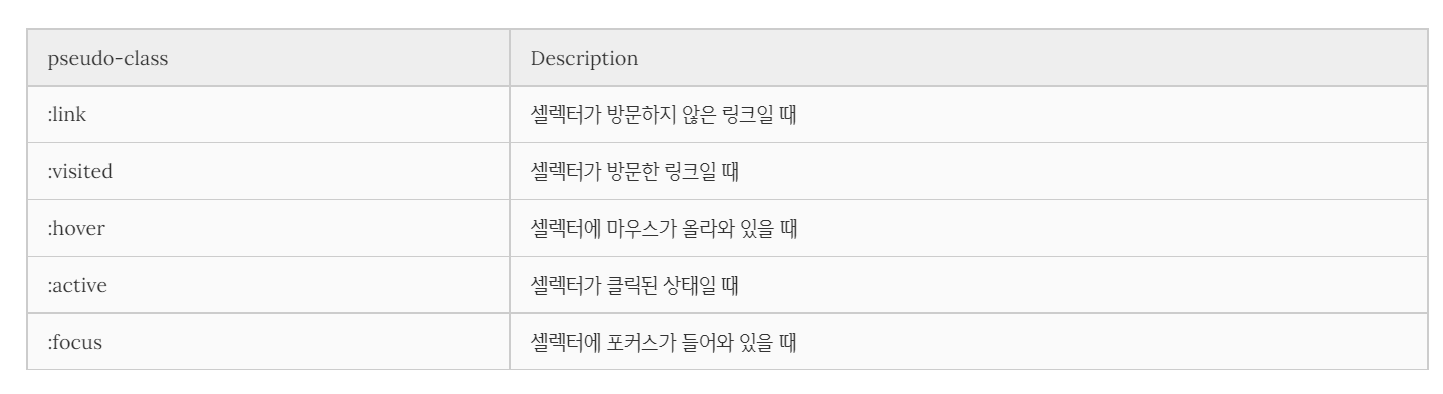
5.가상 클래스 셀렉터(Pseudo-ClassSelector)
가상 클래스는 요소의 특정 상태에 따라 스타일을 정의할 때 사용한다.
특정 상태란?
-마우스가 올라와 있을때
-링크를 방문했을 때와 아직 방문하지 않았을 때
-포커스가 들어와 있을 때
-> 이러한 특정 상태는 원래 클래스가 존재하지 않지만 가상 클래스를 임의로 지정하여 선택하는 방법이다.
-> 가상 클래스는 콜론(:)을 사용한다. CSS 표준에 의해 미리 정의된 이름이 있기 때문에 임의의 이름을 사용할 수 없다.
selector:pseudo-class {
	property:value;
}

//예시

// a 요소가 hover 상태일 때
a:hover {color : red;}

// input 요소가 focus 상태일 때
input:focus {background-color:yellow;}
6.링크 셀렉터(Link pseudo-classes)
a:link {color:orange;} // a태그에 방문 안했을때
a:visited {color:green;} // a태그에 방문하고 나면
a:hover {font-weight:bold;} // a태그 위에 마우스 올리면
a:active {color:blue;} // a태그 클릭된 상태면
input[type=text]:focus, // input태그의 type이 text인 focus 하면
input[type=password]:focus{ // input태그의 type이 password인
color:red;
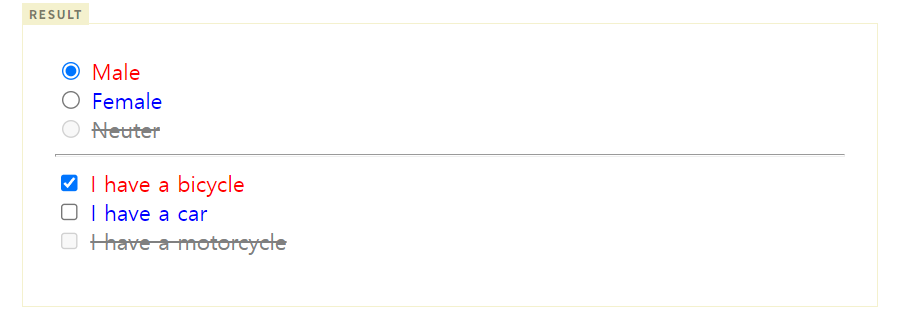
}7.UI 요소 상태 셀렉터

<!DOCTYPE html>
<html>
<head>
  <style>
    /* input 요소가 사용 가능한 상태일 때,
       input 요소 바로 뒤에 위치하는 인접 형제 span 요소를 선택 */
    input:enabled + span {
      color: blue;
    }
    /* input 요소가 사용 불가능한 상태일 때,
       input 요소 바로 뒤에 위치하는 인접 형제 span 요소를 선택 */
    input:disabled + span {
      color: gray;
      text-decoration: line-through;
    }
    /* input 요소가 체크 상태일 때,
       input 요소 바로 뒤에 위치하는 인접 형제 span 요소를 선택 */
    input:checked + span {
      color: red;
    }
  </style>
</head>
<body>
  <input type="radio" checked="checked" value="male" name="gender"> <span>Male</span><br>
  <input type="radio" value="female" name="gender"> <span>Female</span><br>
  <input type="radio" value="neuter" name="gender" disabled> <span>Neuter</span><hr>

  <input type="checkbox" checked="checked" value="bicycle"> <span>I have a bicycle</span><br>
  <input type="checkbox" value="car"> <span>I have a car</span><br>
  <input type="checkbox" value="motorcycle" disabled> <span>I have a motorcycle</span>
</body>
</html>
결과